SpringBoot封装我们自己的Starter
平常我们使用SpringBoot开发经常用到一些第三方jar包,而且通常只是引入一个 xxx-starter jar包就拥有了所有功能,到底其中的原理是怎样的呢?要想知道其中的原理,我们不妨先自己手动制作一个 Starter ,这对我们深入使用一些第三框架将会有相当大的帮助。
一、SpringBoot Starter开发规范
SpringBoot官网文档提到的规范大致由下面几个:
- 1、命名使用
spring-boot-starter-xxx,其中xxx是我们具体的包名称,如果集成Spring Cloud则使用spring-cloud-starter-xxx - 2、通常需要准备两个
jar文件,其中一个不包含任何代码,只用于负责引入相关以来的jar文件,另外一个则包含核心的代码
如 nacos 与Spring Cloud集成的starter如下图:

更多 Starter 制作规范,我们可以查看官网文档
二、Starter开发开发步骤
首先我们应该先明白Springboot加载第三方 Starter 的机制,详情请参考小编的另外一篇文章 SpringBoot启动源码分析及相关技巧学习
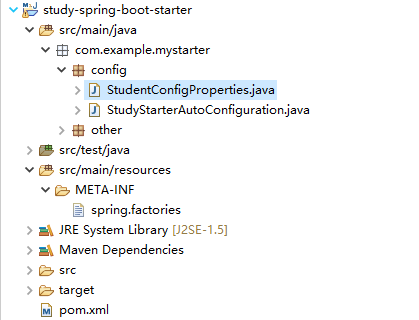
- 1、新建一个
Maven工程,我们起名为study-spring-boot-starter
- 2、引入相关的依赖
<dependencies>
    <dependency>
    	<groupId>org.springframework.boot</groupId>
    	<artifactId>spring-boot-autoconfigure</artifactId>
    </dependency>
</dependencies>
<dependencyManagement>
    <!-- 我们是基于Springboot的应用 -->
    <dependencies>
    	<dependency>
    		<groupId>org.springframework.boot</groupId>
    		<artifactId>spring-boot-dependencies</artifactId>
    		<version>2.1.0.RELEASE</version>
    		<type>pom</type>
    		<scope>import</scope>
    	</dependency>
    </dependencies>
</dependencyManagement>
复制代码
因为我们需要用到Springboot提供的相关注解,并且使用springboot提供的自动配置功能,我们不得不引入 spring-boot-autoconfigure 和 spring-boot-dependencies 两个依赖。
- 3、新建我们自己的自动配置类
一般来说,我们可能想在springboot启动的时候就预先注入自己的一些bean,此时,我们要新建自己的自动配置类,一般采用 xxxxEnableAutoConfiguration 。
下面我们新建 StudyStarterAutoConfiguration.java
package com.example.mystarter.config;

import org.springframework.boot.autoconfigure.condition.ConditionalOnClass;
import org.springframework.boot.autoconfigure.condition.ConditionalOnProperty;
import org.springframework.boot.autoconfigure.condition.ConditionalOnWebApplication;
import org.springframework.boot.context.properties.EnableConfigurationProperties;
import org.springframework.context.annotation.Bean;
import org.springframework.context.annotation.Configuration;

import com.example.mystarter.other.Student;

/**
 * 存放我们的配置类,用来配置我们自定义的bean的。既然是一个配置类,那么我们就需要有@Configuration进行声明
 *
 * @Author jiawei huang
 * @Since 2019年8月23日
 * @Version 1.0
 */
@Configuration
// 导入我们自定义的配置类,供当前类使用
@EnableConfigurationProperties(StudentConfigProperties.class)
// 当存在某个类时,此自动配置类才会生效,这里可以使用外部的String类名
@ConditionalOnClass(Student.class)
// 只有web应用程序时此自动配置类才会生效
@ConditionalOnWebApplication
public class StudyStarterAutoConfiguration {
    /**
     * 当存在study.config.enable=true的配置时,这个Student bean才生效
     *
     * @return
     */
    @Bean
    @ConditionalOnProperty(prefix = "study.config", name = "enable", havingValue = "true")
    public Student defaultStudent(StudentConfigProperties studyConfigProperties) {
    	Student student = new Student();
    	student.setAge(studyConfigProperties.getAge());
    	student.setName(studyConfigProperties.getName());
    	return student;
    }
}
复制代码
@Configuration 声明该类为一个配置类
@EnableConfigurationProperties 的意思是,将括号内所指定的类注入容器成为一个bean对象,因为一般来说,像springboot默认的包扫描路径为 xxxxxxApplication.java 所在包以及其所有子包,但是一些第三方的jar中的bean很明显不能被扫描到,此时该注解就派上了用场,当然,你可能会说,我使用 @ComponentScan 不就行了,这两个注解的区别是: @ComponentScan 前提是你要的bean已经存在bean容器中了,而 @EnableConfigurationProperties 是要让容器自动去发现你要类并注册成为bean。
springboot提供了很多的 @Condition 开头的注解,用于表示当某某条件成立或者不成立时所做的操作。
@ConditionalOnClass 指的是当存在某个类时,此自动配置类 StudyStarterAutoConfiguration 才会生效,我们可能会问,我们有时候想依赖一个第三方的bean存在, StudyStarterAutoConfiguration 才生效怎么办(比如 mybatis 的 starter 源码需要 sqlsessionfactorybean 一样),不用慌, @ConditionalOnClass 也允许我们指定字符串全路径,例如 @ConditionalOnClass("com.xxx.xxx")
@ConditionalOnWebApplication 表示当当前应用是一个web servlet应用时,配置类才生效。这也可以解答为什么springboot源码 SpringApplication.java 中有做应用推断。
@SuppressWarnings({ "unchecked", "rawtypes" })
public SpringApplication(ResourceLoader resourceLoader, Class<?>... primarySources) {
	this.resourceLoader = resourceLoader;
	Assert.notNull(primarySources, "PrimarySources must not be null");
	this.primarySources = new LinkedHashSet<>(Arrays.asList(primarySources));
	// 这里会去做推断
	this.webApplicationType = WebApplicationType.deduceFromClasspath();
	setInitializers((Collection) getSpringFactoriesInstances(
			ApplicationContextInitializer.class));
	setListeners((Collection) getSpringFactoriesInstances(ApplicationListener.class));
	this.mainApplicationClass = deduceMainApplicationClass();
}
复制代码
- 4、我们新建一个
StudentConfigProperties.java,声明该starter的使用者可以配置哪些配置项。
package com.example.mystarter.config;

import org.springframework.boot.context.properties.ConfigurationProperties;

/**
 * 配置项
 *
 * @Author jiawei huang
 * @Since 2019年8月23日
 * @Version 1.0
 */
@ConfigurationProperties(prefix = "study.config")
public class StudentConfigProperties {
	private int age;

	private String name;

	/**
	 * @return the age
	 */
	public int getAge() {
		return age;
	}

	/**
	 * @param age the age to set
	 */
	public void setAge(int age) {
		this.age = age;
	}

	/**
	 * @return the name
	 */
	public String getName() {
		return name;
	}

	/**
	 * @param name the name to set
	 */
	public void setName(String name) {
		this.name = name;
	}

	@Override
	public String toString() {
		return "StudentConfigProperties [age=" + age + ", name=" + name + "]";
	}
}
复制代码
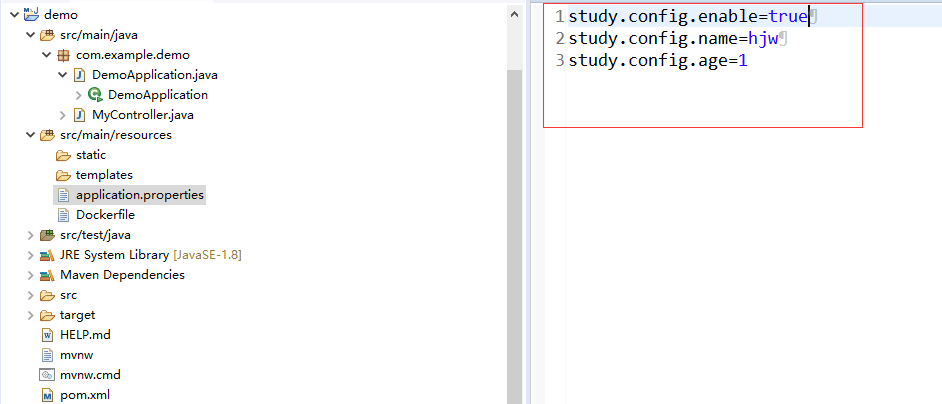
- 5、在
resources目录下新建一个META-INF目录并且创建一个spring.factories文件
org.springframework.boot.autoconfigure.EnableAutoConfiguration=/
 com.example.mystarter.config.StudyStarterAutoConfiguration
复制代码
我们的自动配置入口类,Springboot会扫描到这个文件,扫描机制可以查看小编写的另外一篇博文
三、使用我们自己的 Starter
- 1、我们新建另外一个springboot工程,引入刚刚的
starter
<dependency>
    <groupId>com.example</groupId>
    <artifactId>study</artifactId>
    <version>0.0.1-SNAPSHOT</version>
</dependency>
复制代码
我们新建一个接口,来测试我们的starter是有有用,代码如下:
package com.example.demo;

import org.springframework.beans.factory.annotation.Autowired;
import org.springframework.web.bind.annotation.RequestMapping;
import org.springframework.web.bind.annotation.RestController;

import com.example.mystarter.config.StudentConfigProperties;
import com.example.mystarter.other.Student;

/**
 *
 * @Author jiawei huang
 * @Since 2019年8月19日
 * @Version 1.0
 */
@RestController
public class MyController {

	@Autowired
	private Student student;

	@Autowired
	private StudentConfigProperties studentConfigProperties;

	@RequestMapping("/getStudent")
	private String getStudent() {
		return "name=[" + student.getName() + "],age=[" + student.getAge() + "],studentConfigProperties=["
				+ studentConfigProperties + "]";
	}

}
复制代码
启动我们的demo工程,然后访问我们的接口,结果如下:

好了,我们的starter制作到此就结束了,其实非常简单,我建议在学会制作的基础上,多看看其他框架的源码加以验证,最好能够也动手实现以下,说不定以后我们也需要提供一个starer给其他人用呢。有疑问,欢迎评论区交流,谢谢阅读。
正文到此结束
- 本文标签: XEN servlet IDE dependencies bean EnableAutoConfiguration java UI mybatis Property Spring cloud spring pom 配置 REST Listeners springboot 目录 maven map list 文章 id 源码 sql value http Collection 2019 classpath cat App src IO tag 测试 tar CTO example sqlsession HashSet web https 代码 开发 SqlSessionFactory session
- 版权声明: 本文为互联网转载文章,出处已在文章中说明(部分除外)。如果侵权,请联系本站长删除,谢谢。
- 本文海报: 生成海报一 生成海报二
热门推荐


相关文章


Loading...
![[HBLOG]公众号](http://www.liuhaihua.cn/img/qrcode_gzh.jpg)

