Android网络编程-OKHttp源码角度分析Http
前面介绍了网络的基础知识,这篇主要从 OKHttp 源码角度来分析Http。
OKHttp 是一个优秀的网络请求框架,有以下特点:
- 支持HTTP2/SPDY
- Socket自动选择最好路线,并支持自动重连
- 拥有自动维护的Socket连接池,减少握手次数
- 拥有队列线程池,轻松写并发
- 拥有Interceptors轻松处理请求与响应(比如透明GZIP压缩)
- 实现基于Headers的缓存策略
基本使用
同步请求
同步的Get请求
OkHttpClient client = new OkHttpClient();
Request request = new Request.Builder()
      .url(url)
      .build();

Response response = client.newCall(request).execute();
return response.body().string();
复制代码
异步请求
异步的Get请求
OkHttpClient client = new OkHttpClient();
Request request = new Request.Builder()
      .url(url)
      .build();

client.newCall(request).enqueue(new Callback() {
            @Override
            public void onFailure(Call call, IOException e) {
                Log.e("DEBUG", "##### onFailure: ", e);

            }

            @Override
            public void onResponse(Call call, Response response) throws IOException {
                Log.d("DEBUG", "##### response: " + response.body().string());
            }
        });
复制代码
源码分析
我们从 OKHttp 的初始化开始分析。
OkHttpClient
新建一个 OkHttpClient 对象
OkHttpClient client = new OkHttpClient();
复制代码
构造函数声明:
public OkHttpClient() {
    this(new Builder());
}
复制代码
Builder模式构造:
public Builder() {
   dispatcher = new Dispatcher();
   protocols = DEFAULT_PROTOCOLS;
   connectionSpecs = DEFAULT_CONNECTION_SPECS;
   eventListenerFactory = EventListener.factory(EventListener.NONE);
   proxySelector = ProxySelector.getDefault();
   if (proxySelector == null) {
      proxySelector = new NullProxySelector();
   }
   cookieJar = CookieJar.NO_COOKIES;
   socketFactory = SocketFactory.getDefault();
   hostnameVerifier = OkHostnameVerifier.INSTANCE;
   certificatePinner = CertificatePinner.DEFAULT;
   proxyAuthenticator = Authenticator.NONE;
   authenticator = Authenticator.NONE;
   connectionPool = new ConnectionPool();
   dns = Dns.SYSTEM;
   followSslRedirects = true;
   followRedirects = true;
   retryOnConnectionFailure = true;
   callTimeout = 0;
   connectTimeout = 10_000;
   readTimeout = 10_000;
   writeTimeout = 10_000;
   pingInterval = 0;
}
复制代码
声明了很多属性,具体含义,等后面用到在具体介绍。
请求流程
请求流程可分为同步和异步,大体的请求流程如下图所示:
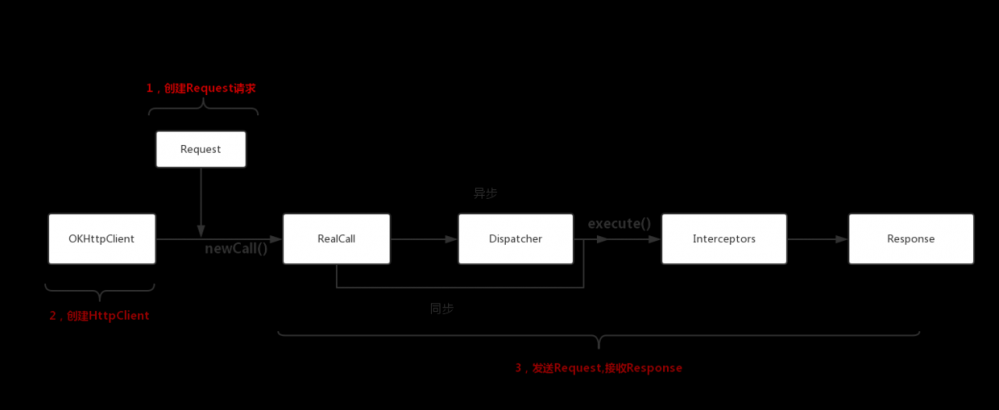
同步请求流程
client.newCall(request).execute();
复制代码
newCall返回的是 RealCall ,上面代码实际上执行的是 RealCall 的execute方法。
@Override public Response execute() throws IOException {
  synchronized (this) {
    if (executed) throw new IllegalStateException("Already Executed");
    executed = true;
  }
  transmitter.timeoutEnter();
  transmitter.callStart();
  try {
    client.dispatcher().executed(this);
    return getResponseWithInterceptorChain();
  } finally {
    client.dispatcher().finished(this);
  }
 }
复制代码
executed
client.dispatcher()
synchronized void executed(RealCall call) {
  runningSyncCalls.add(call);
}
复制代码
getResponseWithInterceptorChain()
client.dispatcher().finished(this)
void finished(RealCall call) {
   finished(runningSyncCalls, call);
 }
复制代码
执行完毕后,会把线程从同步线程队列中移除:
private <T> void finished(Deque<T> calls, T call) {
  Runnable idleCallback;
  synchronized (this) {
    if (!calls.remove(call)) throw new AssertionError("Call wasn't in-flight!");
    idleCallback = this.idleCallback;
  }

  //异步方法中调用
  boolean isRunning = promoteAndExecute();

  if (!isRunning && idleCallback != null) {
    idleCallback.run();
  }
}
复制代码
异步请求流程
RealCall 的enqueue方法:
@Override public void enqueue(Callback responseCallback) {
  synchronized (this) {
    if (executed) throw new IllegalStateException("Already Executed");
    executed = true;
  }
  transmitter.callStart();
  client.dispatcher().enqueue(new AsyncCall(responseCallback));
}
复制代码
-
executed含义和同步请求一样,表示请求只能执行一次 -
client.dispatcher().enqueue(new AsyncCall(responseCallback));,会生成一个AsyncCall对象,并把它加入到readyAsyncCalls线程队列中,等待执行
AsyncCall 是 RealCall 的内部类,并且是 NamedRunnable 线程类,具体执行方法:
@Override protected void execute() {
  boolean signalledCallback = false;
  transmitter.timeoutEnter();
  try {
    Response response = getResponseWithInterceptorChain();
    signalledCallback = true;
    responseCallback.onResponse(RealCall.this, response);
  } catch (IOException e) {
    if (signalledCallback) {
      // Do not signal the callback twice!
      Platform.get().log(INFO, "Callback failure for " + toLoggableString(), e);
    } else {
      responseCallback.onFailure(RealCall.this, e);
    }
  } finally {
    client.dispatcher().finished(this);
  }
}
复制代码
getResponseWithInterceptorChain()
client.dispatcher().finished(this);
finish方法:
void finished(AsyncCall call) {
  call.callsPerHost().decrementAndGet();
  finished(runningAsyncCalls, call);
}
复制代码
private <T> void finished(Deque<T> calls, T call) {
  Runnable idleCallback;
  synchronized (this) {
    if (!calls.remove(call)) throw new AssertionError("Call wasn't in-flight!");
    idleCallback = this.idleCallback;
  }

  //异步方法中调用
  boolean isRunning = promoteAndExecute();

  if (!isRunning && idleCallback != null) {
    idleCallback.run();
  }
}
复制代码
异步流程中, promoteAndExecute 方法:
private boolean promoteAndExecute() {
  assert (!Thread.holdsLock(this));
  List<AsyncCall> executableCalls = new ArrayList<>();
  boolean isRunning;
  synchronized (this) {
    for (Iterator<AsyncCall> i = readyAsyncCalls.iterator(); i.hasNext(); ) {
      AsyncCall asyncCall = i.next();
      if (runningAsyncCalls.size() >= maxRequests) break; // Max capacity.
      if (asyncCall.callsPerHost().get() >= maxRequestsPerHost) continue; // Host max capacity.
      i.remove();
      asyncCall.callsPerHost().incrementAndGet();
      executableCalls.add(asyncCall);
      runningAsyncCalls.add(asyncCall);
    }
    isRunning = runningCallsCount() > 0;
  }
  for (int i = 0, size = executableCalls.size(); i < size; i++) {
    AsyncCall asyncCall = executableCalls.get(i);
    asyncCall.executeOn(executorService());
  }
  return isRunning;
}
复制代码
会遍历异步等待线程队列,并对正在执行的异步线程队列进行最大请求size,以及每个host最大请求size进行检查。
把异步等待线程放到正在执行线程队列中,并在等待线程队列中删除该线程,这样就把等待线程变成正在执行线程。
Dispatcher
任务调度核心类,这个类,其实在同步和异步请求流程中已经介绍过,其最重要功能是负责请求的分发。
Dispatcher在OKHttpClient的Builder中被初始化:
public Builder() {
   dispatcher = new Dispatcher();
   .....
}
复制代码
private int maxRequests = 64;
private int maxRequestsPerHost = 5;
private @Nullable Runnable idleCallback;
/** Executes calls. Created lazily. */
private @Nullable ExecutorService executorService;
/** Ready async calls in the order they'll be run. */
private final Deque<AsyncCall> readyAsyncCalls = new ArrayDeque<>();
/** Running asynchronous calls. Includes canceled calls that haven't finished yet. */
private final Deque<AsyncCall> runningAsyncCalls = new ArrayDeque<>();
/** Running synchronous calls. Includes canceled calls that haven't finished yet. */
private final Deque<RealCall> runningSyncCalls = new ArrayDeque<>();
复制代码
- maxRequests:最大请求并发请求数64
- maxRequestsPerHost:每个主机的最大请求数5
- executorService:线程池
- readyAsyncCalls:异步等待线程队列
- runningAsyncCalls:正在运行的异步线程队列
- runningSyncCalls:正在运行的同步线程队列
线程池executorService的声明:
public synchronized ExecutorService executorService() {
  if (executorService == null) {
    executorService = new ThreadPoolExecutor(0, Integer.MAX_VALUE, 60, TimeUnit.SECONDS,
        new SynchronousQueue<>(), Util.threadFactory("OkHttp Dispatcher", false));
  }
  return executorService;
}
复制代码
- 核心线程数为0,表示线程在空闲时不会被保留,等待一段时间后停止
- 最大线程数Integer.MAX_VALUE,基本上就是可以创建线程无上限
- keepAliveTime为60s,表示如果线程空闲时,最多只能存活60s
综合上诉,在OKHttp中,设置了不设上限的线程,不保留最小线程,线程空闲时,最大存活时间为60s,保证I/O任务中高阻塞低占用的过程,不会长时间卡在阻塞上。并通过 maxRequests 和 maxRequestsPerHost 来控制并发最大请求数。
拦截器
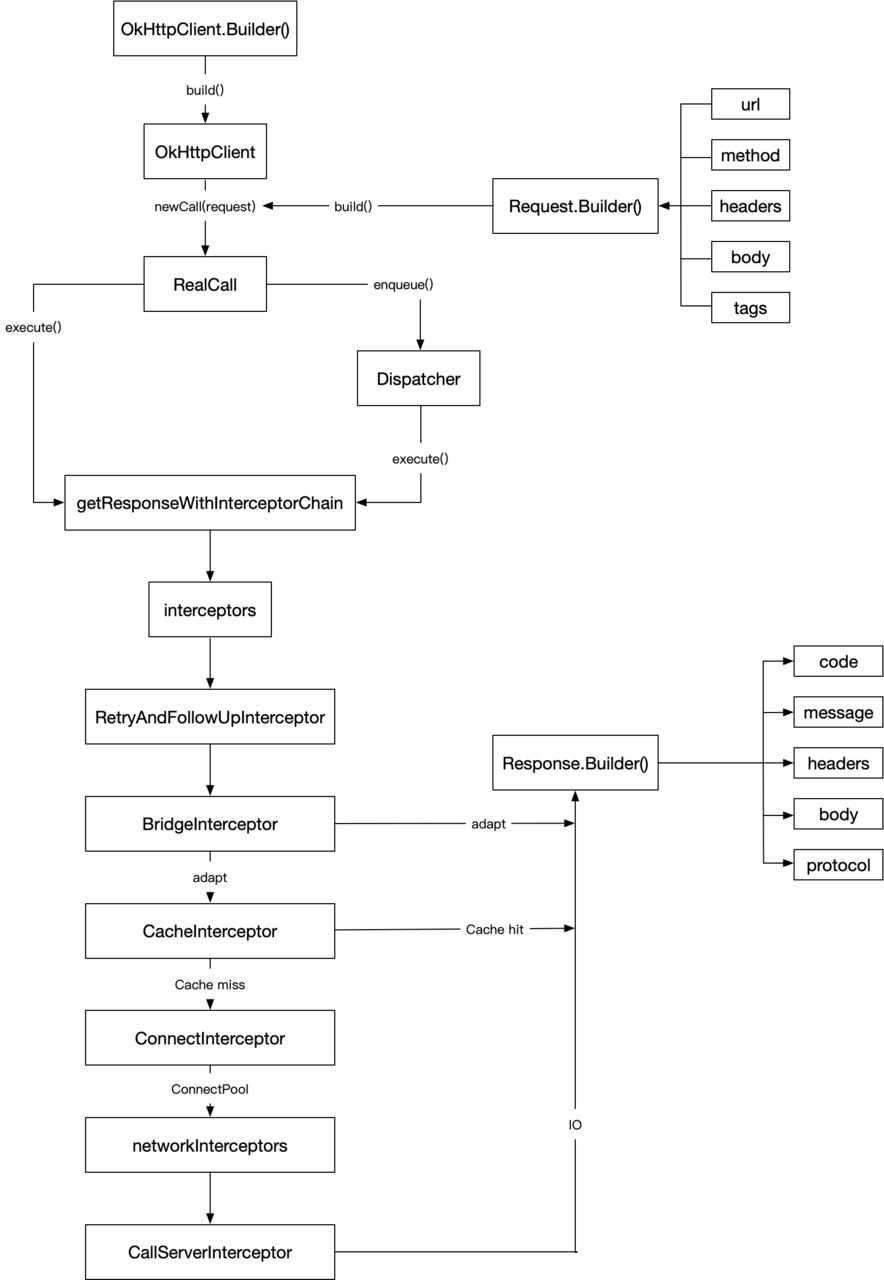
在同步和异步请求中,具体的执行过程中都会调用到 getResponseWithInterceptorChain 方法,该方法添加了一系列的拦截器,它在OKHttp整理流程中处于非常重要的地位,
方法实现:
Response getResponseWithInterceptorChain() throws IOException {
  // Build a full stack of interceptors.
  List<Interceptor> interceptors = new ArrayList<>();
  interceptors.addAll(client.interceptors());
  interceptors.add(new RetryAndFollowUpInterceptor(client));
  interceptors.add(new BridgeInterceptor(client.cookieJar()));
  interceptors.add(new CacheInterceptor(client.internalCache()));
  interceptors.add(new ConnectInterceptor(client));
  if (!forWebSocket) {
    interceptors.addAll(client.networkInterceptors());
  }
  interceptors.add(new CallServerInterceptor(forWebSocket));
  Interceptor.Chain chain = new RealInterceptorChain(interceptors, transmitter, null, 0,
      originalRequest, this, client.connectTimeoutMillis(),
      client.readTimeoutMillis(), client.writeTimeoutMillis());
  boolean calledNoMoreExchanges = false;
  try {
    Response response = chain.proceed(originalRequest);
    if (transmitter.isCanceled()) {
      closeQuietly(response);
      throw new IOException("Canceled");
    }
    return response;
  } catch (IOException e) {
    calledNoMoreExchanges = true;
    throw transmitter.noMoreExchanges(e);
  } finally {
    if (!calledNoMoreExchanges) {
      transmitter.noMoreExchanges(null);
    }
  }
}
复制代码
默认添加的拦截器:
- RetryAndFollowUpInterceptor:负责失败重试以及重定向
- BridgeInterceptor:负责把用户构造的请求转换为发送到服务器的请求、把服务器返回的响应转换为用户友好的响应
- CacheInterceptor:负责读取缓存直接返回、更新缓存
- ConnectInterceptor:负责和服务器建立连接
- CallServerInterceptor:负责向服务器发送请求数据、从服务器读取响应数据
这是典型的责任链模式,通过 Interceptor ,把Request转换为Response,每个 Interceptor 都有各自的责任和逻辑。
interceptors.addAll(client.interceptors());
......
if (!forWebSocket) {
    interceptors.addAll(client.networkInterceptors());
  }
复制代码
开发者可以自己定义 Interceptor ,在最开始或者发送请求前,对Request和Response进行处理。
HTTP实现
OKHttp中实现HTTP主要是在 ConnectInterceptor 和 CallServerInterceptor 。
ConnectInterceptor 建立服务器之间的连接, CallServerInterceptor 发送请求和读取响应。
OKHttp请求一个URL的流程:
- 根据请求的URL,createAddress方法会创建一个Address,用于连接服务器
- 检查address和routes,是否可以从ConnectionPool获取一个连接
- 如果没有获取到连接,会进行下一个路由选择(
routeSelector),并且重新尝试从ConnectionPool获取一个连接。重试还是获取不到,就会重新创建一个连接(RealConnection) - 获取连接后,它会与服务器建立一个直接的Socket连接、使用TLS安全通道(基于HTTP代理的HTTPS),或直接TLS连接
- 发送HTTP请求,并获取响应
ConnectInterceptor
在请求发送前的逻辑,都是 ConnectInterceptor 中实现, ConnectInterceptor 的intercept,这个是3.14.2版本源码,和以前多版本稍微有些区别。
@Override public Response intercept(Chain chain) throws IOException {
  RealInterceptorChain realChain = (RealInterceptorChain) chain;
  Request request = realChain.request();
  Transmitter transmitter = realChain.transmitter();
  // We need the network to satisfy this request. Possibly for validating a conditional GET.
  boolean doExtensiveHealthChecks = !request.method().equals("GET");
  Exchange exchange = transmitter.newExchange(chain, doExtensiveHealthChecks);
  return realChain.proceed(request, transmitter, exchange);
}
复制代码
Exchange 可以传输HTTP请求和响应,并管理连接和事件。 newExchange方法调用:
/** Returns a new exchange to carry a new request and response. */
Exchange newExchange(Interceptor.Chain chain, boolean doExtensiveHealthChecks) {
  synchronized (connectionPool) {
    if (noMoreExchanges) {
      throw new IllegalStateException("released");
    }
    if (exchange != null) {
      throw new IllegalStateException("cannot make a new request because the previous response "
          + "is still open: please call response.close()");
    }
  }
  ExchangeCodec codec = exchangeFinder.find(client, chain, doExtensiveHealthChecks);
  Exchange result = new Exchange(this, call, eventListener, exchangeFinder, codec);
  ......
  }
}
复制代码
find方法会最终执行 ExchangeFinder 的 findConnection 方法,在发送HTTP请求之前的逻辑,都是这个方法中实现。
/**
   * Returns a connection to host a new stream. This prefers the existing connection if it exists,
   * then the pool, finally building a new connection.
   */
  private RealConnection findConnection(int connectTimeout, int readTimeout, int writeTimeout,
      int pingIntervalMillis, boolean connectionRetryEnabled) throws IOException {
    boolean foundPooledConnection = false;
    RealConnection result = null;
    Route selectedRoute = null;
    RealConnection releasedConnection;
    Socket toClose;
    synchronized (connectionPool) {
      if (transmitter.isCanceled()) throw new IOException("Canceled");
      ......

      if (result == null) {
        //2.根据 Address 从连接池获取连接
        // Attempt to get a connection from the pool.
        if (connectionPool.transmitterAcquirePooledConnection(address, transmitter, null, false)) {
          foundPooledConnection = true;
          result = transmitter.connection;
        } else if (nextRouteToTry != null) {
          selectedRoute = nextRouteToTry;
          nextRouteToTry = null;
        } else if (retryCurrentRoute()) {
          selectedRoute = transmitter.connection.route();
        }
      }
    }
    ......
    // 3. 重新选择路由
    // If we need a route selection, make one. This is a blocking operation.
    boolean newRouteSelection = false;
    if (selectedRoute == null && (routeSelection == null || !routeSelection.hasNext())) {
      newRouteSelection = true;
      routeSelection = routeSelector.next();
    }

    List<Route> routes = null;
    synchronized (connectionPool) {
      if (transmitter.isCanceled()) throw new IOException("Canceled");

      if (newRouteSelection) {
        // Now that we have a set of IP addresses, make another attempt at getting a connection from
        // the pool. This could match due to connection coalescing.
        routes = routeSelection.getAll();
        if (connectionPool.transmitterAcquirePooledConnection(
            address, transmitter, routes, false)) {
          foundPooledConnection = true;
          result = transmitter.connection;
        }
      }

      if (!foundPooledConnection) {
        if (selectedRoute == null) {
          selectedRoute = routeSelection.next();
        }

        // 3. 重新选择路由,创建新的 `RealConnection`
        // Create a connection and assign it to this allocation immediately. This makes it possible
        // for an asynchronous cancel() to interrupt the handshake we're about to do.
        result = new RealConnection(connectionPool, selectedRoute);
        connectingConnection = result;
      }
    }

    ......
    // 4. 进行 Socket 连接
    // Do TCP + TLS handshakes. This is a blocking operation.
    result.connect(connectTimeout, readTimeout, writeTimeout, pingIntervalMillis,
        connectionRetryEnabled, call, eventListener);
    connectionPool.routeDatabase.connected(result.route());

    Socket socket = null;
    synchronized (connectionPool) {
      connectingConnection = null;
      // Last attempt at connection coalescing, which only occurs if we attempted multiple
      // concurrent connections to the same host.
      if (connectionPool.transmitterAcquirePooledConnection(address, transmitter, routes, true)) {
        // We lost the race! Close the connection we created and return the pooled connection.
        result.noNewExchanges = true;
        socket = result.socket();
        result = transmitter.connection;
      } else {
        //把连接放入连接池中
        connectionPool.put(result);
        transmitter.acquireConnectionNoEvents(result);
      }
    }
    ......
    return result;
  }
复制代码
HTTP 的连接主要是result.connect方法:
public void connect(int connectTimeout, int readTimeout, int writeTimeout,
      int pingIntervalMillis, boolean connectionRetryEnabled, Call call,
      EventListener eventListener){
   if (protocol != null) throw new IllegalStateException("already connected");
   ......
   while (true) {
      try {
        if (route.requiresTunnel()) {
          connectTunnel(connectTimeout, readTimeout, writeTimeout, call, eventListener);
          if (rawSocket == null) {
            // We were unable to connect the tunnel but properly closed down our resources.
            break;
          }
        } else {
          connectSocket(connectTimeout, readTimeout, call, eventListener);
        }
        establishProtocol(connectionSpecSelector, pingIntervalMillis, call, eventListener);
        eventListener.connectEnd(call, route.socketAddress(), route.proxy(), protocol);
        break;
      } catch (IOException e) {
        ......
      }
    }
    ......
}
复制代码
在 for 循环中检查这个连接是否是隧道协议连接。
connectSocket 连接socket, establishProtocol 根据HTTP协议版本进行连接处理。
重点分析下 connectSocket 方法:
private void connectSocket(int connectTimeout, int readTimeout, Call call,
   EventListener eventListener) throws IOException {
   ......
   try {
      //连接 socket
      Platform.get().connectSocket(rawSocket, route.socketAddress(), connectTimeout);
    } catch (ConnectException e) {
      ConnectException ce = new ConnectException("Failed to connect to " + route.socketAddress());
      ce.initCause(e);
      throw ce;
    }

   try {
      source = Okio.buffer(Okio.source(rawSocket));
      sink = Okio.buffer(Okio.sink(rawSocket));
    } catch (NullPointerException npe) {
      if (NPE_THROW_WITH_NULL.equals(npe.getMessage())) {
        throw new IOException(npe);
      }
    }
}
复制代码
使用 Okio,封装了Socket的读写操作, 建立连接后,就可以发送请求和获取响应。
CallServerInterceptor
CallServerInterceptor的intercept()方法里负责发送请求和获取响应。
具体操作都是通过Exchange来执行,Exchange通过各个功能模块再进行分发处理。
通过 Socket 发送 HTTP消息,会按照以下声明周期:
- writeRequestHeaders发送 request Headers
- 如果有 request body,就通过 Sink 发送request body,然后关闭 Sink
- readResponseHeaders获取 response Headers
- 通过Source读取 response body,然后关闭 Source
writeRequestHeaders
Exchange 调用writeRequestHeaders方法
public void writeRequestHeaders(Request request) throws IOException {
    try {
      eventListener.requestHeadersStart(call);
      codec.writeRequestHeaders(request);
      eventListener.requestHeadersEnd(call, request);
    } catch (IOException e) {
      eventListener.requestFailed(call, e);
      trackFailure(e);
      throw e;
    }
  }
复制代码
实际执行的方法codec实现类 Http1ExchangeCodec (前面根据HTTP协议版本选择)的writeRequest方法
/** Returns bytes of a request header for sending on an HTTP transport. */
public void writeRequest(Headers headers, String requestLine) throws IOException {
  if (state != STATE_IDLE) throw new IllegalStateException("state: " + state);
  sink.writeUtf8(requestLine).writeUtf8("/r/n");
  for (int i = 0, size = headers.size(); i < size; i++) {
    sink.writeUtf8(headers.name(i))
        .writeUtf8(": ")
        .writeUtf8(headers.value(i))
        .writeUtf8("/r/n");
  }
  sink.writeUtf8("/r/n");
  state = STATE_OPEN_REQUEST_BODY;
}
复制代码
readResponseHeaders
读取响应头部, Http1ExchangeCodec 的readResponseHeaders方法:
@Override public Response.Builder readResponseHeaders(boolean expectContinue) throws IOException {
  if (state != STATE_OPEN_REQUEST_BODY && state != STATE_READ_RESPONSE_HEADERS) {
    throw new IllegalStateException("state: " + state);
  }
  try {
    StatusLine statusLine = StatusLine.parse(readHeaderLine());
    Response.Builder responseBuilder = new Response.Builder()
        .protocol(statusLine.protocol)
        .code(statusLine.code)
        .message(statusLine.message)
        .headers(readHeaders());
    if (expectContinue && statusLine.code == HTTP_CONTINUE) {
      return null;
    } else if (statusLine.code == HTTP_CONTINUE) {
      state = STATE_READ_RESPONSE_HEADERS;
      return responseBuilder;
    }
    state = STATE_OPEN_RESPONSE_BODY;
    return responseBuilder;
  } catch (EOFException e) {
    // Provide more context if the server ends the stream before sending a response.
    String address = "unknown";
    if (realConnection != null) {
      address = realConnection.route().address().url().redact();
    }
    throw new IOException("unexpected end of stream on "
        + address, e);
  }
}
复制代码
StatusLine解析HTTP版本信息, readHeaders() 读取response header 信息。
/** Reads headers or trailers. */
private Headers readHeaders() throws IOException {
  Headers.Builder headers = new Headers.Builder();
  // parse the result headers until the first blank line
  for (String line; (line = readHeaderLine()).length() != 0; ) {
    Internal.instance.addLenient(headers, line);
  }
  return headers.build();
}
复制代码
response body
解析 response body 内容:
if (forWebSocket && code == 101) {
  // Connection is upgrading, but we need to ensure interceptors see a non-null response body.
  response = response.newBuilder()
      .body(Util.EMPTY_RESPONSE)
      .build();
} else {
  response = response.newBuilder()
      .body(exchange.openResponseBody(response))
      .build();
}
复制代码
如果不是websocket,调用Exchange的openResponseBody方法:
public ResponseBody openResponseBody(Response response) throws IOException {
  try {
    eventListener.responseBodyStart(call);
    String contentType = response.header("Content-Type");
    long contentLength = codec.reportedContentLength(response);
    Source rawSource = codec.openResponseBodySource(response);
    ResponseBodySource source = new ResponseBodySource(rawSource, contentLength);
    return new RealResponseBody(contentType, contentLength, Okio.buffer(source));
  } catch (IOException e) {
    eventListener.responseFailed(call, e);
    trackFailure(e);
    throw e;
  }
}
复制代码
获取返回的 body,通过 Source 转换为需要的数据类型,ResponseBody提供的 string(),转换为 String 类型
public final String string() throws IOException {
  try (BufferedSource source = source()) {
    Charset charset = Util.bomAwareCharset(source, charset());
    return source.readString(charset);
  }
}
复制代码
通过上述的分析,OKHttp是通过Okio操作Socket实现了Http协议,凭借高效的性能,Android系统从4.4版本开始,HTTP的实现已经替换为OKHttp。
参考
- OKHttp源码解析(一)--初阶
- 拆轮子系列:拆 OkHttp
正文到此结束
- 本文标签: queue IDE bug 遍历 ThreadPoolExecutor stream 源码 删除 cat cache Full Stack list synchronized zip src DNS message 数据 id 解析 同步 retry 协议 http 线程 ORM 时间 value equals client https 线程池 开发者 HTTP协议 Android final 缓存 ssl ECS find Service 代码 Select ArrayList build ip 任务调度 UI IO CTO 开发 Proxy 服务器 主机 tar Transport 管理 cookies parse Connection 并发 tab ACE 安全 executor TCP REST 连接池 web DDL
- 版权声明: 本文为互联网转载文章,出处已在文章中说明(部分除外)。如果侵权,请联系本站长删除,谢谢。
- 本文海报: 生成海报一 生成海报二
热门推荐


相关文章

近期评论
-
ws0132613@gmail.comhttps://getmacos.com/gopanel/william smith
-
谢谢
-
https://www.newcmy.com/register?aff=HBVX建议您试试草莓云机场,可以流畅观看youtube和tiktok,上reddit/x也没有问题,还有各种ai优化节点。
-
-
-
想购买您这个站,我的联系方式QQ741756694微信同步 能卖联系
-
-
-
-
Loading...
![[HBLOG]公众号](https://www.liuhaihua.cn/img/qrcode_gzh.jpg)

