Tomcat源码分析三:Tomcat启动加载过程(一)的源码解析
Tomcat启动加载过程(一)的源码解析
今天,我将分享用源码的方式讲解Tomcat启动的加载过程,关于Tomcat的架构请参阅《Tomcat源码分析二:先看看Tomcat的整体架构》一文。
先看看应用情况
在《Servlet与Tomcat运行示例》一文中,我详细的记录了Tomcat是如何启动一个Servlet的程序的步骤。其中,第6步骤是启动Tomcat,也就是在windows系统上执行startup.bat, 在linux操作系统上执行startup.sh的脚本。那么,我们就从这个脚本出发,走进Tomcat,看看它是如何启动的?这里,我们以startup.sh为例,windows端的startup.bat类似。
startup.sh的内容是什么?
我们先看看tomcat的启动脚本startup.sh的内容是什么,先看看其脚本内容(省略部分注释),如下:
#!/bin/sh

# -----------------------------------------------------------------------------
# Start Script for the CATALINA Server
# -----------------------------------------------------------------------------

# Better OS/400 detection: see Bugzilla 31132
os400=false
case "`uname`" in
OS400*) os400=true;;
esac

# resolve links - $0 may be a softlink
PRG="$0"

while [ -h "$PRG" ] ; do
  ls=`ls -ld "$PRG"`
  link=`expr "$ls" : '.*-> /(.*/)$'`
  if expr "$link" : '/.*' > /dev/null; then
    PRG="$link"
  else
    PRG=`dirname "$PRG"`/"$link"
  fi
done

PRGDIR=`dirname "$PRG"`
EXECUTABLE=catalina.sh

# Check that target executable exists
if $os400; then
  # -x will Only work on the os400 if the files are:
  # 1. owned by the user
  # 2. owned by the PRIMARY group of the user
  # this will not work if the user belongs in secondary groups
  eval
else
  if [ ! -x "$PRGDIR"/"$EXECUTABLE" ]; then
    echo "Cannot find $PRGDIR/$EXECUTABLE"
    echo "The file is absent or does not have execute permission"
    echo "This file is needed to run this program"
    exit 1
  fi
fi

exec "$PRGDIR"/"$EXECUTABLE" start "$@"
提取其中主要的几句:
PRGDIR=`dirname "$PRG"`
EXECUTABLE=catalina.sh
exec "$PRGDIR"/"$EXECUTABLE" start "$@"
简而概之,该脚本的执行内容为:调用catalina.sh脚本。下面,我们继续来看下catalina.sh脚本的内容
catalina.sh脚本
由于catalina.sh脚本内容比较多,这里提取一些重要的内容,然后解释其用途:

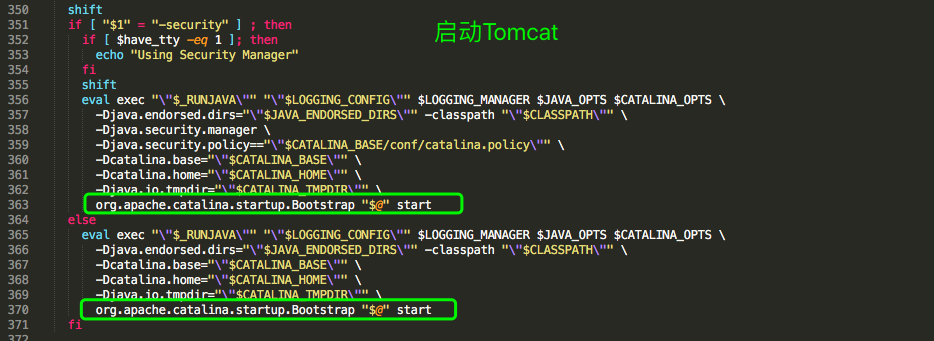
再简要的描述下在catalina.sh中作用:完成环境检查、环境初始化、参数初始化、启动操作步骤。注意一下上图中被绿色框出来的内容,可以看到其调用执行的是org.apache.catalina.startup.Bootstrap类,并且传输过去的command指令为start。
回归Java代码
Bootstrap类进行了什么操作呢?
接下来,我们带着这几个问题来去探索一下Bootstrap类:
- Bootstrap类在接收到start指令后要去干什么?
- Bootstrap类在启动过程中的职责是什么?
下面,我们带着上面的几个问题来具体的探讨一下Tomcat的源码。先来看看Bootstrap类的main方法:
public static void main(String args[]) {

        synchronized (daemonLock) {
            if (daemon == null) {
                // Don't set daemon until init() has completed
                Bootstrap bootstrap = new Bootstrap();
                try {
                    bootstrap.init();
                } catch (Throwable t) {
                    handleThrowable(t);
                    t.printStackTrace();
                    return;
                }
                daemon = bootstrap;
            } else {
                Thread.currentThread().setContextClassLoader(daemon.catalinaLoader);
            }
        }

        try {
            String command = "start";
            if (args.length > 0) {
                command = args[args.length - 1];
            }

            if (command.equals("startd")) {
                args[args.length - 1] = "start";
                daemon.load(args);
                daemon.start();
            } else if (command.equals("stopd")) {
                args[args.length - 1] = "stop";
                daemon.stop();
            } else if (command.equals("start")) {
                daemon.setAwait(true);
                daemon.load(args);
                daemon.start();
                if (null == daemon.getServer()) {
                    System.exit(1);
                }
            } else if (command.equals("stop")) {
                daemon.stopServer(args);
            } else if (command.equals("configtest")) {
                daemon.load(args);
                if (null == daemon.getServer()) {
                    System.exit(1);
                }
                System.exit(0);
            } else {
                log.warn("Bootstrap: command /"" + command + "/" does not exist.");
            }
        } catch (Throwable t) {
            // Unwrap the Exception for clearer error reporting
            if (t instanceof InvocationTargetException &&
                    t.getCause() != null) {
                t = t.getCause();
            }
            handleThrowable(t);
            t.printStackTrace();
            System.exit(1);
        }
    }
从这段代码中,可以看出,其主要实现了两个功能:
- 初始化一个守护进程变量daemon
- 加载catalina.sh传递过来的参数,解析catalina.sh传递过来的指令,并按照指令执行程序,控制守护进程daemon的启停等操作
bootstrap.init();有什么操作呢?
针对上面的两个功能,我们进入到 init()方法看下有什么操作,先看下init()方法的代码:
public void init() throws Exception {

        initClassLoaders();

        Thread.currentThread().setContextClassLoader(catalinaLoader);

        SecurityClassLoad.securityClassLoad(catalinaLoader);

        // Load our startup class and call its process() method
        if (log.isDebugEnabled())
            log.debug("Loading startup class");
        Class<?> startupClass = catalinaLoader.loadClass("org.apache.catalina.startup.Catalina");
        Object startupInstance = startupClass.getConstructor().newInstance();

        // Set the shared extensions class loader
        if (log.isDebugEnabled())
            log.debug("Setting startup class properties");
        String methodName = "setParentClassLoader";
        Class<?> paramTypes[] = new Class[1];
        paramTypes[0] = Class.forName("java.lang.ClassLoader");
        Object paramValues[] = new Object[1];
        paramValues[0] = sharedLoader;
        Method method =
            startupInstance.getClass().getMethod(methodName, paramTypes);
        method.invoke(startupInstance, paramValues);

        catalinaDaemon = startupInstance;
    }
在init()方法中,首先执行的方法initClassLoaders()的作用是初始化三个类加载器,代码如下:
/**
     * Daemon reference.
     */
    private Object catalinaDaemon = null;

    ClassLoader commonLoader = null;
    ClassLoader catalinaLoader = null;
    ClassLoader sharedLoader = null;

    private void initClassLoaders() {
        try {
            commonLoader = createClassLoader("common", null);
            if (commonLoader == null) {
                // no config file, default to this loader - we might be in a 'single' env.
                commonLoader = this.getClass().getClassLoader();
            }
            catalinaLoader = createClassLoader("server", commonLoader);
            sharedLoader = createClassLoader("shared", commonLoader);
        } catch (Throwable t) {
            handleThrowable(t);
            log.error("Class loader creation threw exception", t);
            System.exit(1);
        }
    }

    private ClassLoader createClassLoader(String name, ClassLoader parent)
            throws Exception {

            String value = CatalinaProperties.getProperty(name + ".loader");
            if ((value == null) || (value.equals("")))
                    return parent;

            value = replace(value);

            List<Repository> repositories = new ArrayList<>();

            String[] repositoryPaths = getPaths(value);

            for (String repository : repositoryPaths) {
                    // Check for a JAR URL repository
                    try {
                            @SuppressWarnings("unused")
                            URL url = new URL(repository);
                            repositories.add(new Repository(repository, RepositoryType.URL));
                            continue;
                    } catch (MalformedURLException e) {
                            // Ignore
                    }

                    // Local repository
                    if (repository.endsWith("*.jar")) {
                            repository = repository.substring
                                    (0, repository.length() - "*.jar".length());
                            repositories.add(new Repository(repository, RepositoryType.GLOB));
                    } else if (repository.endsWith(".jar")) {
                            repositories.add(new Repository(repository, RepositoryType.JAR));
                    } else {
                            repositories.add(new Repository(repository, RepositoryType.DIR));
                    }
            }

            return ClassLoaderFactory.createClassLoader(repositories, parent);
    }
//  catalina.properties
common.loader="${catalina.base}/lib","${catalina.base}/lib/*.jar","${catalina.home}/lib","${catalina.home}/lib/*.jar"
- commonLoader : 根据common.loader属性的配置(通过代码
CatalinaProperties.getProperty(name + ".loader");读取:catalina.properties), 创建commonLoader类加载器, 默认情况下顺序加载 ${catalina.base}/lib, ${catalina.base}/lib/ .jar, ${catalina.home}/lib, ${catalina.home}/lib/ .jar 四个目录下的class和jar. - catalinaLoader : 根据server.loader属性的配置, 创建catalinaLoader类加载器,其父类加载其为commonLoader, 默认server.loader属性为空, 直接使用commonLoader.
- sharedLoader :根据shared.loader属性配置,创建sharedLoader类加载器,其父类加载其为commonLoader, 默认shared.loader属性为空, 直接使用commonLoader.
当执行完initClassLoaders()方法之后,调用Thread.currentThread().setContextClassLoader(catalinaLoader);设置上下文类加载器为catalinaLoader,从上面解析的情况看,其实设置的上下文类加载器为catalinaLoader的父类commonLoader。
SecurityClassLoad.securityClassLoad(catalinaLoader) 的作用是如果有SecurityManager,提前加载部分类。
之后,通过使用catalinaLoader加载org.apache.catalina.startup.Catalina类,创建实例Catalina并利用反射调用方法setParentClassLoader(),设置Catalina实例的parentClassLoader属性为sharedLoader类加载器(也就是commonLoader)。
最后,设置daemon为新创建的实例Bootstrap。接下来,看一下main()方法下的指令处理。
传递过来的command指令是如何处理的呢?
我们观察一下main()方法的后半段,这里贴一下代码:
try {
    String command = "start";
    if (args.length > 0) {
            command = args[args.length - 1];
    }
    if (command.equals("startd")) {
            args[args.length - 1] = "start";
            daemon.load(args);
            daemon.start();
    } else if (command.equals("stopd")) {
            args[args.length - 1] = "stop";
            daemon.stop();
    } else if (command.equals("start")) {
            daemon.setAwait(true);
            daemon.load(args);
            daemon.start();
            if (null == daemon.getServer()) {
                    System.exit(1);
            }
    } else if (command.equals("stop")) {
            daemon.stopServer(args);
    } else if (command.equals("configtest")) {
            daemon.load(args);
            if (null == daemon.getServer()) {
                    System.exit(1);
            }
            System.exit(0);
    } else {
            log.warn("Bootstrap: command /"" + command + "/" does not exist.");
    }
} catch (Throwable t) {
    // ...... 省略
}
可以看到,其默认指令为 start , 然后,其根据接收到的参数区分为startd、stopd、start、stop、configtest和其他6种指令情况。这里我们主要看一下start指令的执行逻辑。
- daemon.setAwait(true) :这句代码有什么含义呢,下面我们来具体的分析一下:
/**
     * Set flag.
     * @param await <code>true</code> if the daemon should block
     * @throws Exception Reflection error
     */
    public void setAwait(boolean await)
        throws Exception {

        Class<?> paramTypes[] = new Class[1];
        paramTypes[0] = Boolean.TYPE;
        Object paramValues[] = new Object[1];
        paramValues[0] = Boolean.valueOf(await);
        Method method =
            catalinaDaemon.getClass().getMethod("setAwait", paramTypes);
        method.invoke(catalinaDaemon, paramValues);
    }
这段代码的主要作用是通过反射调用Catalina.setAwait(true),主要目的是当启动完成后, 阻塞main线程,等待stop命令到来。 如果不设置daemon.setAwait(true), 则main线程执行完之后就 直接退出了。
-
daemon.load(args)
daemon.load(args);其实是最终执行的Catalina.load(),在Catalina.load()方法中,主要功能是首先初始化temp目录,然后再初始化naming的一些系统属性,然后获取server.xml配置文件, 创建Digester实例, 开始解析server.xml的操作。
/**
     * Start a new server instance.
     */
    public void load() {

        if (loaded) {
            return;
        }
        loaded = true;

        long t1 = System.nanoTime();

        initDirs();

        // Before digester - it may be needed
        initNaming();

        // Set configuration source
        ConfigFileLoader.setSource(new CatalinaBaseConfigurationSource(Bootstrap.getCatalinaBaseFile(), getConfigFile()));
        File file = configFile();

        // Create and execute our Digester
        Digester digester = createStartDigester();

        try (ConfigurationSource.Resource resource = ConfigFileLoader.getSource().getServerXml()) {
            InputStream inputStream = resource.getInputStream();
            InputSource inputSource = new InputSource(resource.getURI().toURL().toString());
            inputSource.setByteStream(inputStream);
            digester.push(this);
            digester.parse(inputSource);
        } catch (Exception e) {
            log.warn(sm.getString("catalina.configFail", file.getAbsolutePath()), e);
            if (file.exists() && !file.canRead()) {
                log.warn(sm.getString("catalina.incorrectPermissions"));
            }
            return;
        }

        getServer().setCatalina(this);
        getServer().setCatalinaHome(Bootstrap.getCatalinaHomeFile());
        getServer().setCatalinaBase(Bootstrap.getCatalinaBaseFile());

        // Stream redirection
        initStreams();

        // Start the new server
        try {
            getServer().init();
        } catch (LifecycleException e) {
            if (Boolean.getBoolean("org.apache.catalina.startup.EXIT_ON_INIT_FAILURE")) {
                throw new java.lang.Error(e);
            } else {
                log.error(sm.getString("catalina.initError"), e);
            }
        }

        long t2 = System.nanoTime();
        if(log.isInfoEnabled()) {
            log.info(sm.getString("catalina.init", Long.valueOf((t2 - t1) / 1000000)));
        }
    }
- daemon.start() : 启动Tomcat
通过调用daemon.start()启动Tomcat,其内容如下:
/**
     * Start the Catalina daemon.
     * @throws Exception Fatal start error
     */
    public void start() throws Exception {
        if (catalinaDaemon == null) {
            init();
        }

        Method method = catalinaDaemon.getClass().getMethod("start", (Class [])null);
        method.invoke(catalinaDaemon, (Object [])null);
    }
程序通过反射的方式调用Catalina.start()方式启动Tomcat,下面,我们看下Catalina.start()方法的实现逻辑:
/**
     * Start a new server instance.
     */
    public void start() {

        if (getServer() == null) {
            load();
        }

        if (getServer() == null) {
            log.fatal(sm.getString("catalina.noServer"));
            return;
        }

        long t1 = System.nanoTime();

        // Start the new server
        try {
            getServer().start();
        } catch (LifecycleException e) {
            log.fatal(sm.getString("catalina.serverStartFail"), e);
            try {
                getServer().destroy();
            } catch (LifecycleException e1) {
                log.debug("destroy() failed for failed Server ", e1);
            }
            return;
        }

        long t2 = System.nanoTime();
        if(log.isInfoEnabled()) {
            log.info(sm.getString("catalina.startup", Long.valueOf((t2 - t1) / 1000000)));
        }

        // Register shutdown hook
        if (useShutdownHook) {
            if (shutdownHook == null) {
                shutdownHook = new CatalinaShutdownHook();
            }
            Runtime.getRuntime().addShutdownHook(shutdownHook);

            // If JULI is being used, disable JULI's shutdown hook since
            // shutdown hooks run in parallel and log messages may be lost
            // if JULI's hook completes before the CatalinaShutdownHook()
            LogManager logManager = LogManager.getLogManager();
            if (logManager instanceof ClassLoaderLogManager) {
                ((ClassLoaderLogManager) logManager).setUseShutdownHook(
                        false);
            }
        }

        if (await) {
            await();
            stop();
        }
    }
可以看出,程序调用getServer().start()启动,getServer()方法返回的是一个StandardServer类,继而其调用的是StandardServer.startInternal()方法,在StandardServer中,又调用到StandardService.startInternal()方法。
// StandardServer.java
    protected void startInternal() throws LifecycleException {

        fireLifecycleEvent(CONFIGURE_START_EVENT, null);
        setState(LifecycleState.STARTING);

        globalNamingResources.start();

        // Start our defined Services
        synchronized (servicesLock) {
            for (int i = 0; i < services.length; i++) {
                services[i].start();
            }
        }
        // ......省略部分代码
    }

    protected void startInternal() throws LifecycleException {

        if(log.isInfoEnabled())
            log.info(sm.getString("standardService.start.name", this.name));
        setState(LifecycleState.STARTING);

        // Start our defined Container first
        if (engine != null) {
            synchronized (engine) {
                engine.start();
            }
        }

        synchronized (executors) {
            for (Executor executor: executors) {
                executor.start();
            }
        }

        mapperListener.start();

        // Start our defined Connectors second
        synchronized (connectorsLock) {
            for (Connector connector: connectors) {
                // If it has already failed, don't try and start it
                if (connector.getState() != LifecycleState.FAILED) {
                    connector.start();
                }
            }
        }
    }
注意,这里为什么不是start()方法,而是startInternal()方法呢?原因是StandardServer和StandService类都继承了LifecycleMBeanBase类,而LifecycleMBeanBase类又继承了LifecycleBase类。下面看下LifecycleBase类的start()方法:
public final synchronized void start() throws LifecycleException {

        if (LifecycleState.STARTING_PREP.equals(state) || LifecycleState.STARTING.equals(state) ||
                LifecycleState.STARTED.equals(state)) {

            if (log.isDebugEnabled()) {
                Exception e = new LifecycleException();
                log.debug(sm.getString("lifecycleBase.alreadyStarted", toString()), e);
            } else if (log.isInfoEnabled()) {
                log.info(sm.getString("lifecycleBase.alreadyStarted", toString()));
            }

            return;
        }

        if (state.equals(LifecycleState.NEW)) {
            init();
        } else if (state.equals(LifecycleState.FAILED)) {
            stop();
        } else if (!state.equals(LifecycleState.INITIALIZED) &&
                !state.equals(LifecycleState.STOPPED)) {
            invalidTransition(Lifecycle.BEFORE_START_EVENT);
        }

        try {
            setStateInternal(LifecycleState.STARTING_PREP, null, false);
            startInternal();
            if (state.equals(LifecycleState.FAILED)) {
                // This is a 'controlled' failure. The component put itself into the
                // FAILED state so call stop() to complete the clean-up.
                stop();
            } else if (!state.equals(LifecycleState.STARTING)) {
                // Shouldn't be necessary but acts as a check that sub-classes are
                // doing what they are supposed to.
                invalidTransition(Lifecycle.AFTER_START_EVENT);
            } else {
                setStateInternal(LifecycleState.STARTED, null, false);
            }
        } catch (Throwable t) {
            // This is an 'uncontrolled' failure so put the component into the
            // FAILED state and throw an exception.
            handleSubClassException(t, "lifecycleBase.startFail", toString());
        }
    }
可以看出,调用start()方法,最终都会调用到startInternal()方法。在下篇文章中,我们将详细看下StandardService.java中的engine.start()、executor.start()、connector.start()都分别启动了什么?敬请期待!
微信公众号: 源码湾
欢迎关注本人微信公众号: 源码湾。 本公众号将不定期进行相关源码及相关开发技术的分享,共同成长,共同进步~

Blog:
- 简书: https://www.jianshu.com/u/91378a397ffe
- csdn: https://blog.csdn.net/ZhiyouWu
- 开源中国: https://my.oschina.net/u/3204088
- 掘金: https://juejin.im/user/5b5979efe51d451949094265
- 博客园: https://www.cnblogs.com/zhiyouwu/
- 微信公众号: 源码湾
- 微信: WZY1782357529 (欢迎沟通交流)
正文到此结束
- 本文标签: apache ip cat 注释 XML lib Security id java tomcat 进程 代码 实例 开源 message IO servlet 线程 SDN parse final 微信公众号 executor stream rmi windows find Bootstrap 解析 开发 文章 mapper 类加载器 目录 tab tar UI HTML 操作系统 ACE ORM synchronized linux 源码 配置 App 参数 博客 bean equals 启动过程 https map CTO list http Service ArrayList ssl struct apr CEO value src Property bug
- 版权声明: 本文为互联网转载文章,出处已在文章中说明(部分除外)。如果侵权,请联系本站长删除,谢谢。
- 本文海报: 生成海报一 生成海报二
热门推荐


相关文章


Loading...
![[HBLOG]公众号](http://www.liuhaihua.cn/img/qrcode_gzh.jpg)

