羞,Spring Bean 初始化/销毁竟然有这么多姿势
一、前言
日常开发过程有时需要在应用启动之后加载某些资源,或者在应用关闭之前释放资源。Spring 框架提供相关功能,围绕 Spring Bean 生命周期,可以在 Bean 创建过程初始化资源,以及销毁 Bean 过程释放资源。Spring 提供多种不同的方式初始化/销毁 Bean,如果同时使用这几种方式,Spring 如何处理这几者之间的顺序?
有没有觉得标题很熟悉,没错标题模仿二哥 「 @沉默王二 」 文章『 羞,Java 字符串拼接竟然有这么多姿势 』。
二、姿势剖析
首先我们先来回顾一下 Spring 初始化/销毁 Bean 几种方式,分别为:
- init-method/destroy-method
- InitializingBean/DisposableBean
- @PostConstruct/@PreDestroy
- ContextStartedEvent/ContextClosedEvent
PS: 其实还有一种方式,就是继承 Spring Lifecycle 接口。不过这种方式比较繁琐,这里就不再分析。
2.1、init-method/destroy-method
这种方式在配置文件文件指定初始化/销毁方法。XML 配置如下
<bean id="demoService" class="com.dubbo.example.provider.DemoServiceImpl" destroy-method="close" init-method="initMethod"/>
或者也可以使用注解方式配置:
@Configurable
public class AppConfig {

    @Bean(initMethod = "init", destroyMethod = "destroy")
    public HelloService hello() {
        return new HelloService();
    }
}
还记得刚开始接触学习 Spring 框架,使用就是这种方式。
2.2、InitializingBean/DisposableBean
这种方式需要继承 Spring 接口 InitializingBean/DisposableBean ,其中 InitializingBean 用于初始化动作,而 DisposableBean 用于销毁之前清理动作。使用方式如下:
@Service
public class HelloService implements InitializingBean, DisposableBean {

    @Override
    public void destroy() throws Exception {
        System.out.println("hello destroy...");
    }

    @Override
    public void afterPropertiesSet() throws Exception {
        System.out.println("hello init....");
    }
}
2.3、@PostConstruct/@PreDestroy
这种方式相对于上面两种方式来说,使用方式最简单,只需要在相应的方法上使用注解即可。使用方式如下:
@Service
public class HelloService {


    @PostConstruct
    public void init() {
        System.out.println("hello @PostConstruct");
    }

    @PreDestroy
    public void PreDestroy() {
        System.out.println("hello @PreDestroy");
    }
}
这里踩过一个坑,如果使用 JDK9 之后版本 ,@PostConstruct/@PreDestroy 需要使用 maven 单独引入 javax.annotation-api ,否者注解不会生效。
2.4、ContextStartedEvent/ContextClosedEvent
这种方式使用 Spring 事件机制,日常业务开发比较少见,常用与框架集成中。Spring 启动之后将会发送 ContextStartedEvent 事件,而关闭之前将会发送 ContextClosedEvent 事件。我们需要继承 Spring ApplicationListener 才能监听以上两种事件。
@Service
public class HelloListener implements ApplicationListener {

    @Override
    public void onApplicationEvent(ApplicationEvent event) {
        if(event instanceof ContextClosedEvent){
            System.out.println("hello ContextClosedEvent");
        }else if(event instanceof ContextStartedEvent){
            System.out.println("hello ContextStartedEvent");
        }

    }
}
也可以使用 @EventListener 注解,使用方式如下:
public class HelloListenerV2 {

    @EventListener(value = {ContextClosedEvent.class, ContextStartedEvent.class})
    public void receiveEvents(ApplicationEvent event) {
        if (event instanceof ContextClosedEvent) {
            System.out.println("hello ContextClosedEvent");
        } else if (event instanceof ContextStartedEvent) {
            System.out.println("hello ContextStartedEvent");
        }
    }
}
PS:只有调用 ApplicationContext#start 才会发送 ContextStartedEvent 。若不想这么麻烦,可以监听 ContextRefreshedEvent 事件代替。一旦 Spring 容器初始化完成,就会发送 ContextRefreshedEvent 。
三、综合使用
回顾完上面几种方式,这里我们综合使用上面的四种方式,来看下 Spring 内部的处理顺序。在看结果之前,各位读者大人可以猜测下这几种方式的执行顺序。
public class HelloService implements InitializingBean, DisposableBean {


    @PostConstruct
    public void init() {
        System.out.println("hello @PostConstruct");
    }

    @PreDestroy
    public void PreDestroy() {
        System.out.println("hello @PreDestroy");
    }

    @Override
    public void destroy() throws Exception {
        System.out.println("bye DisposableBean...");
    }

    @Override
    public void afterPropertiesSet() throws Exception {
        System.out.println("hello InitializingBean....");
    }

    public void xmlinit(){
        System.out.println("hello xml-init...");
    }

    public void xmlDestory(){
        System.out.println("bye xmlDestory...");
    }

    @EventListener(value = {ContextClosedEvent.class, ContextStartedEvent.class})
    public void receiveEvents(ApplicationEvent event) {
        if (event instanceof ContextClosedEvent) {
            System.out.println("bye ContextClosedEvent");
        } else if (event instanceof ContextStartedEvent) {
            System.out.println("hello ContextStartedEvent");
        }
    }

}
xml 配置方式如下:
<context:annotation-config />
    <context:component-scan base-package="com.dubbo.example.demo"/>

    <bean class="com.dubbo.example.demo.HelloService" init-method="xmlinit" destroy-method="xmlDestory"/>
应用启动方法如下:
ClassPathXmlApplicationContext context = new ClassPathXmlApplicationContext("spring/dubbo-provider.xml");
context.start();
context.close();
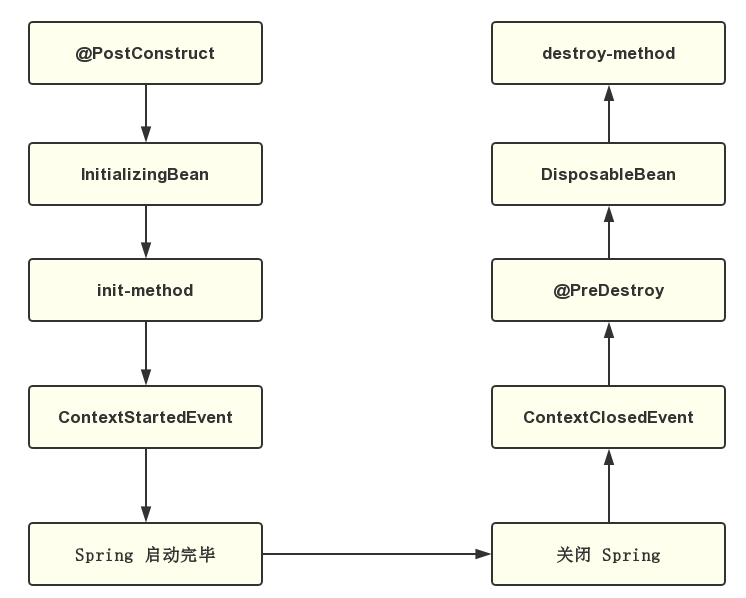
程序输出结果如下所示:

最后采用图示说明总结以上结果:
四、源码解析
不知道各位读者有没有猜对这几种方式的执行顺序,下面我们就从源码角度解析 Spring 内部处理的顺序。
4.1、初始化过程
使用 ClassPathXmlApplicationContext 启动 Spring 容器,将会调用 refresh 方法初始化容器。初始化过程将会创建 Bean 。最后当一切准备完毕,将会发送 ContextRefreshedEvent 。当容器初始化完毕,调用 context.start() 就发送 ContextStartedEvent 事件。
refresh 方法源码如下:
public void refresh() throws BeansException, IllegalStateException {
    synchronized (this.startupShutdownMonitor) {
            //... 忽略无关代码

            // 初始化所有非延迟初始化的 Bean
            finishBeanFactoryInitialization(beanFactory);

            // 发送 ContextRefreshedEvent
            finishRefresh();

            //... 忽略无关代码
    }
}
一路跟踪 finishBeanFactoryInitialization 源码,直到 AbstractAutowireCapableBeanFactory#initializeBean ,源码如下:
protected Object initializeBean(final String beanName, final Object bean, RootBeanDefinition mbd) {
    Object wrappedBean = bean;
    if (mbd == null || !mbd.isSynthetic()) {
        // 调用 BeanPostProcessor#postProcessBeforeInitialization 方法
        wrappedBean = applyBeanPostProcessorsBeforeInitialization(wrappedBean, beanName);
    }

    try {
        // 初始化 Bean
        invokeInitMethods(beanName, wrappedBean, mbd);
    }
    catch (Throwable ex) {
        throw new BeanCreationException(
                (mbd != null ? mbd.getResourceDescription() : null),
                beanName, "Invocation of init method failed", ex);
    }
}
BeanPostProcessor 将会起着拦截器的作用,一旦 Bean 符合条件,将会执行一些处理。这里带有 @PostConstruct 注解的 Bean 都将会被 CommonAnnotationBeanPostProcessor 类拦截,内部将会触发 @PostConstruct 标注的方法。
接着执行 invokeInitMethods ,方法如下:
protected void invokeInitMethods(String beanName, final Object bean, RootBeanDefinition mbd)
        throws Throwable {

    boolean isInitializingBean = (bean instanceof InitializingBean);
    if (isInitializingBean && (mbd == null || !mbd.isExternallyManagedInitMethod("afterPropertiesSet"))) {
        // 省略无关代码
        // 如果是 Bean 继承 InitializingBean,将会执行  afterPropertiesSet 方法
        ((InitializingBean) bean).afterPropertiesSet();
    }

    if (mbd != null) {
        String initMethodName = mbd.getInitMethodName();
        if (initMethodName != null && !(isInitializingBean && "afterPropertiesSet".equals(initMethodName)) &&
                !mbd.isExternallyManagedInitMethod(initMethodName)) {
            // 执行 XML 定义 init-method
            invokeCustomInitMethod(beanName, bean, mbd);
        }
    }
}
如果 Bean 继承 InitializingBean 接口,将会执行 afterPropertiesSet 方法,另外如果在 XML 中指定了 init-method ,也将会触发。
上面源码其实都是围绕着 Bean 创建的过程,当所有 Bean 创建完成之后,调用 context#start 将会发送 ContextStartedEvent 。这里源码比较简单,如下:
public void start() {
    getLifecycleProcessor().start();
    publishEvent(new ContextStartedEvent(this));
}
4.2、销毁过程
调用 ClassPathXmlApplicationContext#close 方法将会关闭容器,具体逻辑将会在 doClose 方法执行。
doClose 这个方法首先发送 ContextClosedEvent ,然再后开始销毁 Bean。
灵魂拷问:如果我们颠倒上面两者顺序,结果会一样吗?
doClose 源码如下:
protected void doClose() {
    if (this.active.get() && this.closed.compareAndSet(false, true)) {
        // 省略无关代码

        try {
            // Publish shutdown event.
            publishEvent(new ContextClosedEvent(this));
        }
        catch (Throwable ex) {
            logger.warn("Exception thrown from ApplicationListener handling ContextClosedEvent", ex);
        }


        // 销毁 Bean
        destroyBeans();

        // 省略无关代码
    }
}
destroyBeans 最终将会执行 DisposableBeanAdapter#destroy , @PreDestroy 、 DisposableBean 、 destroy-method 三者定义的方法都将会在内部被执行。
首先执行 DestructionAwareBeanPostProcessor#postProcessBeforeDestruction ,这里方法类似与上面 BeanPostProcessor。
@PreDestroy 注解将会被 CommonAnnotationBeanPostProcessor 拦截,这里类同时也继承了 DestructionAwareBeanPostProcessor 。
最后如果 Bean 为 DisposableBean 的子类,将会执行 destroy 方法,如果在 xml 定义了 destroy-method 方法,该方法也会被执行。
public void destroy() {
    if (!CollectionUtils.isEmpty(this.beanPostProcessors)) {
        for (DestructionAwareBeanPostProcessor processor : this.beanPostProcessors) {
            processor.postProcessBeforeDestruction(this.bean, this.beanName);
        }
    }

    if (this.invokeDisposableBean) {
        // 省略无关代码
        // 如果 Bean 继承 DisposableBean,执行 destroy 方法
        ((DisposableBean) bean).destroy();

    }

    if (this.destroyMethod != null) {
        // 执行 xml 指定的  destroy-method 方法
        invokeCustomDestroyMethod(this.destroyMethod);
    }
    else if (this.destroyMethodName != null) {
        Method methodToCall = determineDestroyMethod();
        if (methodToCall != null) {
            invokeCustomDestroyMethod(methodToCall);
        }
    }
}
五、总结
init-method/destroy-method 这种方式需要使用 XML 配置文件或单独注解配置类,相对来说比较繁琐。而InitializingBean/DisposableBean 这种方式需要单独继承 Spring 的接口实现相关方法。@PostConstruct/@PreDestroy 这种注解方式使用方式简单,代码清晰,比较推荐使用这种方式。
另外 ContextStartedEvent/ContextClosedEvent 这种方式比较适合在一些集成框架使用,比如 Dubbo 2.6.X 优雅停机就是用改机制。
正文到此结束
- 本文标签: Service UI XML root src tar id 灵魂 final maven BeanDefinition 配置 解析 java example https Collection 代码 开发 db 文章 标题 2019 App spring provider struct IO API list 源码 生命 cat synchronized CTO rmi dubbo ip bean IDE value classpath http description equals CEO 总结
- 版权声明: 本文为互联网转载文章,出处已在文章中说明(部分除外)。如果侵权,请联系本站长删除,谢谢。
- 本文海报: 生成海报一 生成海报二
热门推荐


相关文章

近期评论
-
谢谢
-
https://www.newcmy.com/register?aff=HBVX建议您试试草莓云机场,可以流畅观看youtube和tiktok,上reddit/x也没有问题,还有各种ai优化节点。
-
-
-
想购买您这个站,我的联系方式QQ741756694微信同步 能卖联系
-
-
-
-
-
https://www.liuhaihua.cn/archives/40657.html 这篇博客中的图片打不开了
Loading...
![[HBLOG]公众号](https://www.liuhaihua.cn/img/qrcode_gzh.jpg)

