Spring Boot2 系列教程(三十二)Spring Boot 整合 Shiro
公号后台回复 2TB 获取松哥独家超 2TB 免费 Java 学习资源下载地址

在 Spring Boot 中做权限管理,一般来说,主流的方案是 Spring Security ,但是,仅仅从技术角度来说,也可以使用 Shiro。
今天松哥就来和大家聊聊 Spring Boot 整合 Shiro 的话题!
一般来说,Spring Security 和 Shiro 的比较如下:
-
Spring Security 是一个重量级的安全管理框架;Shiro 则是一个轻量级的安全管理框架
-
Spring Security 概念复杂,配置繁琐;Shiro 概念简单、配置简单
-
Spring Security 功能强大;Shiro 功能简单
-
...
虽然 Shiro 功能简单,但是也能满足大部分的业务场景。所以在传统的 SSM 项目中,一般来说,可以整合 Shiro。
在 Spring Boot 中,由于 Spring Boot 官方提供了大量的非常方便的开箱即用的 Starter ,当然也提供了 Spring Security 的 Starter ,使得在 Spring Boot 中使用 Spring Security 变得更加容易,甚至只需要添加一个依赖就可以保护所有的接口,所以,如果是 Spring Boot 项目,一般选择 Spring Security 。
这只是一个建议的组合,单纯从技术上来说,无论怎么组合,都是没有问题的。
在 Spring Boot 中整合 Shiro ,有两种不同的方案:
-
第一种就是原封不动的,将 SSM 整合 Shiro 的配置用 Java 重写一遍。
-
第二种就是使用 Shiro 官方提供的一个 Starter 来配置,但是,这个 Starter 并没有简化多少配置。
原生的整合
-
创建项目
创建一个 Spring Boot 项目,只需要添加 Web 依赖即可:
项目创建成功后,加入 Shiro 相关的依赖,完整的 pom.xml 文件中的依赖如下:
<dependencies>
    <dependency>
        <groupId>org.springframework.boot</groupId>
        <artifactId>spring-boot-starter-web</artifactId>
    </dependency>
    <dependency>
        <groupId>org.apache.shiro</groupId>
        <artifactId>shiro-web</artifactId>
        <version>1.4.0</version>
    </dependency>
    <dependency>
        <groupId>org.apache.shiro</groupId>
        <artifactId>shiro-spring</artifactId>
        <version>1.4.0</version>
    </dependency>
</dependencies>
-
创建 Realm
接下来我们来自定义核心组件 Realm:
public class MyRealm extends AuthorizingRealm {
    @Override
    protected AuthorizationInfo doGetAuthorizationInfo(PrincipalCollection principals) {
        return null;
    }
    @Override
    protected AuthenticationInfo doGetAuthenticationInfo(AuthenticationToken token) throws AuthenticationException {
        String username = (String) token.getPrincipal();
        if (!"javaboy".equals(username)) {
            throw new UnknownAccountException("账户不存在!");
        }
        return new SimpleAuthenticationInfo(username, "123", getName());
    }
}
在 Realm 中实现简单的认证操作即可,不做授权,授权的具体写法和 SSM 中的 Shiro 一样,不赘述。这里的认证表示用户名必须是 javaboy ,用户密码必须是 123 ,满足这样的条件,就能登录成功!
-
配置 Shiro
接下来进行 Shiro 的配置:
@Configuration
public class ShiroConfig {
    @Bean
    MyRealm myRealm() {
        return new MyRealm();
    }

    @Bean
    SecurityManager securityManager() {
        DefaultWebSecurityManager manager = new DefaultWebSecurityManager();
        manager.setRealm(myRealm());
        return manager;
    }

    @Bean
    ShiroFilterFactoryBean shiroFilterFactoryBean() {
        ShiroFilterFactoryBean bean = new ShiroFilterFactoryBean();
        bean.setSecurityManager(securityManager());
        bean.setLoginUrl("/login");
        bean.setSuccessUrl("/index");
        bean.setUnauthorizedUrl("/unauthorizedurl");
        Map<String, String> map = new LinkedHashMap<>();
        map.put("/doLogin", "anon");
        map.put("/**", "authc");
        bean.setFilterChainDefinitionMap(map);
        return bean;
    }
}
在这里进行 Shiro 的配置主要配置 3 个 Bean :
-
首先需要提供一个 Realm 的实例。
-
需要配置一个 SecurityManager,在 SecurityManager 中配置 Realm。
-
配置一个 ShiroFilterFactoryBean ,在 ShiroFilterFactoryBean 中指定路径拦截规则等。
-
配置登录和测试接口。
其中,ShiroFilterFactoryBean 的配置稍微多一些,配置含义如下:
-
setSecurityManager 表示指定 SecurityManager。
-
setLoginUrl 表示指定登录页面。
-
setSuccessUrl 表示指定登录成功页面。
-
接下来的 Map 中配置了路径拦截规则,注意,要有序。
这些东西都配置完成后,接下来配置登录 Controller:
@RestController
public class LoginController {
    @PostMapping("/doLogin")
    public void doLogin(String username, String password) {
        Subject subject = SecurityUtils.getSubject();
        try {
            subject.login(new UsernamePasswordToken(username, password));
            System.out.println("登录成功!");
        } catch (AuthenticationException e) {
            e.printStackTrace();
            System.out.println("登录失败!");
        }
    }
    @GetMapping("/hello")
    public String hello() {
        return "hello";
    }
    @GetMapping("/login")
    public String  login() {
        return "please login!";
    }
}
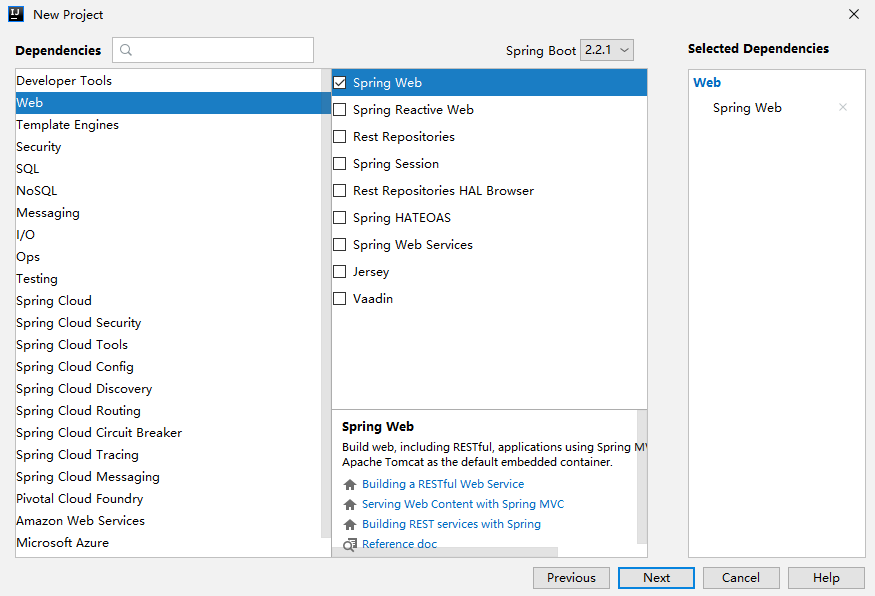
测试时,首先访问 /hello 接口,由于未登录,所以会自动跳转到 /login 接口:
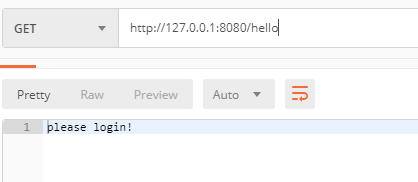
然后调用 /doLogin 接口完成登录:
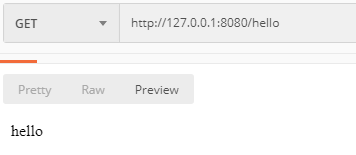
再次访问 /hello 接口,就可以成功访问了:
使用 Shiro Starter
上面这种配置方式实际上相当于把 SSM 中的 XML 配置拿到 Spring Boot 中用 Java 代码重新写了一遍,除了这种方式之外,我们也可以直接使用 Shiro 官方提供的 Starter 。
-
创建工程,和上面的一样
创建成功后,添加 shiro-spring-boot-web-starter ,这个依赖可以代替之前的 shiro-web 和 shiro-spring 两个依赖,pom.xml 文件如下:
<dependencies>
    <dependency>
        <groupId>org.springframework.boot</groupId>
        <artifactId>spring-boot-starter-web</artifactId>
    </dependency>
    <dependency>
        <groupId>org.apache.shiro</groupId>
        <artifactId>shiro-spring-boot-web-starter</artifactId>
        <version>1.4.0</version>
    </dependency>
</dependencies>
-
创建 Realm
这里的 Realm 和前面的一样,我就不再赘述。
-
配置 Shiro 基本信息
接下来在 application.properties 中配置 Shiro 的基本信息:
shiro.sessionManager.sessionIdCookieEnabled=true
shiro.sessionManager.sessionIdUrlRewritingEnabled=true
shiro.unauthorizedUrl=/unauthorizedurl
shiro.web.enabled=true
shiro.successUrl=/index
shiro.loginUrl=/login
配置解释:
-
第一行表示是否允许将sessionId 放到 cookie 中
-
第二行表示是否允许将 sessionId 放到 Url 地址拦中
-
第三行表示访问未获授权的页面时,默认的跳转路径
-
第四行表示开启 shiro
-
第五行表示登录成功的跳转页面
-
第六行表示登录页面
-
配置 ShiroConfig
@Configuration
public class ShiroConfig {
    @Bean
    MyRealm myRealm() {
        return new MyRealm();
    }
    @Bean
    DefaultWebSecurityManager securityManager() {
        DefaultWebSecurityManager manager = new DefaultWebSecurityManager();
        manager.setRealm(myRealm());
        return manager;
    }
    @Bean
    ShiroFilterChainDefinition shiroFilterChainDefinition() {
        DefaultShiroFilterChainDefinition definition = new DefaultShiroFilterChainDefinition();
        definition.addPathDefinition("/doLogin", "anon");
        definition.addPathDefinition("/**", "authc");
        return definition;
    }
}
这里的配置和前面的比较像,但是不再需要 ShiroFilterFactoryBean 实例了,替代它的是 ShiroFilterChainDefinition ,在这里定义 Shiro 的路径匹配规则即可。
这里定义完之后,接下来的登录接口定义以及测试方法都和前面的一致,我就不再赘述了。大家可以参考上文。
总结
本文主要向大家介绍了 Spring Boot 整合 Shiro 的两种方式,一种是传统方式的 Java 版,另一种则是使用 Shiro 官方提供的 Starter,两种方式,不知道大家有没有学会呢?
本文案例,我已经上传到 GitHub ,欢迎大家 star:https://github.com/lenve/javaboy-code-samples
关于本文,有问题欢迎留言讨论。


1 、 Spring Boot2 系列教程(一)纯 Java 搭建 SSM 项目
2、 Spring Boot2 系列教程(二)创建 Spring Boot 项目的三种方式
3、 Spring Boot2 系列教程(三)理解 spring-boot-starter-parent
4、 Spring Boot2 系列教程(四)理解配置文件 application.properties !
5、 Spring Boot2 系列教程(五)Spring Boot中的 yaml 配置
6、 Spring Boot2 系列教程(六)自定义 Spring Boot 中的 starter
7、 Spring Boot2 系列教程(七)理解自动化配置的原理
14、 Spring Boot2 系列教程(十四)CORS 解决跨域问题
16、 Spring Boot2 系列教程(十六)定时任务的两种实现方式
21、 Spring Boot2 系列教程(二十一)整合 MyBatis
23、 Spring Boot2 系列教程(二十三)理解 Spring Data Jpa
27、 Spring Boot2 系列教程(二十七)Nginx 极简扫盲入门

喜欢就点个 "在看" 呗^_^
正文到此结束
- 本文标签: Nginx 下载 tar Spring Boot GitHub 总结 pom Security session map 实例 web ACE https id 管理 dependencies 自动化 Authorization HashMap 安全 App apache Word git Collection IDE mybatis 认证 JPA token cat CTO java http ip IO tk UI REST 测试 免费 文案 Spring Security 代码 spring src bean equals 配置 XML
- 版权声明: 本文为互联网转载文章,出处已在文章中说明(部分除外)。如果侵权,请联系本站长删除,谢谢。
- 本文海报: 生成海报一 生成海报二
热门推荐


相关文章

近期评论
-
ws0132613@gmail.comhttps://getmacos.com/gopanel/william smith
-
谢谢
-
https://www.newcmy.com/register?aff=HBVX建议您试试草莓云机场,可以流畅观看youtube和tiktok,上reddit/x也没有问题,还有各种ai优化节点。
-
-
-
想购买您这个站,我的联系方式QQ741756694微信同步 能卖联系
-
-
-
-
Loading...
![[HBLOG]公众号](https://www.liuhaihua.cn/img/qrcode_gzh.jpg)

