基于SpringBoot的代码在线运行的简单实现
说明
由于没有实现沙盒,所以这个运行只适合提交自己写的代码到服务器,不适合像 菜鸟工具 那样可以让人公开提交代码并访问。
基本思路
前端提交代码,后端运行并返回结果。
后端实现
为了方便实现后端采用到了SpringBoot
我们需要先完成代码运行所需要的配置
@ConfigurationProperties(prefix = "run.script")
@Component
public class Config {
    private String cpp;
    private String c;
    private String python;

    public void setCpp(String cpp) {
        this.cpp = cpp;
    }

    public void setC(String c) {
        this.c = c;
    }

    public void setPython(String python) {
        this.python = python;
    }

    public String getCpp() {
        return cpp;
    }

    public String getC() {
        return c;
    }

    public String getPython() {
        return python;
    }

}
配置yml文件
此处的cpp和c应为需要编译运行,所以需要根据不同的操作系统写运行脚本
所有的路径都必须是绝对路径
run:
  script:
    cpp: F:/Spring/runCode/src/main/resources/runCpp.bat
    c: F:/Spring/runCode/src/main/resources/runC.bat
    python: C:/Users/puzhiwei/AppData/Local/Programs/Python/Python38/python.exe
然后我们需要将前端提交的代码保存到文件
        // 获取系统缓存文件的位置
        String tmpDir = System.getProperty("java.io.tmpdir");
        // 随机文件夹的名字
        File pwd = Paths.get(tmpDir, String.format("%016x", nextLong.incrementAndGet())).toFile();
        // 新建文件夹
        pwd.mkdirs();
        ProcessBuilder pb = null;
        switch (type) {
            case "C":
                try (Writer writer = new BufferedWriter(new FileWriter(new File(pwd, "Main.c"), Charset.defaultCharset()))) {
                    writer.write(code);
                }
                pb = new ProcessBuilder().command(config.getC()).directory(pwd);
                break;
            case "CPP":
                try (Writer writer = new BufferedWriter(new FileWriter(new File(pwd, "Main.cpp"), Charset.defaultCharset()))) {
                    writer.write(code);
                }
                pb = new ProcessBuilder().command(config.getCpp()).directory(pwd);
                break;
            case "JAVA":
                try (Writer writer = new BufferedWriter(new FileWriter(new File(pwd, "Main.java"), Charset.defaultCharset()))) {
                    writer.write(code);
                }
                String[] command = new String[]{getJavaExecutePath(), "-Dfile.encoding=" + Charset.defaultCharset(), "--source", "11", "--enable-preview", "Main.java"};
                pb = new ProcessBuilder().command(command).directory(pwd);
                break;
            case "PYTHON":
                try (Writer writer = new BufferedWriter(new FileWriter(new File(pwd, "Main.py"), Charset.defaultCharset()))) {
                    writer.write(code);
                }
                pb = new ProcessBuilder().command(config.getPython(), "Main.py").directory(pwd);
                break;
            default:
                break;
        }
这段代码主要实现了将代码保存到系统的缓存文件夹中,
pb为要在终端中执行的编译运行命令
由于C和C++需要编译才能执行,所以执行的是运行脚本,需要根据自己的系统进行修改
在windows下如下
@echo off
clang -std=c11 main.c && a.exe
@echo off
clang++ -std=c++17 main.cpp && a.exe
获取Java执行路径的的代码如下
    private String getJavaExecutePath() {
        if (javaExec == null) {
            String javaHome = System.getProperty("java.home");
            String os = System.getProperty("os.name");
            boolean isWindows = os.toLowerCase().startsWith("windows");
            Path javaPath = Paths.get(javaHome, "bin", isWindows ? "java.exe" : "java");
            javaExec = javaPath.toString();
        }
        return javaExec;
    }
之后就是使用 ProcessBuilder 执行脚本,并读取运行结果了
pb.redirectErrorStream(true);
        Process p = pb.start();
        if (p.waitFor(5, TimeUnit.SECONDS)) {
            String result = null;
            try (InputStream input = p.getInputStream()) {
                result = readAsString(input, Charset.defaultCharset());
            }
            return new ProcessResult(p.exitValue(), result);
        } else {
            System.err.println(String.format("Error: process %s timeout. destroy forcibly.", p.pid()));
            p.destroyForcibly();
            return new ProcessResult(p.exitValue(), "运行超时");
        }
最后,这个类的完整代码如下
import org.springframework.beans.factory.annotation.Autowired;
import org.springframework.stereotype.Component;

import java.io.*;
import java.nio.charset.Charset;
import java.nio.file.Path;
import java.nio.file.Paths;
import java.util.concurrent.TimeUnit;
import java.util.concurrent.atomic.AtomicLong;

/**
 * @author Pu Zhiwei {@literal puzhiweipuzhiwei@foxmail.com}
 * create          2020-03-13 18:22
 */
@Component
public class RunCode {
    private final Config config;

    private static String javaExec = null;


    private static AtomicLong nextLong = new AtomicLong(System.currentTimeMillis());

    @Autowired
    public RunCode(Config config) {
        this.config = config;
    }


    public ProcessResult runCode(String type, String code) throws IOException, InterruptedException {
        // 获取系统缓存文件的位置
        String tmpDir = System.getProperty("java.io.tmpdir");
        // 随机文件夹的名字
        File pwd = Paths.get(tmpDir, String.format("%016x", nextLong.incrementAndGet())).toFile();
        // 新建文件夹
        pwd.mkdirs();
        ProcessBuilder pb = null;
        switch (type) {
            case "C":
                try (Writer writer = new BufferedWriter(new FileWriter(new File(pwd, "Main.c"), Charset.defaultCharset()))) {
                    writer.write(code);
                }
                pb = new ProcessBuilder().command(config.getC()).directory(pwd);
                break;
            case "CPP":
                try (Writer writer = new BufferedWriter(new FileWriter(new File(pwd, "Main.cpp"), Charset.defaultCharset()))) {
                    writer.write(code);
                }
                pb = new ProcessBuilder().command(config.getCpp()).directory(pwd);
                break;
            case "JAVA":
                try (Writer writer = new BufferedWriter(new FileWriter(new File(pwd, "Main.java"), Charset.defaultCharset()))) {
                    writer.write(code);
                }
                String[] command = new String[]{getJavaExecutePath(), "-Dfile.encoding=" + Charset.defaultCharset(), "--source", "11", "--enable-preview", "Main.java"};
                pb = new ProcessBuilder().command(command).directory(pwd);
                break;
            case "PYTHON":
                try (Writer writer = new BufferedWriter(new FileWriter(new File(pwd, "Main.py"), Charset.defaultCharset()))) {
                    writer.write(code);
                }
                pb = new ProcessBuilder().command(config.getPython(), "Main.py").directory(pwd);
                break;
            default:
                break;
        }


        pb.redirectErrorStream(true);
        Process p = pb.start();
        if (p.waitFor(5, TimeUnit.SECONDS)) {
            String result = null;
            try (InputStream input = p.getInputStream()) {
                result = readAsString(input, Charset.defaultCharset());
            }
            return new ProcessResult(p.exitValue(), result);
        } else {
            System.err.println(String.format("Error: process %s timeout. destroy forcibly.", p.pid()));
            p.destroyForcibly();
            return new ProcessResult(p.exitValue(), "运行超时");
        }
    }


    private String getJavaExecutePath() {
        if (javaExec == null) {
            String javaHome = System.getProperty("java.home");
            String os = System.getProperty("os.name");
            boolean isWindows = os.toLowerCase().startsWith("windows");
            Path javaPath = Paths.get(javaHome, "bin", isWindows ? "java.exe" : "java");
            javaExec = javaPath.toString();
        }
        return javaExec;
    }

    public String readAsString(InputStream input, Charset charset) throws IOException {
        ByteArrayOutputStream output = new ByteArrayOutputStream();
        byte[] buffer = new byte[102400];
        for (; ; ) {
            int n = input.read(buffer);
            if (n == (-1)) {
                break;
            }
            output.write(buffer, 0, n);
        }
        return output.toString(charset);
    }
}

完整代码
写完这些,我们就基本完成了代码在后端的运行并返回结果
接下来可以写一个测试方法测试一下结果的运行
import org.junit.jupiter.api.Test;
import org.springframework.beans.factory.annotation.Autowired;
import org.springframework.boot.test.context.SpringBootTest;

@SpringBootTest
class RunApplicationTests {

    @Autowired
    private RunCode runCode;

    @Test
    void contextLoads() throws Exception {
        String code = "#include <stdio.h>/n" +
                "/n" +
                "int main()/n" +
                "{/n" +
                "   printf(/"Hello, World! //n/");/n" +
                "   /n" +
                "   return 0;/n" +
                "}";
        System.out.println(runCode.runCode("C", code).getOutput());
    }

}

测试运行
如果没有异常,应该可以看到如下内容

最后,写一个controller,用来接收前端提交的代码
@RestController
@CrossOrigin("*")
public class WebController {
    public final RunCode runCode;

    @Autowired
    public WebController(RunCode runCode) {
        this.runCode = runCode;
    }

    @PostMapping("/run")
    public ProcessResult runCode(@RequestBody CodeModel codeModel) throws Exception {
        return runCode.runCode(codeModel.getType(), codeModel.getCode());
    }
}
public class CodeModel {
    private String type;
    private String code;

    public String getType() {
        return type;
    }

    public void setType(String type) {
        this.type = type;
    }

    public String getCode() {
        return code;
    }

    public void setCode(String code) {
        this.code = code;
    }
}

CodeModel
/**
 * @author Pu Zhiwei {@literal puzhiweipuzhiwei@foxmail.com}
 * create          2020-03-13 18:26
 */
public class ProcessResult {
    private int exitCode;

    private String output;

    public ProcessResult(int exitCode, String output) {
        this.exitCode = exitCode;
        this.output = output;
    }

    public int getExitCode() {
        return exitCode;
    }

    public String getOutput() {
        return output;
    }
}

ProcessResult
至此,我们的后端就基本完成了。
前端
我们先写一个简单的html页面来进行测试
<!DOCTYPE html>
<html lang="en">
<head>
    <meta charset="UTF-8">
    <title>Title</title>
</head>
<body>
<select>
    <option selected>Java</option>
    <option>C</option>
</select>
<br/>
<textarea id="code" style="height: 500px; width: 600px"></textarea>
<button id="sub-btn" onclick="submit()">提交</button>
<br/>
<textarea id="output"></textarea>

<script>
    function submit() {
        let data = document.querySelector("#code").value;

        fetch("http://127.0.0.1:8848/run", {
            method: "POST",
            headers: {
                "Content-Type": "application/json; charset=UTF-8"
            },
            body: JSON.stringify({
                code: data,
                type: "JAVA"
            })

        }).then(response => response.json())
            .then(json => {
                console.log(json)
                document.querySelector("#output").value = json.output;
            });
    }
</script>
</body>
</html>
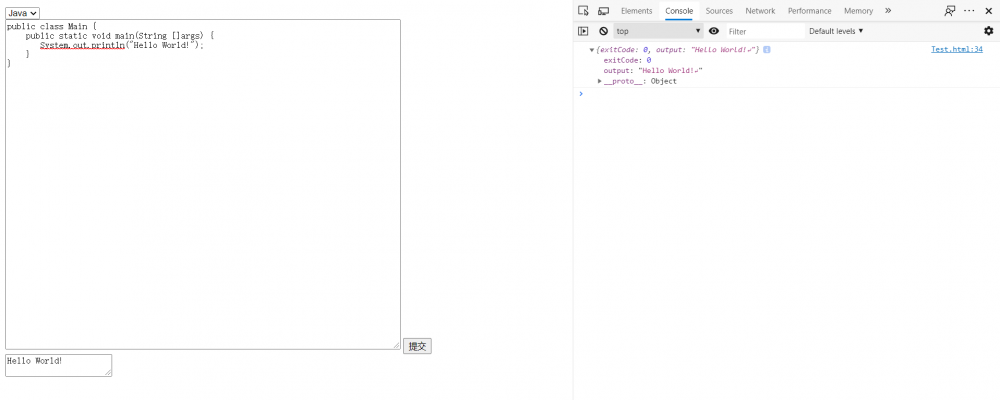
如果没有问题,我们就能看到如下结果了
最后,完善一下页面
<!DOCTYPE html>
<html lang="en">
<head>
    <meta charset="UTF-8">
    <title>代码在线运行工具</title>
    <link rel="stylesheet" href="https://cdn.jsdelivr.net/npm/bootstrap@4.4.1/dist/css/bootstrap.min.css" integrity="sha384-Vkoo8x4CGsO3+Hhxv8T/Q5PaXtkKtu6ug5TOeNV6gBiFeWPGFN9MuhOf23Q9Ifjh" crossorigin="anonymous">
    <style>
        #editor {
            position: absolute;
            width: 100%;
            height: 100%;
        }
    </style>
</head>
<body>
<nav class="navbar navbar-expand-lg navbar-light bg-light">
    <div class="container">
        <a class="navbar-brand" href="/">代码在线运行工具</a>
        <button class="navbar-toggler" type="button" data-toggle="collapse" data-target="#navbarSupportedContent" aria-controls="navbarSupportedContent" aria-expanded="false" aria-label="Toggle navigation">
            <span class="navbar-toggler-icon"></span>
        </button>
    </div>
</nav>
<div style="height: 30px"></div>
<div class="container shadow p-3 mb-5 bg-white rounded">
    <div class="container-fluid">
        <div class="row">
            <div class="col-2">
                <button id="sub-btn" class="btn btn-success " onclick="submit()">点击运行!</button>
            </div>
            <div class="col-3">
                <select onchange="selectLanguage(this)" id="language-type" class="form-control">
                    <option selected>Java</option>
                    <option>C</option>
                    <option>CPP</option>
                    <option>Python</option>
                </select>
            </div>
            <div class="col-3">
                <button type="button" class="btn btn-secondary" onclick="clean()">清空</button>
            </div>
        </div>
    </div>
    <div style="height: 20px"></div>

    <div class="row">
        <div class="col-7 border border-light">
            <div id="editor"></div>
        </div>
        <div class="col-1 border-left"></div>
        <div class="col text-center">
            <textarea id="output" class="form-control" rows="15"></textarea>
        </div>
    </div>
</div>
<script src="https://cdnjs.cloudflare.com/ajax/libs/ace/1.4.8/ace.js" type="text/javascript"></script>
<script src="https://cdnjs.cloudflare.com/ajax/libs/ace/1.4.8/ext-language_tools.min.js" type="text/javascript"></script>
<!--<script src="https://cdnjs.cloudflare.com/ajax/libs/ace/1.4.8/mode-java.min.js" type="text/javascript"></script>-->
<script>
    ace.require("ace/ext/language_tools");
    const editor = ace.edit("editor");
    editor.session.setMode("ace/mode/java");
    editor.setTheme("ace/theme/github");
    // enable autocompletion and snippets
    editor.setOptions({
        enableBasicAutocompletion: true,
        enableSnippets: true,
        enableLiveAutocompletion: true
    });

    function submit() {
        document.querySelector("#output").value = "代码运行中!";
        let data = editor.getValue();


        fetch("http://127.0.0.1:8848/run", {
            method: "POST",
            headers: {
                "Content-Type": "application/json; charset=UTF-8"
            },
            body: JSON.stringify({
                code: data,
                type: document.querySelector("#language-type").value.toUpperCase()
            })

        }).then(response => response.json())
            .then(json => {
                console.log(json)
                document.querySelector("#output").value = json.output;
            });
    }

    function clean() {
        editor.setValue("");
    }

    function selectLanguage(e) {
        let mode = "ace/mode/" + e.value.toLowerCase();
        if (e.value.toLowerCase() === "c" || e.value.toLowerCase() === "cpp") {
            mode = "ace/mode/c_cpp"
        }
        editor.session.setMode(mode);
    }
</script>
</body>
</html>
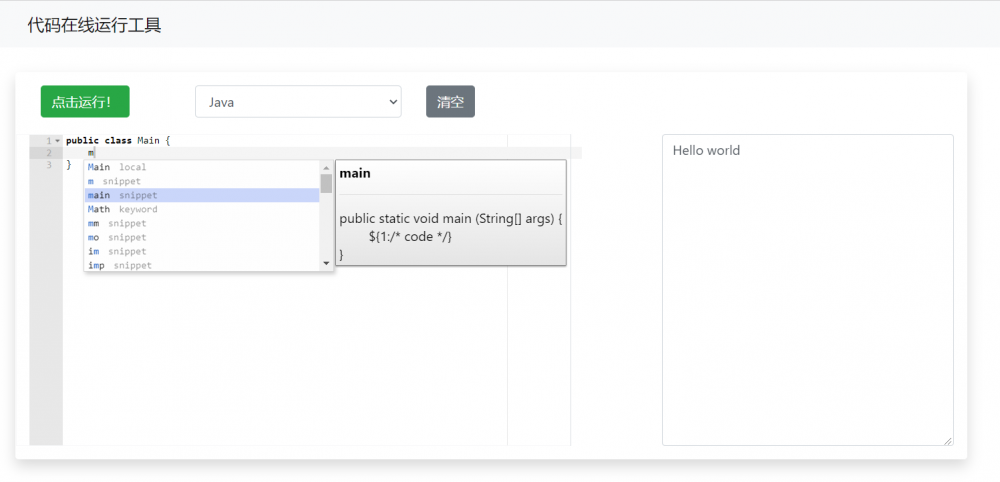
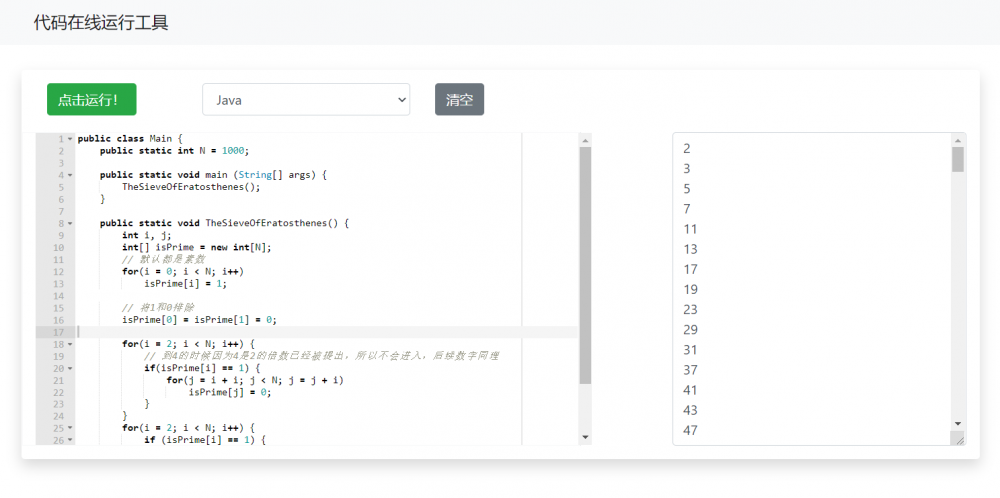
效果如下

正文到此结束
- 本文标签: Atom session GitHub value ip src 配置 ORM tk App 服务器 final CDN kk springboot API json mail lib map bean stream CTO web 操作系统 js python CSS id Select windows dist cat Property junit TCP java REST https ACE Bootstrap IO Document 测试 build tar JavaScript 缓存 代码 spring onchange git http UI NIO rand HTML 编译 Ajax
- 版权声明: 本文为互联网转载文章,出处已在文章中说明(部分除外)。如果侵权,请联系本站长删除,谢谢。
- 本文海报: 生成海报一 生成海报二
热门推荐


相关文章

近期评论
-
谢谢
-
https://www.newcmy.com/register?aff=HBVX建议您试试草莓云机场,可以流畅观看youtube和tiktok,上reddit/x也没有问题,还有各种ai优化节点。
-
-
-
想购买您这个站,我的联系方式QQ741756694微信同步 能卖联系
-
-
-
-
-
https://www.liuhaihua.cn/archives/40657.html 这篇博客中的图片打不开了
Loading...
![[HBLOG]公众号](https://www.liuhaihua.cn/img/qrcode_gzh.jpg)

