Java 基础篇——线程
-
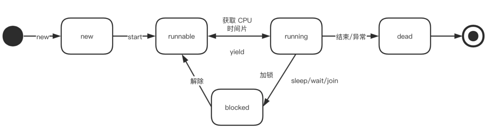
New:线程刚刚创建,还未加入线程调度
-
Runnable:就绪态,调用 start() 后,线程加入线程调度。此时,只要获取到 CPU 时间片,就会进入运行态
-
Running:运行态,线程获取到 CPU 时间片后,就会被 CPU 运行。可以通过 yield() 主动让出时间片,会使得线程返回就绪态
-
Blocked:阻塞态,此时线程需要等待释放信号才能进入就绪态,如等待用户输入、等待锁被解除
-
Dead:线程结束或抛出未捕获异常
下面我们来学习一下如何创建线程。
1. 创建线程的两种方法
-
继承 Thread 类,重写 run 方法:
extends Thread -
实现 Runnable 接口,实现 run 方法:
implements Runnable
1.1 继承 Thread 类
public class MyThread extends thread {
    @Override
    public void run() {
        // ...
    }
}
复制代码
MyThread thread = new MyThread();
thread.start();
复制代码注意是调用 start 方法,而不是直接调用 run 方法。
调用 start 方法会进入 runnable 就绪态。当分配到 CPU 时间片时,run() 方法就会执行,从而进入 Running 态。
1.2 实现 Runnable 接口
public class MyThread implements Runnable {
    @Override
    public void run() {
        System.out.println("hello...");
    }
}
复制代码
Thread thread = new Thread(new MyThread());
thread.start();
复制代码Lambda 写法:
Thread thread = new Thread(() -> {
	System.out.println("你好");
});
thread.start();
复制代码
2. 线程内部概念
2.1 常用 API
// 获取当前线程
Thread thread = Thread.currentThread();
// 获取线程 ID
long id = thread.getId();
// 获取线程 Name
String name = thread.getName();
// 获取线程优先级
int priority = thread.getPriority();
// 判定线程是否为守护线程
boolean isDaemon = thread.isDaemon();
// 判定线程是否被中断;被中断会进入阻塞 Blocked 状态
boolean isInterrupted = thread.isInterrupted();
// 判定线程是否存活
boolean isAlive = thread.isAlive();
复制代码
线程优先级
Thread 中定义了三个优先级常量:
public final static int MIN_PRIORITY = 1;
public final static int NORM_PRIORITY = 5;
public final static int MAX_PRIORITY = 10;
复制代码
所以线程一共有 10 个优先级,最低为 1,最高为 10,默认为 5
2.2 守护线程
private boolean	daemon = false;

public final boolean isDaemon() {
        return daemon;
}

public final void setDaemon(boolean on) {
	checkAccess();
	if (isAlive()) {
		throw new IllegalThreadStateException();
	}
	daemon = on;
}
复制代码
守护线程的含义是:该线程是一个后台线程,依赖于其他线程,当其他线程都结束之后,该线程也会自动结束。当正在运行的都是守护线程的时候,Java 虚拟机会关闭。
example:
public static void main(String[] args) {
    Thread front = new Thread(() -> {
       System.out.println("前台线程开始运行...");
        try {
            Thread.sleep(3000);
        } catch (InterruptedException e) {
            e.printStackTrace();
        }
        System.out.println("前台线程运行结束");
    });

    Thread back = new Thread(() -> {
        while (true) {
            System.out.println("后台线程开始运行,当前台线程 Dead,我就自杀!");

            try {
                Thread.sleep(1000);
            } catch (InterruptedException e) {
                e.printStackTrace();
            }
        }
    });

    front.start();
    back.setDaemon(true);
    back.start();
}
复制代码
result:
前台线程开始运行...
后台线程开始运行,当前台线程 Dead,我就自杀!
后台线程开始运行,当前台线程 Dead,我就自杀!
后台线程开始运行,当前台线程 Dead,我就自杀!
前台线程运行结束
复制代码
2.3 线程状态转换、线程交互
在上面的状态图里,我们已经看到了部分线程状态转换、线程交互的方法。这里详细总结一下这部分的知识。
2.3.1 sleep
Thread 提供了 sleep 静态方法,可以使线程进入阻塞态指定时间,单位是毫秒。超时后,线程自动进入就绪态,等待再次分配 CPU 时间片进入运行态。
源码:
public static native void sleep(long millis) throws InterruptedException;
复制代码
Example:
Thread.sleep(1000); // 睡眠 1s
复制代码
这个方法非常常见,是 Thread 中使用最多的 API 之一。
2.3.2 yield
Thread 提供了 yield 静态方法,可以使当前线程主动让出时间片,进入就绪态,等待再次分配时间片。
public static native void yield();
复制代码
2.3.3 join
等待该线程死亡,即在 B 线程中调用了 A.join(),那么 B 线程将在此处等待 A 线程死亡才会继续往下执行。
public final void join() throws InterruptedException {
    join(0);
}
复制代码
public final synchronized void join(long millis) throws InterruptedException {
long base = System.currentTimeMillis();
long now = 0;
if (millis < 0) {
throw new IllegalArgumentException("timeout value is negative");
}
if (millis == 0) {
while (isAlive()) {
wait(0);
}
} else {
while (isAlive()) {
long delay = millis - now;
if (delay <= 0) {
break;
}
wait(delay);
now = System.currentTimeMillis() - base;
}
}
}
复制代码注意这里调用了 Object 类的 wait 方法。
Example:
    public static void main(String[] args) {
        Thread front = new Thread(() -> {
           System.out.println("开始下载文件...");
           for (int i = 0; i < 100; i++) {
               System.out.println("下载进度" + i + "%");
               try {
                   Thread.sleep(50);
               } catch (InterruptedException e) {
                   e.printStackTrace();
               }
           }
            System.out.println("下载结束,是否打开文件?");
        });

        Thread back = new Thread(() -> {
            System.out.println("等待文件下载完毕...");
            try {
                front.join();
            } catch (InterruptedException e) {
                e.printStackTrace();
            }
            System.out.println("是,文件打开如下...");
        });

        front.start();
        back.start();
    }
复制代码
Result:
开始下载文件...
等待文件下载完毕...
下载进度0%
下载进度1%
// ...
下载进度99%
下载结束,是否打开文件?
是,文件打开如下...
复制代码
2.3.4 Object 的 wait 和 notify
在 Thread 的 join 方法中使用了 wait 方法,wait 和 notify 是 Object 提供的线程之间协调工作的方法。
public final void wait() throws InterruptedException {
     wait(0);
}

// timeout 表示最长等待多长时间,如果 = 0,则表示一直等待,直到 notify 被触发!
public final native void wait(long timeout) throws InterruptedException;

public final native void notify();

public final native void notifyAll();
复制代码
使用某个对象的 wait 方法,使得当前线程进入阻塞态,直到该对象的 notify 方法被调用,该线程进入就绪态。如果该对象的 wait 方法被多个线程调用,那么 notify 方法会随机释放一个线程。如果想要释放所有线程,使用 notifyAll 方法。
注意,使用 wait 和 notify 方法时,必须对该对象加锁。
Example:
        public static void main(String[] args) {

        Integer obj = 1;
        Thread front = new Thread(() -> {
            System.out.println("线程1开始下载文件...");
            for (int i = 1; i <= 10; i++) {
                System.out.println("下载进度" + (i*10) + "%");
                try {
                    Thread.sleep(50);
                } catch (InterruptedException e) {
                    e.printStackTrace();
                }
            }

            System.out.println("下载结束,通知线程2打开文件");
            synchronized (obj) {
                obj.notify();
            }
        });

        Thread back = new Thread(() -> {
            System.out.println("线程2启动,等待线程1通知文件下载完成...");
            synchronized (obj) {
                try {
                    obj.wait();
                } catch (InterruptedException e) {
                    e.printStackTrace();
                }
            }
            System.out.println("接受到线程1通知,打开文件");
        });

        front.start();
        back.start();
    }
复制代码
Result:
线程1开始下载文件...
线程2启动,等待线程1通知文件下载完成...
下载进度10%
下载进度20%
下载进度30%
下载进度40%
下载进度50%
下载进度60%
下载进度70%
下载进度80%
下载进度90%
下载进度100%
下载结束,通知线程2打开文件
接受到线程1通知,打开文件
复制代码
3. 多线程并发问题
在多线程环境下,经常会出现并发问题,主要体现在抢占临界资源问题上。
比如同时调用某个对象。
解决办法通常是使用支持并发的对象(即对象内的资源被加锁了),比如 ConcurrentHashMap,或者直接对调用该对象的代码块加锁。
最简单的加锁方式就是 synchronized,如:
synchronized (user) {
	user.setName("hello");
}
复制代码
4. 线程池
创建和销毁线程通常会消耗一定的资源,如果在线程非常多的情况下,这种资源消耗就不可小视了。这时候我们引入了线程池的概念——通俗理解,管理线程的容器。
这里用一个简单的例子演示一下线程池的使用:
-
创建 ExecutorService 和提交 Runnable
ExecutorService pool = Executors.newFixedThreadPool(3);

        for (int i = 0; i < 10; i++) {
            Runnable runnable = () -> {
                Thread currentThread = Thread.currentThread();
                System.out.println(currentThread.getName() + " 执行任务");
                try {
                    Thread.sleep(2000);
                } catch (InterruptedException e) {
                    e.printStackTrace();
                }

                System.out.println(currentThread.getName() + " 完毕");
            };
            pool.execute(runnable);
        }

        pool.shutdown();
复制代码
本文使用 mdnice 排版
正文到此结束
热门推荐


相关文章

近期评论
-
谢谢
-
https://www.newcmy.com/register?aff=HBVX建议您试试草莓云机场,可以流畅观看youtube和tiktok,上reddit/x也没有问题,还有各种ai优化节点。
-
-
-
想购买您这个站,我的联系方式QQ741756694微信同步 能卖联系
-
-
-
-
-
https://www.liuhaihua.cn/archives/40657.html 这篇博客中的图片打不开了
Loading...
![[HBLOG]公众号](https://www.liuhaihua.cn/img/qrcode_gzh.jpg)

