SSM 框架整合完整流程讲解(IDEA + Maven)

开篇日常絮叨
在前面的几篇文章中,我分别写了 Mybatis 、Spring、Spring MVC 入门相关技术的几篇文章,
而这三个框架进行整合,就是我们常说的 SSM ,还是有很多项目使用 SSM 进行开发的,今天我们要介绍的就是如何整合使用SSM
如果有需要的小伙伴,也可以去参考我前一段时间针对这几个框架 写过的一些入门类型的文章,都是适合入门朋友看的,技术含量或许不高,大佬轻喷哈
图片本身是高清的,但是由于 部分社区的 markdown 不支持 img百分比的调配大小,固定大小图片过多的时候也很麻烦,所以如果对图片不够满意的小伙伴,可以去我公众号或者博客里面看也可以
(一) 搭建基本环境
在前面分别讲解 Mybatis 、Spring、Spring MVC 的时候,都有介绍几种不同的配置方式
① 纯 XML ② 注解 + XML ③ 纯注解
我最常用的方式,还是第二个,即注解 + XML,当然这一种也是比较流行的配置方式,所以下文我们按照这种方式进行介绍
(1) 创建数据库和表
数据库和表,并不是固定的,可以自己随便创,下列创建的算是一个最简单的库和表,不过实际上不是很规范,只是为了尽可能让大家看得懂,就三个字段 编号、姓名、余额
下面给了几条数据,方便等一会测试
-- 创建数据库
CREATE DATABASE ssm;

-- 使用数据库
USE ssm;

/*==============================================================*/
/* Table: account                                                */
/*==============================================================*/
CREATE TABLE account(
    id INT PRIMARY KEY AUTO_INCREMENT,
    name VARCHAR(32),
    balance DOUBLE
);

-- ----------------------------
-- Records of account
-- ----------------------------
INSERT INTO `account` VALUES (1, '张三', 1000);
INSERT INTO `account` VALUES (2, '李四', 1000);
INSERT INTO `account` VALUES (3, '王五', 1000);
INSERT INTO `account` VALUES (4, '汤姆', 2000);
(2) 创建 Maven 工程
如果是一步一步学到这里的朋友,应该都是有接触过Maven的,不过或许仍有一些朋友没接触过,仍选择将 jar 包放在 lib 文件夹下,这种方式当然可行,不过去找对应的 jar 包实际是相对繁琐的,而且如果是对于多人的开发中,jar 包版本的不同,可能会导致其他依赖的 jar 包版本也发生变化,错误的引入可能会出现一些版本导致的兼容问题,所以使用Maven还是非常有必要的,没有接触过的朋友,我还是推荐去了解一下的
① 首先创建一个 Maven 项目
选择使用骨架 maven-archetype-webapp ,这是我们创建一个Web 比较常用的骨架
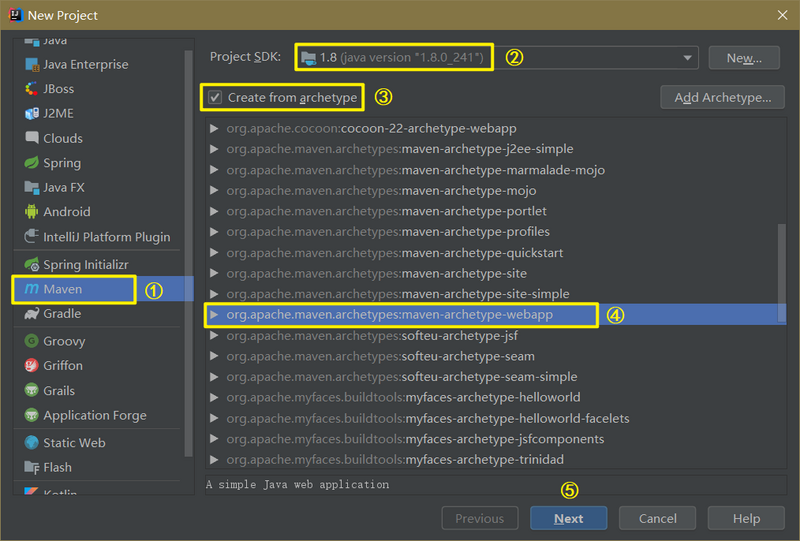
② 接着选择下一步
GroupID 是项目组织唯一的标识符,一般来说可以设置的与包结构一致,也就是 main 目录里java 的目录结构,可以设置为域名的倒序,当然这不是强制的,例如我设置为 cn.ideal
ArtifactID 就是项目的唯一的标识符,一般设置为项目的名称
正是通过这两个值,形成了一个 “坐标” ,能保证项目的唯一性

③ 继续下一步
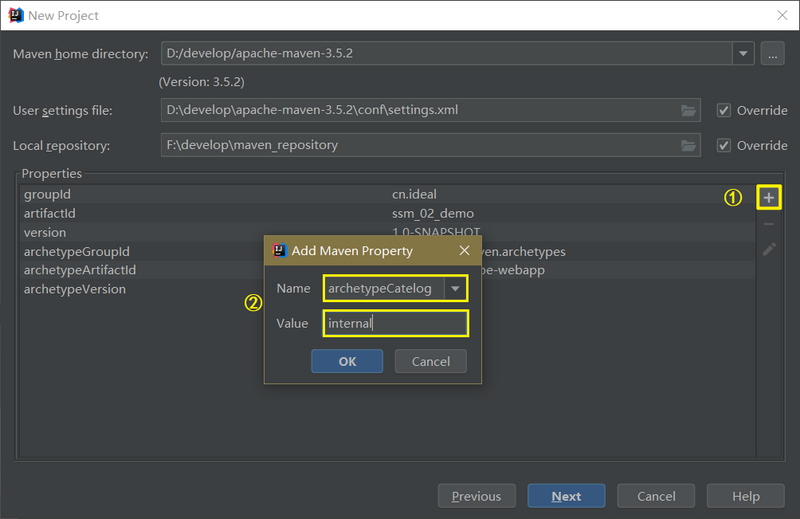
下面显示的就是 Maven 仓库的一些信息
但是,由于创建 maven archetype 的原因,在创建时,会执行 mvn archetype:generate这个命令,这样就需要指定一个 archetype-catalog.xml 文件,命令中参数 -DarchetypeCatalog 的值有三种
- remote:从Maven远程中央仓库获取 archetypeCatalog(默认的)
- internal:从 maven-archetype-plugin 内置的 archetypeCatalog 文件获取
- local:本地的 archetypeCatalog 文件
我们需要做的就是添加这样一组键值对,就可以加快创建项目的速度
- DarchetypeCatalog
- internal
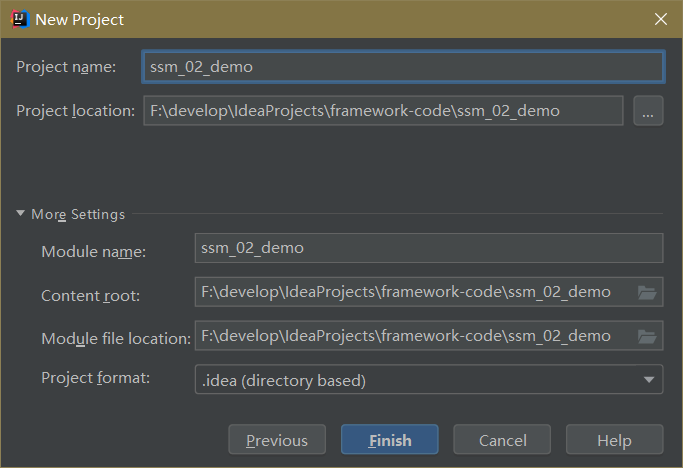
④ 继续下一步,没什么好说的直接 Finish
(3) 修改 pom.xml 引入坐标依赖
首先将版本从 1.7 --> 1.8
还可以看到我们上面给出了一些 <xxx.version>几点几</xxx.version> 的标签,这叫做版本锁定,统一将版本放在这里管理,例如以后需要更换依赖版本,就不需要一个一个去改,直接在这里修改一次就可以了
<properties>
  <project.build.sourceEncoding>UTF-8</project.build.sourceEncoding>
  <maven.compiler.source>1.8</maven.compiler.source>
  <maven.compiler.target>1.8</maven.compiler.target>
  <spring.version>5.0.2.RELEASE</spring.version>
  <slf4j.version>1.6.6</slf4j.version>
  <log4j.version>1.2.12</log4j.version>
  <mysql.version>5.1.6</mysql.version>
  <mybatis.version>3.4.5</mybatis.version>
</properties>
下面是具体的依赖,版本使用 ${xxx.version} 引用,例如 ${spring.version}
<dependencies>
  <!-- spring -->
  <!-- aop相关的技术 -->
  <dependency>
    <groupId>org.aspectj</groupId>
    <artifactId>aspectjweaver</artifactId>
    <version>1.6.8</version>
  </dependency>

  <!-- aop -->
  <dependency>
    <groupId>org.springframework</groupId>
    <artifactId>spring-aop</artifactId>
    <version>${spring.version}</version>
  </dependency>

  <!-- context容器 -->
  <dependency>
    <groupId>org.springframework</groupId>
    <artifactId>spring-context</artifactId>
    <version>${spring.version}</version>
  </dependency>

  <!-- web -->
  <dependency>
    <groupId>org.springframework</groupId>
    <artifactId>spring-web</artifactId>
    <version>${spring.version}</version>
  </dependency>

  <!-- webmvc -->
  <dependency>
    <groupId>org.springframework</groupId>
    <artifactId>spring-webmvc</artifactId>
    <version>${spring.version}</version>
  </dependency>

  <!-- spring测试 -->
  <dependency>
    <groupId>org.springframework</groupId>
    <artifactId>spring-test</artifactId>
    <version>${spring.version}</version>
  </dependency>

  <!-- 事务 -->
  <dependency>
    <groupId>org.springframework</groupId>
    <artifactId>spring-tx</artifactId>
    <version>${spring.version}</version>
  </dependency>

  <!-- jdbc模板技术 -->
  <dependency>
    <groupId>org.springframework</groupId>
    <artifactId>spring-jdbc</artifactId>
    <version>${spring.version}</version>
  </dependency>

  <!-- 单元测试 -->
  <dependency>
    <groupId>junit</groupId>
    <artifactId>junit</artifactId>
    <version>4.12</version>
    <scope>compile</scope>
  </dependency>

  <!-- mysql连接 -->
  <dependency>
    <groupId>mysql</groupId>
    <artifactId>mysql-connector-java</artifactId>
    <version>${mysql.version}</version>
  </dependency>

  <!-- servlet -->
  <dependency>
    <groupId>javax.servlet</groupId>
    <artifactId>servlet-api</artifactId>
    <version>2.5</version>
    <scope>provided</scope>
  </dependency>

  <!-- jsp -->
  <dependency>
    <groupId>javax.servlet.jsp</groupId>
    <artifactId>jsp-api</artifactId>
    <version>2.0</version>
    <scope>provided</scope>
  </dependency>

  <!-- EL JL TL表达式 -->
  <dependency>
    <groupId>jstl</groupId>
    <artifactId>jstl</artifactId>
    <version>1.2</version>
  </dependency>

  <!-- log start -->
  <dependency>
    <groupId>log4j</groupId>
    <artifactId>log4j</artifactId>
    <version>${log4j.version}</version>
  </dependency>

  <dependency>
    <groupId>org.slf4j</groupId>
    <artifactId>slf4j-api</artifactId>
    <version>${slf4j.version}</version>
  </dependency>

  <dependency>
    <groupId>org.slf4j</groupId>
    <artifactId>slf4j-log4j12</artifactId>
    <version>${slf4j.version}</version>
  </dependency>
  <!-- log end -->

  <!-- mybatis相关 -->
  <dependency>
    <groupId>org.mybatis</groupId>
    <artifactId>mybatis</artifactId>
    <version>${mybatis.version}</version>
  </dependency>

  <dependency>
    <groupId>org.mybatis</groupId>
    <artifactId>mybatis-spring</artifactId>
    <version>1.3.0</version>
  </dependency>

  <!-- druid 连接池 -->
  <dependency>
    <groupId>com.alibaba</groupId>
    <artifactId>druid</artifactId>
    <version>1.0.9</version>
  </dependency>
</dependencies>
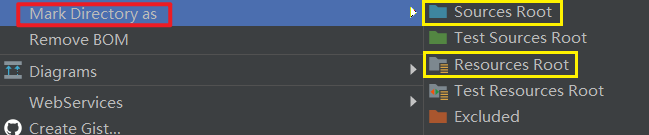
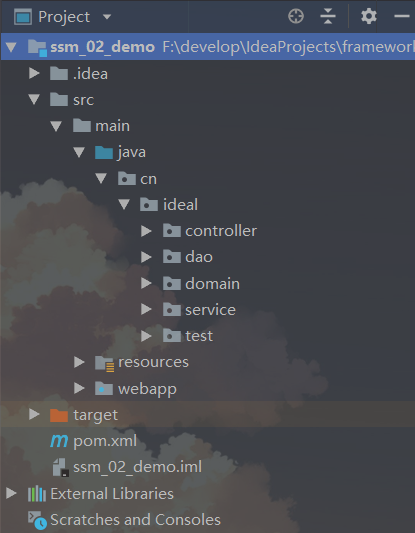
(4) 完善目录结构
使用上述方式,刚创建好的项目,目录结构是不完整的,需要进行补充,在 main 文件夹下 创建 java 和 resources 两个文件夹,然后分别对其右键,找到 Mark Directory as 分别选择 Sources Root 和 Resources Root
当然也可以继续将java文件夹下的基本包结构创建出来,当然这不是现在必须的,放在后面也可以,下面我扔一张我文中的结构图
(5) 创建一些基本的类和方法(随自己)
创建好了包结构,以及为了后面的演示,就把根据我们开篇创建的数据库和表创建出实体类,然后给出 Service 和 Dao 下的一些基本方法
Account 实体类
根据数据库中的字段创出实体
package cn.ideal.domain;

import java.io.Serializable;

public class Account implements Serializable {
    private Integer id;
    private String name;
    private Double balance;

    ......省略 get set 以及 toString 方法 自行补充即可
}
AccountService 和 AccountServiceImpl
public interface AccountService {

   /**
    * /查询所有
    * @return
    */
   List<Account> findAll();

   /**
    * 添加账户
    * @param account
    */
   void addAccount(Account account);
}
暂时只给出方法的定义和简单实现就好了,实现就加个输出语句,测试可以直观一点
public class AccountServiceImpl implements AccountService {

    public List<Account> findAll() {
        System.out.println("这是业务层——查询所有账户方法");
        return null;
    }

    public void addAccount(Account account) {
        System.out.println("这是业务层——添加账户方法");
    }
}
AccountDao
注意:这里的Dao可不需要实现类,我们今天持久层是要使用 Mybatis的技术
public interface AccountDao {
    /**
     * /查询所有
     * @return
     */
    public List<Account> findAll();

    /**
     * 添加账户
     * @param account
     */
    public void addAccount(Account account);
}
AccountController
public class AccountController {
}
到这里位置,一个基本的环境以及结构就搭建好了,下面就可以开始,编写我们三个框架的代码代码了,我们选择的方式是,逐个编写,测试无误后,然后进行整合
(二) Spring 框架代码的编写
首先我们先将 Spring 相关的基本搭建出来
(1) 创建配置文件
首先创建一个applicationContext.xml 配置文件
引入XML配置的一些约束等头部引用,为了使用 IOC ,同时开启注解扫描,我们将 Service 和 Dao 全部交给 Spring 来管理,但是 Controller 我们要使用 Spring MVC 进行管理,所以要配置扫描略过 Controller
<?xml version="1.0" encoding="UTF-8"?>
<beans xmlns="http://www.springframework.org/schema/beans"
       xmlns:xsi="http://www.w3.org/2001/XMLSchema-instance"
       xmlns:context="http://www.springframework.org/schema/context"
       xmlns:aop="http://www.springframework.org/schema/aop"
       xmlns:tx="http://www.springframework.org/schema/tx"
       xsi:schemaLocation="http://www.springframework.org/schema/beans
   http://www.springframework.org/schema/beans/spring-beans.xsd
   http://www.springframework.org/schema/context
   http://www.springframework.org/schema/context/spring-context.xsd
   http://www.springframework.org/schema/aop
   http://www.springframework.org/schema/aop/spring-aop.xsd
   http://www.springframework.org/schema/tx
   http://www.springframework.org/schema/tx/spring-tx.xsd">

    <!-- 开启注解扫描,处理service和dao,但是不需要处理 controller -->
    <context:component-scan base-package="cn.ideal">
        <!-- 配置哪些注解不扫描 -->
        <context:exclude-filter type="annotation" expression="org.springframework.stereotype.Controller"/>
    </context:component-scan>

</beans>
(2) 添加注解
在ServiceImpl 上增加业务层注解
@Service("accountService")
public class AccountServiceImpl implements AccountService {

    public List<Account> findAll() {
        System.out.println("这是业务层——查询所有账户方法");
        return null;
    }

    public void addAccount(Account account) {
        System.out.println("这是业务层——添加账户方法");
    }
}
(3) 测试
测试 Spring
还是一套老流程 test 包下简单写测试程序,这里使用的直接是 Junit ,当然还可以配合Spring的单元测试,简化一下,这在我前面Spring中的文章也提过
public class TestSpring {
    @Test
    public void testFindAll(){
        //加载配置
        ApplicationContext ac = new ClassPathXmlApplicationContext("classpath:applicationContext.xml");
        AccountService as = (AccountService) ac.getBean("accountService");
        as.findAll();
    }
}
能打印出话,代表 Spring 就基本配置成功了
(三) Spring MVC 框架代码的编写
(1) 配置 Web.xml
A:配置前端控制器
首先修改 webapp --> WEB-INF 文件下的 web.xml
在 <web-app></web-app> 中进行配置 ,配置的大致意思就是,服务器启动就加载前端控制器,然后加载 springmvc.xml 这个配置文件(现在还没有,下面就准备创建),并且设置所有请求都要经过这里
<!--配置前端控制器-->
    <servlet>
        <servlet-name>dispatcherServlet</servlet-name>
        <servlet-class>org.springframework.web.servlet.DispatcherServlet</servlet-class>
        <!--加载springmvc.xml配置文件-->
        <init-param>
            <param-name>contextConfigLocation</param-name>
            <param-value>classpath:springmvc.xml</param-value>
        </init-param>
        <!--启动服务器,创建该servlet-->
        <load-on-startup>1</load-on-startup>
    </servlet>
    <servlet-mapping>
        <servlet-name>dispatcherServlet</servlet-name>
        <url-pattern>/</url-pattern>
    </servlet-mapping>
B:配置过滤器
这个没什么好说的,就是为了统一解决中文乱码问题
<!--配置过滤器,解决中文乱码-->
<filter>
    <filter-name>characterEncodingFilter</filter-name>
    <filter-class>org.springframework.web.filter.CharacterEncodingFilter</filter-class>
    <init-param>
        <param-name>encoding</param-name>
        <param-value>UTF-8</param-value>
    </init-param>
</filter>
<filter-mapping>
    <filter-name>characterEncodingFilter</filter-name>
    <url-pattern>/*</url-pattern>
</filter-mapping>
这里有一个小 Tips ,如果写完后, <web-app></web-app> 标签报红,但是也不影响使用,问题就是在于配置的顺序问题,顺序依据下面的要求来放就可以了,例如应该把过滤器放到前端控制器前面去
"(icon?,display-name?,description?,distributable?,context-param ,filter ,filter-mapping ,listener ,servlet ,servlet-mapping ,session-config?,mime-mapping ,welcome-file-list?,error-page ,taglib ,resource-env-ref ,resource-ref ,security-constraint ,login-config?,security-role ,env-entry ,ejb-ref ,ejb-local-ref )"
(2) 创建 springmvc.xml 文件
这里算是 Spring MVC 一个核心的配置了,开启扫描,注解,还有解析视图的,以及防止 css js 等静态文件被过滤的(报红意味着你没创建这几个文件夹,创出来就好了),当然有些(例如不过滤静态资源)可能你测试的时候也用不到,但是最好先配上吧,省着后面麻烦
注:视图解析器路径需要根据自己的来写,例如我在WEB-INF 下创建了名为了pages的文件夹 /WEB-INF/pages/
<?xml version="1.0" encoding="UTF-8"?>
<beans xmlns="http://www.springframework.org/schema/beans"
       xmlns:mvc="http://www.springframework.org/schema/mvc"
       xmlns:context="http://www.springframework.org/schema/context"
       xmlns:xsi="http://www.w3.org/2001/XMLSchema-instance"
       xsi:schemaLocation="
        http://www.springframework.org/schema/beans
        http://www.springframework.org/schema/beans/spring-beans.xsd
        http://www.springframework.org/schema/mvc
        http://www.springframework.org/schema/mvc/spring-mvc.xsd
        http://www.springframework.org/schema/context
        http://www.springframework.org/schema/context/spring-context.xsd">

    <!--开启只对controller的扫描-->
    <context:component-scan base-package="cn.ideal">
        <context:include-filter type="annotation" expression="org.springframework.stereotype.Controller"/>
    </context:component-scan>

    <!--配置视图解析器-->
    <bean id="org" class="org.springframework.web.servlet.view.InternalResourceViewResolver">
        <!--JSP 目录-->
        <property name="prefix" value="/WEB-INF/pages/"/>
        <!--文件后缀-->
        <property name="suffix" value=".jsp"/>
    </bean>

    <!--不过滤静态资源-->
    <mvc:resources mapping="/css/**" location="/css/"/>
    <mvc:resources mapping="/images/**" location="/images/"/>
    <mvc:resources mapping="/js/**" location="/js/"/>

    <!--开启注解支持-->
    <mvc:annotation-driven/>
</beans>
(3) 执行测试
A:创建控制层
给出一个基本的测试方法,打印语句,同时通过视图解析器,跳转到 list_account 页面
@Controller
@RequestMapping("/account")
public class AccountController {

    @RequestMapping("/findAll")
    public String findAll(){
        System.out.println("这是控制层——查询所有账户的方法");
        return "list_account";
    }
}
B:编写页面
① 在 webapp 文件夹下创建 index.jsp页面
注:默认是有一个index.jsp的但是不太完整,最好删掉重新创建一个标准的jsp,不然会有乱码等一些问题
<%@ page contentType="text/html;charset=UTF-8" language="java" %>
<html>
<head>
    <title>主页</title>
</head>
<body>
<h2>主页</h2>
<a href="account/findAll">查询所有</a>
</body>
</html>
② 在 webapp --> WEB-INF 下创建文件夹 名为 pages的文件夹,然后创建 list_account.jsp
<%@ page contentType="text/html;charset=UTF-8" language="java" isELIgnored="false" %>
<html>
<head>
    <title>查询所有</title>
</head>
<body>
<h3>恭喜跳转成功,这是查询所有账户页面</h3>
</body>
</html>
当在浏览器中访问 http://localhost:8080/ssm (ssm是部署tomcat配的) 通过链接可以跳转的时候,就代表Spring MVC 环境基本搭建成功了
(四) Spring 整合 Spring MVC
从现在的测试来看,通过Spring已经可以访问调用Service,Controller 相关的配置也已经通过Spring MVC做好了,这一部分,就将已有的两部分整合,也就是通过 Controller 去访问调用 Service中的方法
(1) 配置监听器和文件路径
通过对 Spring MVC 的代码编写,我们知道,在服务器启动的时候就回去加载 springmvc.xml 这个配置,现在我们就需要继续在 web.xml 中配置,使得在项目启动的时候,就去加载applicationContext.xml的配置文件
所以我们可以在 web.xml 中,配置spring核心监听器,它默认会以 /WEB-INF/applicationContext.xml作为配置文件
<!--配置 Spring 的监听器-->
<listener>
    <listener-class>org.springframework.web.context.ContextLoaderListener</listener-class>
</listener>

<!--设置配置文件路径-->
<context-param>
    <param-name>contextConfigLocation</param-name>
    <param-value>classpath:applicationContext.xml</param-value>
</context-param>
注:web-app 标签报红的话还是要注意顺序问题,上面有说
(2) 控制层调用业务层方法
@Controller
@RequestMapping("/account")
public class AccountController {

    @Autowired
    private AccountService accountService;

    @RequestMapping("/findAll")
    public String findAll(Model model){
        System.out.println("控制层:查询所有账户");
        accountService.findAll();
        return "list_account";
    }
}
如果访问后,可以跳转成功,同时控制台打印出两句话,一句控制层的输出语句,一句业务层的输出语句,这两部分就算整合成功了
(五) MyBatis 框架代码编写
(1) 创建 SqlMapConfig.xml
创建 SqlMapConfig.xml 配置文件,也就是MyBatis 的主配置文件(当然整合后就不需要了)
这些都是基本的,和原来是没什么区别的,我们这里选择的是注解的配置sql,当然你也可以选择 xml 配置 sql
<?xml version="1.0" encoding="UTF-8"?>
<!DOCTYPE configuration
        PUBLIC "-//mybatis.org//DTD Config 3.0//EN"
        "http://mybatis.org/dtd/mybatis-3-config.dtd">

<configuration>
    <environments default="mysql">
        <environment id="mysql">
            <transactionManager type="JDBC"></transactionManager>
            <dataSource type="POOLED">
                <property name="driver" value="com.mysql.jdbc.Driver"/>
                <property name="url" value="jdbc:mysql:///ssm"/>
                <property name="username" value="root"/>
                <property name="password" value="root99"/>
            </dataSource>
        </environment>
    </environments>

    <!--使用注解-->
    <mappers>
        <package name="cn.ideal"/>
    </mappers>
</configuration>
(2) Dao 层代码编写
这里将sql通过注解配置,因为比较演示简单,这里除了查询所有,又增加了一个添加的方法,这里自己看着写就好了,写什么功能测试都是可以的
@Repository
public interface AccountDao {

    /**
     * /查询所有
     * @return
     */
    @Select("SELECT * FROM account")
    public List<Account> findAll();

    /**
     * 添加账户
     * @param account
     */
    @Select("INSERT INTO account (name,balance) VALUES (#{name},#{balance})")
    public void addAccount(Account account);
}
(3) 测试 MyBatis
public class TestMybatis {

    private InputStream inputStream;
    private SqlSession sqlSession;
    private AccountDao accountDao;

    /*
        单独测试Mybatis时所用,整合后 SqlMapConfig.xml文件就不再使用了
        配置到 applicationContext.xml
     */

    @Before
    public void init() throws Exception{
        //加载配置文件
        inputStream = Resources.getResourceAsStream("SqlMapConfig.xml");
        // 创建 SqlSessionFactory 对象
        SqlSessionFactory factory = new SqlSessionFactoryBuilder().build(inputStream);
        //创建 SqlSession 对象
        sqlSession = factory.openSession();
        accountDao = sqlSession.getMapper(AccountDao.class);
    }

    @After
    public void destroy() throws Exception {
        //提交事务
        sqlSession.commit();
        sqlSession.close();
        inputStream.close();
    }


    @Test
    public void TestFindAll(){
        List<Account> accounts = accountDao.findAll();
        for (Account account : accounts){
            System.out.println("----------------------");
            System.out.println(account);
        }
    }

    @Test
    public void TestAddAccount(){
        Account account = new Account();
        account.setName("测试");
        account.setBalance(800d);

        accountDao.addAccount(account);


    }
}
(六) Spring 整合 MyBatis
(1) 修改 applicationContext.xml
这一步就是将 SqlMapConfig.xml 配置文件中的内容配置到 applicationContext.xml 配置文件中去,MyBatis 就不再独立了,被整合到了 Spring中去
有一点区别就是,我们在 resources 文件夹下创建了 config 的文件夹,然后创建了druid.properties文件吗,也就是将数据库例如用户名密码配置到了 properties 中,后期维护等就更加方便了,当然使用前需要像下面一样开始扫描 properties文件
<!--扫描Resources中的相关properties文件-->
<context:property-placeholder location="classpath:config/*.properties" ignore-unresolvable="true"/>

<!--Spring 整合 MyBatis-->
<!--配置数据库连接池-->
<bean id="dataSource" class="com.alibaba.druid.pool.DruidDataSource">
    <!-- 数据库基本信息配置 -->
    <property name="url" value="${druid.jdbc.url}" />
    <property name="username" value="${druid.jdbc.username}" />
    <property name="password" value="${druid.jdbc.password}" />
    <property name="driverClassName" value="${druid.jdbc.driver}" />
</bean>

<!--配置SqlSessionFactory工厂-->
<bean id="sqlSessionFactory" class="org.mybatis.spring.SqlSessionFactoryBean">
    <property name="dataSource" ref="dataSource"/>
</bean>

<!--配置AccountDao接口所在包-->
<bean id="mapperScanner" class="org.mybatis.spring.mapper.MapperScannerConfigurer">
    <property name="basePackage" value="cn.ideal.dao"/>
</bean>
druid.properties
druid.jdbc.url=jdbc:mysql://localhost:3306/ssm
druid.jdbc.driver=com.mysql.jdbc.Driver
druid.jdbc.username=root
druid.jdbc.password=root99
(2) 执行测试
① 测试之前
需要确认一下,AccountDao 中是否已经添加了 @Repository 注解,前面我已经加上了,如果没有,现在加上就可以了
② 接着在Service 中注入 Dao
@Service("accountService")
public class AccountServiceImpl implements AccountService {

    @Autowired
    private AccountDao accountDao;

    public List<Account> findAll() {
        System.out.println("这是业务层——查询所有账户方法");
        return accountDao.findAll();
    }

    public void addAccount(Account account) {

        System.out.println("这是业务层——添加账户方法");
        accountDao.addAccount(account);
    }
}
③ 控制层测试
在控制层中,去调用业务层,然后执行到 Dao 中的 sql,你要嫌麻烦,就只测试查询所有也成
查询所有中,添加了 Model 参数,然后把查询到的 list 写入
@Controller
@RequestMapping("/account")
public class AccountController {

    @Autowired
    private AccountService accountService;

    @RequestMapping("/findAll")
    public String findAll(Model model){
        System.out.println("这是控制层——查询所有账户的方法");
        List<Account> list = accountService.findAll();
        model.addAttribute("accounts",list);
        return "list_account";
    }

    @RequestMapping("/add")
    public void add(Account account, HttpServletRequest request, HttpServletResponse response) throws IOException {
        accountService.addAccount(account);
        response.sendRedirect(request.getContextPath()+"/account/findAll");
        return;
    }
}
④ 页面编写
为了测试增加方法,再加一个表单用来输入信息
index.jsp
<%@ page contentType="text/html;charset=UTF-8" language="java" %>
<html>
<head>
    <title>Title</title>
</head>
<body>
<h2>主页</h2>
<a href="account/findAll">查询所有</a>

<form action="account/add" method="post">
    姓名:<input type="text" name="name" /><br/>
    余额:<input type="text" name="balance" /><br/>
    <input type="submit" value="添加"/><br/>
</form>
</body>
</html>
list_account.jsp
这里随便写一个遍历,把数据库中的姓名信息都查出来
<%@ taglib prefix="c" uri="http://java.sun.com/jsp/jstl/core" %>
<%@ page contentType="text/html;charset=UTF-8" language="java" isELIgnored="false" %>
<html>
<head>
    <title>Title</title>
</head>
<body>
<h3>查询所有账户</h3>

<c:forEach items="${accounts}" var="account">
    ${account.name}
</c:forEach>

</body>
</html>
(3) 添加事务管理
在applicationContext.xm中添加事务的相关配置,这些在以前Spring AOP文章都有详细讲解过,事务也就交给 Spring 管理了
<!--配置Spring框架声明式事务管理-->
<!--配置事务管理器-->
<bean id="transactionManager" class="org.springframework.jdbc.datasource.DataSourceTransactionManager">
    <property name="dataSource" ref="dataSource" />
</bean>

<!--配置事务通知-->
<tx:advice id="txAdvice" transaction-manager="transactionManager">
    <tx:attributes>
        <tx:method name="find*" read-only="true"/>
        <tx:method name="*" isolation="DEFAULT"/>
    </tx:attributes>
</tx:advice>

<!--配置AOP增强-->
<aop:config>
    <aop:advisor advice-ref="txAdvice" pointcut="execution(* cn.ideal.service.impl.*ServiceImpl.*(..))"/>
</aop:config>
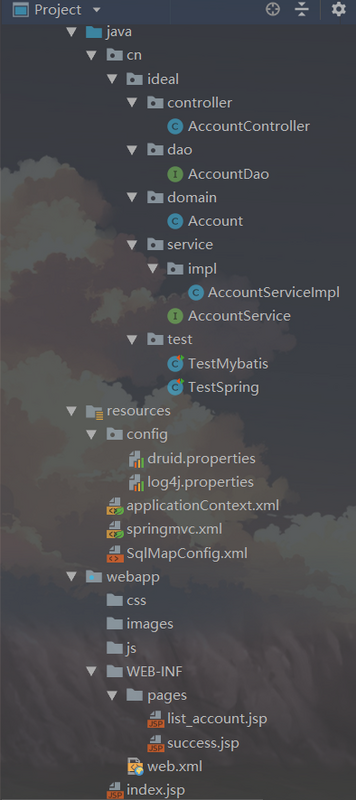
最后给大家附一张,结构图,如果有需要的朋友可以参考一下哈
(七) 总结
到这里 Mybatis 、Spring、Spring MVC 这三个框架的整合也就完成了,只要对这三个框架的使用和配置都有了解和学习,整合起来实际上是没有什么技术上的难度的,只是综合到一起,可能会感觉有一点繁琐复杂,多加练习就可以了,对大家能有一些帮助,本身不是很复杂,源码也没往上传,如果有需要的朋友可以在下面留言,我后期传上去
感谢大家的支持!!! 谢谢大家!!!
(八) 结尾
如果文章中有什么不足,欢迎大家留言交流,感谢朋友们的支持!
如果能帮到你的话,那就来关注我吧!如果您更喜欢微信文章的阅读方式,可以关注我的公众号
一个坚持推送原创开发技术文章的公众号:理想二旬不止

正文到此结束
- 本文标签: schema session map ACE web tag 代码 Select bean maven dependencies 图片 find src 单元测试 IDE App 监听器 classpath list SqlSessionFactoryBuilder ip dataSource 乱码 sql Word java druid API DOM Service db 参数 plugin tar lib zab 数据 CTO 微信文章 测试 value ORM tomcat 总结 id cat 博客 spring stream 管理 遍历 Action remote mybatis sqlsession dist JDBC UI 域名 文章 服务器 key 业务层 servlet 锁 AOP 数据库 http 目录 junit NSA 解析 Property tab SpringMVC mapper js build 连接池 配置 朋友们 root 部署 时间 XML ioc pom 开发 IO description core mysql Markdown CSS HTML Security 源码 组织 SqlSessionFactory https
- 版权声明: 本文为互联网转载文章,出处已在文章中说明(部分除外)。如果侵权,请联系本站长删除,谢谢。
- 本文海报: 生成海报一 生成海报二
热门推荐


相关文章

近期评论
-
ws0132613@gmail.comhttps://getmacos.com/gopanel/william smith
-
谢谢
-
https://www.newcmy.com/register?aff=HBVX建议您试试草莓云机场,可以流畅观看youtube和tiktok,上reddit/x也没有问题,还有各种ai优化节点。
-
-
-
想购买您这个站,我的联系方式QQ741756694微信同步 能卖联系
-
-
-
-
Loading...
![[HBLOG]公众号](https://www.liuhaihua.cn/img/qrcode_gzh.jpg)

