干掉 try catch !
作者:巨人大哥
链接:cnblogs.com/jurendage/p/11255197.html
背景
软件开发过程中,不可避免的是需要处理各种异常,就我自己来说,至少有一半以上的时间都是在处理各种异常情况,所以代码中就会出现大量的
try {...} catch {...} finally {...}
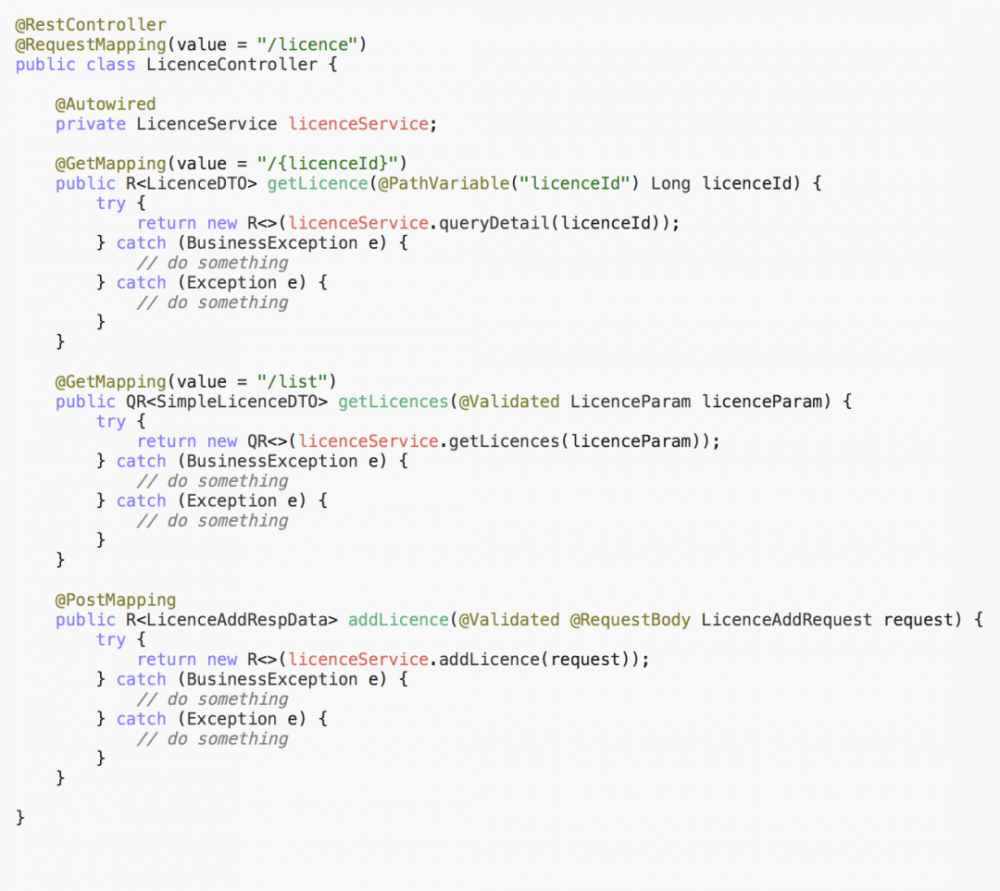
代码块,不仅有大量的冗余代码,而且还影响代码的可读性。比较下面两张图,看看您现在编写的代码属于哪一种风格?然后哪种编码风格您更喜欢?
丑陋的 try catch 代码块
 优雅的Controller
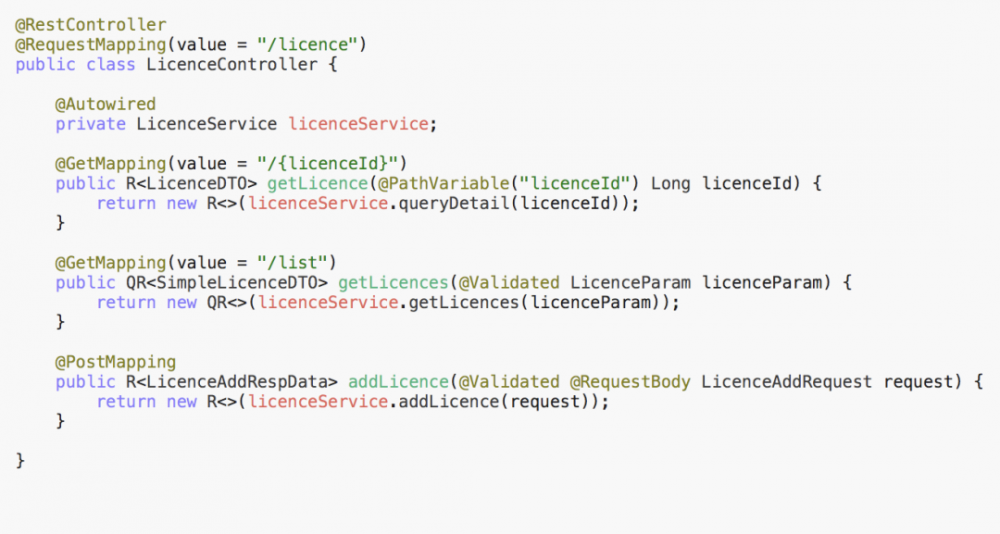 上面的示例,还只是在
Controller
层,如果是在
Service
层,可能会有更多的
try catch
代码块。这将会严重影响代码的可读性、“美观性”。
所以如果是我的话,我肯定偏向于第二种,我可以把更多的精力放在业务代码的开发,同时代码也会变得更加简洁。
既然业务代码不显式地对异常进行捕获、处理,而异常肯定还是处理的,不然系统岂不是动不动就崩溃了,所以必须得有其他地方捕获并处理这些异常。公众号(Java后端)还发布过很多编程技巧文章,关注「 Java后端 」回复 666 下载。
那么问题来了,如何优雅的处理各种异常?
什么是统一异常处理
Spring
在3.2版本增加了一个注解
@ControllerAdvice
,可以与
@ExceptionHandler
、
@InitBinder
、
@ModelAttribute
等注解注解配套使用,对于这几个注解的作用,这里不做过多赘述,若有不了解的,可以参考Spring3.2新注解@ControllerAdvice,先大概有个了解。
不过跟异常处理相关的只有注解
@ExceptionHandler
,从字面上看,就是 异常处理器
的意思,其实际作用也是:若在某个
Controller
类定义一个异常处理方法,并在方法上添加该注解,那么当出现指定的异常时,会执行该处理异常的方法,其可以使用springmvc提供的数据绑定,比如注入HttpServletRequest等,还可以接受一个当前抛出的Throwable对象。
但是,这样一来,就必须在每一个
Controller
类都定义一套这样的异常处理方法,因为异常可以是各种各样。这样一来,就会造成大量的冗余代码,而且若需要新增一种异常的处理逻辑,就必须修改所有
Controller
类了,很不优雅。
当然你可能会说,那就定义个类似
BaseController
的基类,这样总行了吧。
这种做法虽然没错,但仍不尽善尽美,因为这样的代码有一定的侵入性和耦合性。简简单单的
Controller
,我为啥非得继承这样一个类呢,万一已经继承其他基类了呢。大家都知道
Java
只能继承一个类。
那有没有一种方案,既不需要跟
Controller
耦合,也可以将定义的 异常处理器
应用到所有控制器呢?所以注解
@ControllerAdvice
出现了,简单的说,该注解可以把异常处理器应用到所有控制器,而不是单个控制器。借助该注解,我们可以实现:在独立的某个地方,比如单独一个类,定义一套对各种异常的处理机制,然后在类的签名加上注解
@ControllerAdvice
,统一对
不同阶段的
、
不同异常
进行处理。这就是统一异常处理的原理。
注意到上面对异常按阶段进行分类,大体可以分成:进入
Controller
前的异常 和
Service
层异常,具体可以参考下图:
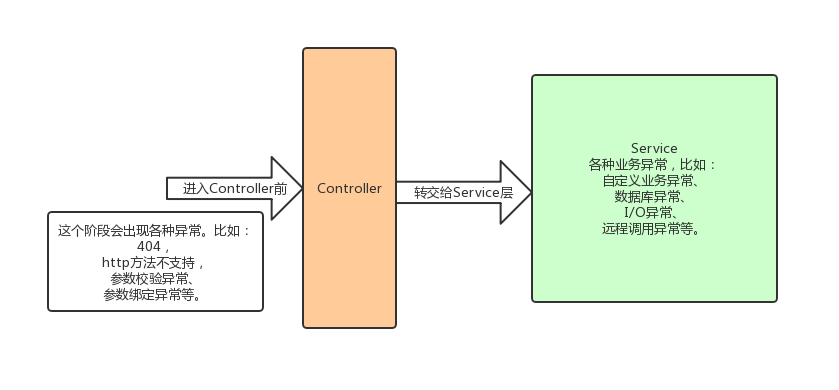
不同阶段的异常
目标
消灭95%以上的
try catch
代码块,以优雅的
Assert
(断言) 方式来校验业务的异常情况,只关注业务逻辑,而不用花费大量精力写冗余的
try catch
代码块。
统一异常处理实战
在定义统一异常处理类之前,先来介绍一下如何优雅的判定异常情况并抛异常。
用 Assert(断言) 替换 throw exception
想必
Assert(断言)
大家都很熟悉,比如
Spring
家族的
org.springframework.util.Assert
,在我们写测试用例的时候经常会用到,使用断言能让我们编码的时候有一种非一般丝滑的感觉,比如:
@Test
    public void test1() {
        ...
        User user = userDao.selectById(userId);
        Assert.notNull(user, "用户不存在.");
        ...
    }

    @Test
    public void test2() {
        // 另一种写法
        User user = userDao.selectById(userId);
        if (user == null) {
            throw new IllegalArgumentException("用户不存在.");
        }
    }
if {...}
代码块。那么
神奇的
Assert.notNull()
背后到底做了什么呢?下面是
Assert
的部分源码:
public abstract class Assert {
    public Assert() {
    }

    public static void notNull(@Nullable Object object, String message) {
        if (object == null) {
            throw new IllegalArgumentException(message);
        }
    }
}
可以看到,
Assert
其实就是帮我们把
if {...}
封装了一下,是不是很神奇。虽然很简单,但不可否认的是编码体验至少提升了一个档次。那么我们能不能模仿
org.springframework.util.Assert
,也写一个断言类,不过断言失败后抛出的异常不是
IllegalArgumentException
这些内置异常,而是我们自己定义的异常。下面让我们来尝试一下。
Assert
public interface Assert {
    /**
     * 创建异常
     * @param args
     * @return
     */
    BaseException newException(Object... args);

    /**
     * 创建异常
     * @param t
     * @param args
     * @return
     */
    BaseException newException(Throwable t, Object... args);

    /**
     * <p>断言对象<code>obj</code>非空。如果对象<code>obj</code>为空,则抛出异常
     *
     * @param obj 待判断对象
     */
    default void assertNotNull(Object obj) {
        if (obj == null) {
            throw newException(obj);
        }
    }

    /**
     * <p>断言对象<code>obj</code>非空。如果对象<code>obj</code>为空,则抛出异常
     * <p>异常信息<code>message</code>支持传递参数方式,避免在判断之前进行字符串拼接操作
     *
     * @param obj 待判断对象
     * @param args message占位符对应的参数列表
     */
    default void assertNotNull(Object obj, Object... args) {
        if (obj == null) {
            throw newException(args);
        }
    }
}
上面的
Assert
断言方法是使用接口的默认方法定义的,然后有没有发现当断言失败后,抛出的异常不是具体的某个异常,而是交由2个
newException
接口方法提供。因为业务逻辑中出现的异常基本都是对应特定的场景,比如根据用户id获取用户信息,查询结果为
null
,此时抛出的异常可能为
UserNotFoundException
,并且有特定的异常码(比如7001)和异常信息“用户不存在”。所以具体抛出什么异常,有
Assert
的实现类决定。(此处推荐一下前日的文章 去掉烦人的 !=null)
看到这里,您可能会有这样的疑问,按照上面的说法,那岂不是有多少异常情况,就得有定义等量的断言类和异常类,这显然是反人类的,这也没想象中高明嘛。别急,且听我细细道来。
善解人意的Enum
自定义异常
BaseException
有2个属性,即
code
、
message
,这样一对属性,有没有想到什么类一般也会定义这2个属性?没错,就是枚举类。且看我如何将
Enum
和
Assert
结合起来,相信我一定会让你眼前一亮。如下:
public interface IResponseEnum {
    int getCode();
    String getMessage();
}
/**
 * <p>业务异常</p>
 * <p>业务处理时,出现异常,可以抛出该异常</p>
 */
public class BusinessException extends  BaseException {

    private static final long serialVersionUID = 1L;

    public BusinessException(IResponseEnum responseEnum, Object[] args, String message) {
        super(responseEnum, args, message);
    }

    public BusinessException(IResponseEnum responseEnum, Object[] args, String message, Throwable cause) {
        super(responseEnum, args, message, cause);
    }
}
public interface BusinessExceptionAssert extends IResponseEnum, Assert {

    @Override
    default BaseException newException(Object... args) {
        String msg = MessageFormat.format(this.getMessage(), args);

        return new BusinessException(this, args, msg);
    }

    @Override
    default BaseException newException(Throwable t, Object... args) {
        String msg = MessageFormat.format(this.getMessage(), args);

        return new BusinessException(this, args, msg, t);
    }

}
@Getter
@AllArgsConstructor
public enum ResponseEnum implements BusinessExceptionAssert {

    /**
     * Bad licence type
     */
    BAD_LICENCE_TYPE(7001, "Bad licence type."),
    /**
     * Licence not found
     */
    LICENCE_NOT_FOUND(7002, "Licence not found.")
    ;

    /**
     * 返回码
     */
    private int code;
    /**
     * 返回消息
     */
    private String message;
}
看到这里,有没有眼前一亮的感觉,代码示例中定义了两个枚举实例:
BAD_LICENCE_TYPE
、
LICENCE_NOT_FOUND
,分别对应了
BadLicenceTypeException
、
LicenceNotFoundException
两种异常。以后每增加一种异常情况,只需增加一个枚举实例即可,再也不用每一种异常都定义一个异常类了。然后再来看下如何使用,假设
LicenceService
有校验
Licence
是否存在的方法,如下:
/**
     * 校验{@link Licence}存在
     * @param licence
     */
    private void checkNotNull(Licence licence) {
        ResponseEnum.LICENCE_NOT_FOUND.assertNotNull(licence);
    }
若不使用断言,代码可能如下:
private void checkNotNull(Licence licence) {
        if (licence == null) {
            throw new LicenceNotFoundException();
            // 或者这样
            throw new BusinessException(7001, "Bad licence type.");
        }
    }
使用枚举类结合(继承)
Assert
,只需根据特定的异常情况定义不同的枚举实例,如上面的
BAD_LICENCE_TYPE
、
LICENCE_NOT_FOUND
,就能够针对不同情况抛出特定的异常(这里指携带特定的异常码和异常消息),这样既不用定义大量的异常类,同时还具备了断言的良好可读性,当然这种方案的好处远不止这些,请继续阅读后文,慢慢体会。
注:上面举的例子是针对特定的业务,而有部分异常情况是通用的,比如:服务器繁忙、网络异常、服务器异常、参数校验异常、404等,所以有
CommonResponseEnum
、
ArgumentResponseEnum
、
ServletResponseEnum
,其中
ServletResponseEnum
会在后文详细说明。
定义统一异常处理器类
@Slf4j
@Component
@ControllerAdvice
@ConditionalOnWebApplication
@ConditionalOnMissingBean(UnifiedExceptionHandler.class)
public class UnifiedExceptionHandler {
    /**
     * 生产环境
     */
    private final static String ENV_PROD = "prod";

    @Autowired
    private UnifiedMessageSource unifiedMessageSource;

    /**
     * 当前环境
     */
    @Value("${spring.profiles.active}")
    private String profile;

    /**
     * 获取国际化消息
     *
     * @param e 异常
     * @return
     */
    public String getMessage(BaseException e) {
        String code = "response." + e.getResponseEnum().toString();
        String message = unifiedMessageSource.getMessage(code, e.getArgs());

        if (message == null || message.isEmpty()) {
            return e.getMessage();
        }

        return message;
    }

    /**
     * 业务异常
     *
     * @param e 异常
     * @return 异常结果
     */
    @ExceptionHandler(value = BusinessException.class)
    @ResponseBody
    public ErrorResponse handleBusinessException(BaseException e) {
        log.error(e.getMessage(), e);

        return new ErrorResponse(e.getResponseEnum().getCode(), getMessage(e));
    }

    /**
     * 自定义异常
     *
     * @param e 异常
     * @return 异常结果
     */
    @ExceptionHandler(value = BaseException.class)
    @ResponseBody
    public ErrorResponse handleBaseException(BaseException e) {
        log.error(e.getMessage(), e);

        return new ErrorResponse(e.getResponseEnum().getCode(), getMessage(e));
    }

    /**
     * Controller上一层相关异常
     *
     * @param e 异常
     * @return 异常结果
     */
    @ExceptionHandler({
            NoHandlerFoundException.class,
            HttpRequestMethodNotSupportedException.class,
            HttpMediaTypeNotSupportedException.class,
            MissingPathVariableException.class,
            MissingServletRequestParameterException.class,
            TypeMismatchException.class,
            HttpMessageNotReadableException.class,
            HttpMessageNotWritableException.class,
            // BindException.class,
            // MethodArgumentNotValidException.class
            HttpMediaTypeNotAcceptableException.class,
            ServletRequestBindingException.class,
            ConversionNotSupportedException.class,
            MissingServletRequestPartException.class,
            AsyncRequestTimeoutException.class
    })
    @ResponseBody
    public ErrorResponse handleServletException(Exception e) {
        log.error(e.getMessage(), e);
        int code = CommonResponseEnum.SERVER_ERROR.getCode();
        try {
            ServletResponseEnum servletExceptionEnum = ServletResponseEnum.valueOf(e.getClass().getSimpleName());
            code = servletExceptionEnum.getCode();
        } catch (IllegalArgumentException e1) {
            log.error("class [{}] not defined in enum {}", e.getClass().getName(), ServletResponseEnum.class.getName());
        }

        if (ENV_PROD.equals(profile)) {
            // 当为生产环境, 不适合把具体的异常信息展示给用户, 比如404.
            code = CommonResponseEnum.SERVER_ERROR.getCode();
            BaseException baseException = new BaseException(CommonResponseEnum.SERVER_ERROR);
            String message = getMessage(baseException);
            return new ErrorResponse(code, message);
        }

        return new ErrorResponse(code, e.getMessage());
    }


    /**
     * 参数绑定异常
     *
     * @param e 异常
     * @return 异常结果
     */
    @ExceptionHandler(value = BindException.class)
    @ResponseBody
    public ErrorResponse handleBindException(BindException e) {
        log.error("参数绑定校验异常", e);

        return wrapperBindingResult(e.getBindingResult());
    }

    /**
     * 参数校验异常,将校验失败的所有异常组合成一条错误信息
     *
     * @param e 异常
     * @return 异常结果
     */
    @ExceptionHandler(value = MethodArgumentNotValidException.class)
    @ResponseBody
    public ErrorResponse handleValidException(MethodArgumentNotValidException e) {
        log.error("参数绑定校验异常", e);

        return wrapperBindingResult(e.getBindingResult());
    }

    /**
     * 包装绑定异常结果
     *
     * @param bindingResult 绑定结果
     * @return 异常结果
     */
    private ErrorResponse wrapperBindingResult(BindingResult bindingResult) {
        StringBuilder msg = new StringBuilder();

        for (ObjectError error : bindingResult.getAllErrors()) {
            msg.append(", ");
            if (error instanceof FieldError) {
                msg.append(((FieldError) error).getField()).append(": ");
            }
            msg.append(error.getDefaultMessage() == null ? "" : error.getDefaultMessage());

        }

        return new ErrorResponse(ArgumentResponseEnum.VALID_ERROR.getCode(), msg.substring(2));
    }

    /**
     * 未定义异常
     *
     * @param e 异常
     * @return 异常结果
     */
    @ExceptionHandler(value = Exception.class)
    @ResponseBody
    public ErrorResponse handleException(Exception e) {
        log.error(e.getMessage(), e);

        if (ENV_PROD.equals(profile)) {
            // 当为生产环境, 不适合把具体的异常信息展示给用户, 比如数据库异常信息.
            int code = CommonResponseEnum.SERVER_ERROR.getCode();
            BaseException baseException = new BaseException(CommonResponseEnum.SERVER_ERROR);
            String message = getMessage(baseException);
            return new ErrorResponse(code, message);
        }

        return new ErrorResponse(CommonResponseEnum.SERVER_ERROR.getCode(), e.getMessage());
    }

}
可以看到,上面将异常分成几类,实际上只有两大类,一类是
ServletException
、
ServiceException
,还记得上文提到的 按阶段分类
吗,即对应 进入
Controller
前的异常 和
Service
层异常;然后
ServiceException
再分成自定义异常、未知异常。对应关系如下:
-
进入
Controller前的异常: handleServletException、handleBindException、handleValidException -
自定义异常: handleBusinessException、handleBaseException
-
未知异常: handleException
接下来分别对这几种异常处理器做详细说明。
异常处理器说明
handleServletException
一个
http
请求,在到达
Controller
前,会对该请求的请求信息与目标控制器信息做一系列校验。这里简单说一下:
NoHandlerFoundException:首先根据请求
Url
查找有没有对应的控制器,若没有则会抛该异常,也就是大家非常熟悉的
404
异常;
HttpRequestMethodNotSupportedException:若匹配到了(匹配结果是一个列表,不同的是
http
方法不同,如:Get、Post等),则尝试将请求的
http
方法与列表的控制器做匹配,若没有对应
http
方法的控制器,则抛该异常;
HttpMediaTypeNotSupportedException:然后再对请求头与控制器支持的做比较,比如
content-type
请求头,若控制器的参数签名包含注解
@RequestBody
,但是请求的
content-type
请求头的值没有包含
application/json
,那么会抛该异常(当然,不止这种情况会抛这个异常);
MissingPathVariableException:未检测到路径参数。比如url为:
/licence/{licenceId}
,参数签名包含
@PathVariable("licenceId")
,当请求的url为
/licence
,在没有明确定义url为
/licence
的情况下,会被判定为:缺少路径参数;
MissingServletRequestParameterException: 缺少请求参数。 比如定义了参数@RequestParam("licenceId") String licenceId,但发起请求时,未携带该参数,则会抛该异常;
TypeMismatchException: 参数类型匹配失败。 比如: 接收参数为Long型,但传入的值确是一个字符串,那么将会出现类型转换失败的情况,这时会抛该异常;
HttpMessageNotReadableException:与上面的
HttpMediaTypeNotSupportedException
举的例子完全相反,即请求头携带了
"content-type: application/json;charset=UTF-8"
,但接收参数却没有添加注解
@RequestBody
,或者请求体携带的 json 串反序列化成 pojo 的过程中失败了,也会抛该异常;
HttpMessageNotWritableException: 返回的 pojo 在序列化成 json 过程失败了,那么抛该异常;
handleBindException
参数校验异常,后文详细说明。
handleValidException
参数校验异常,后文详细说明。
handleBusinessException、handleBaseException
处理自定义的业务异常,只是
handleBaseException
处理的是除了
BusinessException
意外的所有业务异常。就目前来看,这2个是可以合并成一个的。
handleException
处理所有未知的异常,比如操作数据库失败的异常。
handleServletException
、
handleException
这两个处理器,返回的异常信息,不同环境返回的可能不一样,以为这些异常信息都是框架自带的异常信息,一般都是英文的,不太好直接展示给用户看,所以统一返回
SERVER_ERROR
代表的异常信息。
异于常人的404
上文提到,当请求没有匹配到控制器的情况下,会抛出
NoHandlerFoundException
异常,但其实默认情况下不是这样,默认情况下会出现类似如下页面:

Whitelabel Error Page
这个页面是如何出现的呢?实际上,当出现404的时候,默认是不抛异常的,而是
forward
跳转到
/error
控制器,
spring
也提供了默认的
error
控制器,如下:
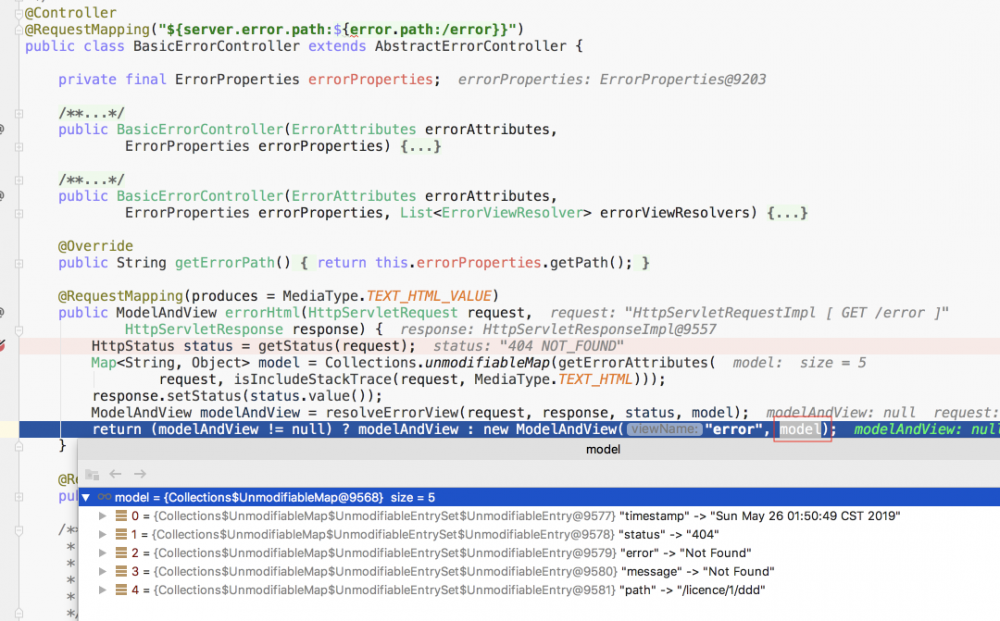
那么,如何让404也抛出异常呢,只需在
properties
文件中加入如下配置即可:
spring.mvc.throw-exception-if-no-handler-found=true
spring.resources.add-mappings=false
如此,就可以异常处理器中捕获它了,然后前端只要捕获到特定的状态码,立即跳转到404页面即可
捕获404对应的异常
统一返回结果
在验证统一异常处理器之前,顺便说一下统一返回结果。说白了,其实是统一一下返回结果的数据结构。
code
、
message
是所有返回结果中必有的字段,而当需要返回数据时,则需要另一个字段
data
来表示。
所以首先定义一个
BaseResponse
来作为所有返回结果的基类;
然后定义一个通用返回结果类
CommonResponse
,继承
BaseResponse
,而且多了字段
data
;
为了区分成功和失败返回结果,于是再定义一个
ErrorResponse
最后还有一种常见的返回结果,即返回的数据带有分页信息,因为这种接口比较常见,所以有必要单独定义一个返回结果类
QueryDataResponse
,该类继承自
CommonResponse
,只是把
data
字段的类型限制为
QueryDdata
,
QueryDdata
中定义了分页信息相应的字段,即
totalCount
、
pageNo
、
pageSize
、
records
。
其中比较常用的只有
CommonResponse
和
QueryDataResponse
,但是名字又贼鬼死长,何不定义2个名字超简单的类来替代呢?于是
R
和
QR
诞生了,以后返回结果的时候只需这样写:
new R<>(data)
、
new QR<>(queryData)
。
所有的返回结果类的定义这里就不贴出来了
验证统一异常处理
因为这一套统一异常处理可以说是通用的,所有可以设计成一个
common
包,以后每一个新项目/模块只需引入该包即可。所以为了验证,需要新建一个项目,并引入该
common
包。
主要代码
下面是用于验证的主要源码:
@Service
public class LicenceService extends ServiceImpl<LicenceMapper, Licence> {

    @Autowired
    private OrganizationClient organizationClient;

    /**
     * 查询{@link Licence} 详情
     * @param licenceId
     * @return
     */
    public LicenceDTO queryDetail(Long licenceId) {
        Licence licence = this.getById(licenceId);
        checkNotNull(licence);

        OrganizationDTO org = ClientUtil.execute(() -> organizationClient.getOrganization(licence.getOrganizationId()));
        return toLicenceDTO(licence, org);
    }

    /**
     * 分页获取
     * @param licenceParam 分页查询参数
     * @return
     */
    public QueryData<SimpleLicenceDTO> getLicences(LicenceParam licenceParam) {
        String licenceType = licenceParam.getLicenceType();
        LicenceTypeEnum licenceTypeEnum = LicenceTypeEnum.parseOfNullable(licenceType);
        // 断言, 非空
        ResponseEnum.BAD_LICENCE_TYPE.assertNotNull(licenceTypeEnum);

        LambdaQueryWrapper<Licence> wrapper = new LambdaQueryWrapper<>();
        wrapper.eq(Licence::getLicenceType, licenceType);
        IPage<Licence> page = this.page(new QueryPage<>(licenceParam), wrapper);
        return new QueryData<>(page, this::toSimpleLicenceDTO);
    }

    /**
     * 新增{@link Licence}
     * @param request 请求体
     * @return
     */
    @Transactional(rollbackFor = Throwable.class)
    public LicenceAddRespData addLicence(LicenceAddRequest request) {
        Licence licence = new Licence();
        licence.setOrganizationId(request.getOrganizationId());
        licence.setLicenceType(request.getLicenceType());
        licence.setProductName(request.getProductName());
        licence.setLicenceMax(request.getLicenceMax());
        licence.setLicenceAllocated(request.getLicenceAllocated());
        licence.setComment(request.getComment());
        this.save(licence);

        return new LicenceAddRespData(licence.getLicenceId());
    }

    /**
     * entity -> simple dto
     * @param licence {@link Licence} entity
     * @return {@link SimpleLicenceDTO}
     */
    private SimpleLicenceDTO toSimpleLicenceDTO(Licence licence) {
        // 省略
    }

    /**
     * entity -> dto
     * @param licence {@link Licence} entity
     * @param org {@link OrganizationDTO}
     * @return {@link LicenceDTO}
     */
    private LicenceDTO toLicenceDTO(Licence licence, OrganizationDTO org) {
        // 省略
    }

    /**
     * 校验{@link Licence}存在
     * @param licence
     */
    private void checkNotNull(Licence licence) {
        ResponseEnum.LICENCE_NOT_FOUND.assertNotNull(licence);
    }

}
mybatis-plus
。
启动时,自动插入的数据为:
-- licence
INSERT INTO licence (licence_id, organization_id, licence_type, product_name, licence_max, licence_allocated)
VALUES (1, 1, 'user','CustomerPro', 100,5);
INSERT INTO licence (licence_id, organization_id, licence_type, product_name, licence_max, licence_allocated)
VALUES (2, 1, 'user','suitability-plus', 200,189);
INSERT INTO licence (licence_id, organization_id, licence_type, product_name, licence_max, licence_allocated)
VALUES (3, 2, 'user','HR-PowerSuite', 100,4);
INSERT INTO licence (licence_id, organization_id, licence_type, product_name, licence_max, licence_allocated)
VALUES (4, 2, 'core-prod','WildCat Application Gateway', 16,16);

-- organizations
INSERT INTO organization (id, name, contact_name, contact_email, contact_phone)
VALUES (1, 'customer-crm-co', 'Mark Balster', 'mark.balster@custcrmco.com', '823-555-1212');
INSERT INTO organization (id, name, contact_name, contact_email, contact_phone)
VALUES (2, 'HR-PowerSuite', 'Doug Drewry','doug.drewry@hr.com', '920-555-1212');
开始验证
捕获自定义异常
1. 获取不存在的
licence
详情:http://localhost:10000/licence/5。成功响应的请求:licenceId=1
检验非空

捕获 Licence not found 异常

Licence not found
 2. 根据不存在的
licence type
获取
licence
列表:http://localhost:10000/licence/list?licenceType=ddd。可选的
licence type
为:user、core-prod 。
校验非空

捕获 Bad licence type 异常

Bad licence type
 捕获进入 Controller 前的异常
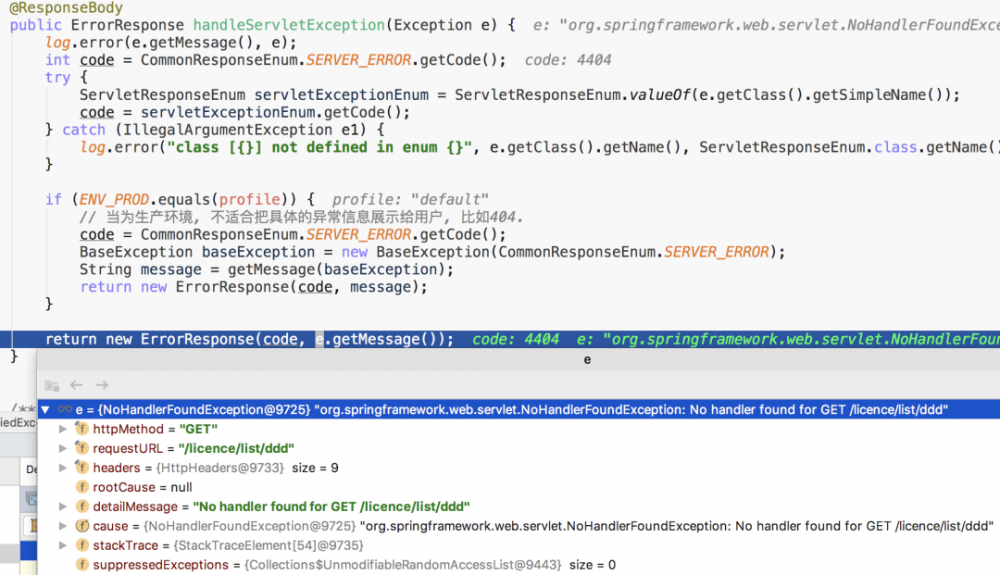
1. 访问不存在的接口:http://localhost:10000/licence/list/ddd
捕获404异常
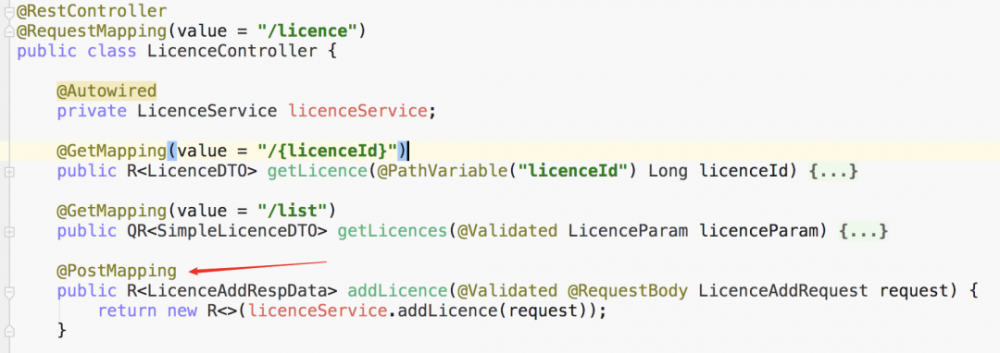
2. http 方法不支持:http://localhost:10000/licence
PostMapping
捕获 Request method not supported 异常
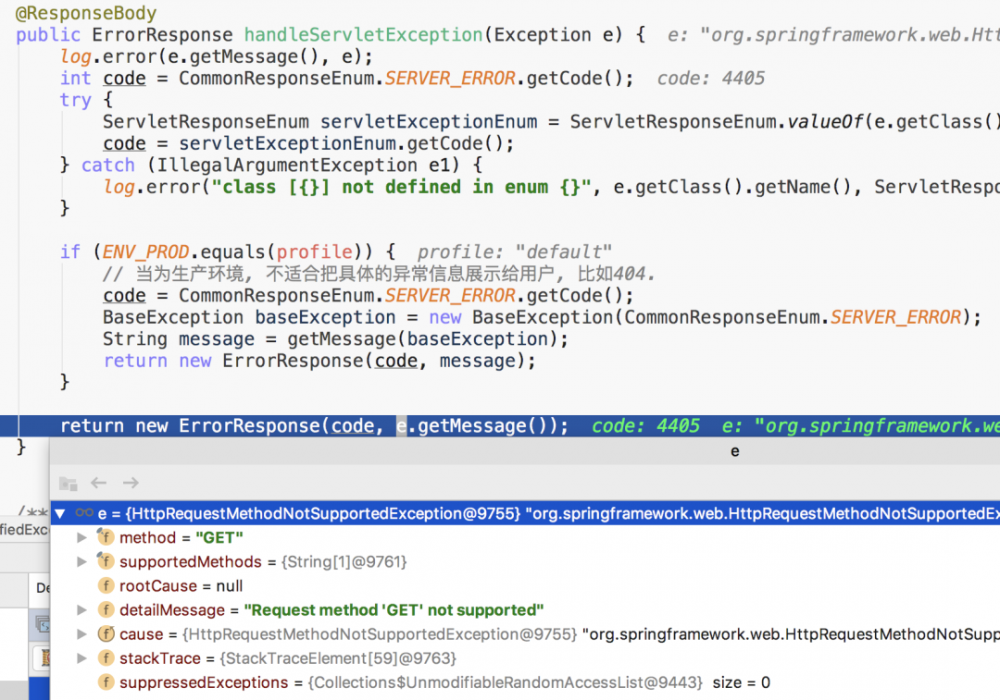
Request method not supported

3. 校验异常1:http://localhost:10000/licence/list?licenceType=
getLicences

LicenceParam

捕获参数绑定校验异常
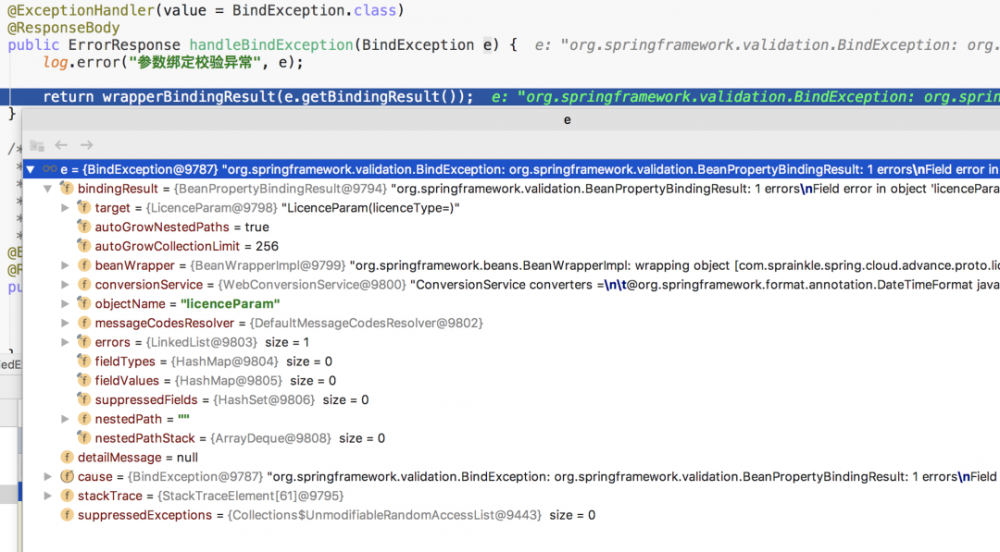
licence type cannot be empty
 4. 校验异常2:post 请求,这里使用postman模拟。
addLicence

LicenceAddRequest
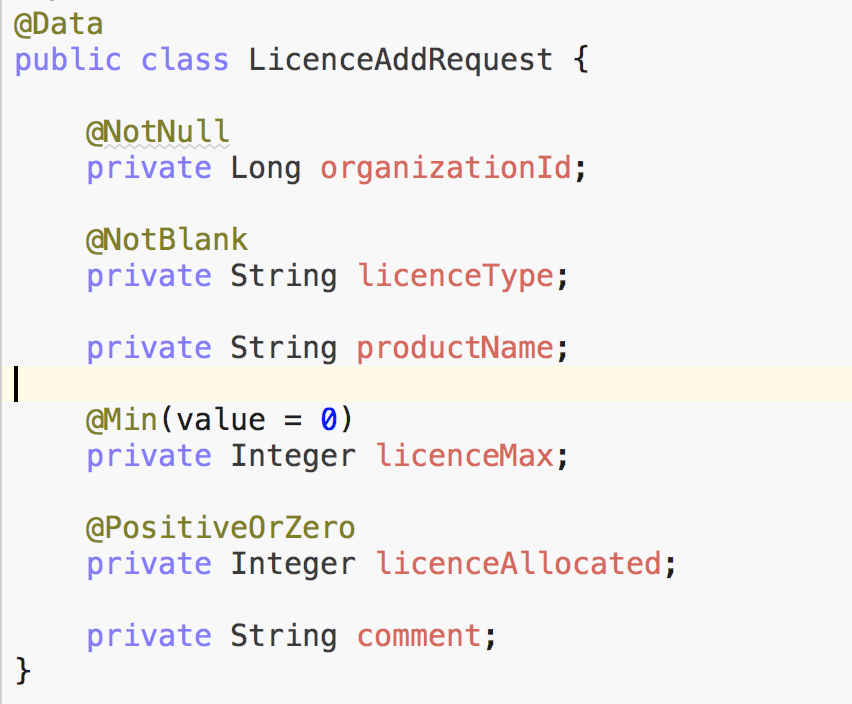
请求url即结果
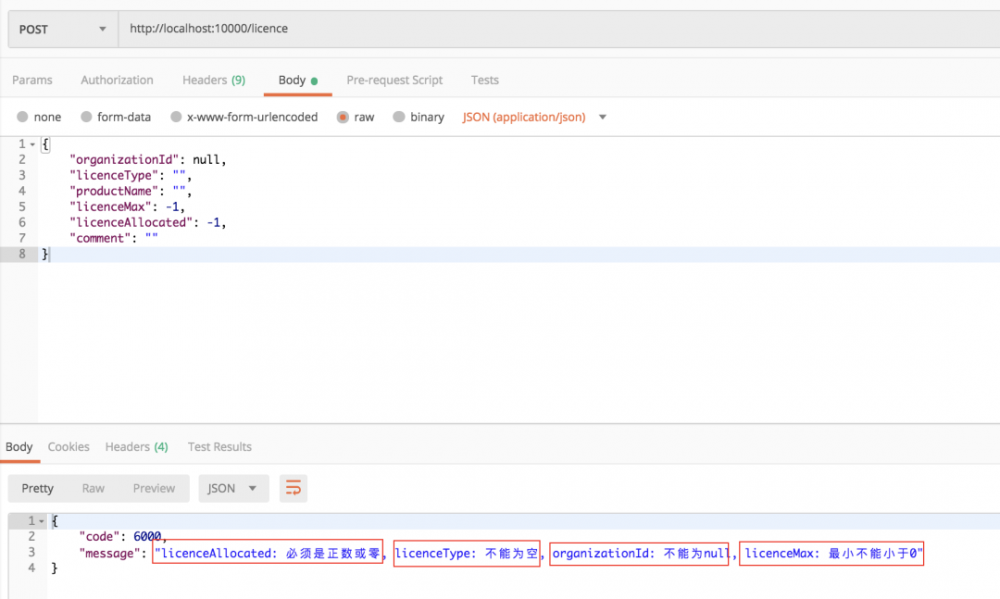
捕获参数绑定校验异常
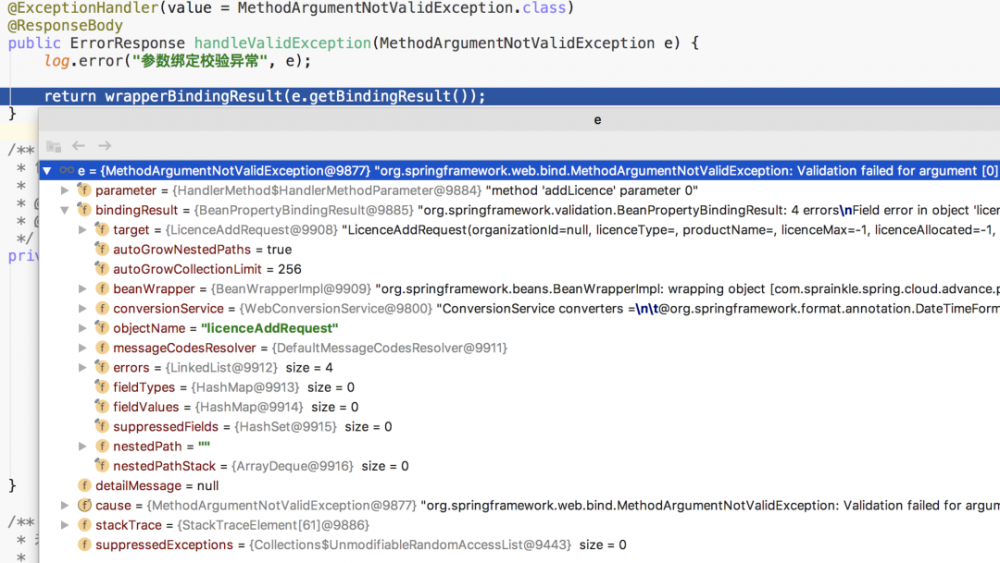
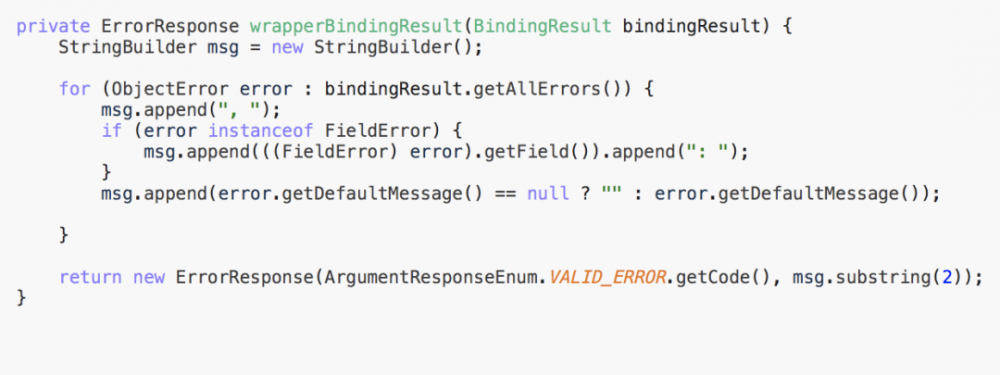
注:因为参数绑定校验异常的异常信息的获取方式与其它异常不一样,所以才把这2种情况的异常从 进入 Controller 前的异常 单独拆出来,下面是异常信息的收集逻辑:
异常信息的收集
捕获未知异常
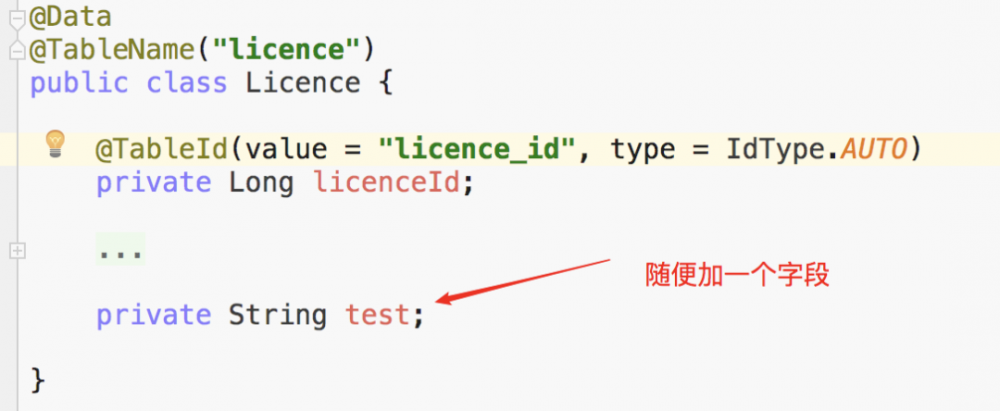
假设我们现在随便对
Licence
新增一个字段
test
,但不修改数据库表结构,然后访问:http://localhost:10000/licence/1。
增 加test字段
捕获数据库异常
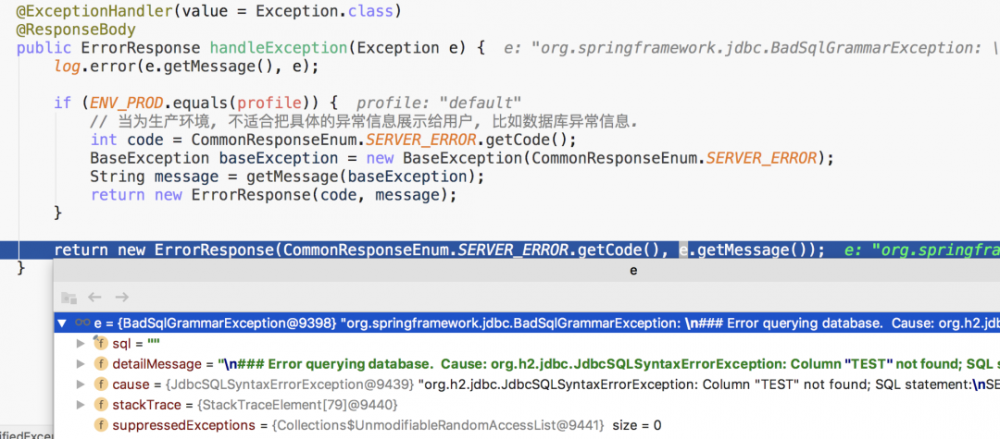
Error querying d a tabase

小结
可以看到,测试的异常都能够被捕获,然后以
code
、
message
的形式返回。每一个项目/模块,在定义业务异常的时候,只需定义一个枚举类,然后实现接口
BusinessExceptionAssert
,最后为每一种业务异常定义对应的枚举实例即可,而不用定义许多异常类。使用的时候也很方便,用法类似断言。
扩展
在生产环境,若捕获到 未知异常
或者
ServletException
,因为都是一长串的异常信息,若直接展示给用户看,显得不够专业,于是,我们可以这样做:当检测到当前环境是生产环境,那么直接返回 "网络异常"。
生产环境返 回“网络异常”
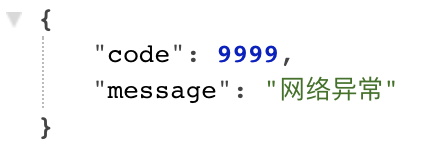
可以通过 以下方式修改当前环境:

修改当前环境为生产环境
总结
使用 断言
和 枚举类
相结合的方式,再配合统一异常处理,基本大部分的异常都能够被捕获。为什么说大部分异常,因为当引入
spring cloud security
后,还会有认证/授权异常,网关的服务降级异常、跨模块调用异常、远程调用第三方服务异常等,这些异常的捕获方式与本文介绍的不太一样,不过限于篇幅,这里不做详细说明,以后会有单独的文章介绍。
另外,当需要考虑国际化的时候,捕获异常后的异常信息一般不能直接返回,需要转换成对应的语言,不过本文已考虑到了这个,获取消息的时候已经做了国际化映射,逻辑如下:
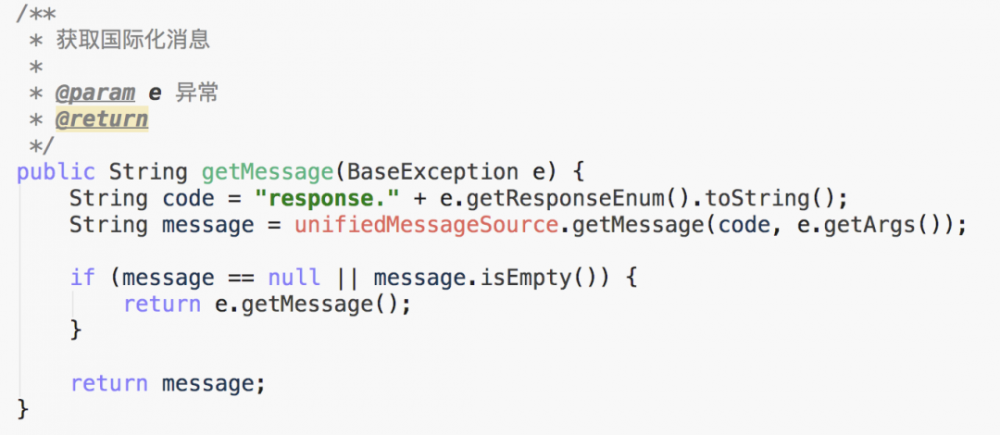
获取国际化消息
最后总结,全局异常属于老生长谈的话题,希望这次通过手机的项目对大家有点指导性的学习。大家根据实际情况自行修改。
也可以采用以下的jsonResult对象的方式进行处理,也贴出来代码.
@Slf4j
@RestControllerAdvice
public class GlobalExceptionHandler {

    /**
     * 没有登录
     * @param request
     * @param response
     * @param e
     * @return
     */
    @ExceptionHandler(NoLoginException.class)
    public Object noLoginExceptionHandler(HttpServletRequest request,HttpServletResponse response,Exception e)
    {
        log.error("[GlobalExceptionHandler][noLoginExceptionHandler] exception",e);
        JsonResult jsonResult = new JsonResult();
        jsonResult.setCode(JsonResultCode.NO_LOGIN);
        jsonResult.setMessage("用户登录失效或者登录超时,请先登录");
        return jsonResult;
    }

    /**
     * 业务异常
     * @param request
     * @param response
     * @param e
     * @return
     */
    @ExceptionHandler(ServiceException.class)
    public Object businessExceptionHandler(HttpServletRequest request,HttpServletResponse response,Exception e)
    {
        log.error("[GlobalExceptionHandler][businessExceptionHandler] exception",e);
        JsonResult jsonResult = new JsonResult();
        jsonResult.setCode(JsonResultCode.FAILURE);
        jsonResult.setMessage("业务异常,请联系管理员");
        return jsonResult;
    }

    /**
     * 全局异常处理
     * @param request
     * @param response
     * @param e
     * @return
     */
    @ExceptionHandler(Exception.class)
    public Object exceptionHandler(HttpServletRequest request,HttpServletResponse response,Exception e)
    {
        log.error("[GlobalExceptionHandler][exceptionHandler] exception",e);
        JsonResult jsonResult = new JsonResult();
        jsonResult.setCode(JsonResultCode.FAILURE);
        jsonResult.setMessage("系统错误,请联系管理员");
        return jsonResult;
    }
}
最后,如果学到东西,请点赞+转发+收藏!
-END-
如果看到这里,说明你喜欢这篇文章,请 转发 、点赞 。同时 标星(置顶) 本公众号可以第一时间接受到博文推送。
推 荐 阅 读
1. Spring Boot + Vue.js 实现前后端分离
2. 数据库里账号的密码,怎样存放更加安全?
3. Spring Boot 深度调优,JVM 调优
4. 去掉烦人的 !=null

- 本文标签: 代码 1212 json mapper 测试 开发 lambda https UI http App 处理器 软件 Spring Boot db 数据库 client 管理 下载 实例 ORM 服务器 参数 JVM struct 配置 DDL CTO Security SpringMVC id tab build tar NSA 文章 Select bean web 分页 equals ip map core CEO message list 希望 认证 总结 IDE ACE parse Service java mybatis bus servlet 安全 entity 时间 CRM value IO 源码 final js 数据 mmm HTML Action spring REST Spring cloud mail cat src
- 版权声明: 本文为互联网转载文章,出处已在文章中说明(部分除外)。如果侵权,请联系本站长删除,谢谢。
- 本文海报: 生成海报一 生成海报二


![[HBLOG]公众号](https://www.liuhaihua.cn/img/qrcode_gzh.jpg)

