接近8000字的Spring/SpringBoot常用注解总结!安排!
0.前言
大家好,我是 Guide 哥!这是我的 221 篇优质原创文章。如需转载,请在文首注明地址,蟹蟹!
本文已经收录进我的 75K Star 的 Java 开源项目 JavaGuide: https://github.com/Snailclimb/JavaGuide 相关阅读: V2.0 版本的 《JavaGuide面试突击版》来啦!带着它的在线阅读版本来啦!
可以毫不夸张地说,这篇文章介绍的 Spring/SpringBoot 常用注解基本已经涵盖你工作中遇到的大部分常用的场景。对于每一个注解我都说了具体用法,掌握搞懂,使用 SpringBoot 来开发项目基本没啥大问题了!
整个目录如下,内容有点多:
为什么要写这篇文章?
最近看到网上有一篇关于 SpringBoot 常用注解的文章被转载的比较多,我看了文章内容之后属实觉得质量有点低,并且有点会误导没有太多实际使用经验的人(这些人又占据了大多数)。所以,自己索性花了大概 两天时间简单总结一下了。
因为我个人的能力和精力有限,如果有任何不对或者需要完善的地方,请帮忙指出!Guide 哥感激不尽!
1. @SpringBootApplication
这里先单独拎出 @SpringBootApplication 注解说一下,虽然我们一般不会主动去使用它。
Guide 哥:这个注解是 Spring Boot 项目的基石,创建 SpringBoot 项目之后会默认在主类加上。
@SpringBootApplication
public class SpringSecurityJwtGuideApplication {
      public static void main(java.lang.String[] args) {
        SpringApplication.run(SpringSecurityJwtGuideApplication.class, args);
    }
}
我们可以把 @SpringBootApplication 看作是 @Configuration 、 @EnableAutoConfiguration 、 @ComponentScan 注解的集合。
package org.springframework.boot.autoconfigure;
@Target(ElementType.TYPE)
@Retention(RetentionPolicy.RUNTIME)
@Documented
@Inherited
@SpringBootConfiguration
@EnableAutoConfiguration
@ComponentScan(excludeFilters = {
        @Filter(type = FilterType.CUSTOM, classes = TypeExcludeFilter.class),
        @Filter(type = FilterType.CUSTOM, classes = AutoConfigurationExcludeFilter.class) })
public @interface SpringBootApplication {
   ......
}

package org.springframework.boot;
@Target(ElementType.TYPE)
@Retention(RetentionPolicy.RUNTIME)
@Documented
@Configuration
public @interface SpringBootConfiguration {

}
根据 SpringBoot 官网,这三个注解的作用分别是:
-
@EnableAutoConfiguration:启用 SpringBoot 的自动配置机制 -
@ComponentScan: 扫描被@Component(@Service,@Controller)注解的 bean,注解默认会扫描该类所在的包下所有的类。 -
@Configuration:允许在 Spring 上下文中注册额外的 bean 或导入其他配置类
2. Spring Bean 相关
2.1. @Autowired
自动导入对象到类中,被注入进的类同样要被 Spring 容器管理比如:Service 类注入到 Controller 类中。
@Service
public class UserService {
  ......
}

@RestController
@RequestMapping("/users")
public class UserController {
   @Autowired
   private UserService userService;
   ......
}
2.2. Component , @Repository , @Service , @Controller
我们一般使用 @Autowired 注解让 Spring 容器帮我们自动装配 bean。要想把类标识成可用于 @Autowired 注解自动装配的 bean 的类,可以采用以下注解实现:
-
@Component:通用的注解,可标注任意类为Spring组件。如果一个 Bean 不知道属于哪个层,可以使用@Component注解标注。 -
@Repository: 对应持久层即 Dao 层,主要用于数据库相关操作。 -
@Service: 对应服务层,主要涉及一些复杂的逻辑,需要用到 Dao 层。 -
@Controller: 对应 Spring MVC 控制层,主要用户接受用户请求并调用 Service 层返回数据给前端页面。
2.3. @RestController
@RestController 注解是 @Controller和 @ ResponseBody 的合集,表示这是个控制器 bean,并且是将函数的返回值直 接填入 HTTP 响应体中,是 REST 风格的控制器。
Guide 哥:现在都是前后端分离,说实话我已经很久没有用过 @Controller 。如果你的项目太老了的话,就当我没说。
单独使用 @Controller 不加 @ResponseBody 的话一般使用在要返回一个视图的情况,这种情况属于比较传统的 Spring MVC 的应用,对应于前后端不分离的情况。 @Controller + @ResponseBody 返回 JSON 或 XML 形式数据
关于 @RestController 和 @Controller 的对比,请看这篇文章: @RestController vs @Controller 。
2.4. @Scope
声明 Spring Bean 的作用域,使用方法:
@Bean
@Scope("singleton")
public Person personSingleton() {
    return new Person();
}
四种常见的 Spring Bean 的作用域:
- singleton : 唯一 bean 实例,Spring 中的 bean 默认都是单例的。
- prototype : 每次请求都会创建一个新的 bean 实例。
- request : 每一次 HTTP 请求都会产生一个新的 bean,该 bean 仅在当前 HTTP request 内有效。
- session : 每一次 HTTP 请求都会产生一个新的 bean,该 bean 仅在当前 HTTP session 内有效。
2.5. Configuration
一般用来声明配置类,可以使用 @Component 注解替代,不过使用 Configuration 注解声明配置类更加语义化。
@Configuration
public class AppConfig {
    @Bean
    public TransferService transferService() {
        return new TransferServiceImpl();
    }

}
3. 处理常见的 HTTP 请求类型
5 种常见的请求类型:
- GET :请求从服务器获取特定资源。举个例子:
GET /users(获取所有学生) - POST :在服务器上创建一个新的资源。举个例子:
POST /users(创建学生) - PUT :更新服务器上的资源(客户端提供更新后的整个资源)。举个例子:
PUT /users/12(更新编号为 12 的学生) - DELETE :从服务器删除特定的资源。举个例子:
DELETE /users/12(删除编号为 12 的学生) - PATCH :更新服务器上的资源(客户端提供更改的属性,可以看做作是部分更新),使用的比较少,这里就不举例子了。
3.1. GET 请求
@GetMapping("users") 等价于 @RequestMapping(value="/users",method=RequestMethod.GET)
@GetMapping("/users")
public ResponseEntity<List<User>> getAllUsers() {
 return userRepository.findAll();
}
3.2. POST 请求
@PostMapping("users") 等价于 @RequestMapping(value="/users",method=RequestMethod.POST)
关于 @RequestBody 注解的使用,在下面的“前后端传值”这块会讲到。
@PostMapping("/users")
public ResponseEntity<User> createUser(@Valid @RequestBody UserCreateRequest userCreateRequest) {
 return userRespository.save(user);
}
3.3. PUT 请求
@PutMapping("/users/{userId}") 等价于 @RequestMapping(value="/users/{userId}",method=RequestMethod.PUT)
@PutMapping("/users/{userId}")
public ResponseEntity<User> updateUser(@PathVariable(value = "userId") Long userId,
  @Valid @RequestBody UserUpdateRequest userUpdateRequest) {
  ......
}
3.4.DELETE 请求
@DeleteMapping("/users/{userId}") 等价于 @RequestMapping(value="/users/{userId}",method=RequestMethod.DELETE)
@DeleteMapping("/users/{userId}")
public ResponseEntity deleteUser(@PathVariable(value = "userId") Long userId){
  ......
}
3.5.PATCH 请求
一般实际项目中,我们都是 PUT 不够用了之后才用 PATCH 请求去更新数据。
@PatchMapping("/profile")
  public ResponseEntity updateStudent(@RequestBody StudentUpdateRequest studentUpdateRequest) {
        studentRepository.updateDetail(studentUpdateRequest);
        return ResponseEntity.ok().build();
    }
4. 前后端传值
掌握前后端传值的正确姿势,是你开始 CRUD 的第一步!
4.1. @PathVariable 和 @RequestParam
@PathVariable 用于获取路径参数, @RequestParam 用于获取查询参数。
举个简单的例子:
@GetMapping("/klasses/{klassId}/teachers")
public List<Teacher> getKlassRelatedTeachers(
         @PathVariable("klassId") Long klassId,
         @RequestParam(value = "type", required = false) String type ) {
...
}
如果我们请求的 url 是: /klasses/{123456}/teachers?type=web
那么我们服务获取到的数据就是: klassId=123456,type=web 。
4.2. @RequestBody
用于读取 Request 请求(可能是 POST,PUT,DELETE,GET 请求)的 body 部分并且 Content-Type 为 application/json 格式的数据,接收到数据之后会自动将数据绑定到 Java 对象上去。系统会使用 HttpMessageConverter 或者自定义的 HttpMessageConverter 将请求的 body 中的 json 字符串转换为 java 对象。
我用一个简单的例子来给演示一下基本使用!
我们有一个注册的接口:
@PostMapping("/sign-up")
public ResponseEntity signUp(@RequestBody @Valid UserRegisterRequest userRegisterRequest) {
  userService.save(userRegisterRequest);
  return ResponseEntity.ok().build();
}
UserRegisterRequest 对象:
@Data
@AllArgsConstructor
@NoArgsConstructor
public class UserRegisterRequest {
    @NotBlank
    private String userName;
    @NotBlank
    private String password;
    @FullName
    @NotBlank
    private String fullName;
}
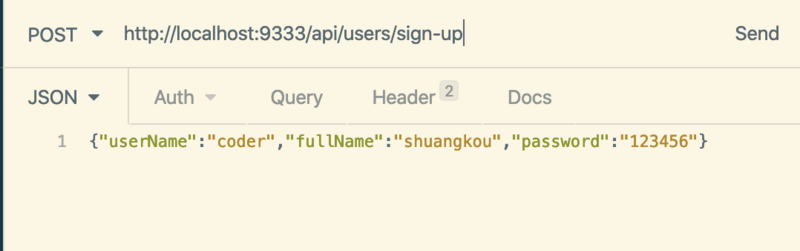
我们发送 post 请求到这个接口,并且 body 携带 JSON 数据:
{"userName":"coder","fullName":"shuangkou","password":"123456"}
这样我们的后端就可以直接把 json 格式的数据映射到我们的 UserRegisterRequest 类上。
:point_right: 需要注意的是: 一个请求方法只可以有一个 @RequestBody ,但是可以有多个 @RequestParam 和 @PathVariable 。 如果你的方法必须要用两个 @RequestBody 来接受数据的话,大概率是你的数据库设计或者系统设计出问题了!
5. 读取配置信息
很多时候我们需要将一些常用的配置信息比如阿里云 oss、发送短信、微信认证的相关配置信息等等放到配置文件中。
下面我们来看一下 Spring 为我们提供了哪些方式帮助我们从配置文件中读取这些配置信息。
我们的数据源 application.yml 内容如下::
wuhan2020: 2020年初武汉爆发了新型冠状病毒,疫情严重,但是,我相信一切都会过去!武汉加油!中国加油!

my-profile:
  name: Guide哥
  email: koushuangbwcx@163.com

library:
  location: 湖北武汉加油中国加油
  books:
    - name: 天才基本法
      description: 二十二岁的林朝夕在父亲确诊阿尔茨海默病这天,得知自己暗恋多年的校园男神裴之即将出国深造的消息——对方考取的学校,恰是父亲当年为她放弃的那所。
    - name: 时间的秩序
      description: 为什么我们记得过去,而非未来?时间“流逝”意味着什么?是我们存在于时间之内,还是时间存在于我们之中?卡洛·罗韦利用诗意的文字,邀请我们思考这一亘古难题——时间的本质。
    - name: 了不起的我
      description: 如何养成一个新习惯?如何让心智变得更成熟?如何拥有高质量的关系? 如何走出人生的艰难时刻?
5.1. @value (常用)
使用 @Value("${property}") 读取比较简单的配置信息:
@Value("${wuhan2020}")
String wuhan2020;
5.2. @ConfigurationProperties (常用)
通过 @ConfigurationProperties 读取配置信息并与 bean 绑定。
@Component
@ConfigurationProperties(prefix = "library")
class LibraryProperties {
    @NotEmpty
    private String location;
    private List<Book> books;

    @Setter
    @Getter
    @ToString
    static class Book {
        String name;
        String description;
    }
  省略getter/setter
  ......
}
你可以像使用普通的 Spring bean 一样,将其注入到类中使用。
5.3. PropertySource (不常用)
@PropertySource 读取指定 properties 文件
@Component
@PropertySource("classpath:website.properties")

class WebSite {
    @Value("${url}")
    private String url;

  省略getter/setter
  ......
}
更多内容请查看我的这篇文章:《 10 分钟搞定 SpringBoot 如何优雅读取配置文件? 》 。
6. 参数校验
数据的校验的重要性就不用说了,即使在前端对数据进行校验的情况下,我们还是要对传入后端的数据再进行一遍校验,避免用户绕过浏览器直接通过一些 HTTP 工具直接向后端请求一些违法数据。
JSR(Java Specification Requests)是一套 JavaBean 参数校验的标准,它定义了很多常用的校验注解,我们可以直接将这些注解加在我们 JavaBean 的属性上面,这样就可以在需要校验的时候进行校验了,非常方便!
校验的时候我们实际用的是 Hibernate Validator 框架。Hibernate Validator 是 Hibernate 团队最初的数据校验框架,Hibernate Validator 4.x 是 Bean Validation 1.0(JSR 303)的参考实现,Hibernate Validator 5.x 是 Bean Validation 1.1(JSR 349)的参考实现,目前最新版的 Hibernate Validator 6.x 是 Bean Validation 2.0(JSR 380)的参考实现。
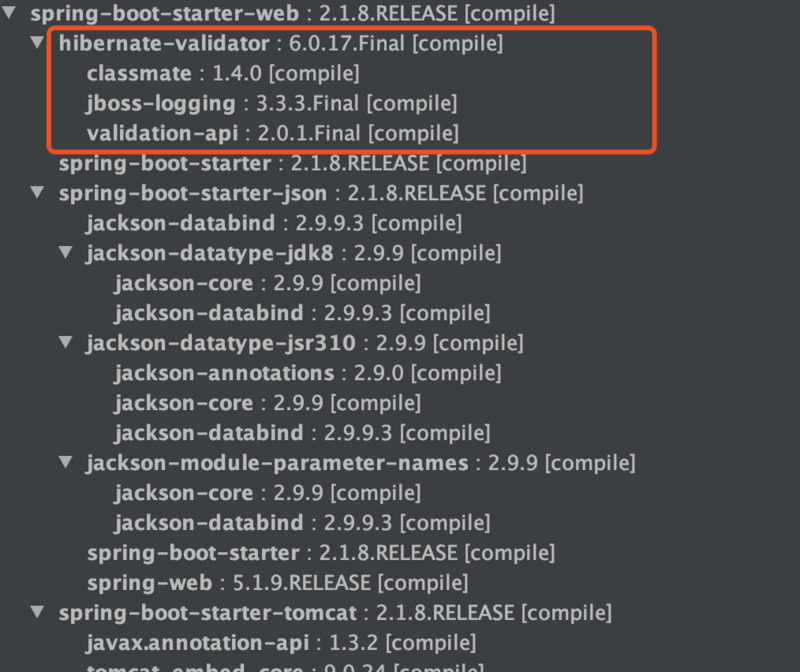
SpringBoot 项目的 spring-boot-starter-web 依赖中已经有 hibernate-validator 包,不需要引用相关依赖。如下图所示(通过 idea 插件—Maven Helper 生成):
非 SpringBoot 项目需要自行引入相关依赖包,这里不多做讲解,具体可以查看我的这篇文章:《 如何在 Spring/Spring Boot 中做参数校验?你需要了解的都在这里! 》。
:point_right: 需要注意的是: 所有的注解,推荐使用 JSR 注解,即 javax.validation.constraints ,而不是 org.hibernate.validator.constraints
6.1. 一些常用的字段验证的注解
@NotEmpty
@NotBlank
@Null
@NotNull
@AssertTrue
@AssertFalse
@Pattern(regex=,flag=)
@Email
@Min(value)
@Max(value)
@DecimalMin(value)
@DecimalMax(value)
@Size(max=, min=)
@Digits (integer, fraction)
@Past
@Future
6.2. 验证请求体(RequestBody)
@Data
@AllArgsConstructor
@NoArgsConstructor
public class Person {

    @NotNull(message = "classId 不能为空")
    private String classId;

    @Size(max = 33)
    @NotNull(message = "name 不能为空")
    private String name;

    @Pattern(regexp = "((^Man$|^Woman$|^UGM$))", message = "sex 值不在可选范围")
    @NotNull(message = "sex 不能为空")
    private String sex;

    @Email(message = "email 格式不正确")
    @NotNull(message = "email 不能为空")
    private String email;

}
我们在需要验证的参数上加上了 @Valid 注解,如果验证失败,它将抛出 MethodArgumentNotValidException 。
@RestController
@RequestMapping("/api")
public class PersonController {

    @PostMapping("/person")
    public ResponseEntity<Person> getPerson(@RequestBody @Valid Person person) {
        return ResponseEntity.ok().body(person);
    }
}
6.3. 验证请求参数(Path Variables 和 Request Parameters)
一定一定不要忘记在类上加上 Validated 注解了,这个参数可以告诉 Spring 去校验方法参数。
@RestController
@RequestMapping("/api")
@Validated
public class PersonController {

    @GetMapping("/person/{id}")
    public ResponseEntity<Integer> getPersonByID(@Valid @PathVariable("id") @Max(value = 5,message = "超过 id 的范围了") Integer id) {
        return ResponseEntity.ok().body(id);
    }
}
更多关于如何在 Spring 项目中进行参数校验的内容,请看《 如何在 Spring/Spring Boot 中做参数校验?你需要了解的都在这里! 》这篇文章。
7. 全局处理 Controller 层异常
介绍一下我们 Spring 项目必备的全局处理 Controller 层异常。
相关注解:
@ControllerAdvice
@ExceptionHandler
如何使用呢?拿我们在第 5 节参数校验这块来举例子。如果方法参数不对的话就会抛出 MethodArgumentNotValidException ,我们来处理这个异常。
@ControllerAdvice
@ResponseBody
public class GlobalExceptionHandler {

    /**
     * 请求参数异常处理
     */
    @ExceptionHandler(MethodArgumentNotValidException.class)
    public ResponseEntity<?> handleMethodArgumentNotValidException(MethodArgumentNotValidException ex, HttpServletRequest request) {
       ......
    }
}
更多关于 Spring Boot 异常处理的内容,请看我的这两篇文章:
- SpringBoot 处理异常的几种常见姿势
- 使用枚举简单封装一个优雅的 Spring Boot 全局异常处理!
8. JPA 相关
8.1. 创建表
@Entity 声明一个类对应一个数据库实体。
@Table 设置表明
@Entity
@Table(name = "role")
public class Role {
    @Id
    @GeneratedValue(strategy = GenerationType.IDENTITY)
    private Long id;
    private String name;
    private String description;
    省略getter/setter......
}
8.2. 创建主键
@Id :声明一个字段为主键。
使用 @Id 声明之后,我们还需要定义主键的生成策略。我们可以使用 @GeneratedValue 指定主键生成策略。
1.通过 @GeneratedValue 直接使用 JPA 内置提供的四种主键生成策略来指定主键生成策略。
@Id
@GeneratedValue(strategy = GenerationType.IDENTITY)
private Long id;
JPA 使用枚举定义了 4 中常见的主键生成策略,如下:
Guide 哥:枚举替代常量的一种用法
public enum GenerationType {

    /**
     * 使用一个特定的数据库表格来保存主键
     * 持久化引擎通过关系数据库的一张特定的表格来生成主键,
     */
    TABLE,

    /**
     *在某些数据库中,不支持主键自增长,比如Oracle、PostgreSQL其提供了一种叫做"序列(sequence)"的机制生成主键
     */
    SEQUENCE,

    /**
     * 主键自增长
     */
    IDENTITY,

    /**
     *把主键生成策略交给持久化引擎(persistence engine),
     *持久化引擎会根据数据库在以上三种主键生成 策略中选择其中一种
     */
    AUTO
}
@GeneratedValue 注解默认使用的策略是 GenerationType.AUTO
public @interface GeneratedValue {

    GenerationType strategy() default AUTO;
    String generator() default "";
}
一般使用 MySQL 数据库的话,使用 GenerationType.IDENTITY 策略比较普遍一点(分布式系统的话需要另外考虑使用分布式 ID)。
2.通过 @GenericGenerator 声明一个主键策略,然后 @GeneratedValue 使用这个策略
@Id
@GeneratedValue(generator = "IdentityIdGenerator")
@GenericGenerator(name = "IdentityIdGenerator", strategy = "identity")
private Long id;
等价于:
@Id
@GeneratedValue(strategy = GenerationType.IDENTITY)
private Long id;
jpa 提供的主键生成策略有如下几种:
public class DefaultIdentifierGeneratorFactory
        implements MutableIdentifierGeneratorFactory, Serializable, ServiceRegistryAwareService {

    @SuppressWarnings("deprecation")
    public DefaultIdentifierGeneratorFactory() {
        register( "uuid2", UUIDGenerator.class );
        register( "guid", GUIDGenerator.class );            // can be done with UUIDGenerator + strategy
        register( "uuid", UUIDHexGenerator.class );            // "deprecated" for new use
        register( "uuid.hex", UUIDHexGenerator.class );     // uuid.hex is deprecated
        register( "assigned", Assigned.class );
        register( "identity", IdentityGenerator.class );
        register( "select", SelectGenerator.class );
        register( "sequence", SequenceStyleGenerator.class );
        register( "seqhilo", SequenceHiLoGenerator.class );
        register( "increment", IncrementGenerator.class );
        register( "foreign", ForeignGenerator.class );
        register( "sequence-identity", SequenceIdentityGenerator.class );
        register( "enhanced-sequence", SequenceStyleGenerator.class );
        register( "enhanced-table", TableGenerator.class );
    }

    public void register(String strategy, Class generatorClass) {
        LOG.debugf( "Registering IdentifierGenerator strategy [%s] -> [%s]", strategy, generatorClass.getName() );
        final Class previous = generatorStrategyToClassNameMap.put( strategy, generatorClass );
        if ( previous != null ) {
            LOG.debugf( "    - overriding [%s]", previous.getName() );
        }
    }

}
8.3. 设置字段类型
@Column 声明字段。
示例:
设置属性 userName 对应的数据库字段名为 user_name,长度为 32,非空
@Column(name = "user_name", nullable = false, length=32)
private String userName;
设置字段类型并且加默认值,这个还是挺常用的。
Column(columnDefinition = "tinyint(1) default 1")
private Boolean enabled;
8.4. 指定不持久化特定字段
@Transient :声明不需要与数据库映射的字段,在保存的时候不需要保存进数据库 。
如果我们想让 secrect 这个字段不被持久化,可以使用 @Transient 关键字声明。
Entity(name="USER")
public class User {

    ......
    @Transient
    private String secrect; // not persistent because of @Transient

}
除了 @Transient 关键字声明, 还可以采用下面几种方法:
static String secrect; // not persistent because of static
final String secrect = “Satish”; // not persistent because of final
transient String secrect; // not persistent because of transient
一般使用注解的方式比较多。
8.5. 声明大字段
@Lob :声明某个字段为大字段。
@Lob
private String content;
更详细的声明:
@Lob
//指定 Lob 类型数据的获取策略, FetchType.EAGER 表示非延迟 加载,而 FetchType. LAZY 表示延迟加载 ;
@Basic(fetch = FetchType.EAGER)
//columnDefinition 属性指定数据表对应的 Lob 字段类型
@Column(name = "content", columnDefinition = "LONGTEXT NOT NULL")
private String content;
8.6. 创建枚举类型的字段
可以使用枚举类型的字段,不过枚举字段要用 @Enumerated 注解修饰。
public enum Gender {
    MALE("男性"),
    FEMALE("女性");

    private String value;
    Gender(String str){
        value=str;
    }
}
@Entity
@Table(name = "role")
public class Role {
    @Id
    @GeneratedValue(strategy = GenerationType.IDENTITY)
    private Long id;
    private String name;
    private String description;
    @Enumerated(EnumType.STRING)
    private Gender gender;
    省略getter/setter......
}
数据库里面对应存储的是 MAIL/FEMAIL。
8.7. 增加审计功能
只要继承了 AbstractAuditBase 的类都会默认加上下面四个字段。
@Data
@AllArgsConstructor
@NoArgsConstructor
@MappedSuperclass
@EntityListeners(value = AuditingEntityListener.class)
public abstract class AbstractAuditBase {

    @CreatedDate
    @Column(updatable = false)
    @JsonIgnore
    private Instant createdAt;

    @LastModifiedDate
    @JsonIgnore
    private Instant updatedAt;

    @CreatedBy
    @Column(updatable = false)
    @JsonIgnore
    private String createdBy;

    @LastModifiedBy
    @JsonIgnore
    private String updatedBy;
}
我们对应的审计功能对应地配置类可能是下面这样的(Spring Security 项目):
@Configuration
@EnableJpaAuditing
public class AuditSecurityConfiguration {
    @Bean
    AuditorAware<String> auditorAware() {
        return () -> Optional.ofNullable(SecurityContextHolder.getContext())
                .map(SecurityContext::getAuthentication)
                .filter(Authentication::isAuthenticated)
                .map(Authentication::getName);
    }
}
简单介绍一下上面设计到的一些注解:
-
@CreatedDate: 表示该字段为创建时间时间字段,在这个实体被 insert 的时候,会设置值 -
@CreatedBy:表示该字段为创建人,在这个实体被 insert 的时候,会设置值@LastModifiedDate、@LastModifiedBy同理。
@EnableJpaAuditing :开启 JPA 审计功能。
8.8. 删除/修改数据
@Modifying 注解提示 JPA 该操作是修改操作,注意还要配合 @Transactional 注解使用。
@Repository
public interface UserRepository extends JpaRepository<User, Integer> {

    @Modifying
    @Transactional(rollbackFor = Exception.class)
    void deleteByUserName(String userName);
}
8.9. 关联关系
@OneToOne
@OneToMany
@ManyToOne
MangToMang
更多关于 Spring Boot JPA 的文章请看我的这篇文章: 一文搞懂如何在 Spring Boot 正确中使用 JPA 。
9. 事务 @Transactional
在要开启事务的方法上使用 @Transactional 注解即可!
@Transactional(rollbackFor = Exception.class)
public void save() {
  ......
}
我们知道 Exception 分为运行时异常 RuntimeException 和非运行时异常。在 @Transactional 注解中如果不配置 rollbackFor 属性,那么事物只会在遇到 RuntimeException 的时候才会回滚,加上 rollbackFor=Exception.class ,可以让事物在遇到非运行时异常时也回滚。
@Transactional 注解一般用在可以作用在 类 或者 方法 上。
- 作用于类 :当把
@Transactional 注解放在类上时,表示所有该类的public 方法都配置相同的事务属性信息。 - 作用于方法 :当类配置了
@Transactional,方法也配置了@Transactional,方法的事务会覆盖类的事务配置信息。
更多关于关于 Spring 事务的内容请查看:
- 可能是最漂亮的 Spring 事务管理详解
- 一口气说出 6 种 @Transactional 注解失效场景
10. json 数据处理
10.1. 过滤 json 数据
@JsonIgnoreProperties 作用在类上用于过滤掉特定字段不返回或者不解析。
//生成json时将userRoles属性过滤
@JsonIgnoreProperties({"userRoles"})
public class User {

    private String userName;
    private String fullName;
    private String password;
    @JsonIgnore
    private List<UserRole> userRoles = new ArrayList<>();
}
@JsonIgnore 一般用于类的属性上,作用和上面的 @JsonIgnoreProperties 一样。
public class User {

    private String userName;
    private String fullName;
    private String password;
   //生成json时将userRoles属性过滤
    @JsonIgnore
    private List<UserRole> userRoles = new ArrayList<>();
}
10.2. 格式化 json 数据
@JsonFormat 一般用来格式化 json 数据。:
比如:
@JsonFormat(shape=JsonFormat.Shape.STRING, pattern="yyyy-MM-dd'T'HH:mm:ss.SSS'Z'", timezone="GMT")
private Date date;
10.3. 扁平化对象
@Getter
@Setter
@ToString
public class Account {
    @JsonUnwrapped
    private Location location;
    @JsonUnwrapped
    private PersonInfo personInfo;

  @Getter
  @Setter
  @ToString
  public static class Location {
     private String provinceName;
     private String countyName;
  }
  @Getter
  @Setter
  @ToString
  public static class PersonInfo {
    private String userName;
    private String fullName;
  }
}
未扁平化之前:
{
    "location": {
        "provinceName":"湖北",
        "countyName":"武汉"
    },
    "personInfo": {
        "userName": "coder1234",
        "fullName": "shaungkou"
    }
}
使用 @JsonUnwrapped 扁平对象之后:
@Getter
@Setter
@ToString
public class Account {
    @JsonUnwrapped
    private Location location;
    @JsonUnwrapped
    private PersonInfo personInfo;
    ......
}
{
  "provinceName":"湖北",
  "countyName":"武汉",
  "userName": "coder1234",
  "fullName": "shaungkou"
}
11. 测试相关
@ActiveProfiles 一般作用于测试类上, 用于声明生效的 Spring 配置文件。
@SpringBootTest(webEnvironment = RANDOM_PORT)
@ActiveProfiles("test")
@Slf4j
public abstract class TestBase {
  ......
}
@Test 声明一个方法为测试方法
@Transactional 被声明的测试方法的数据会回滚,避免污染测试数据。
@WithMockUser Spring Security 提供的,用来模拟一个真实用户,并且可以赋予权限。
@Test
    @Transactional
    @WithMockUser(username = "user-id-18163138155", authorities = "ROLE_TEACHER")
    void should_import_student_success() throws Exception {
        ......
    }
暂时总结到这里吧!虽然花了挺长时间才写完,不过可能还是会一些常用的注解的被漏掉,所以,我将文章也同步到了 Github 上去,Github 地址: https://github.com/Snailclimb/JavaGuide/blob/master/docs/system-design/framework/spring/spring-annotations.md 欢迎完善!
本文已经收录进我的 75K Star 的 Java 开源项目 JavaGuide: https://github.com/Snailclimb/JavaGuide 。
正文到此结束
- 本文标签: 插件 Master https 本质 sql build API JPA 测试 实例 Action description 开发 分布式 ArrayList 数据 http spring App Listeners tab list IO git bug cat 同步 rand 管理 文章 服务器 Select Property mail 参数 Spring Security find session UI entity 目录 CTO OneToOne authenticate value ORM struct 学生 开源 分布式系统 tk 开源项目 ACE web DOM Security 质量 阿里云 Spring Boot tar EnableAutoConfiguration 配置 src 云 时间 neToMany 认证 XML bean ip 数据库 总结 springboot GMT NSA Word update Document Persistence maven REST id js 病毒 map lib mysql GitHub ManyToOne classpath json Service servlet Oracle final validator zab IDE 删除 java 解析 message db
- 版权声明: 本文为互联网转载文章,出处已在文章中说明(部分除外)。如果侵权,请联系本站长删除,谢谢。
- 本文海报: 生成海报一 生成海报二
热门推荐


相关文章

近期评论
-
谢谢
-
https://www.newcmy.com/register?aff=HBVX建议您试试草莓云机场,可以流畅观看youtube和tiktok,上reddit/x也没有问题,还有各种ai优化节点。
-
-
-
想购买您这个站,我的联系方式QQ741756694微信同步 能卖联系
-
-
-
-
-
https://www.liuhaihua.cn/archives/40657.html 这篇博客中的图片打不开了
Loading...
![[HBLOG]公众号](https://www.liuhaihua.cn/img/qrcode_gzh.jpg)

