Springboot快速上手- 第二篇 helloWord走起
1 基础工程创建
1:创建一个maven工程
2:加入parent
<parent>
     <groupId>org.springframework.boot</groupId>
     <artifactId>spring-boot-starter-parent</artifactId>
     <version>1.5.6.RELEASE</version>
 </parent>
3:加入启动依赖
<dependency>
     <groupId>org.springframework.boot</groupId>
     <artifactId>spring-boot-starter-web</artifactId>
 </dependency>
4:设置properties
<properties>
     <java.version>1.8</java.version>
     <project.build.sourceEncoding>UTF-8</project.build.sourceEncoding>
     <start-class>com.cc.Application</start-class>
 </properties>
5:配置springboot 插件
<build>
     <finalName>springbootstudy</finalName>
     <plugins>
         <plugin>
           <groupId>org.springframework.boot</groupId>
           <artifactId>spring-boot-maven-plugin</artifactId>
         </plugin>
     </plugins>
 </build>
6:开发Controller
@Controller
@RequestMapping("/hello")
public class FirstController {
    @RequestMapping("/abc")
    @ResponseBody
    public String abc() {
       System.out.println("now in FirstController.abc");
       return "Hello World!";
    }
}
7:启动类
@SpringBootApplication
public class App {
   public static void main(String[] args) {
     //负责启动引导应 用程序
     SpringApplication.run(App.class, args);
   }
}
8:启动运行
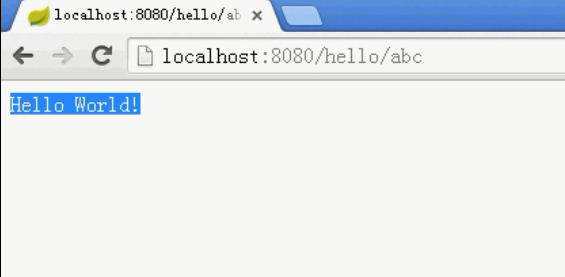
先运行启动类,然后在浏览器输入:<u> http://localhost:8080/hello/abc </u>
@SpringBootApplication:开启组件扫描和自动配置,
实际 上,@SpringBootApplication将三个有用的注解组合在了一起:
Spring的@Configuration:标明该类使用Spring基于Java的配置
Spring的@ComponentScan:启用组件扫描
Spring Boot的@EnableAutoConfiguration:开启Spring Boot自动配置

2 加入数据层
1:环境设置
(1)加入依赖
<dependency>
     <groupId>org.springframework.boot</groupId>
     <artifactId>spring-boot-starter-data-jpa</artifactId>
 </dependency>
 <dependency>
     <groupId>mysql</groupId>
     <artifactId>mysql-connector-java</artifactId>
     <version>5.1.43</version>
 </dependency>
(2)在数据库中创建一个库springbootstudy,同时建一个表tbl_user,有如下字段:uuid、name、age
(3)配置数据源、配置jpa对hibernate的支持,在resources文件夹中建立一个application.properties文件,基本配置如下:
spring.datasource.driverClassName=com.mysql.jdbc.Driver
spring.datasource.url=jdbc:mysql://127.0.0.1:3306/springbootstudy?useUnicode=true&characterEncoding=UTF-8
spring.datasource.username=root
spring.datasource.password=root
spring.datasource.max-active=20
spring.datasource.max-idle=8
spring.datasource.min-idle=8
spring.datasource.initial-size=10
spring.jpa.database=MySQL
spring.jpa.show-sql=true
spring.jpa.generate-ddl=false
spring.jpa.hibernate.ddl-auto=update
spring.jpa.properties.hibernate.current_session_context_class=org.springframework.orm.hibernate4.SpringSessionContext
spring.jpa.properties.hibernate.format_sql=true
spring.jpa.properties.hibernate.use_sql_comments=false
spring.hibernate.packageScan=com.cc
spring.jta.transaction-manager-id=transactionManager
spring.jpa.properties.hibernate.dialect=org.hibernate.dialect.MySQL5Dialect
2:添加user模块,先写vo
3:添加dao及实现,DAO接口示例如下:
public interface UserDAO<M extends UserModel> {

   public String create(M m);
   public void update(M m);
   public void delete(String uuid);
   public M getByUuid(String uuid);
   public List<M> getAll();
}
4:添加java配置
为了支持直接注入Hibernate的SessionFactory,建立一个H4Conf的类,采用java配置的方式:
@Configuration
public class H4Conf {
    @Bean
    public SessionFactory sessionFactory(HibernateEntityManagerFactory hemf) {
       return hemf.getSessionFactory();
    }
}
添加Service及实现
添加Controller实现
3 添加页面,使用ThymeLeaf
1:环境构建
(1)在application.properties中添加:
spring.thymeleaf.cache=false
 spring.thymeleaf.prefix=classpath:/templates
(2)添加依赖
<dependency>
     <groupId>org.springframework.boot</groupId>
     <artifactId>spring-boot-starter-thymeleaf</artifactId>
 </dependency>
2:在resources下面添加templates,在templates下面添加user文件夹,下面用来存放页面
3:使用ThymeLeaf开发的页面,比如userAdd.html,示例如下:
<!DOCTYPE HTML>
<html xmlns:th="http://www.thymeleaf.org">
<head>
    <title>hello</title>
    <meta http-equiv="Content-Type" content="text/html; charset=UTF-8" />
</head>
<body>
<form th:action="@{/user/add}" method="post">
<table>
    <tr>
        <td>uuid</td>
        <td><input type="text" name="uuid" id="uuid"/></td>
    </tr>
    <tr>
        <td>name</td>
        <td><input type="text" name="name" id="name"/></td>
    </tr>
    <tr>
        <td>age</td>
        <td><input type="text" name="age" id="age"/></td>
    </tr>
    <tr>
        <td></td>
        <td><input type="submit" value="保存"/></td>
    </tr>
</table>
</form>
</body>
</html>
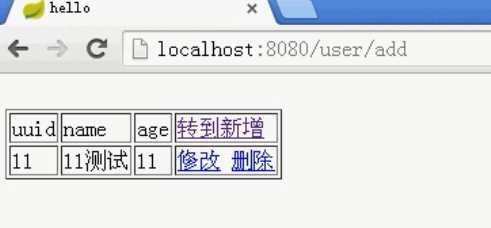
4 启动运行
http://localhost:8080/user/toList


通过几天的学习,首先最有收获的地方应该是内心沉静下来了,每天面对工作机械的crud,有时候是烦躁的,但是又不知道如何改变现状,疫情期间也不能出去乱逛把之前购买CC老师的课程翻出来,继续学习吧~~哈哈,我给大家来了硬广,618折扣才6800元,课程内容惊喜多多,详情都在私塾的官网,感兴趣的小伙伴,可以一起去 【 私塾在线 】 学习
正文到此结束
- 本文标签: UI springboot 插件 web http 数据库 plugin App MySQL5 db EntityManagerFactory 配置 Spring Boot list update DDL tar ORM CTO JDBC dataSource tab JPA map id value java entity https bean NSA session final classpath ACE sql IO XML spring src Service 数据 EnableAutoConfiguration 开发 root Word cat cache HTML mysql build maven Action
- 版权声明: 本文为互联网转载文章,出处已在文章中说明(部分除外)。如果侵权,请联系本站长删除,谢谢。
- 本文海报: 生成海报一 生成海报二
热门推荐


相关文章

近期评论
-
谢谢
-
https://www.newcmy.com/register?aff=HBVX建议您试试草莓云机场,可以流畅观看youtube和tiktok,上reddit/x也没有问题,还有各种ai优化节点。
-
-
-
想购买您这个站,我的联系方式QQ741756694微信同步 能卖联系
-
-
-
-
-
https://www.liuhaihua.cn/archives/40657.html 这篇博客中的图片打不开了
Loading...
![[HBLOG]公众号](https://www.liuhaihua.cn/img/qrcode_gzh.jpg)

