Spring Boot 集成 WebSocket 实现服务端推送消息到客户端
假设有这样一个场景:服务端的资源经常在更新,客户端需要尽量及时地了解到这些更新发生后展示给用户,如果是 HTTP 1.1,通常会开启 ajax 请求询问服务端是否有更新,通过定时器反复轮询服务端响应的资源是否有更新。
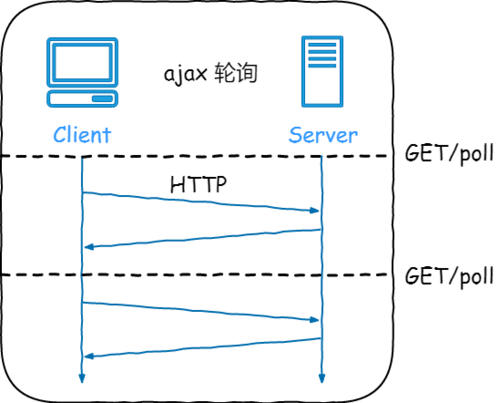
在长时间不更新的情况下,反复地去询问会对服务器造成很大的压力,对网络也有很大的消耗,如果定时的时间比较大,服务端有更新的话,客户端可能需要等待定时器达到以后才能获知,这个信息也不能很及时地获取到。
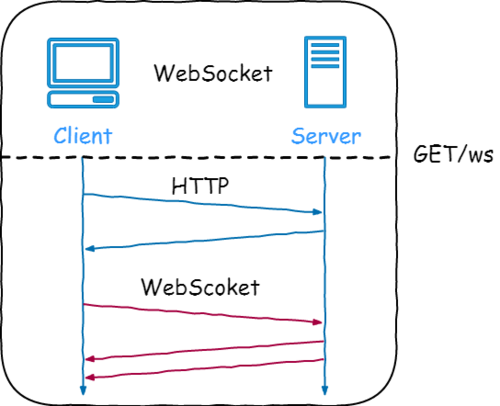
而有了 WebSocket 协议,就能很好地解决这些问题,WebSocket 可以反向通知的,通常向服务端订阅一类消息,服务端发现这类消息有更新就会不停地通知客户端。
WebSocket 简介
WebSocket 协议是基于 TCP 的一种新的网络协议,它实现了浏览器与服务器全双工(full-duplex)通信—允许服务器主动发送信息给客户端,这样就可以实现从客户端发送消息到服务器,而服务器又可以转发消息到客户端,这样就能够实现客户端之间的交互。对于 WebSocket 的开发,Spring 也提供了良好的支持,目前很多浏览器已经实现了 WebSocket 协议,但是依旧存在着很多浏览器没有实现该协议,为了兼容那些没有实现该协议的浏览器,往往还需要通过 STOMP 协议来完成这些兼容。
下面我们在 Spring Boot 中集成 WebSocket 来实现服务端推送消息到客户端。
Spring Boot 集成 WebSocket
首先创建一个 Spring Boot 项目,然后在 pom.xml 加入如下依赖集成 WebSocket:
<dependency>
    <groupId>org.springframework.boot</groupId>
    <artifactId>spring-boot-starter-websocket</artifactId>
</dependency>
开启配置
接下来在 config 包下创建一个 WebSocket 配置类 WebSocketConfiguration ,在配置类上加入注解 @EnableWebSocket ,表明开启 WebSocket,内部实例化 ServerEndpointExporter 的 Bean,该 Bean 会自动注册 @ServerEndpoint 注解声明的端点,代码如下:
@Configuration
@EnableWebSocket
public class WebSocketConfiguration {

    @Bean
    public ServerEndpointExporter serverEndpointExporter() {
        return new ServerEndpointExporter();
    }
}
编写端点服务类
接下来使用 @ServerEndpoint 定义一个端点服务类,在端点服务类中,可以定义 WebSocket 的打开、关闭、错误和发送消息的方法,具体代码如下所示:
@ServerEndpoint("/websocket/{userId}")
@Component
public class WebSocketServer {

    private static final Logger log = LoggerFactory.getLogger(WebSocketServer.class);

    /**
     * 当前在线连接数
     */
    private static AtomicInteger onlineCount = new AtomicInteger(0);

    /**
     * 用来存放每个客户端对应的 WebSocketServer 对象
     */
    private static ConcurrentHashMap<String, WebSocketServer> webSocketMap = new ConcurrentHashMap<>();

    /**
     * 与某个客户端的连接会话,需要通过它来给客户端发送数据
     */
    private Session session;

    /**
     * 接收 userId
     */
    private String userId = "";

    /**
     * 连接建立成功调用的方法
     */
    @OnOpen
    public void onOpen(Session session, @PathParam("userId") String userId) {
        this.session = session;
        this.userId = userId;
        if (webSocketMap.containsKey(userId)) {
            webSocketMap.remove(userId);
            webSocketMap.put(userId, this);
        } else {
            webSocketMap.put(userId, this);
            addOnlineCount();
        }
        log.info("用户连接:" + userId + ",当前在线人数为:" + getOnlineCount());
        try {
            sendMessage("连接成功!");
        } catch (IOException e) {
            log.error("用户:" + userId + ",网络异常!!!!!!");
        }
    }

    /**
     * 连接关闭调用的方法
     */
    @OnClose
    public void onClose() {
        if (webSocketMap.containsKey(userId)) {
            webSocketMap.remove(userId);
            subOnlineCount();
        }
        log.info("用户退出:" + userId + ",当前在线人数为:" + getOnlineCount());
    }

    /**
     * 收到客户端消息后调用的方法
     *
     * @param message 客户端发送过来的消息
     */
    @OnMessage
    public void onMessage(String message, Session session) {
        log.info("用户消息:" + userId + ",报文:" + message);
        if (!StringUtils.isEmpty(message)) {
            try {
                JSONObject jsonObject = JSON.parseObject(message);
                jsonObject.put("fromUserId", this.userId);
                String toUserId = jsonObject.getString("toUserId");
                if (!StringUtils.isEmpty(toUserId) && webSocketMap.containsKey(toUserId)) {
                    webSocketMap.get(toUserId).sendMessage(jsonObject.toJSONString());
                } else {
                    log.error("请求的 userId:" + toUserId + "不在该服务器上");
                }
            } catch (Exception e) {
                e.printStackTrace();
            }
        }
    }

    /**
     * 发生错误时调用
     *
     * @param session
     * @param error
     */
    @OnError
    public void onError(Session session, Throwable error) {
        log.error("用户错误:" + this.userId + ",原因:" + error.getMessage());
        error.printStackTrace();
    }

    /**
     * 实现服务器主动推送
     */
    public void sendMessage(String message) throws IOException {
        this.session.getBasicRemote().sendText(message);
    }

    public static synchronized AtomicInteger getOnlineCount() {
        return onlineCount;
    }

    public static synchronized void addOnlineCount() {
        WebSocketServer.onlineCount.getAndIncrement();
    }

    public static synchronized void subOnlineCount() {
        WebSocketServer.onlineCount.getAndDecrement();
    }
}
其中, @ServerEndpoint("/websocket/{userId}") 表示让 Spring 创建 WebSocket 的服务端点,其中请求地址是 /websocket/{userId} 。
另外 WebSocket 一共有四个事件,分别对应 JSR-356 定义的 @OnOpen、@OnMessage、@OnClose、@OnError 注解。
- @OnOpen:标注客户端打开 WebSocket 服务端点调用方法
- @OnClose:标注客户端关闭 WebSocket 服务端点调用方法
- @OnMessage:标注客户端发送消息,WebSocket 服务端点调用方法
- @OnError:标注客户端请求 WebSocket 服务端点发生异常调用方法
接下来启动项目,使用 WebSocket 在线测试工具( http://www.easyswoole.com/wstool.html )进行测试,有能力的也可以自己写个 html 测试。
打开网页后,在服务地址中输入 ws://127.0.0.1:8080/websocket/wupx ,点击 开启连接 按钮,消息记录中会多一条由服务器端发送的 连接成功! 记录。
接下来再打开一个网页,服务地址中输入 ws://127.0.0.1:8080/websocket/huxy ,点击 开启连接 按钮,然后回到第一次打开的网页在消息框中输入 {"toUserId":"huxy","message":"i love you"} ,点击 发送到服务端 ,第二个网页中会收到服务端推送的消息 {"fromUserId":"wupx","message":"i love you","toUserId":"huxy"} 。
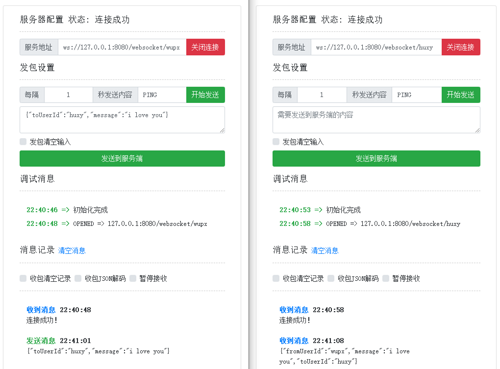
同样,项目的日志中也会有相应的日志:
2020-06-30 12:40:48.894  INFO 78908 --- [nio-8080-exec-1] com.wupx.server.WebSocketServer          : 用户连接:wupx,当前在线人数为:1
2020-06-30 12:40:58.073  INFO 78908 --- [nio-8080-exec-2] com.wupx.server.WebSocketServer          : 用户连接:huxy,当前在线人数为:2
2020-06-30 12:41:05.870  INFO 78908 --- [nio-8080-exec-3] com.wupx.server.WebSocketServer          : 用户消息:wupx,报文:{"toUserId":"huxy","message":"i love you"}
总结
本文简单地介绍了 Spring Boot 集成 WebSocket 实现服务端主动推送消息到客户端,是不是十分简单呢?大家可以自己也写个 demo 试试!
本文的完整代码在 https://github.com/wupeixuan/SpringBoot-Learn 的 websocket 目录下。
最好的关系就是互相成就,大家的 点赞、在看、转发、留言 就是我创作的最大动力。
参考
https://github.com/wupeixuan/SpringBoot-Learn
《深入浅出Spring Boot 2.x》
正文到此结束
- 本文标签: map ConcurrentHashMap HTML spring Ajax js 服务端 GitHub XML 测试 message cat HashMap CTO 目录 总结 https IO 数据 json 协议 ACE 压力 springboot TCP final git NIO UI synchronized 实例 服务器 http tar Spring Boot 时间 开发 pom bean 配置 session parse web src id 代码 key remote Atom
- 版权声明: 本文为互联网转载文章,出处已在文章中说明(部分除外)。如果侵权,请联系本站长删除,谢谢。
- 本文海报: 生成海报一 生成海报二
热门推荐


相关文章

近期评论
-
ws0132613@gmail.comhttps://getmacos.com/gopanel/william smith
-
谢谢
-
https://www.newcmy.com/register?aff=HBVX建议您试试草莓云机场,可以流畅观看youtube和tiktok,上reddit/x也没有问题,还有各种ai优化节点。
-
-
-
想购买您这个站,我的联系方式QQ741756694微信同步 能卖联系
-
-
-
-
Loading...
![[HBLOG]公众号](https://www.liuhaihua.cn/img/qrcode_gzh.jpg)

