JDBC
一 JDBC简介
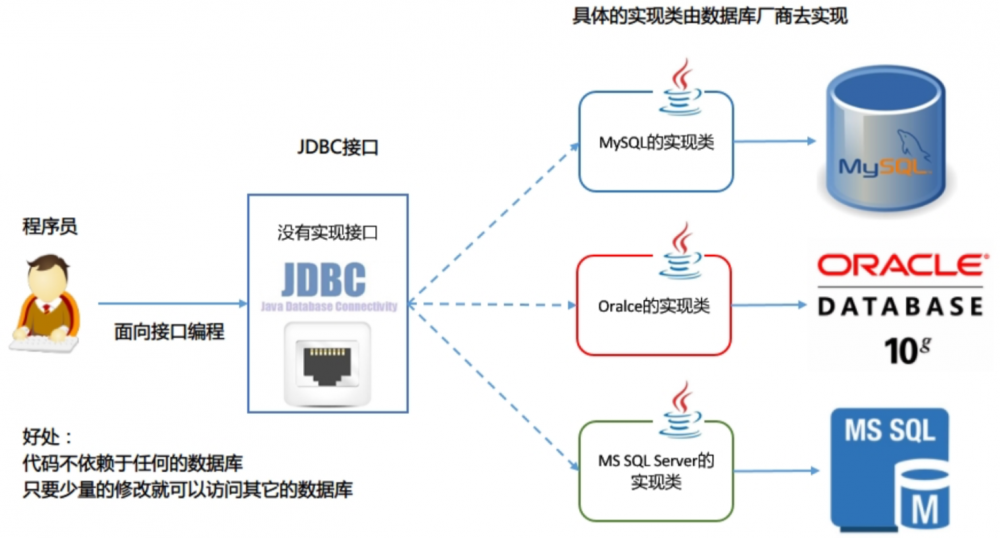
Java DataBase Connectivity Java语言连接数据库
官方(Sun公司)定义的一套操作所有关系型数据库的规则(接口) 各个数据库厂商去实现这套接口 提供数据库驱动JAR包 可以使用这套接口(JDBC)编程 真正执行的代码是驱动JAR包中的实现类
二 JDBC初体验
1. 新建一个Maven项目
pom.xml
<?xml version="1.0" encoding="UTF-8"?>
<project xmlns="http://maven.apache.org/POM/4.0.0"
         xmlns:xsi="http://www.w3.org/2001/XMLSchema-instance"
         xsi:schemaLocation="http://maven.apache.org/POM/4.0.0 http://maven.apache.org/xsd/maven-4.0.0.xsd">
    <modelVersion>4.0.0</modelVersion>
    <groupId>com.hy.jdbc</groupId>
    <artifactId>jdbc-demo</artifactId>
    <version>1.0-SNAPSHOT</version>

    <!-- 定义依赖版本号 -->
    <properties>
        <junit.version>4.12</junit.version>
        <mysql-connector-java.version>8.0.11</mysql-connector-java.version>
        <druid.version>1.1.10</druid.version>
    </properties>

    <!-- 管理jar版本号 -->
    <dependencyManagement>
        <dependencies>
            <!-- junit -->
            <dependency>
                <groupId>junit</groupId>
                <artifactId>junit</artifactId>
                <version>${junit.version}</version>
            </dependency>
            <!-- mysql -->
            <dependency>
                <groupId>mysql</groupId>
                <artifactId>mysql-connector-java</artifactId>
                <version>${mysql-connector-java.version}</version>
            </dependency>
            <dependency>
                <groupId>com.alibaba</groupId>
                <artifactId>druid</artifactId>
                <version>${druid.version}</version>
            </dependency>
        </dependencies>
    </dependencyManagement>

    <dependencies>
        <!-- junit -->
        <dependency>
            <groupId>junit</groupId>
            <artifactId>junit</artifactId>
        </dependency>
        <!-- mysql -->
        <dependency>
            <groupId>mysql</groupId>
            <artifactId>mysql-connector-java</artifactId>
        </dependency>
        <dependency>
            <groupId>com.alibaba</groupId>
            <artifactId>druid</artifactId>
        </dependency>
    </dependencies>
</project>
sql
CREATE TABLE account (
    aid INT PRIMARY KEY,
    aname VARCHAR(100),
    amoney DOUBLE
);
2. 插入
@Test
public void test01() {
    Connection connection = null;
    PreparedStatement statement = null;
    try {
        // 注册驱动 MySQL5之后的驱动JAR包可以省略该步骤
        Class.forName("com.mysql.cj.jdbc.Driver");
        // 获取数据库连接对象 Connection
        connection = DriverManager.getConnection("jdbc:mysql://localhost:3306/demo_hy", "root", "root");
        // 开启事务
        connection.setAutoCommit(false);
        // 定义SQL
        String sql = "insert into account values(?, ?, ?)";
        // 获取执行SQL的对象 PreparedStatement
        statement = connection.prepareStatement(sql);
        // 设置参数
        statement.setInt(1, 1); //'?' 位置的编号 从1开始
        statement.setString(2, "No1"); //'?' 位置的编号 从1开始
        statement.setDouble(3, 2000); //'?' 位置的编号 从1开始
        // 执行SQL 返回受影响的行数
        int count = statement.executeUpdate();
        // 提交事务
        connection.commit();
        // 处理结果
        System.out.println("count = " + count);

    } catch (Exception e) {
        e.printStackTrace();
        // 回滚事务
        if (null != connection) {
            try {
                connection.rollback();
            } catch (SQLException exception) {
                exception.printStackTrace();
            }
        }

    } finally {
        // 释放资源
        if (null != statement) {
            try {
                statement.close();
            } catch (SQLException e) {
                e.printStackTrace();
            }
        }

        if (null != connection) {
            try {
                connection.close();
            } catch (SQLException e) {
                e.printStackTrace();
            }
        }
    }
}
3. 删除
@Test
public void test02() {
    Connection connection = null;
    PreparedStatement statement = null;
    try {
        // 注册驱动 MySQL5之后的驱动JAR包可以省略该步骤
        //Class.forName("com.mysql.cj.jdbc.Driver");
        // 获取数据库连接对象 Connection
        connection = DriverManager.getConnection("jdbc:mysql://localhost:3306/demo_hy", "root", "root");
        // 开启事务
        connection.setAutoCommit(false);
        // 定义SQL
        String sql = "delete from account where aid = ?";
        // 获取执行SQL的对象 PreparedStatement
        statement = connection.prepareStatement(sql);
        // 设置参数
        statement.setInt(1, 1); //'?' 位置的编号 从1开始
        // 执行SQL 返回受影响的行数
        int count = statement.executeUpdate();
        // 提交事务
        connection.commit();
        // 处理结果
        System.out.println("count = " + count);

    } catch (Exception e) {
        e.printStackTrace();
        // 回滚事务
        if (null != connection) {
            try {
                connection.rollback();
            } catch (SQLException exception) {
                exception.printStackTrace();
            }
        }

    } finally {
        // 释放资源
        if (null != statement) {
            try {
                statement.close();
            } catch (SQLException e) {
                e.printStackTrace();
            }
        }

        if (null != connection) {
            try {
                connection.close();
            } catch (SQLException e) {
                e.printStackTrace();
            }
        }
    }
}
4. 修改
@Test
public void test03() {
    Connection connection = null;
    PreparedStatement statement1 = null;
    PreparedStatement statement2 = null;
    try {
        // 注册驱动 MySQL5之后的驱动JAR包可以省略该步骤
        Class.forName("com.mysql.cj.jdbc.Driver");
        // 获取数据库连接对象 Connection
        connection = DriverManager.getConnection("jdbc:mysql://localhost:3306/demo_hy", "root", "root");
        // 开启事务
        connection.setAutoCommit(false);
        // 定义SQL
        String sql1 = "update account set amoney = amoney + ? where aid = ?";
        String sql2 = "update account set amoney = amoney - ? where aid = ?";
        // 获取执行SQL的对象 PreparedStatement
        statement1 = connection.prepareStatement(sql1);
        statement2 = connection.prepareStatement(sql2);
        // 设置参数
        statement1.setDouble(1, 500); //'?' 位置的编号 从1开始
        statement1.setInt(2, 1); //'?' 位置的编号 从1开始
        statement2.setDouble(1, 500); //'?' 位置的编号 从1开始
        statement2.setInt(2, 2); //'?' 位置的编号 从1开始
        // 执行SQL 返回受影响的行数
        statement1.executeUpdate();
        int i = 3 / 0; //模拟异常
        statement2.executeUpdate();
        // 提交事务
        connection.commit();

    } catch (Exception e) {
        e.printStackTrace();
        // 回滚事务
        if (null != connection) {
            try {
                connection.rollback();
            } catch (SQLException exception) {
                exception.printStackTrace();
            }
        }

    } finally {
        // 释放资源
        if (null != statement2) {
            try {
                statement2.close();
            } catch (SQLException e) {
                e.printStackTrace();
            }
        }

        if (null != statement1) {
            try {
                statement1.close();
            } catch (SQLException e) {
                e.printStackTrace();
            }
        }

        if (null != connection) {
            try {
                connection.close();
            } catch (SQLException e) {
                e.printStackTrace();
            }
        }
    }
}
5. 查询
@Test
public void test04() {
    Connection connection = null;
    PreparedStatement statement = null;
    ResultSet resultSet = null;
    try {
        // 注册驱动 MySQL5之后的驱动JAR包可以省略该步骤
        Class.forName("com.mysql.cj.jdbc.Driver");
        // 获取数据库连接对象 Connection
        connection = DriverManager.getConnection("jdbc:mysql://localhost:3306/demo_hy", "root", "root");
        // 开启事务
        connection.setAutoCommit(false);
        // 定义SQL
        String sql = "select * from account";
        // 获取执行SQL的对象 PreparedStatement
        statement = connection.prepareStatement(sql);
        // 执行SQL 返回结果集
        resultSet = statement.executeQuery();
        // 提交事务
        connection.commit();
        // 处理结果
        while (resultSet.next()) {
            int id = resultSet.getInt(1); //代表列的编号 从1开始
            String name = resultSet.getString("aname"); //代表列的名称
            double money = resultSet.getDouble(3); //代表列的编号 从1开始
            System.out.println(id + "---" + name + "---" + money);
        }

    } catch (Exception e) {
        e.printStackTrace();
        // 回滚事务
        if (null != connection) {
            try {
                connection.rollback();
            } catch (SQLException exception) {
                exception.printStackTrace();
            }
        }

    } finally {
        // 释放资源
        if (null != resultSet) {
            try {
                resultSet.close();
            } catch (SQLException e) {
                e.printStackTrace();
            }
        }

        if (null != statement) {
            try {
                statement.close();
            } catch (SQLException e) {
                e.printStackTrace();
            }
        }

        if (null != connection) {
            try {
                connection.close();
            } catch (SQLException e) {
                e.printStackTrace();
            }
        }
    }
}
三 数据库连接池
一个存放数据库连接的容器
当系统初始化后 容器被创建 容器中会申请一些连接对象 当用户访问数据库时 从容器中获取连接对象 用户访问完之后 会将连接对象归还给容器 这样可以节约资源 提高访问效率
常见的数据库连接池有 Druid C3P0...
Druid初体验
druid.properties
url=jdbc:mysql://localhost:3306/demo_hy
driverClassName=com.mysql.cj.jdbc.Driver
username=root
password=root
maxActive=10
minIdle=5
XTest.java
@Test
public void test05() {
    InputStream stream = null;
    Connection connection = null;
    PreparedStatement statement = null;
    ResultSet resultSet = null;
    try {
        // 加载配置文件
        Properties properties = new Properties();
        stream = XTest.class.getClassLoader().getResourceAsStream("druid.properties");
        properties.load(stream);
        // 获取连接池对象
        DataSource dataSource = DruidDataSourceFactory.createDataSource(properties);
        // 获取数据库连接对象 Connection
        connection = dataSource.getConnection();
        // 开启事务
        connection.setAutoCommit(false);
        // 定义SQL
        String sql = "select * from account";
        // 获取执行SQL的对象 PreparedStatement
        statement = connection.prepareStatement(sql);
        // 执行SQL 返回结果集
        resultSet = statement.executeQuery();
        // 提交事务
        connection.commit();
        // 处理结果
        while (resultSet.next()) {
            int id = resultSet.getInt(1); //代表列的编号 从1开始
            String name = resultSet.getString("aname"); //代表列的名称
            double money = resultSet.getDouble(3); //代表列的编号 从1开始
            System.out.println(id + "---" + name + "---" + money);
        }

    } catch (Exception e) {
        e.printStackTrace();
        // 回滚事务
        if (null != connection) {
            try {
                connection.rollback();
            } catch (SQLException exception) {
                exception.printStackTrace();
            }
        }

    } finally {
        // 释放资源
        if (null != resultSet) {
            try {
                resultSet.close();
            } catch (SQLException e) {
                e.printStackTrace();
            }
        }

        if (null != statement) {
            try {
                statement.close();
            } catch (SQLException e) {
                e.printStackTrace();
            }
        }

        if (null != connection) {
            try {
                connection.close(); //归还连接
            } catch (SQLException e) {
                e.printStackTrace();
            }
        }

        if (null != stream) {
            try {
                stream.close();
            } catch (IOException e) {
                e.printStackTrace();
            }
        }
    }
}
正文到此结束
- 本文标签: 代码 final 删除 ssl ResultSet sql key MySQL5 mysql IO pom 管理 dependencies http root Statement cat XML Connection autocommit maven druid 数据 参数 src apache JDBC 数据库 Select dataSource ACE db stream UI REST lib update 连接池 CTO C3P0 Word tab junit 配置 value schema java id https
- 版权声明: 本文为互联网转载文章,出处已在文章中说明(部分除外)。如果侵权,请联系本站长删除,谢谢。
- 本文海报: 生成海报一 生成海报二
热门推荐


相关文章

近期评论
-
收到
-
https://www.liuhaihua.cn/archives/40657.html 这篇博客中的图片打不开了
-
不会英语啊。
-
-
-
https://pplx.ai/floraliu4199466 这个链接打不开是什么原因?
-
-
-
-
来看看,最近更新了一波,顺着友联过来的,几年过去了,网站越搞越好,厉害
Loading...
![[HBLOG]公众号](https://www.liuhaihua.cn/img/qrcode_gzh.jpg)

