Java NIO 笔记
一、NIO和IO的区别
1.1 单向和双向
传统IO在读写数据到一个具体位置(可能是文件、网络主机)时,读写操作需要分别对应一个流。而NIO是通过channel的方式连接具体位置,且channel是双向,即可用来读,也可用来写
1.2 直接和间接
传统的流,读取时,直接从流中即可获取内容,写时,直接向流写内容即可。而NIO中,channel读写需要通过Buffer间接进行。
一段典型的IO代码如下:
import java.io.*;
public class CopyFile {

   public static void main(String args[]) throws IOException {
      FileInputStream in = null;
      FileOutputStream out = null;

      try {
         in = new FileInputStream("input.txt");
         out = new FileOutputStream("output.txt");

         int c;
         while ((c = in.read()) != -1) {
            out.write(c);
         }
      }finally {
         if (in != null) {
            in.close();
         }
         if (out != null) {
            out.close();
         }
      }
   }
}
一段典型NIO代码如下:
RandomAccessFile aFile = new RandomAccessFile("/home/vincent/Temp/test_nio", "rw");
   FileChannel inChannel = aFile.getChannel();

    ByteBuffer buf = ByteBuffer.allocate(48);


    //从文件中读
    int bytesRead = inChannel.read(buf);//读数据先要读到buffer
    while (bytesRead != -1) {
        System.out.println("Read " + bytesRead);
        buf.flip();

        while(buf.hasRemaining()){
            System.out.print((char) buf.get());//再从buffer中输出结果
        }
        buf.clear();
        bytesRead = inChannel.read(buf);
    }
    aFile.close();
1.3 阻塞和非阻塞
传统IO在通过stream读写时,会阻塞当前线程,一定要操作完成后才能返回。比如InputStream的read方法就规定,在流结束或异常之前,如果没有读到数据就阻塞。而NIO的Buffer是非阻塞式的,调用后,立马返回,当前buffer中有什么就是什么。
二、NIO的典型流程和组件
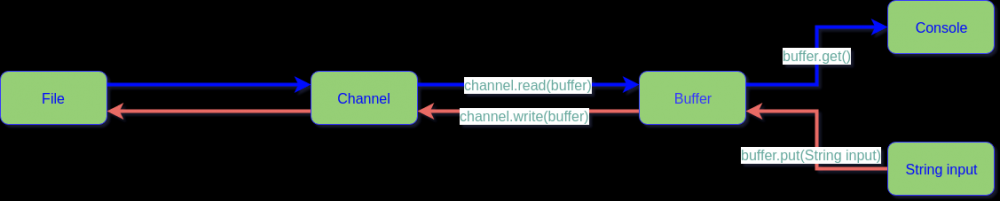
不同于IO直接通过流进行读写。NIO在读写时,都需要channel和buffer两个组件来配合使用,才能完成读写操作。
上图以对文件读写为例。
由于NIO中,channel和buffer都是双向的,即可用来读,也可用来写。所以只需要创建一个channel和buffer
读时
- channel通过read方法,将读到数据写到buffer
- buffer通过get方法,获取从channel中拿到的数据,然后输出到console(或者其他什么处理都可以)
写时
- 将需要写的内容方法通过put方法放入buffer
- 然后将buffer,通过channel.write(buffer)方式写入到channel。由于channel对接的file,也即写入到了文件
三、Buffer的三个指针
- position :指向读/写的下一个位置
- limit:指向读/写的最大边界
- mark:标记当前position的位置,后面可以通过reset将postition重置到mark标记的位置
Buffer的一系列方法,无非就是在操控上面的三个指针,从而达到灵活读写的目的。以ByteBuffer举例,典型的指针操作场景如下
3.1 Buffer的读写转换
 从左至右介绍
- 初始写状态,buffer为空。position指向0, limit 指向最大的位置3
- 当调用buffer的put方法,写两个内容时。position位置指向了2
- 调用buffer的flip方法后,将buffer由写模式,变成读模式。limit指向了1,表示可以读的最大位置。position指向0,表示从buffer初始位置开始读
- 调用buffer的get方法,读取一个数据。position的便指向下一个可读位置,也就是1
- buffer调用clear方法,将buffer转化成写模式,回到第一步。position指向buffer初始位置,limit指向buffer最大位置。
3.2 Buffer的倒带操作
读模式倒带
将position恢复到初始位置,重新读取
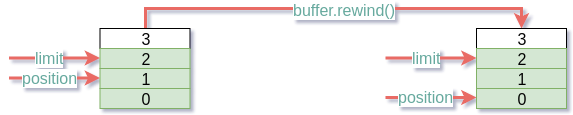
position已经读到了1位置,调用buffer rewind方法后,position会被重置到初始位置,也既是0。这样buffer中的内容,又可以重新读取
写模式倒带
将position恢复到初始位置,重新写,会造成之前的写丢失。这里就不画图了
3.3 mark指针操作
在调用buffer的mark方法后,再调用reset方法,可以实现类似rewind的倒带操作,并都可用于读写。不同的是,rewind倒带时,会将position指针重置到初始位置。而reset则会将指针重置到mark方法之前标记的位置
 以上图为读模式下的buffer做举例说明,从左至右
- position读到了1
- 调用mark方法后,mark指针也指向了1
- 调用get方法后,position指针指向了2
- 调用reset方法后,position指针重置到mark指针所在的位置,也就是1
四、一段典型的NIO代码
public void testNio() throws IOException {
    RandomAccessFile aFile = new RandomAccessFile("/home/vincent/Temp/test_nio", "rw");
    FileChannel inChannel = aFile.getChannel();

    ByteBuffer buf = ByteBuffer.allocate(48);


    //从文件中读
    int bytesRead = inChannel.read(buf);
    while (bytesRead != -1) {
        System.out.println("Read " + bytesRead);
        buf.flip();

        while(buf.hasRemaining()){
            System.out.print((char) buf.get());
        }
        buf.clear();
        bytesRead = inChannel.read(buf);
    }

    //写数据到文件:
    buf.clear();
    buf.put("/nhello java.".getBytes());
    buf.flip();
    while(buf.hasRemaining()) {
        inChannel.write(buf);
    }
    aFile.close();
}
test_nio文件之前有一句文本“hello world”
以上方法使用了一个channel和一个buffer,完成了从test_nio读数据输出后,再向文件写如了一句“hello java”。程序执行完毕后,可以在文件中看到“hello world”和“hello java”两句话。这段代码展示了channel和buffer的双向性,同时也展示了buffer在读写两种模式下的切换方法。
五、Selector
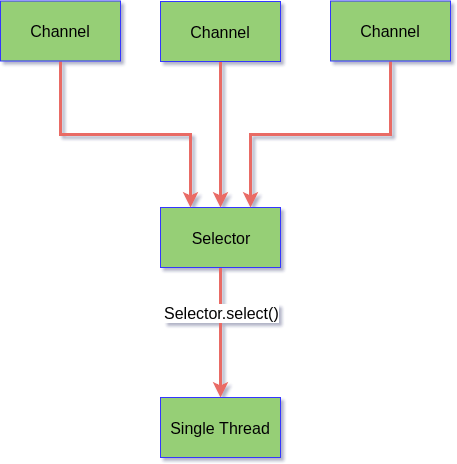
我们知道,每个线程需要占用一定资源,同时线程间切换,也需要耗费资源。所以如果对每个channel都创建一个线程的话,在某些场景下是低效的。比如通过NIO实现一个网络服务器,由于可能面对巨大的并发量,显然一个channel对应一个线程是不可取的。而selector是一种多路复用器技术,通过selector的单线程,实现对多个channel状态的监听,从而降低线程数量。selector的机制图如下:
使用selector的典型代码如下:
Selector selector = Selector.open();

	channel.configureBlocking(false);

	SelectionKey key = channel.register(selector, SelectionKey.OP_READ);


	while(true) {

	  int readyChannels = selector.select();//这一步会阻塞

	  if(readyChannels == 0) continue;


	  Set<SelectionKey> selectedKeys = selector.selectedKeys();

	  Iterator<SelectionKey> keyIterator = selectedKeys.iterator();

	  while(keyIterator.hasNext()) {

	    SelectionKey key = keyIterator.next();

	    if(key.isAcceptable()) {
	        // a connection was accepted by a ServerSocketChannel.

	    } else if (key.isConnectable()) {
	        // a connection was established with a remote server.

	    } else if (key.isReadable()) {
	        // a channel is ready for reading

	    } else if (key.isWritable()) {
	        // a channel is ready for writing
	    }

	    keyIterator.remove();
	  }
	}
上述代码大致来看,首先先将channel注册到selector,然后selector通过select方法返回已经ready的channel数量,如果没有任何ready,则阻塞。如果有ready的channel,则通过遍历SelectionKey,依次判定期望的事件是否发生。如果是,则执行相关业务操作
六、参考资料
http://tutorials.jenkov.com/java-nio/index.html
正文到此结束
热门推荐


相关文章

近期评论
-
出现OpenClaw "device signature expired"。the Gateway rejects if Math.abs(Date.now() - signedAt) > 10 * 60 * 1000 (10 minutes)
-
-
想购买您这个站,我的联系方式QQ741756694微信同步 能卖联系
-
-
-
博主的博客用的什么技术栈,内容都是干货,赞
-
-
https://www.liuhaihua.cn/archives/40657.html 这篇博客中的图片打不开了
-
不会英语啊。
-
Loading...
![[HBLOG]公众号](https://www.liuhaihua.cn/img/qrcode_gzh.jpg)

