Spring 源码学习(一)容器的基础结构

[TOC]
本篇笔记主要记录了以下内容:
使用 ClassPathXmlApplicationContext ,通过在 xml 注册一个 bean ,跟踪代码,了解它从配置文件的 <bean> 标签,加载到 BeanFactory 注册表 beanDefinitionMap 的详细过程。
展示的代码摘取了一些核心方法,去掉一些默认设置和日志输出,还有大多数错误异常也去掉了,小伙伴想看详细代码,注释和 demo,可以下载我上传的笔记项目:ledger:
码云 Gitee 地址
Github 地址
通过阅读源码的过程,了解设计者的设计思路和从中学习,对 spring 有个基础的了解。
基础结构
一开始先介绍如何在代码中注册和使用 bean :
config.xml
<?xml version="1.0" encoding="UTF-8"?>
<beans>
	<bean id="book" class="domain.SimpleBook"/>
</beans>
复制代码
定义一个简单类:
SimpleBook.java
public class SimpleBook {

	private int id;

	private String name = "Default Name";

}
复制代码
使用 ClassPathXmlApplicationContext 从 xml 配置文件中获取 bean :
public static void main(String[] args) {
	ClassPathXmlApplicationContext context = new ClassPathXmlApplicationContext("config.xml");
	SimpleBook book = context.getBean(SimpleBook.class);
	System.out.println(book.getName());
}
复制代码
正常运行代码后,控制台会输出:
Default Name
复制代码
通常来说,我们要使用一个对象,需要通过 new 初始化,分配内存空间等操作进行实例化,但有了 Spring 容器后,我们可以将 SimpleBook 交给了 Spring 进行管理,不需要在代码中进行 new SimpleBook 等操作,通过自动注入(例如 @Autowire 注解),或者像例子中的,获取上下文对象,然后使用 getBean() 方法,可以方便的获取对象实例~。
ClassPathXmlApplicationContext
ClassPathXmlApplicationContext 的继承体系结构图:
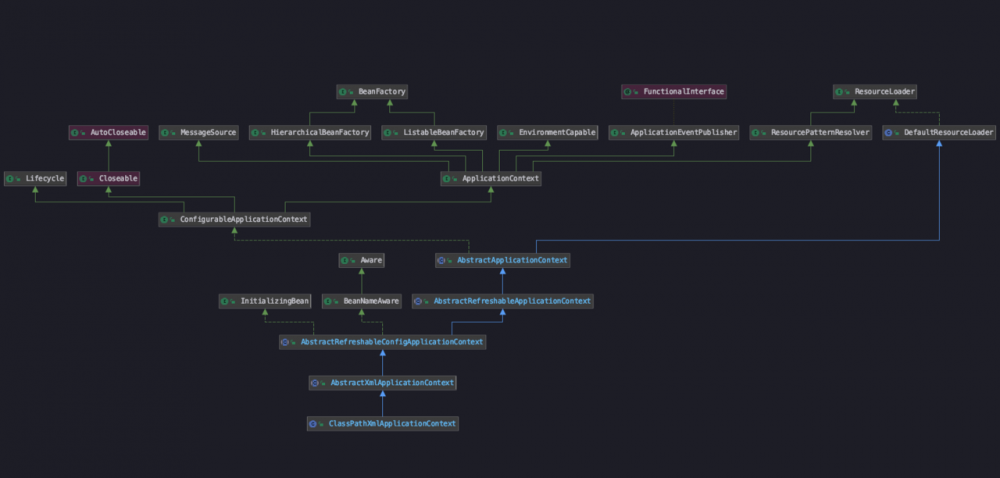
这种结构图是通过 IDEA 编辑器的 Diagrams 功能展示的,对当前类右键选择,可以看到继承体系,继承了哪些类和引用了哪些接口,方便我们去了解~
ClassPathXmlApplicationContext 继承自 AbstractApplicationContext ,而 AbstractRefreshableApplicationContext 是 AbstractApplicationContext 的抽象子类,使用的类注册工厂是 DefaultListableBeanFactory ,这个注册工厂也很重要,后面会有它的介绍。
简单来说, DefaultListableBeanFactory 是 Spring 注册及加载 bean 的默认实现,它会将注册的 bean 放入 beanDefinitionMap 进行 key-value 形式存储。
在图片的右上角能看到, ResourceLoader 是它的顶层接口,表示这个类实现了资源加载功能。
构造器的代码:
public ClassPathXmlApplicationContext(
		String[] configLocations, boolean refresh, @Nullable ApplicationContext parent)
		throws BeansException {
	super(parent);
	// 注释 1.1 获取资源文件
	setConfigLocations(configLocations);
	if (refresh) {
		refresh();
	}
}
复制代码
构造器
从这行代码看出,子类构造器调用了父类的构造器:
super(parent)
一直跟踪代码,发现从子类开始,沿着父类一直往上调用,直到 AbstractApplicationContext :
public AbstractApplicationContext() {
	this.resourcePatternResolver = getResourcePatternResolver();
}

public AbstractApplicationContext(@Nullable ApplicationContext parent) {
	this();
	setParent(parent);
}
复制代码
protected ResourcePatternResolver getResourcePatternResolver() {
	return new PathMatchingResourcePatternResolver(this);
}
复制代码
初始化函数主要用来设定资源匹配的处理器, ResourcePatternResolver 接口定义了将位置模式(例如, ant样式的路径模式)解析为资源对象的策略,具体实现类是 PathMatchingResourcePatternResolver (路径匹配资源模式解析器,用来解析我们传入的路径 config.xml )
设置配置文件路径
org.springframework.context.support.AbstractRefreshableConfigApplicationContext
public void setConfigLocations(@Nullable String... locations) {
	if (locations != null) {
		Assert.noNullElements(locations, "Config locations must not be null");
		// 注释 1.2 将配置资源路径放入 configLocations 数组中
		this.configLocations = new String[locations.length];
		for (int i = 0; i < locations.length; i++) {
			this.configLocations[i] = resolvePath(locations[i]).trim();
		}
	}
	else {
		this.configLocations = null;
	}
}
复制代码
resolvePath ,用途是: 解析给定的路径,用对应的占位符(placeholder)替换占位符
例如 new ClassPathXmlApplicationContext("classpath:config.xml"); ,就需要解析 classpath ,变成正确路径。
protected String resolvePath(String path) {
	return getEnvironment().resolveRequiredPlaceholders(path);
}
复制代码
我们有不同的运行环境, dev , test 或者 prod ,这个时候加载的配置文件和属性应该有所不同,这个时候就需要使用到 Environment 来进行区分。
Spring 环境和属性是由四个部分组成:
-
Environment: 环境,由Profile和PropertyResolver组合。 -
Profile: 配置文件,可以理解为,容器里多个配置组别的属性和bean,只有激活的profile,它对应的组别属性和bean才会被加载 -
PropertySource: 属性源, 使用CopyOnWriteArrayList数组进行属性对key-value形式存储 -
PropertyResolver:属性解析器,这个用途就是解析属性
Environment
首先来看 StandardServletEnvironment 的继承体系:
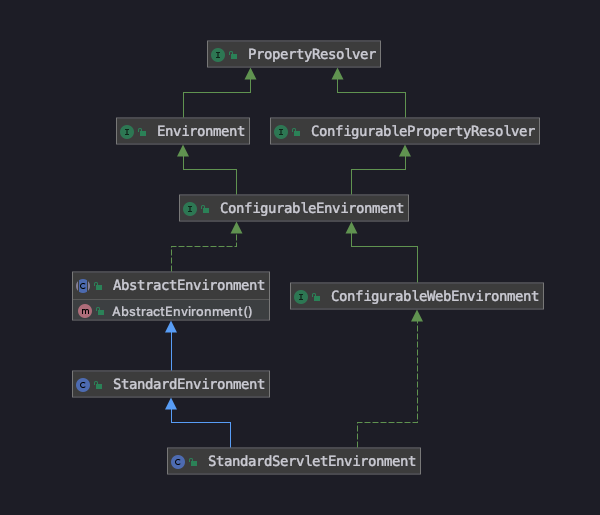
可以看到,顶层接口是 PropertyResolver ,它是用来解析属性的,最终解析调用方法的是
PropertyPlaceholderHelper.replacePlaceholders
public String replacePlaceholders(String value, PlaceholderResolver placeholderResolver) {
	Assert.notNull(value, "'value' must not be null");
    // 用返回的值替换格式为{@code ${name}}的所有占位符
	return parseStringValue(value, placeholderResolver, null);
}
复制代码
Profile
通过这个属性,可以同时在配置文件中部署两套配置,用来适用于生产环境和开发环境,这样可以方便的进行切换开发、部署环境,常用来更换不同的数据库或者配置文件。
demo :(引用自参考资料第四条)
<!-- 测试环境配置文件 -->
<beans profile="test">
    <context:property-placeholder location="classpath:test/*.properties, classpath:common/*.properties" />
</beans>

<!-- 生产环境配置文件 -->
<beans profile="production">
    <context:property-placeholder location="classpath:production/*.properties, classpath:common/*.properties" />
</beans>

<!-- 开发环境配置文件 -->
<beans profile="development">
    <context:property-placeholder location="classpath:dev/*.properties, classpath:common/*.properties" />
</beans>
复制代码
有两种方式可以设置选择使用哪套配置:
① 在 web.xml 中设置
<context-param>
    <param-name>spring.profiles.active</param-name>
    <param-value>test</param-value>
</context-param>
复制代码
② 在代码启动时设置
context.getEnvironment().setActiveProfiles("test");
复制代码
Property
Property 官方注释描述:
/**
 * A description of a JavaBeans Property that allows us to avoid a dependency on
 * {@code java.beans.PropertyDescriptor}. The {@code java.beans} package
 * is not available in a number of environments (e.g. Android, Java ME), so this is
 * desirable for portability of Spring's core conversion facility.
 *
 **/

它允许我们避免对 {@code java.bean . propertydescriptor}的依赖。

因为 {@code java。bean} package 在许多环境中都不可用(例如 Android、Java ME),因此这对于 Spring 的核心转换工具的可移植性来说是非常理想的。
复制代码
在 AbstractEnvironment.java 中能找到,在设置环境 env 时, new 了一个 MutablePropertySources ,用这个对象来保存属性 :
private final MutablePropertySources propertySources = new MutablePropertySources()

private final ConfigurablePropertyResolver propertyResolver =
			new PropertySourcesPropertyResolver(this.propertySources);

public AbstractEnvironment() {
	customizePropertySources(this.propertySources);
}
复制代码
PropertySource 接口
继承体系如图:
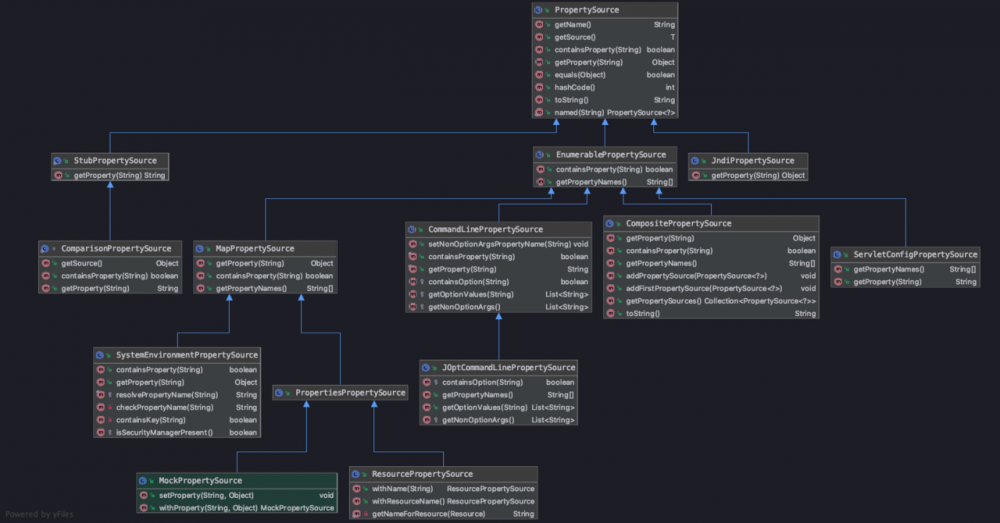
从 PropertySource 继承体系来看, customizePropertySources 方法的调用链路是从子类一直往上调用 :
AbstractEnvironment -> StandardServletEnvironment -> StandardEnvironment
最终在 StandardEnvironment 使用 CopyOnWriteArrayList 数组进行属性存储
protected void customizePropertySources(MutablePropertySources propertySources) {
	propertySources.addLast(new MapPropertySource(SYSTEM_PROPERTIES_PROPERTY_SOURCE_NAME, getSystemProperties()));
	propertySources.addLast(new SystemEnvironmentPropertySource(SYSTEM_ENVIRONMENT_PROPERTY_SOURCE_NAME, getSystemEnvironment()));
}
复制代码
例如从上面可以看出, propertySourceList 将会存储系统的参数:

到时这些参数就能在启动的应用中,通过上下文 context 进行获取
((MutablePropertySources)((StandardEnvironment)context.environment).propertySources).propertySourceList
复制代码
小结
刚才一系列的前奏工作,只是用来识别路径资源和加载系统参数
- 设定构造器
- 识别路径变量
- 设定环境参数 :主要是
Environment体系,还有在propertySources中保存了运行时的参数
Bean 的解析和注册
Spring bean 的解析和注册有一个重要的方法 refresh()
AbstractApplicationContext.refresh()
public void refresh() throws BeansException, IllegalStateException {
	synchronized (this.startupShutdownMonitor) {
		// Prepare this context for refreshing. (为更新准备上下文,设定一些标志)
		prepareRefresh();
		// Tell the subclass to refresh the internal bean factory. (告诉子类去更新它们的 bean factory)
		// 类的注册到 bean factory 也是在这一步
		ConfigurableListableBeanFactory beanFactory = obtainFreshBeanFactory();
		// Prepare the bean factory for use in this context.
		prepareBeanFactory(beanFactory);
		try {
			// Allows post-processing of the bean factory in context subclasses.
			postProcessBeanFactory(beanFactory);
			// Invoke factory processors registered as beans in the context.
			invokeBeanFactoryPostProcessors(beanFactory);
			// Register bean processors that intercept bean creation.
			registerBeanPostProcessors(beanFactory);
			// Initialize message source for this context.
			initMessageSource();
			// Initialize event multicaster for this context.
			initApplicationEventMulticaster();
			// Initialize other special beans in specific context subclasses.
			onRefresh();
			// Check for listener beans and register them.
			registerListeners();
			// Instantiate all remaining (non-lazy-init) singletons.
			finishBeanFactoryInitialization(beanFactory);
			// Last step: publish corresponding event.
			finishRefresh();
		}
		catch (BeansException ex) {
			if (logger.isWarnEnabled()) {
				logger.warn("Exception encountered during context initialization - " +
						"cancelling refresh attempt: " + ex);
			}
			// Destroy already created singletons to avoid dangling resources.
			destroyBeans();
			// Reset 'active' flag.
			cancelRefresh(ex);
			// Propagate exception to caller.
			throw ex;
		}
		finally {
			// Reset common introspection caches in Spring's core, since we
			// might not ever need metadata for singleton beans anymore...
			resetCommonCaches();
		}
	}
}
复制代码
下面会围绕这个方法进行跟踪和分析。
prepareRefresh 准备更新
该方法作用: 准备此上下文用于刷新、设置其启动日期和 active 标志,以及执行任何属性源的初始化。
protected void prepareRefresh() {
	// Switch to active.
	// Initialize any placeholder property sources in the context environment.(空方法,等子类实现)
	initPropertySources();
	// Validate that all properties marked as required are resolvable:(校验参数)
	// see ConfigurablePropertyResolver#setRequiredProperties
	getEnvironment().validateRequiredProperties();
	// Allow for the collection of early ApplicationEvents,
	// to be published once the multicaster is available...
	this.earlyApplicationEvents = new LinkedHashSet<>();
}
复制代码
具体校验的方法
org.springframework.core.env.AbstractPropertyResolver#validateRequiredProperties
public void validateRequiredProperties() {
	MissingRequiredPropertiesException ex = new MissingRequiredPropertiesException();
	for (String key : this.requiredProperties) {
		if (this.getProperty(key) == null) {
			ex.addMissingRequiredProperty(key);
		}
	}
	if (!ex.getMissingRequiredProperties().isEmpty()) {
		throw ex;
	}
}
复制代码
可以看到,校验逻辑是遍历 requiredProperties ,它是一个字符 Set ,默认情况下是空,表示不需要校验任何元素,如果列表中有值,然后根据 key 获取对应的环境变量为空,将会抛出异常,导致 Spring 容器初始化失败。
自定义环境变量校验
既然给出了 requireProperties 列表,表示我们能够往里面自定义添加,需要校验的环境变量:
- 创建一个类,继承自
AnnotationConfigServletWebServerApplicationContext,重载initPropertySources - 在应用启动时,将自己新建的类设定成应用上下文(
application.setApplicationContextClass(CustomContext.class);)
例如:(引用自参考资料第五条)
public class CustomApplicationContext extends AnnotationConfigServletWebServerApplicationContext {
    @Override
    protected void initPropertySources() {
        super.initPropertySources();
        //把"MYSQL_HOST"作为启动的时候必须验证的环境变量
        getEnvironment().setRequiredProperties("MYSQL_HOST");
    }
}


public static void main(String[] args) {
    SpringApplication springApplication = new SpringApplication(CustomizepropertyverifyApplication.class);
    springApplication.setApplicationContextClass(CustomApplicationContext.class);
    springApplication.run(args);
}
复制代码
通过添加自定义的校验值,在 Spring 应用启动时,就能提前进行校验
获取 bean 容器
在这行代码中 ConfigurableListableBeanFactory beanFactory = obtainFreshBeanFactory();
具体调用的是 :
org.springframework.context.support.AbstractRefreshableApplicationContext#refreshBeanFactory
protected final void refreshBeanFactory() throws BeansException {
	// 在更新时,如果发现已经存在,将会把之前的 bean 清理掉,并且关闭老 bean 容器
	if (hasBeanFactory()) {
		destroyBeans();
		closeBeanFactory();
	}
	try {
		DefaultListableBeanFactory beanFactory = createBeanFactory();
		beanFactory.setSerializationId(getId());
		customizeBeanFactory(beanFactory);
		// 注释 1.3 开始加载 (bean 注册)
		loadBeanDefinitions(beanFactory);
		synchronized (this.beanFactoryMonitor) {
			this.beanFactory = beanFactory;
		}
	}
	catch (IOException ex) {
		throw new ApplicationContextException("I/O error parsing bean definition source for " + getDisplayName(), ex);
	}
}
复制代码
这个入口方法很重要,在这一步新建了 bean 容器和解析 bean ,并将 bean 注册到容器中。
BeanFactory 继承体系
本次例子以及多数情况下,使用的 bean 容器都是 DefaultListableBeanFactory ,所以来介绍一下它的继承体系:

可以看出,继承体系十分庞大,继承了多个注册器和实现多个接口,常用的是单例 Singleton 注册器和别名 Alias 注册器,这两个概念也很庞大,可以先简单熟悉下,知道容器默认的对象是单例模式,还有可以通过别名来找到 bean ,之后有机会再详细介绍吧。
BanFactory 自定义
具体方法如下,通过这个方法,可以对工厂进行定制化设置,让子类进行自由配置:
org.springframework.context.support.AbstractRefreshableApplicationContext#customizeBeanFactory
protected void customizeBeanFactory(DefaultListableBeanFactory beanFactory) {
	if (this.allowBeanDefinitionOverriding != null) {
		// 默认是 false,不允许覆盖
		beanFactory.setAllowBeanDefinitionOverriding(this.allowBeanDefinitionOverriding);
	}
	if (this.allowCircularReferences != null) {
		// 默认是 false,不允许循环引用
		beanFactory.setAllowCircularReferences(this.allowCircularReferences);
	}
}
复制代码
Bean 加载和解析
核心方法是这个:
org.springframework.context.support.AbstractXmlApplicationContext#loadBeanDefinitions(org.springframework.beans.factory.support.DefaultListableBeanFactory)
protected void loadBeanDefinitions(DefaultListableBeanFactory beanFactory) throws BeansException, IOException {
	// Create a new XmlBeanDefinitionReader for the given BeanFactory.
	// 为给定的BeanFactory创建一个新的XmlBeanDefinitionReader
	XmlBeanDefinitionReader beanDefinitionReader = new XmlBeanDefinitionReader(beanFactory);
	// Configure the bean definition reader with this context's
	// resource loading environment.
	beanDefinitionReader.setEnvironment(this.getEnvironment());
	beanDefinitionReader.setResourceLoader(this);
	beanDefinitionReader.setEntityResolver(new ResourceEntityResolver(this));
	// Allow a subclass to provide custom initialization of the reader,
	// then proceed with actually loading the bean definitions.(空方法,让子类进行扩展实现)
	initBeanDefinitionReader(beanDefinitionReader);
	loadBeanDefinitions(beanDefinitionReader);
}
复制代码
在解析 XML 中,使用到以下两个继承体系: EntityResolver 和 BeanDefinitionReader
EntityResolver

接口全路径是: org.xml.sax.EntityResolver ,具体解析使用的方法是:
org.springframework.beans.factory.xml.ResourceEntityResolver#resolveEntity
该方法是用于解析 schema 和 dtd ,具体深究的话也很复杂,但解析 xml 不是我想了解的点,所以先跳过~
BeanDefinitionReader
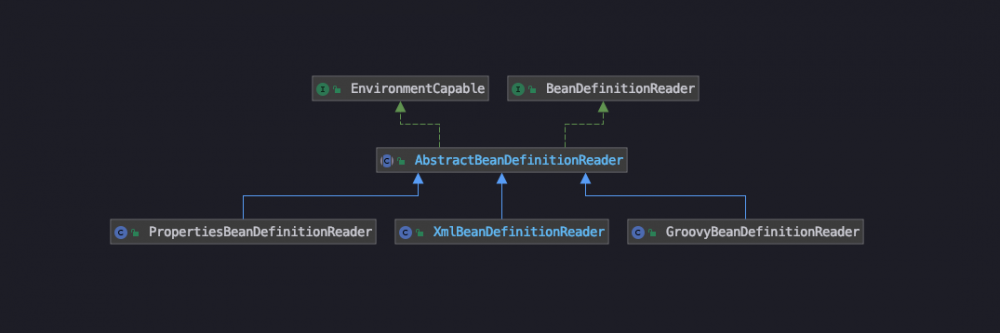
顶级接口是 BeanDefinitionReader ,用于 XML Bean 定义的 Bean 定义阅读器。将实际读取的 XML 文档委托给实现。
这两个类用途很明了,就是将 XML 转成输入流,感兴趣的同学可以继续深入跟踪~
配置文件加载
入口方法:(由于有多个重名方法,所以复制路径时,将参数的类型也拷贝了)
org.springframework.beans.factory.support.AbstractBeanDefinitionReader#loadBeanDefinitions(java.lang.String, java.util.Set<org.springframework.core.io.Resource>)
核心方法是这两行
public int loadBeanDefinitions(String location, @Nullable Set<Resource> actualResources) throws BeanDefinitionStoreException {
    // 获取资源文件(资源加载器从路径识别资源文件)
    Resource[] resources = ((ResourcePatternResolver) resourceLoader).getResources(location)
    // 注释 1.6 根据资源文件加载 bean
    int count = loadBeanDefinitions(resources);
    ···
}
复制代码
获取资源文件后,开始解析资源文件(也就是一开始传参的 config.xml ),将它转换成 Document
跟踪代码可以看到,进行解析的资源文件从 Resource 包装成 EncodeResouce ,为输入流添加了字符编码(默认为 null ),体现了设计模式 - 装饰器模式
遍历资源文件,进行转换,核心方法是以下两行:
org.springframework.beans.factory.xml.XmlBeanDefinitionReader#loadBeanDefinitions(org.springframework.core.io.support.EncodedResource)
public int loadBeanDefinitions(EncodedResource encodedResource) throws BeanDefinitionStoreException {
	// 注释 1.7 从资源文件中获取输入流
	InputStream inputStream = encodedResource.getResource().getInputStream();
	InputSource inputSource = new InputSource(inputStream);
	return doLoadBeanDefinitions(inputSource, encodedResource.getResource());
}
复制代码
Bean 解析
org.springframework.beans.factory.xml.XmlBeanDefinitionReader#doLoadBeanDefinitions
protected int doLoadBeanDefinitions(InputSource inputSource, Resource resource)
	throws BeanDefinitionStoreException {
	// 注释 1.8 将资源文件解析成 document
	Document doc = doLoadDocument(inputSource, resource);
	// 注释 1.10 从 doc 和资源中解析元素,注册到 bean factory
	int count = registerBeanDefinitions(doc, resource);
	if (logger.isDebugEnabled()) {
		logger.debug("Loaded " + count + " bean definitions from " + resource);
	}
	return count;
}
复制代码
在 doLoadDocument() 方法中,将资源文件解析成 docuemnt 文档
org.springframework.beans.factory.xml.XmlBeanDefinitionReader#registerBeanDefinitions
public int registerBeanDefinitions(Document doc, Resource resource) throws BeanDefinitionStoreException {
	// 使用 DefaultBeanDefinitionDocumentReader 实例化 BeanDefinitionDocumentReader
	BeanDefinitionDocumentReader documentReader = createBeanDefinitionDocumentReader();
	// 记录统计前 beanDefinition 的加载个数
	int countBefore = getRegistry().getBeanDefinitionCount();
	// 加载及注册 bean,这里使用注册工厂的是 DefaultListableBeanFactory
	documentReader.registerBeanDefinitions(doc, createReaderContext(resource));
	// 记录本次加载的 BeanDefinition 个数(新值 - 旧值)
	return getRegistry().getBeanDefinitionCount() - countBefore;
}
复制代码
这里不多介绍如何转换成 document 和 documentReader 初始化,感兴趣的同学请继续跟踪~
下面要说的是 bean 容器 DefaultListableBeanFactory 解析 document
org.springframework.beans.factory.xml.DefaultBeanDefinitionDocumentReader#doRegisterBeanDefinitions
protected void doRegisterBeanDefinitions(Element root) {
	BeanDefinitionParserDelegate parent = this.delegate;
	this.delegate = createDelegate(getReaderContext(), root, parent);
	if (this.delegate.isDefaultNamespace(root)) {
		String profileSpec = root.getAttribute(PROFILE_ATTRIBUTE);
		if (StringUtils.hasText(profileSpec)) {
			String[] specifiedProfiles = StringUtils.tokenizeToStringArray(
					profileSpec, BeanDefinitionParserDelegate.MULTI_VALUE_ATTRIBUTE_DELIMITERS);
			// We cannot use Profiles.of(...) since profile expressions are not supported
			// in XML config. See SPR-12458 for details.
			if (!getReaderContext().getEnvironment().acceptsProfiles(specifiedProfiles)) {
				if (logger.isDebugEnabled()) {
					logger.debug("Skipped XML bean definition file due to specified profiles [" + profileSpec +
							"] not matching: " + getReaderContext().getResource());
				}
				return;
			}
		}
	}
	// preProcess 和 postProcess 点进去会发现是空方法,这两个方法留给子类重载,体现了设计模式 - 模板方法
	preProcessXml(root);
	// 注释 1.11 核心方法,解析 doc 元素
	parseBeanDefinitions(root, this.delegate);
	postProcessXml(root);
	this.delegate = parent;
}
复制代码
从上面可以看出,在解析之前,如果命名空间是以 http://www.springframework.org/schema/beans 开头,将会检查 profile 属性
校验通过后,开始正式解析 doc 元素
org.springframework.beans.factory.xml.DefaultBeanDefinitionDocumentReader#parseBeanDefinitions
protected void parseBeanDefinitions(Element root, BeanDefinitionParserDelegate delegate) {
	if (delegate.isDefaultNamespace(root)) {
		// 注释 1.12 遍历 doc 中的节点列表
		NodeList nl = root.getChildNodes();
		for (int i = 0; i < nl.getLength(); i++) {
			Node node = nl.item(i);
			if (node instanceof Element) {
				Element ele = (Element) node;
				if (delegate.isDefaultNamespace(ele)) {
					// 注释 1.13 识别出默认标签的 bean 注册
					// 根据元素名称,调用不同的加载方法,注册 bean
					parseDefaultElement(ele, delegate);
				}
				else {
					delegate.parseCustomElement(ele);
				}
			}
		}
	}
	else {
		delegate.parseCustomElement(root);
	}
}
复制代码
在这一步中,我们在 xml 中配置的属性就能对应到 document 对象中,在之后流程中取出使用
默认标签解析
这部分不会细说,之后再写一篇进行补充,所以简单的过下代码中,是如何解析默认标签的
- IMPORT :导入标签
- ALIAS :别名标签
- BEAN :
bean标签 - NESTED_BEANS :
beans标签(嵌套的beans)
org.springframework.beans.factory.xml.DefaultBeanDefinitionDocumentReader#parseDefaultElement
private void parseDefaultElement(Element ele, BeanDefinitionParserDelegate delegate) {
	if (delegate.nodeNameEquals(ele, IMPORT_ELEMENT)) {
		importBeanDefinitionResource(ele);
	}
	else if (delegate.nodeNameEquals(ele, ALIAS_ELEMENT)) {
		processAliasRegistration(ele);
	}
	else if (delegate.nodeNameEquals(ele, BEAN_ELEMENT)) {
		processBeanDefinition(ele, delegate);
	}
	else if (delegate.nodeNameEquals(ele, NESTED_BEANS_ELEMENT)) {
		// recurse
		doRegisterBeanDefinitions(ele);
	}
}
复制代码
让我们来看下如何解析 bean 标签
bean 标签解析
org.springframework.beans.factory.xml.DefaultBeanDefinitionDocumentReader#processBeanDefinition
protected void processBeanDefinition(Element ele, BeanDefinitionParserDelegate delegate) {
	// 注释 1.15 解析 bean 名称的元素
	BeanDefinitionHolder bdHolder = delegate.parseBeanDefinitionElement(ele);
	if (bdHolder != null) {
		bdHolder = delegate.decorateBeanDefinitionIfRequired(ele, bdHolder);
		try {
			// Register the final decorated instance. (注释 1.16 注册最后修饰后的实例)
			BeanDefinitionReaderUtils.registerBeanDefinition(bdHolder, getReaderContext().getRegistry());
		}
		catch (BeanDefinitionStoreException ex) {
			getReaderContext().error("Failed to register bean definition with name '" +
					bdHolder.getBeanName() + "'", ele, ex);
		}
		// Send registration event.
		getReaderContext().fireComponentRegistered(new BeanComponentDefinition(bdHolder));
	}
}
复制代码
下面讲下几个关键方法所做的事情
获取 id 和 name
org.springframework.beans.factory.xml.BeanDefinitionParserDelegate#parseBeanDefinitionElement(org.w3c.dom.Element, org.springframework.beans.factory.config.BeanDefinition)
public BeanDefinitionHolder parseBeanDefinitionElement(Element ele, @Nullable BeanDefinition containingBean) {
	// 获取 ID 属性
	String id = ele.getAttribute(ID_ATTRIBUTE);
	// 获取 NAME 属性
	String nameAttr = ele.getAttribute(NAME_ATTRIBUTE);
	List<String> aliases = new ArrayList<>();
	if (StringUtils.hasLength(nameAttr)) {
		// 名称按照 , ; 进行分割
		String[] nameArr = StringUtils.tokenizeToStringArray(nameAttr, MULTI_VALUE_ATTRIBUTE_DELIMITERS);
		aliases.addAll(Arrays.asList(nameArr));
	}
	String beanName = id;
	if (!StringUtils.hasText(beanName) && !aliases.isEmpty()) {
		// 如果没有指定 id,将 name 的第一个值作为 id
		beanName = aliases.remove(0);
	}
	// 默认 null
	if (containingBean == null) {
		// 检查名字是否唯一,如果 id 重复了,将抛出错误
		// 内部 usedNames 是一个 HashSet,将会存储加载过的 name 和 aliases
		checkNameUniqueness(beanName, aliases, ele);
	}
	// 将公共属性放入 AbstractBeanDefinition,具体实现在子类 GenericBeanDefinition
	AbstractBeanDefinition beanDefinition = parseBeanDefinitionElement(ele, beanName, containingBean);
	if (beanDefinition != null) {
		if (!StringUtils.hasText(beanName)) {
			if (containingBean != null) {
				// 如果 id 和 name 都是空,那个 spring 会给它生成一个默认的名称
				beanName = BeanDefinitionReaderUtils.generateBeanName(
						beanDefinition, this.readerContext.getRegistry(), true);
			}
			else {
				beanName = this.readerContext.generateBeanName(beanDefinition);
				String beanClassName = beanDefinition.getBeanClassName();
				if (beanClassName != null &&
						beanName.startsWith(beanClassName) && beanName.length() > beanClassName.length() &&
						!this.readerContext.getRegistry().isBeanNameInUse(beanClassName)) {
					aliases.add(beanClassName);
				    }
			    }
		    }
		}
		String[] aliasesArray = StringUtils.toStringArray(aliases);
		return new BeanDefinitionHolder(beanDefinition, beanName, aliasesArray);
	}
	return null;
}
复制代码
获取 id 和 name 属性的流程,按照代码注释一步一步往下走就清晰了
该方法主要工作流程如下:
- 提取元素中的
idname属性 - 进一步解析其它所有属性并统一封装到
GenericBeanDefinition类型的实例中 - 检测到
bean没有指定beanName使用默认规则生成beanName - 将获取到的信息封装到
BeanDefinitionHolder的实例中
对标签中其它属性的解析
org.springframework.beans.factory.xml.BeanDefinitionParserDelegate#parseBeanDefinitionElement(org.w3c.dom.Element, java.lang.String, org.springframework.beans.factory.config.BeanDefinition)
public AbstractBeanDefinition parseBeanDefinitionElement(
		Element ele, String beanName, @Nullable BeanDefinition containingBean) {
    AbstractBeanDefinition bd = createBeanDefinition(className, parent);
    parseBeanDefinitionAttributes(ele, beanName, containingBean, bd);
    bd.setDescription(DomUtils.getChildElementValueByTagName(ele, DESCRIPTION_ELEMENT));
    parseMetaElements(ele, bd);
    parseLookupOverrideSubElements(ele, bd.getMethodOverrides());
    parseReplacedMethodSubElements(ele, bd.getMethodOverrides());
    parseConstructorArgElements(ele, bd);
    parsePropertyElements(ele, bd);
    parseQualifierElements(ele, bd);
    bd.setResource(this.readerContext.getResource());
    bd.setSource(extractSource(ele));
    return bd;
}
复制代码
初始化 BeanDefiniton 在这个方法中:(具体实现是它的子类 GenericBeanDefinition 噢~)
BeanDefinitionReaderUtils.createBeanDefinition(parentName, className, this.readerContext.getBeanClassLoader())
public static AbstractBeanDefinition createBeanDefinition(
			@Nullable String parentName, @Nullable String className, @Nullable ClassLoader classLoader) throws ClassNotFoundException {
	GenericBeanDefinition bd = new GenericBeanDefinition();
	bd.setParentName(parentName);
	if (className != null) {
		if (classLoader != null) {
			bd.setBeanClass(ClassUtils.forName(className, classLoader));
		}
		else {
			bd.setBeanClassName(className);
		}
	}
	return bd;
}
复制代码
后面就是解析其它标签的内容,之后会补坑~
BeanDefinition 继承体系
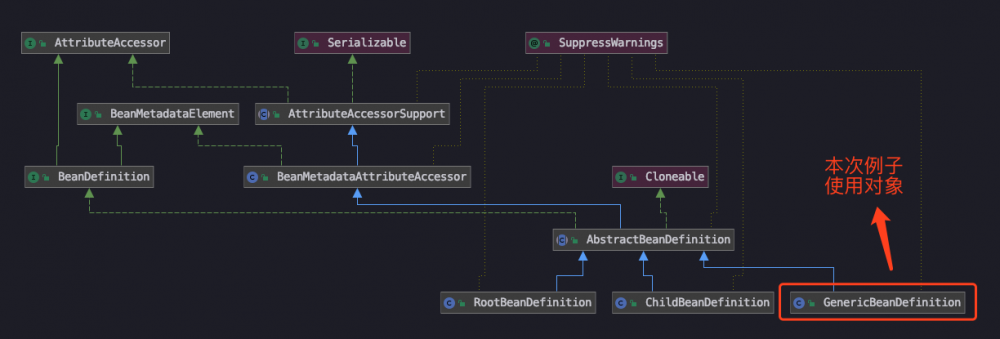
从图中可以看出, BeanDefinition 是一个接口, GenericBeanDefinition 、 RootBeanDefinition 、 ChildBeanDefinition ,这三者都继承了 AbstractBeanDefinition 。
其中 BeanDefinition 是配置文件 <bean> 元素标签在容器中的内部表示形式。
<bean> 元素标签拥有 class 、 scope 、 lazy-init 等配置属性, BeanDefinition 则提供了相应的 beanClass 、 scope 、 lazyInit 属性,两者是互相对应的。
BeanDefinitionHolder 修饰
org.springframework.beans.factory.xml.BeanDefinitionParserDelegate#decorateBeanDefinitionIfRequired(org.w3c.dom.Element, org.springframework.beans.factory.config.BeanDefinitionHolder, org.springframework.beans.factory.config.BeanDefinition)
public BeanDefinitionHolder decorateBeanDefinitionIfRequired(
			Element ele, BeanDefinitionHolder definitionHolder, @Nullable BeanDefinition containingBd) {
	// 方法中的第三个参数是父类 bean
	// 当对某个嵌套配置进行分析时,这里需要传递,是为了使用父类的 scope 属性,以备子类没设定 scope,可以使用父类的 scope 属性
	BeanDefinitionHolder finalDefinition = definitionHolder;

	// Decorate based on custom attributes first.
	NamedNodeMap attributes = ele.getAttributes();
	// 遍历所有的属性,进行属性的修饰
	for (int i = 0; i < attributes.getLength(); i++) {
		Node node = attributes.item(i);
		finalDefinition = decorateIfRequired(node, finalDefinition, containingBd);
	}

	// Decorate based on custom nested elements.
	NodeList children = ele.getChildNodes();
	// 遍历所有的子节点,修饰子元素
	for (int i = 0; i < children.getLength(); i++) {
		Node node = children.item(i);
		if (node.getNodeType() == Node.ELEMENT_NODE) {
			finalDefinition = decorateIfRequired(node, finalDefinition, containingBd);
		}
	}
	return finalDefinition;
}
复制代码
在之前的常规属性解析后,在这一步操作中,主要用来完成自定义标签元素的解析,这里继续留个坑~
Bean 注册
经历千辛万苦,通过上面一些列的解析操作,终于到了注册 bean 信息的方法
org.springframework.beans.factory.support.BeanDefinitionReaderUtils#registerBeanDefinition
public static void registerBeanDefinition(
			BeanDefinitionHolder definitionHolder, BeanDefinitionRegistry registry)
			throws BeanDefinitionStoreException {
		// Register bean definition under primary name.
		// 注释 1.17 在 DefaultListableBeanFactory 的 beanDefinitionMap 中添加 bean 定义
		String beanName = definitionHolder.getBeanName();
		registry.registerBeanDefinition(beanName, definitionHolder.getBeanDefinition());
		// Register aliases for bean name, if any.
		String[] aliases = definitionHolder.getAliases();
		if (aliases != null) {
			for (String alias : aliases) {
				registry.registerAlias(beanName, alias);
			}
		}
	}
复制代码
上面也说过,这里使用的 bean 容器是 DefaultListableBeanFactory ,注册方法关键操作时以下两行代码:
org.springframework.beans.factory.support.DefaultListableBeanFactory#registerBeanDefinition
public void registerBeanDefinition(String beanName, BeanDefinition beanDefinition) {
	this.beanDefinitionMap.put(beanName, beanDefinition);
	this.beanDefinitionNames.add(beanName);
}
复制代码
到了这一步,将 bean 信息放入到 beanDefinitionMap ,完成了类注册的操作~
为了描述代码逻辑的完整性,对以下一些方法进行简单介绍。
prepareBeanFactory
准备类加载器的环境,对前面获取到的 beanFactory(ConfigurationListableBeanFactory) 进行相关的设置,包括 ClassLoader , post-processors 等
postProcessBeanFactory
将加载所有 bean 定义,但还没有实例化 bean 时,在应用程序上下文的标准初始化之后修改它的内部 bean 容器。
这允许在特定的 ApplicationContext 实现中注册特殊的 beanpostprocessor 等。
这也是一个空方法,等子类去实现
invokeBeanFactoryPostProcessors
实例化并调用所有注册的 BeanFactoryPostProcessorBean ,这些是后处理器,处理类型是 BeanFactory , Spring 容器允许在实例化 bean 前,读取 bean 信息和修改它的属性。
相当于在实例化前,给用户最后一次机会去修改 bean 信息。
还有一点,执行也可以有先后顺序,依据这些处理器是否实现 PriorityOrdered 、 Order 接口,根据 order 值进行排序。
registerBeanPostProcessors
实例化并注册所有后处理器,跟上面的不一样,这个方法处理的类型是 Bean ,跟上面方法一样的是,也有优先级的概念~
initMessageSource
初始化此上下文的消息源
initApplicationEventMulticaster
初始化此上下文的事件多播程序
onRefresh
模板方法,可被重写以添加特定于上下文的刷新工作。
在实例化单例之前调用特殊 bean 的初始化。(雾,不知道是啥特殊 bean ,留个坑=-=)
此实现为空。
registerListeners
检查侦听器 bean 并注册它们
事件监听者类型是 java.util.EventListener
finishBeanFactoryInitialization
完成 bean 容器的初始化,实例化所有剩余的(非惰性初始化)单例
finishRefresh
最后一步,发布相应的事件
事件的类型是: java.util.EventObject
resetCommonCaches
真真注册的最后一步,用来清除缓存
重置 Spring 核心中的公共内省缓存,因为我们可能再也不需要单例 bean 的元数据了
总结
本章笔记只是记录了一个 bean 如何从 xml 加载到 bean 容器的注册表中,经历了多行代码,终于摸清调用链路。
这里总结一下核心的 loadBeanDefinitions(beanFactory) 工作流程:
① 读取配置文件
- 封装资源文件 :获取路径文件,封装成
EncodeResource - 获取输入流 :从
Resource中获取对应的InputStream并构造InputSource - 传递参数 :通过构造的
InputSource实例和Resource实例,传递给doLoadBeanDefinitions方法
② 加载 bean
- 获取对
XML资源文件的验证模式 - 加载
XML资源文件,解析成对应的Document文档 :里面有多个Node节点信息,保存了我们写的配置信息 - 根据
Document文件进行Bean信息解析
③ bean 标签的解析和注册
- 委托
BeanDefinitionDelegate类的parseBeanDefinitionElement方法 :对元素进行解析,返回BeanDefinitionHolder类型的实例(里面包含了class、name、id、alias等属性) - 解析标签 :判断标签类型,看解析的是默认标签还是自定义标签
- 对
bdHodler进行注册 :解析完成后,注册bean信息,注册操作委托给了BeanDefinitionReaderUtils的registerBeanDefinition方法 - 发送响应事件 :通知相关的监听器,通知
bean容器已经加载完成
下一篇笔记再会~
踩坑记录
Javadoc generation failed. Generated Javadoc options file (useful for troubleshooting)
在编译时,发现无法成功,提示 Javadoc 的错误,解决方法是在 gradle 文件中添加以下配置:
tasks.withType(Javadoc) {
    options.addStringOption('Xdoclint:none', '-quiet')
    options.addStringOption('encoding', 'UTF-8')
}
复制代码
正文到此结束
- 本文标签: Document IO node Qualifier description 开发 管理 ask mysql Android BeanDefinition 测试 key token ip HashSet map src 设计模式 下载 web parse 图片 IBM 类加载器 tar 解决方法 IDE DDL App 处理器 定制 XML bug servlet stream sql schema 注释 ACE java 遍历 cache tab https 参数 synchronized 部署 数据 统计 CTO message 编译 实例 id 测试环境 cat 总结 代码 http spring 解析 bean 源码 git list equals 自定义标签 UI core CEO 监听器 ssl DOM Collection db 缓存 数据库 final GitHub W3C 云 代码注释 Property classpath struct value ArrayList tag 配置 entity 空间 Listeners root
- 版权声明: 本文为互联网转载文章,出处已在文章中说明(部分除外)。如果侵权,请联系本站长删除,谢谢。
- 本文海报: 生成海报一 生成海报二
热门推荐


相关文章

近期评论
-
出现OpenClaw "device signature expired"。the Gateway rejects if Math.abs(Date.now() - signedAt) > 10 * 60 * 1000 (10 minutes)
-
-
想购买您这个站,我的联系方式QQ741756694微信同步 能卖联系
-
-
-
博主的博客用的什么技术栈,内容都是干货,赞
-
-
https://www.liuhaihua.cn/archives/40657.html 这篇博客中的图片打不开了
-
不会英语啊。
-
Loading...
![[HBLOG]公众号](https://www.liuhaihua.cn/img/qrcode_gzh.jpg)

