Mybatis逆向工程和对它的优化
逆向工程就是,我们根据数据的表,自动生成常见的Mapper映射接口和与数据库表对应的pojo实体类,以及和Mapper接口对应的XML SQL语句,解放双手不在去写重复的代码;比如对于每个表根据主键id的查询、更新、删除、以及添加,这些常见的我们都会去手写。但是逆向工程就会把这些东西给我生成好,直接拿去用。
github项目地址: github.com/fireshoot/G…
我使用的环境和逆向工程的方法
我是在IDEA上写的,其实和Eclipse差不多的,没有什么区别。
另外我使用的方法是使用的mybatis官方的插件:mybatis-generator。
使用mybatis-generator前的工作
首先导入 mybatis-generator的依赖:
<!-- 关于其他数据库依赖啥的我就不写了-->
        <!-- mybatis-generator逆向工程依赖-->
        <dependency>
            <groupId>org.mybatis.generator</groupId>
            <artifactId>mybatis-generator-core</artifactId>
            <version>1.3.2</version>
        </dependency>
复制代码
与数据的操作肯定要先配置数据库相关的参数:
spring.datasource.username=root
spring.datasource.url=jdbc:mysql://localhost:3306/training?useSSL=false
spring.datasource.password=root
spring.datasource.driver-class-name=com.mysql.jdbc.Driver
# mappers的位置
mybatis.mapper-locations=classpath:mappers/*.xml
# mybatis的基础配置
mybatis.config-location=classpath:mybatis-config.xml
复制代码
mybatis-config.xml中的配置文件:
<?xml version="1.0" encoding="UTF-8" ?>
<!DOCTYPE configuration PUBLIC "-//mybatis.org//DTD Config 3.0//EN" "http://mybatis.org/dtd/mybatis-3-config.dtd">
<configuration>
    <settings>
        <!-- 打开驼峰的配置 -->
        <setting name="mapUnderscoreToCamelCase" value="true"/>
    </settings>
    <!-- 设置这个数据类型的别名,后面可以用到-->
    <typeAliases>
        <typeAlias alias="Integer" type="java.lang.Integer"/>
        <typeAlias alias="Long" type="java.lang.Long"/>
        <typeAlias alias="HashMap" type="java.util.HashMap"/>
        <typeAlias alias="LinkedHashMap" type="java.util.LinkedHashMap"/>
        <typeAlias alias="List" type="java.util.List"/>
        <typeAlias alias="ArrayList" type="java.util.ArrayList"/>
        <typeAlias alias="LinkedList" type="java.util.LinkedList"/>
    </typeAliases>
</configuration>
复制代码
基础工作做完后,开始正式的配置逆向工程需要的参数
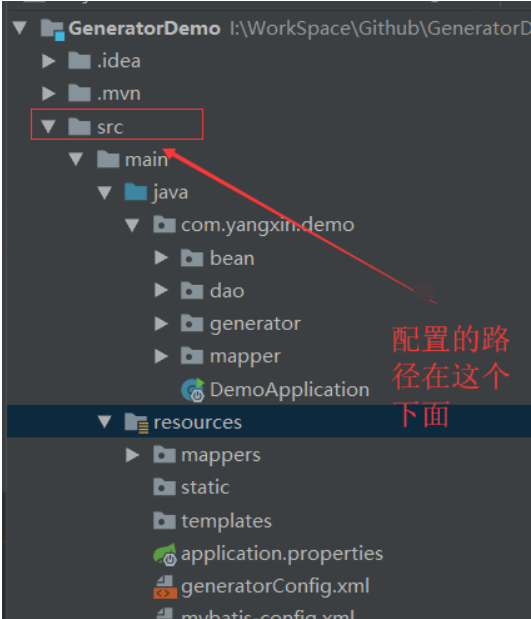
我在resources资源文件夹下新建了generatorConfig.xml文件,这个文件主要就是配置的是与逆向工程相关的参数,我将配置的信息都写了 注解:
<?xml version="1.0" encoding="UTF-8"?>
<!DOCTYPE generatorConfiguration
PUBLIC "-//mybatis.org//DTD MyBatis Generator Configuration 1.0//EN"
"http://mybatis.org/dtd/mybatis-generator-config_1_0.dtd">
<generatorConfiguration>
<!-- targetRuntime 要写Mybatis3,写其他的估计会报错,因为mysql现在的版本都很高了-->
<context id="DB2Tables" targetRuntime="Mybatis3">
<property name="javaFormatter" value="org.mybatis.generator.api.dom.DefaultJavaFormatter"/>
<commentGenerator>
<property name="suppressDate" value="true"/>
<!-- 是否去除自动生成的注释 true:是 : false:否 -->
<property name="suppressAllComments" value="true"/>
</commentGenerator>
<!--数据库链接URL,用户名、密码 -->
<!-- nullCatalogMeansCurrent 在5.1.42中默认是true,而在6.0.6默认为false。-->
<jdbcConnection driverClass="com.mysql.jdbc.Driver"
connectionURL="jdbc:mysql://localhost:3306/training" userId="root" password="root">
</jdbcConnection>
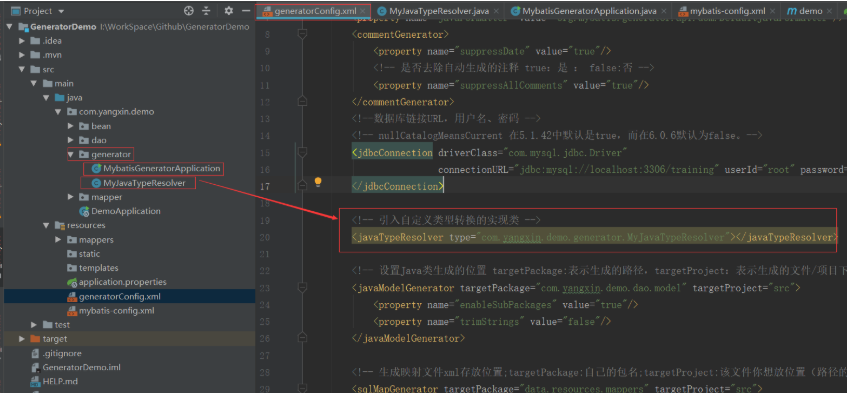
<!-- 引入自定义类型转换的实现类: 可以不用写 -->
<javaTypeResolver type="com.yangxin.demo.generator.MyJavaTypeResolver"></javaTypeResolver>
<!-- 设置Java类生成的位置 targetPackage:表示生成的路径,targetProject:表示生成的文件/项目下 , 下面这个配置的意思就是:在src下生成com.yangxin.demo.dao.model-->
<javaModelGenerator targetPackage="com.yangxin.demo.dao.model" targetProject="src">
<property name="enableSubPackages" value="true"/>
<property name="trimStrings" value="false"/>
</javaModelGenerator>
<!-- 生成映射文件xml存放位置;targetPackage:自己的包名;targetProject:该文件你想放位置(路径的不要有中文) -->
<sqlMapGenerator targetPackage="data.resources.mappers" targetProject="src">
<property name="enableSubPackages" value="true"/>
</sqlMapGenerator>
<!-- 生成DAO的包名和位置-->
<javaClientGenerator type="XMLMAPPER" targetPackage="com.yangxin.demo.dao.mapper"
targetProject="src">
<property name="enableSubPackages" value="true"/>
</javaClientGenerator>
<!-- 要生成的表 tableName是数据库中的表名或视图名 domainObjectName是实体类名-->
<table tableName="user" domainObjectName="User"
enableCountByExample="false"
enableUpdateByExample="false"
enableDeleteByExample="false"
enableSelectByExample="false"
selectByExampleQueryId="false">
<generatedKey column="id" sqlStatement="MySql" identity="true"/>
</table>
</context>
</generatorConfiguration>
复制代码
把generatorConfig.xml配置完成后,于是该进行下一步,写生成的代码,我新建了一个generator的包,并且新建了MybatisGeneratorApplication类具体如下:
public class MybatisGeneratorApplication {
private static Logger logger = LoggerFactory.getLogger(MybatisGeneratorApplication.class);
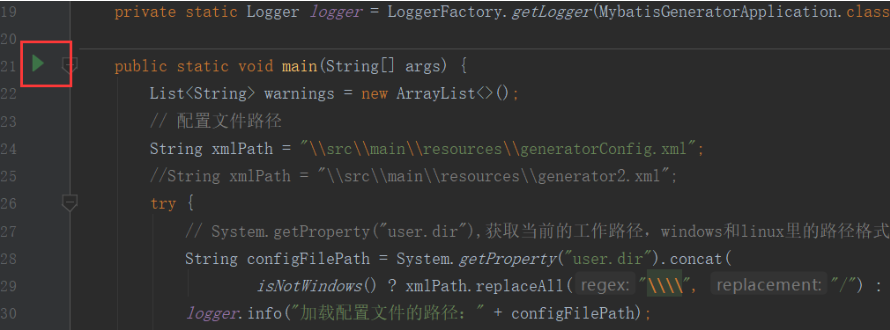
public static void main(String[] args) {
List<String> warnings = new ArrayList<>();
// 配置文件路径
String xmlPath = "//src//main//resources//generatorConfig.xml";
try {
// System.getProperty("user.dir"),获取当前的工作路径,windows和linux里的路径格式不一致,这里用来转换,windows的是左斜杠,linux是右斜杠
String configFilePath = System.getProperty("user.dir").concat(
isNotWindows() ? xmlPath.replaceAll("////", "/") : xmlPath);
logger.info("加载配置文件的路径:" + configFilePath);
boolean overwrite = true;
File configFile = new File(configFilePath);
// configFile.exists():测试此抽象路径名表示的文件或目录是否存在, isFile() :表示测试此抽象路径名表示的文件是否是一个标准文件。
logger.info("" + configFile.exists());
// 创建配置解析器
ConfigurationParser cp = new ConfigurationParser(warnings);
// 调用解析器创建配置对象()
Configuration config = cp.parseConfiguration(configFile);
// 创建一个ShellCallback对象,shellCallback接口是处理文件的创建和合并,默认是不支持文件合并的。
DefaultShellCallback callback = new DefaultShellCallback(overwrite);
// 创建一个MyBatisGenerator对象。MyBatisGenerator类是真正用来执行生成动作的类
MyBatisGenerator myBatisGenerator = new MyBatisGenerator(config, callback, warnings);
myBatisGenerator.generate(null);
} catch (Exception e) {
logger.error(e.getMessage(), e);
}
for (String wa : warnings) {
logger.info("warning:" + wa);
}
}
private static boolean isNotWindows() {
// System.getProperty("os.name") 获取当前运行的系统名称
return !System.getProperty("os.name").toLowerCase()
.startsWith("windows");
}
}
复制代码
emmm... 我在数据库建表的时候,有tinyInt类型的属性,于是还新建了下面这个类,如果你没有用到其实是不用配置,不过我都贴出来:
public class MyJavaTypeResolver extends JavaTypeResolverDefaultImpl {
    /**
     * 将tinyint转换为Integer
     */
    public MyJavaTypeResolver() {
        super();
        super.typeMap.put(-6, new JdbcTypeInformation("TINYINT", new FullyQualifiedJavaType(Short.class.getName())));
    }
}

复制代码
所有的事都准备,点击运行
得到的文件:

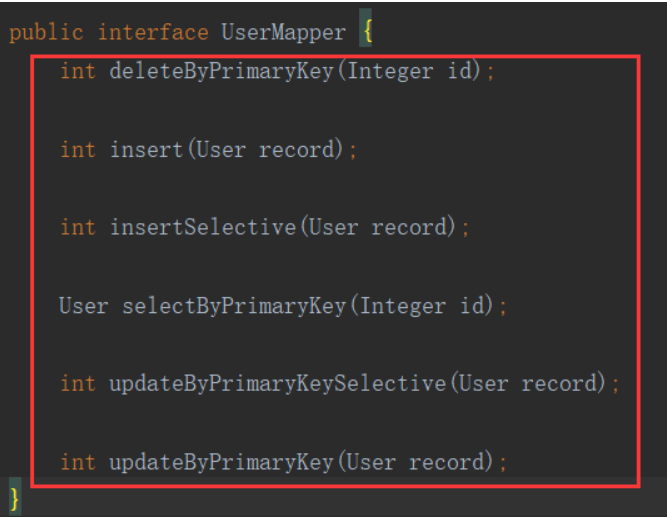
点开看看生成的是些什么内容:
public interface UserMapper {
    int deleteByPrimaryKey(Integer id);

    int insert(User record);

    int insertSelective(User record);

    User selectByPrimaryKey(Integer id);

    int updateByPrimaryKeySelective(User record);

    int updateByPrimaryKey(User record);
}
复制代码
生成的Mapper接口,这6个就是我们常见经常写的,而且自己都不知道写过多少遍的东西。
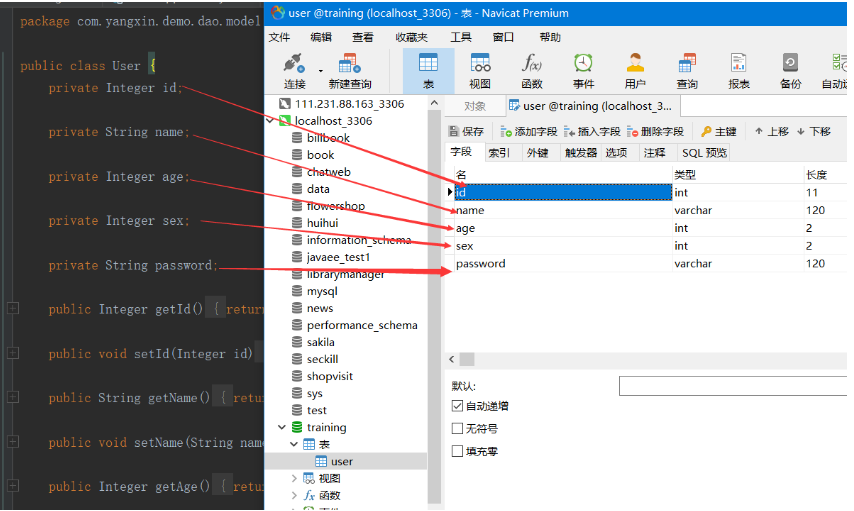
public class User {
    private Integer id;

    private String name;

    private Integer age;

    private Integer sex;

    private String password;

    public Integer getId() {
        return id;
    }

    public void setId(Integer id) {
        this.id = id;
    }

    public String getName() {
        return name;
    }

    public void setName(String name) {
        this.name = name;
    }

    public Integer getAge() {
        return age;
    }

    public void setAge(Integer age) {
        this.age = age;
    }

    public Integer getSex() {
        return sex;
    }

    public void setSex(Integer sex) {
        this.sex = sex;
    }

    public String getPassword() {
        return password;
    }

    public void setPassword(String password) {
        this.password = password;
    }
}
复制代码
生成的实体类,也不用我们自己写,但是这个位置需要注意的是,如果生成的属性名称没有成驼峰的形式,那么你要检查一下Mybatis的驼峰的配置是否存在或者有效。
<?xml version="1.0" encoding="UTF-8" ?>
<!DOCTYPE mapper PUBLIC "-//mybatis.org//DTD Mapper 3.0//EN" "http://mybatis.org/dtd/mybatis-3-mapper.dtd" >
<mapper namespace="com.yangxin.demo.dao.mapper.UserMapper" >
  <resultMap id="BaseResultMap" type="com.yangxin.demo.dao.model.User" >
    <id column="id" property="id" jdbcType="INTEGER" />
    <result column="name" property="name" jdbcType="VARCHAR" />
    <result column="age" property="age" jdbcType="INTEGER" />
    <result column="sex" property="sex" jdbcType="INTEGER" />
    <result column="password" property="password" jdbcType="VARCHAR" />
  </resultMap>
  <sql id="Base_Column_List" >
    id, name, age, sex, password
  </sql>
  <select id="selectByPrimaryKey" resultMap="BaseResultMap" parameterType="java.lang.Integer" >
    select
    <include refid="Base_Column_List" />
    from user
    where id = #{id,jdbcType=INTEGER}
  </select>
  <delete id="deleteByPrimaryKey" parameterType="java.lang.Integer" >
    delete from user
    where id = #{id,jdbcType=INTEGER}
  </delete>
  <insert id="insert" parameterType="com.yangxin.demo.dao.model.User" >
    <selectKey resultType="java.lang.Integer" keyProperty="id" order="AFTER" >
      SELECT LAST_INSERT_ID()
    </selectKey>
    insert into user (name, age, sex,
      password)
    values (#{name,jdbcType=VARCHAR}, #{age,jdbcType=INTEGER}, #{sex,jdbcType=INTEGER},
      #{password,jdbcType=VARCHAR})
  </insert>
  <insert id="insertSelective" parameterType="com.yangxin.demo.dao.model.User" >
    <selectKey resultType="java.lang.Integer" keyProperty="id" order="AFTER" >
      SELECT LAST_INSERT_ID()
    </selectKey>
    insert into user
    <trim prefix="(" suffix=")" suffixOverrides="," >
      <if test="name != null" >
        name,
      </if>
      <if test="age != null" >
        age,
      </if>
      <if test="sex != null" >
        sex,
      </if>
      <if test="password != null" >
        password,
      </if>
    </trim>
    <trim prefix="values (" suffix=")" suffixOverrides="," >
      <if test="name != null" >
        #{name,jdbcType=VARCHAR},
      </if>
      <if test="age != null" >
        #{age,jdbcType=INTEGER},
      </if>
      <if test="sex != null" >
        #{sex,jdbcType=INTEGER},
      </if>
      <if test="password != null" >
        #{password,jdbcType=VARCHAR},
      </if>
    </trim>
  </insert>
  <update id="updateByPrimaryKeySelective" parameterType="com.yangxin.demo.dao.model.User" >
    update user
    <set >
      <if test="name != null" >
        name = #{name,jdbcType=VARCHAR},
      </if>
      <if test="age != null" >
        age = #{age,jdbcType=INTEGER},
      </if>
      <if test="sex != null" >
        sex = #{sex,jdbcType=INTEGER},
      </if>
      <if test="password != null" >
        password = #{password,jdbcType=VARCHAR},
      </if>
    </set>
    where id = #{id,jdbcType=INTEGER}
  </update>
  <update id="updateByPrimaryKey" parameterType="com.yangxin.demo.dao.model.User" >
    update user
    set name = #{name,jdbcType=VARCHAR},
      age = #{age,jdbcType=INTEGER},
      sex = #{sex,jdbcType=INTEGER},
      password = #{password,jdbcType=VARCHAR}
    where id = #{id,jdbcType=INTEGER}
  </update>
</mapper>
复制代码
mapper的映射也生成好了的,这些都能大部分使用。
踩坑指南
有可能会出现一些奇怪的问题一般如下:
1.你要生成的表 没有主键id那么,生成的东西就有问题
2.在配置生成表的属性那儿,没有配置完全,有些方法会生成不全,只生成一部分
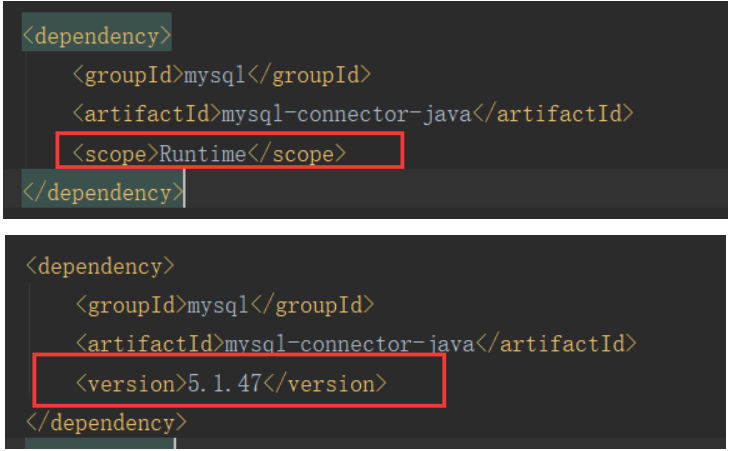
3.mysql版本引起的坑如下:springBoot自动添加的依赖是这样,我因为这个问题导致生成的方法不全,缺少一些东西。更改就是添加版本号就可以了
4.其他问题,多半还是和配置有关,看看自己配置是否正确,也可以去mybatis官网看官方文档。
优化
逆向工程帮我们生成了这些东西,帮我们做了很多工作,但是我们会发现 在Mapper接口中,其实大多数表都是生成的这些东西,那么我们可以将这些东西封装一下吗?
我们封装一个公共的接口 BaseMapper,因为在查询更新的时候传入实体类的值,BaseMapper接口设计肯定要设计成一个泛型。
BaseMapper接口如下:
public interface BaseMapper<T extends BaseModel> {

    int deleteByPrimaryKey(Integer id);

    int insert(T record);

    int insertSelective(T record);

    T selectByPrimaryKey(Integer id);

    int updateByPrimaryKeySelective(T record);

    int updateByPrimaryKey(T record);

}
复制代码
那么我们就生成的接口中这样如下图操作:把生成的接口都去掉,那么这个接口就空了,在这里面我们写自己要写的特列接口,特征接口。

public interface UserMapper extends BaseMapper<User> {
    // todo 添加特殊的表操作接口
}
复制代码
在pojo的实体类中 继承BaseModel
BaseModel类封装了主键ID如下:
public class BaseModel {

    protected Integer id;

    public Integer getId() {
        return id;
    }

    public void setId(Integer id) {
        this.id = id;
    }

}

复制代码
总体来看就简洁了很多。
再次优化
虽然逆向工程帮我们生成了很多代码,但是我们还有很多相同的操作它没有办法生成下来:
①:我们通过表的某一个字段的查询。
②:我们要对某一个字段进行模糊查询 或者 in查询
③:in查询。
那么我们在BaseMapper中自己添加这些接口,我们自己写一个模板,以后就可以直接复制粘贴使用了。
BaseMapper接口添加的如下:
public interface BaseMapper<T extends BaseModel> {

    int deleteByPrimaryKey(Integer id);

    int insert(T record);

    int insertSelective(T record);

    T selectByPrimaryKey(Integer id);

    int updateByPrimaryKeySelective(T record);

    int updateByPrimaryKey(T record);

    // conditions 这个参数,就是我们传进来的条件,在Sql中根据conditions这个list拼接sql语句
    List<T> getByConditions(@Param("conditions") Map<String, Object> conditions);

    // 同上:不过的是Condition类 其中有3个属性:key opt value;key表示的是表的字段,opt表示 操作类型:locate模糊查询、in查询、为空的时候就是等值查询
    List<T> getByConditionList(@Param("conditions") List<Condition> conditions);

    // 同上 、 添加了 排序信息,Sort这个类有两个参数 : field表示要排序的字段,sortType表示排序的方式
    List<T> getSortedResultByConditionList(@Param("conditions") List<Condition> conditions,
                                           @Param("sorter") Sort sort);、
    // field 表示要查询的字段,set里表示给值的内容
    List<T> getByIn(@Param("field") String field, @Param("set") Set<Object> set);

}
复制代码
Condition 封装类:
public class Condition {

    private String key;
    /**
     * new Condition("account","like","%" + account + "%") new Condition("account","!=","account")
     */
    private String opt;
    private Object value;

    public Condition(String key, String opt, Object value) {
        this.key = key;
        this.opt = opt;
        this.value = value;
    }

    public Condition(String key, Object value) {
        this(key, "=", value);
    }

    public String getKey() {
        return key;
    }

    public void setKey(String key) {
        this.key = key;
    }

    public String getOpt() {
        return opt;
    }

    public void setOpt(String opt) {
        this.opt = opt;
    }

    public Object getValue() {
        return value;
    }

    public void setValue(Object value) {
        this.value = value;
    }
}
复制代码
Sort封装类:
public class Sort {

    /**
     * 可以field1,field2,field3,
     */
    private String field;
    /**
     * desc ,asc
     */
    private String sortType;

    public Sort(String field, String sortType) {
        this.field = field;
        this.sortType = sortType;
    }

    public String getField() {
        return field;
    }

    public void setField(String field) {
        this.field = field;
    }

    public String getSortType() {
        return sortType;
    }

    public void setSortType(String sortType) {
        this.sortType = sortType;
    }
}
复制代码
在BaseMapper中添加后,我们在对应的.xml中添加 对应的接口映射,不过这里涉及到了Mybatis的动态SqL,不会的同志去Mybatis官网看。
在我们生成的mapper.xml中的最后的update后面添加:
<!-- 我就bb两句逻辑吧: conditions中存储的都是,key-value映射键值对,如果这个conditions不为空,那么我们将这些条件都拼接,并且使用的and连接-->
<select id="getByConditions" parameterType="map" resultMap="BaseResultMap">
    select
    <include refid="Base_Column_List"/>
    from user
    <where>
      <choose>
        <when test="conditions!= null">
          <!-- 循环拼接-->
          <foreach close="" collection="conditions" index="key" item="value" open="" separator="AND">
            ${key}=#{value}
          </foreach>
        </when>
      </choose>
    </where>
  </select>

  <select id="getByConditionList" resultMap="BaseResultMap" parameterType="list">
    select
    <include refid="Base_Column_List"/>
    from user
    <where>
      <choose>
        <when test="conditions != null and conditions.size() > 0">
          <foreach item="item" collection="conditions"
                   open="" separator="AND" close="">
            <choose>
              <when test="item.opt == 'locate'">
                locate(#{item.value}, ${item.key}) > 0
              </when>
              <when test="item.opt == 'in'">
                ${item.key} in
                <foreach item="itemIn" collection="item.value" open="(" separator="," close=")">
                  #{itemIn}
                </foreach>
              </when>
              <otherwise>
                ${item.key} ${item.opt} #{item.value}
              </otherwise>
            </choose>
          </foreach>
        </when>
      </choose>
    </where>
  </select>

  <select id="getSortedResultByConditionList" resultMap="BaseResultMap">
    select
    <include refid="Base_Column_List"/>
    from user
    <where>
      <choose>
        <when test="conditions != null and conditions.size() > 0">
          <foreach item="item" collection="conditions"
                   open="" separator="AND" close="">
            <choose>
              <when test="item.opt != 'in'">
                ${item.key} ${item.opt} #{item.value}
              </when>
              <otherwise>
                ${item.key} ${item.opt} ${item.value}
              </otherwise>
            </choose>

          </foreach>
        </when>
      </choose>
    </where>
    <choose>
      <when test="sorter !=null">
        order by ${sorter.field} ${sorter.sortType}
      </when>
    </choose>
  </select>

  <select id="getByIn" resultMap="BaseResultMap">
    SELECT
    <include refid="Base_Column_List"/>
    from user
    <where>
      <choose>
        <when test="field != null">
          ${field} in
          <foreach item="item" index="index" collection="set" open="(" separator="," close=")">
            #{item}
          </foreach>
        </when>
      </choose>
    </where>
  </select>
复制代码
感觉这样就是一劳永逸的,说一说怎么使用吧:如下:这个是list的,map的也是类似。

不过在复制粘贴到另外的地方使用的时候,要注意表名也要更改。
正文到此结束
- 本文标签: 配置 mmm App IO 目录 插件 Statement windows tar src API Property Select springboot root Java类 shell map 删除 CTO 自动生成 mysql list JDBC tab client IDE message DOM id update 参数 selectByPrimaryKey eclipse sql http 注释 动态SQL linux value ArrayList classpath https example 数据 ACE parse MQ java mybatis tk db cat core 代码 mapper key LinkedList 测试 Connection git UI Word 解析 Collection spring BaseResultMap tag db2 数据库 entity GitHub ORM XML HashMap ssl dataSource ip
- 版权声明: 本文为互联网转载文章,出处已在文章中说明(部分除外)。如果侵权,请联系本站长删除,谢谢。
- 本文海报: 生成海报一 生成海报二
热门推荐


相关文章

近期评论
-
https://www.liuhaihua.cn/archives/40657.html 这篇博客中的图片打不开了
-
不会英语啊。
-
前100名用户会展示特殊的纪念徽章
-
-
https://pplx.ai/floraliu4199466 这个链接打不开是什么原因?
-
-
-
-
来看看,最近更新了一波,顺着友联过来的,几年过去了,网站越搞越好,厉害
-
哥太牛了
Loading...
![[HBLOG]公众号](https://www.liuhaihua.cn/img/qrcode_gzh.jpg)

