SpringCloud教程一:eureka注册中心(Finchley版)
一、spring cloud简介
本阶段学习教程Spring Boot版本2.0.3.RELEASE,Spring Cloud版本为Finchley.RELEASE。
Finchley版本的官方文档如下: http://cloud.spring.io/spring-cloud-static/Finchley.RELEASE/single/spring-cloud.html
spring cloud 为开发人员提供了快速构建分布式系统的一些工具,包括配置管理、服务发现、断路器、路由、微代理、事件总线、全局锁、决策竞选、分布式会话等等。它运行环境简单,可以在开发人员的电脑上跑。另外说明spring cloud是基于springboot的,所以需要开发中对springboot有一定的了解,如果不了解的话可以看这篇文章: 2小时学会springboot 。另外对于“微服务架构” 不了解的话,可以通过搜索引擎搜索“微服务架构”了解下。
二、创建服务注册中心
在这里,我还是采用Eureka作为服务注册与发现的组件,至于Consul 之后会出文章详细介绍。
2.1 首先创建一个maven主工程。
首先创建一个主Maven工程,在其pom文件引入依赖,spring Boot版本为2.0.3.RELEASE,Spring Cloud版本为Finchley.RELEASE。这个pom文件作为父pom文件,起到依赖版本控制的作用,其他module工程继承该pom。这一系列文章全部采用这种模式。代码如下:
 1 <?xml version="1.0" encoding="UTF-8"?>
 2 <project xmlns="http://maven.apache.org/POM/4.0.0"
 3          xmlns:xsi="http://www.w3.org/2001/XMLSchema-instance"
 4          xsi:schemaLocation="http://maven.apache.org/POM/4.0.0 http://maven.apache.org/xsd/maven-4.0.0.xsd">
 5     <modelVersion>4.0.0</modelVersion>
 6
 7     <groupId>com.liumy</groupId>
 8     <artifactId>eureka-f-1</artifactId>
 9     <version>0.0.1-SNAPSHOT</version>
10     <packaging>pom</packaging>
11
12     <name>eureka-f-1</name>
13     <description>Demo project for Spring Boot</description>
14
15     <parent>
16         <groupId>org.springframework.boot</groupId>
17         <artifactId>spring-boot-starter-parent</artifactId>
18         <version>2.0.3.RELEASE</version>
19         <relativePath/>
20     </parent>
21
22     <modules>
23         <module>eureka-server</module>
24         <module>eureka-client</module>
25     </modules>
26
27     <properties>
28         <project.build.sourceEncoding>UTF-8</project.build.sourceEncoding>
29         <project.reporting.outputEncoding>UTF-8</project.reporting.outputEncoding>
30         <java.version>1.8</java.version>
31         <spring-cloud.version>Finchley.RELEASE</spring-cloud.version>
32     </properties>
33
34     <dependencies>
35         <dependency>
36             <groupId>org.springframework.boot</groupId>
37             <artifactId>spring-boot-starter-test</artifactId>
38             <scope>test</scope>
39         </dependency>
40
41         <dependency>
42             <groupId>org.springframework.boot</groupId>
43             <artifactId>spring-boot-autoconfigure</artifactId>
44             <version>2.0.3.RELEASE</version>
45             <scope>compile</scope>
46         </dependency>
47     </dependencies>
48
49     <dependencyManagement>
50         <dependencies>
51             <dependency>
52                 <groupId>org.springframework.cloud</groupId>
53                 <artifactId>spring-cloud-dependencies</artifactId>
54                 <version>${spring-cloud.version}</version>
55                 <type>pom</type>
56                 <scope>import</scope>
57             </dependency>
58         </dependencies>
59     </dependencyManagement>
60
61     <build>
62         <plugins>
63             <plugin>
64                 <groupId>org.springframework.boot</groupId>
65                 <artifactId>spring-boot-maven-plugin</artifactId>
66             </plugin>
67         </plugins>
68     </build>
69
70 </project>
2.2 然后创建2个model工程:一个model工程作为服务注册中心,即Eureka Server,另一个作为Eureka Client。
下面以创建server为例子,详细说明创建过程:
右键工程->创建model-> 选择spring initialir 如下图:
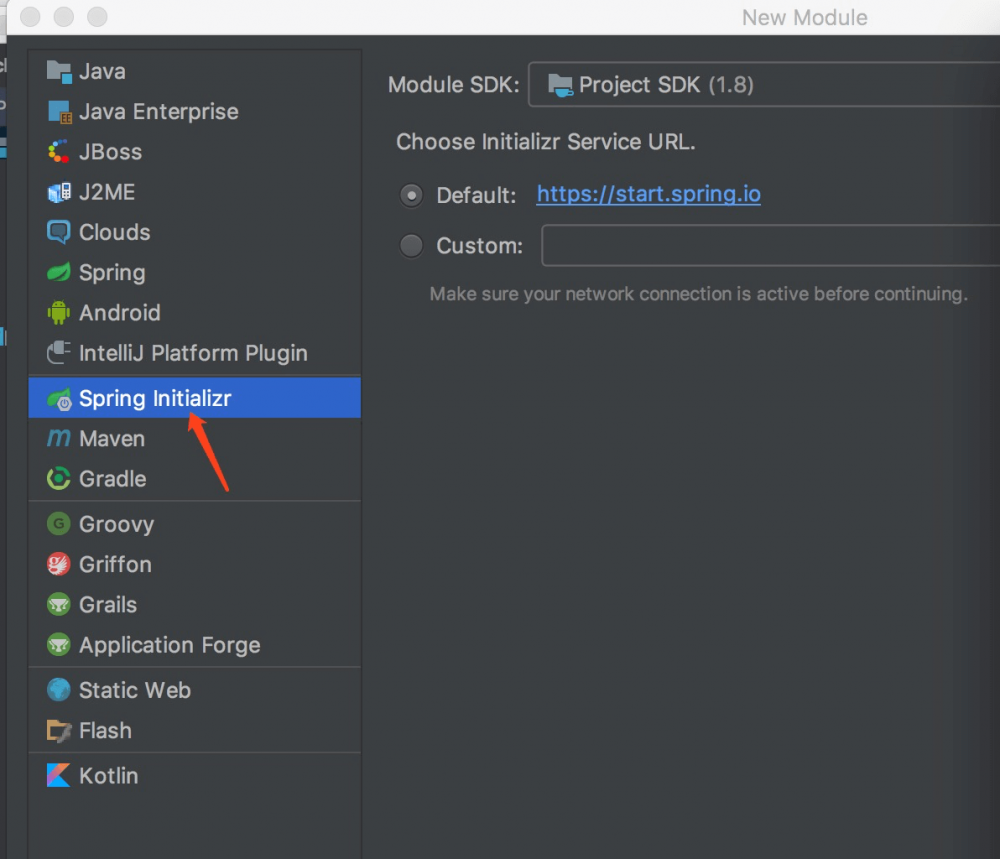
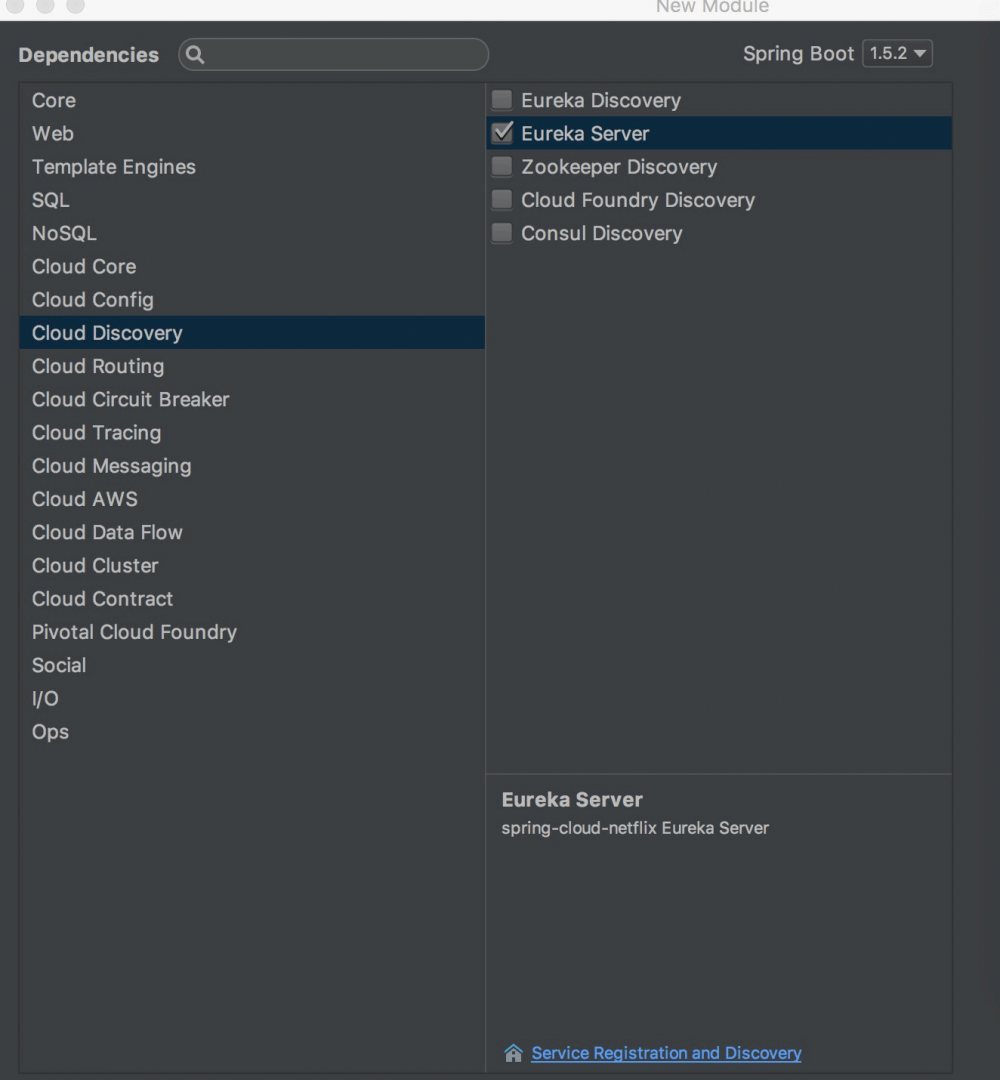
下一步->选择cloud discovery->eureka server ,然后一直下一步就行了。
创建完后的工程,其pom.xml继承了父pom文件,并引入spring-cloud-starter-netflix-eureka-server的依赖,代码如下:
 1 <?xml version="1.0" encoding="UTF-8"?>
 2 <project xmlns="http://maven.apache.org/POM/4.0.0" xmlns:xsi="http://www.w3.org/2001/XMLSchema-instance"
 3          xsi:schemaLocation="http://maven.apache.org/POM/4.0.0 https://maven.apache.org/xsd/maven-4.0.0.xsd">
 4     <modelVersion>4.0.0</modelVersion>
 5     <parent>
 6         <groupId>com.liumy</groupId>
 7         <artifactId>eureka-f-1</artifactId>
 8         <version>0.0.1-SNAPSHOT</version>
 9     </parent>
10
11     <groupId>com.liumy</groupId>
12     <artifactId>eureka-server</artifactId>
13     <version>0.0.1-SNAPSHOT</version>
14     <packaging>jar</packaging>
15
16     <name>eureka-server</name>
17     <description>Demo project for Spring Boot</description>
18
19     <dependencies>
20         <dependency>
21             <groupId>org.springframework.cloud</groupId>
22             <artifactId>spring-cloud-starter-netflix-eureka-server</artifactId>
23         </dependency>
24     </dependencies>
25
26 </project>
2.3 启动一个服务注册中心,只需要一个注解@EnableEurekaServer,这个注解需要在springboot工程的启动application类上加:
 1 package com.liumy.eurekaserver;
 2
 3 import org.springframework.boot.SpringApplication;
 4 import org.springframework.boot.autoconfigure.SpringBootApplication;
 5 import org.springframework.cloud.netflix.eureka.server.EnableEurekaServer;
 6
 7 @EnableEurekaServer
 8 @SpringBootApplication
 9 public class EurekaServerApplication {
10
11     public static void main(String[] args) {
12         SpringApplication.run(EurekaServerApplication.class, args);
13     }
14
15 }
2.4 yml配置文件的配置
eureka是一个高可用的组件,它没有后端缓存,每一个实例注册之后需要向注册中心发送心跳(因此可以在内存中完成),在默认情况下erureka server也是一个eureka client ,必须要指定一个 server。eureka server的配置文件appication.yml:
 1 server:
 2   port: 8881
 3
 4 eureka:
 5   instance:
 6     hostname: localhost
 7   client:
 8     registerWithEureka: false
 9     fetchRegistry: false
10     serviceUrl:
11       defaultZone: http://${eureka.instance.hostname}:${server.port}/eureka/
12
13 spring:
14   application:
15     name: eurka-server
通过eureka.client.registerWithEureka:false和fetchRegistry:false来表明自己是一个eureka server.
2.5 eureka server 是有界面的,启动工程,打开浏览器访问: http://localhost:8761 ,界面如下:
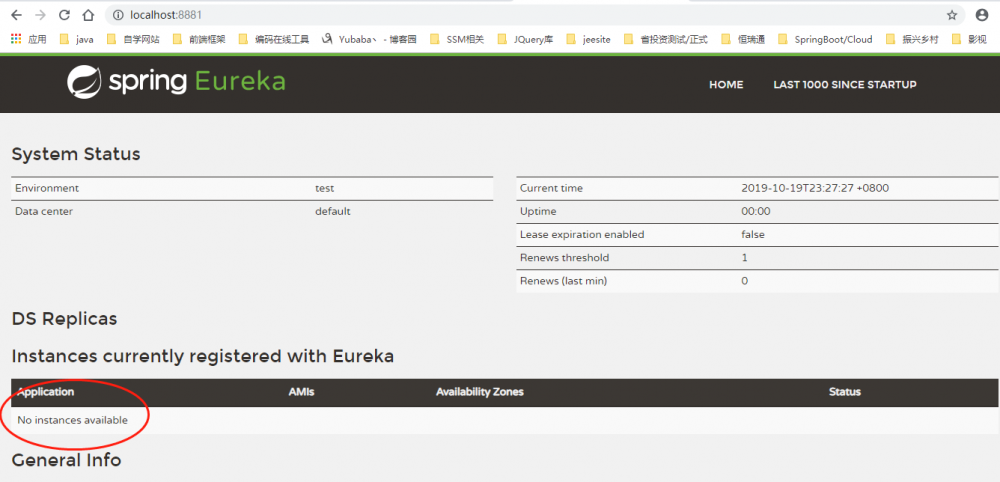
PS: No application available 没有服务被发现 ……^_^ 因为没有注册服务当然不可能有服务被发现了。
三、创建一个服务提供者 (eureka client)
当client向server注册时,它会提供一些元数据,例如主机和端口,URL,主页等。Eureka server 从每个client实例接收心跳消息。 如果心跳超时,则通常将该实例从注册server中删除。
创建过程同server类似,创建完pom.xml如下:
 1 <?xml version="1.0" encoding="UTF-8"?>
 2 <project xmlns="http://maven.apache.org/POM/4.0.0" xmlns:xsi="http://www.w3.org/2001/XMLSchema-instance"
 3          xsi:schemaLocation="http://maven.apache.org/POM/4.0.0 https://maven.apache.org/xsd/maven-4.0.0.xsd">
 4     <modelVersion>4.0.0</modelVersion>
 5     <parent>
 6         <groupId>com.liumy</groupId>
 7         <artifactId>eureka-f-1</artifactId>
 8         <version>0.0.1-SNAPSHOT</version>
 9     </parent>
10
11     <groupId>com.liumy</groupId>
12     <artifactId>eureka-client</artifactId>
13     <version>0.0.1-SNAPSHOT</version>
14     <packaging>jar</packaging>
15
16     <name>eureka-client</name>
17     <description>Demo project for Spring Boot</description>
18
19     <dependencies>
20         <dependency>
21             <groupId>org.springframework.cloud</groupId>
22             <artifactId>spring-cloud-starter-netflix-eureka-client</artifactId>
23         </dependency>
24         <dependency>
25             <groupId>org.springframework.boot</groupId>
26             <artifactId>spring-boot-starter-web</artifactId>
27         </dependency>
28     </dependencies>
29
30     <build>
31         <plugins>
32             <plugin>
33                 <groupId>org.springframework.boot</groupId>
34                 <artifactId>spring-boot-maven-plugin</artifactId>
35             </plugin>
36         </plugins>
37     </build>
38
39 </project>
通过注解@EnableEurekaClient 表明自己是一个eurekaclient.
 1 package com.liumy.eurekaclient;
 2
 3 import org.springframework.beans.factory.annotation.Value;
 4 import org.springframework.boot.SpringApplication;
 5 import org.springframework.boot.autoconfigure.SpringBootApplication;
 6 import org.springframework.cloud.netflix.eureka.EnableEurekaClient;
 7 import org.springframework.web.bind.annotation.RequestParam;
 8 import org.springframework.web.bind.annotation.RestController;
 9
10 @EnableEurekaClient
11 @SpringBootApplication
12 @RestController
13 public class EurekaClientApplication {
14
15     public static void main(String[] args) {
16         SpringApplication.run(EurekaClientApplication.class, args);
17     }
18
19     @Value("${server.port}")
20     String port;
21     public String Hello(@RequestParam(value = "name",defaultValue = "liumingyu")String name){
22         return "Hello ~"+name+",My Port is:"+port;
23     }
24 }
仅仅@EnableEurekaClient是不够的,还需要在配置文件中注明自己的服务注册中心的地址,application.yml配置文件如下:
 1 server:
 2   port: 8882
 3
 4 spring:
 5   application:
 6     name: eureka-client
 7
 8
 9 eureka:
10   client:
11     serviceUrl:
12       defaultZone: http://localhost:8881/eureka/
需要指明spring.application.name,这个很重要,这在以后的服务与服务之间相互调用一般都是根据这个name 。 启动工程,打开http://localhost:8881,即eureka server 的网址:
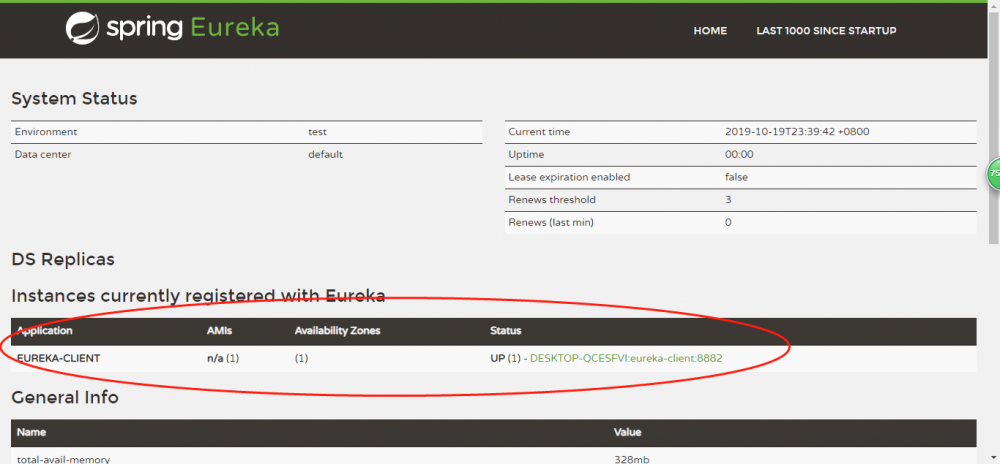
你会发现一个服务已经注册在服务中了,这样就成功注册,服务名为EUREKA-CLIENT ,端口为8882
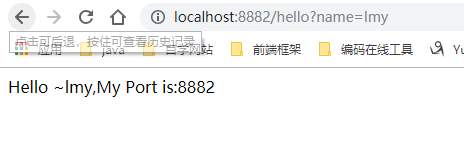
这时打开 http://localhost:8882/hello?name=lmy,你会在浏览器上看到 :
四、参考资料
http://blog.csdn.net/forezp/article/details/69696915
http://cloud.spring.io/spring-cloud-static/Finchley.RELEASE/single/spring-cloud.html
注:本篇为原创文章,其中的过程与实现是参考某BAT顶级架构师的教学完成。
正文到此结束
- 本文标签: bean ip 管理 springcloud Eureka 微服务 主机 web Spring Boot cat App 服务注册 锁 Service 数据 分布式系统 value 缓存 src apache id description CTO 注册中心 开发 文章 pom UI springboot XML 索引 client java IO tar 代码 Netflix dependencies 删除 maven 高可用 配置 实例 架构师 build spring plugin https SDN Spring cloud REST http 端口 分布式 搜索引擎 HTML consul schema
- 版权声明: 本文为互联网转载文章,出处已在文章中说明(部分除外)。如果侵权,请联系本站长删除,谢谢。
- 本文海报: 生成海报一 生成海报二
热门推荐


相关文章

近期评论
-
谢谢
-
https://www.newcmy.com/register?aff=HBVX建议您试试草莓云机场,可以流畅观看youtube和tiktok,上reddit/x也没有问题,还有各种ai优化节点。
-
-
-
想购买您这个站,我的联系方式QQ741756694微信同步 能卖联系
-
-
-
-
-
https://www.liuhaihua.cn/archives/40657.html 这篇博客中的图片打不开了
Loading...
![[HBLOG]公众号](https://www.liuhaihua.cn/img/qrcode_gzh.jpg)

