伙计,来跟我一起学SpringBoot! 【第二弹】
大家好,我是小菜,一个渴望在互联网行业做到蔡不菜的小菜。可柔可刚,点赞则柔,白嫖则刚!
死鬼~看完记得给我来个三连哦!

“
本文主要介绍
SprinBoot
如有需要,可以参考
如有帮助,不忘 点赞 ❥
一、 配置嵌入式Servlet容器
1)定制和修改Servlet容器的相关配置
法1:修改和server有关的配置
properties server.tomcat.uri-encoding=UTF-8 //通用的Servlet容器设置 server.xxx //Tomcat的设置 server.tomcat.xxx
法2:编写一个EmbeddedServletContainerCustomizer:嵌入式的Servlet容器的定制器;来修改Servlet容器的配置

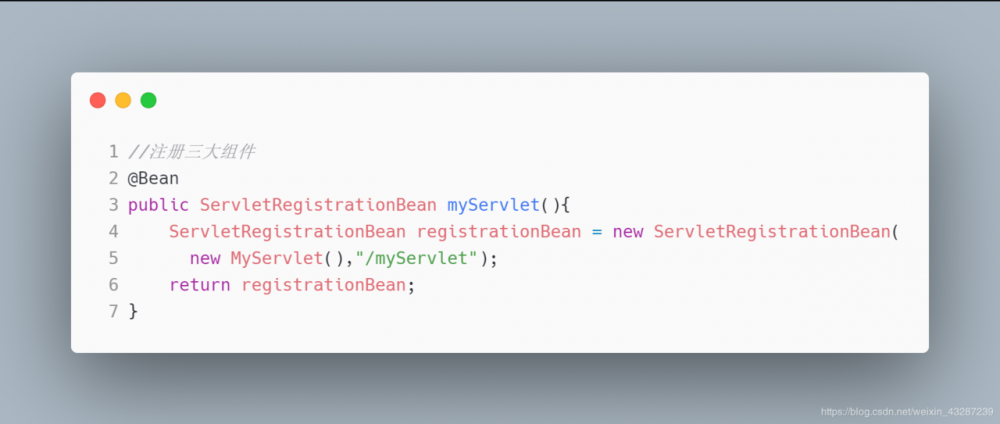
2)注册Servlet三大组件
Servlet
Filter
Listener
由于 SpringBoot 默认是以jar包的方式启动嵌入式的Servlet容器来启动SpringBoot的web应用,所以没有 web.xml 文件
注册三大组件用以下方式 :
ServletRegistrationBean :
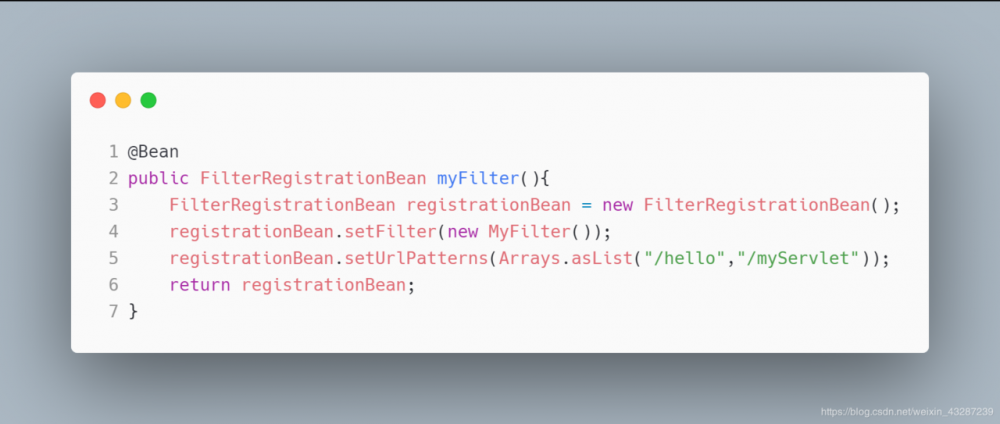
FilterRegistrationBean :
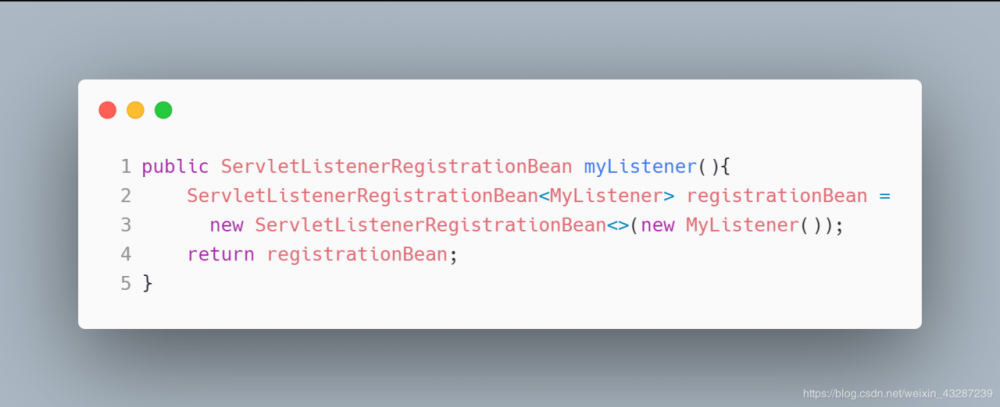
ServletListenerRegistrationBean :
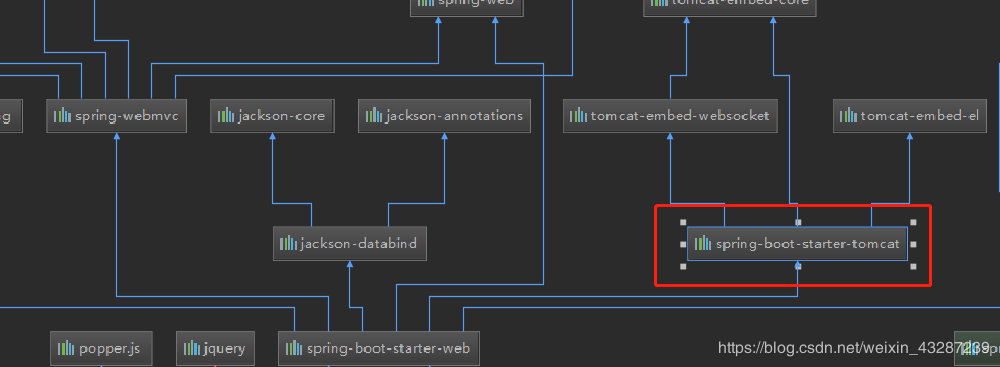
3)替换为其他嵌入式Servlet容器
默认支持以下容器
-
Tomcat
<!-- 引入web模块默认就是使用嵌入式的Tomcat作为Servlet容器 -->
<dependency>
   <groupId>org.springframework.boot</groupId>
   <artifactId>spring-boot-starter-web</artifactId>
</dependency>
复制代码
-
Jetty
<!-- 先排除内置默认容器 -->
<dependency>
   <groupId>org.springframework.boot</groupId>
   <artifactId>spring-boot-starter-web</artifactId>
   <exclusions>
      <exclusion>
         <artifactId>spring-boot-starter-tomcat</artifactId>
         <groupId>org.springframework.boot</groupId>
      </exclusion>
   </exclusions>
</dependency>

<!--引入其他的Servlet容器-->
<dependency>
   <artifactId>spring-boot-starter-jetty</artifactId>
   <groupId>org.springframework.boot</groupId>
</dependency>
复制代码
-
Undertow
<!-- 先排除内置默认容器 -->
<dependency>
   <groupId>org.springframework.boot</groupId>
   <artifactId>spring-boot-starter-web</artifactId>
   <exclusions>
      <exclusion>
         <artifactId>spring-boot-starter-tomcat</artifactId>
         <groupId>org.springframework.boot</groupId>
      </exclusion>
   </exclusions>
</dependency>

<!--引入其他的Servlet容器-->
<dependency>
   <artifactId>spring-boot-starter-undertow</artifactId>
   <groupId>org.springframework.boot</groupId>
</dependency>
复制代码
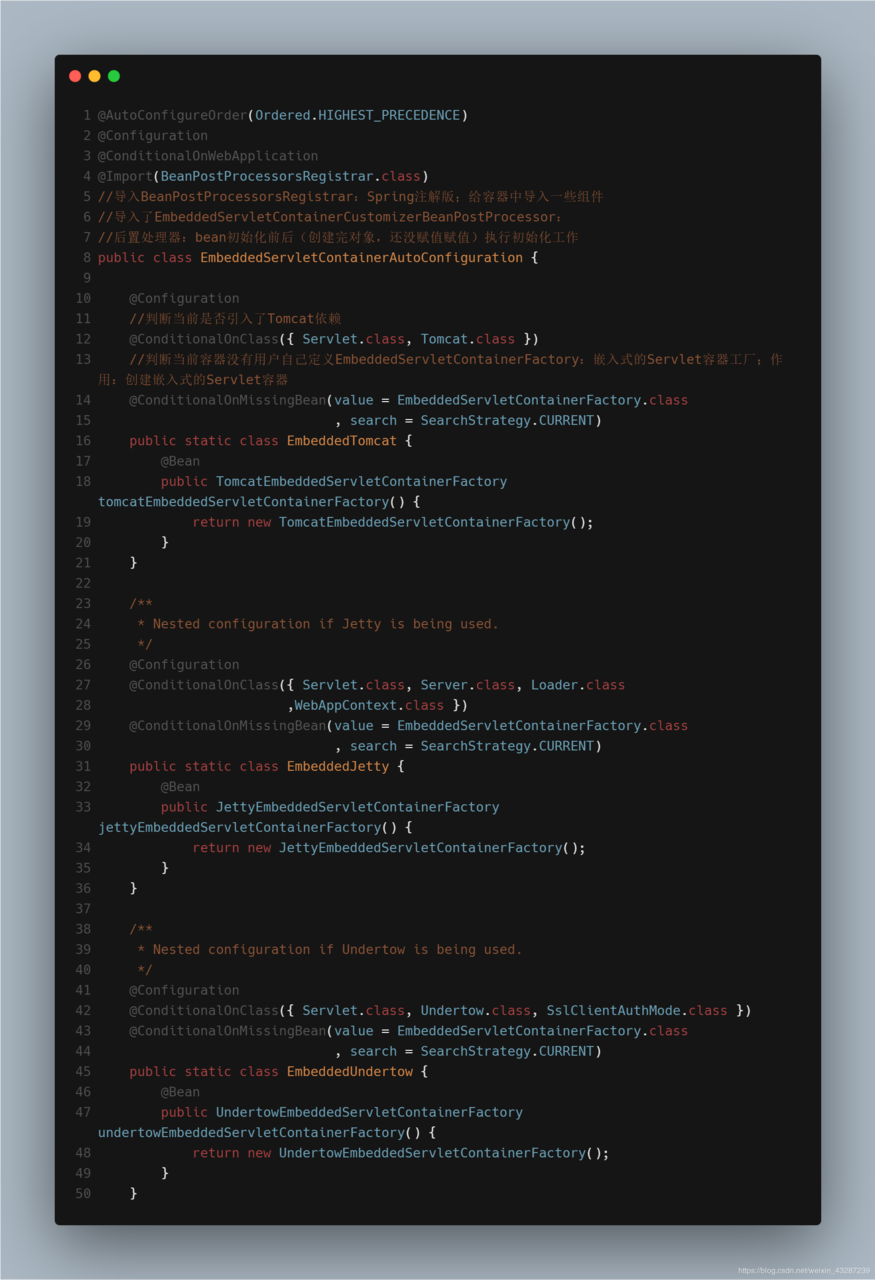
4)嵌入式Servlet容器自动配置原理
EmbeddedServletContainerAutoConfiguration :
-
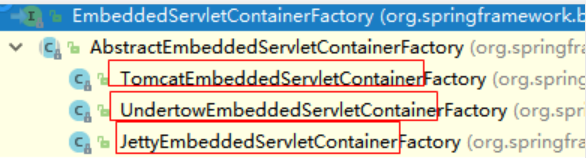
EmbeddedServletContainerFactory(嵌入式Servlet容器工厂)public interface EmbeddedServletContainerFactory { //获取嵌入式的Servlet容器 EmbeddedServletContainer getEmbeddedServletContainer( ServletContextInitializer... initializers); } } 复制代码
-
EmbeddedServletContainer:(嵌入式的Servlet容器)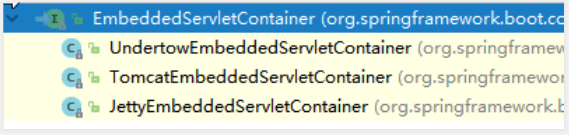
-
以
TomcatEmbeddedServletContainerFactory为例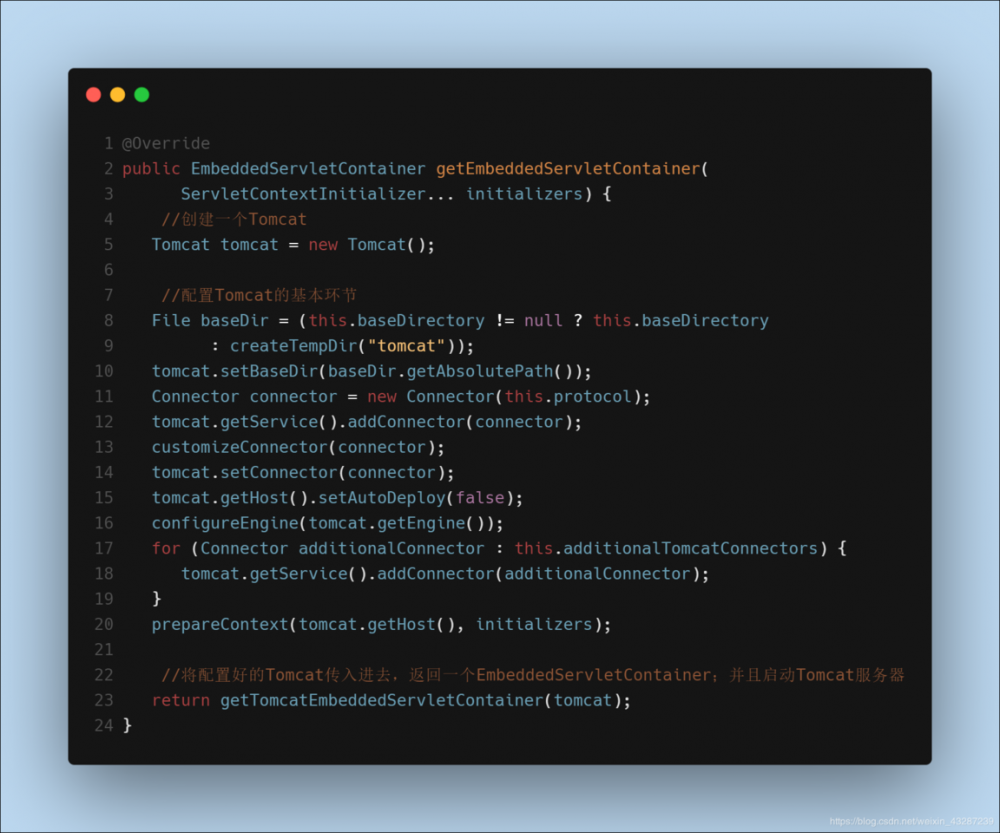
-
嵌入式容器的配置修改怎么生效
-
方法1 :
ServerProperties -
方法2 :
EmbeddedServletContainerCustomizer(定制器帮我们修改了Servlet容器的配置)
修改原理 :
容器中导入了 EmbeddedServletContainerCustomizerBeanPostProcessor
ServerProperties :也是定制器
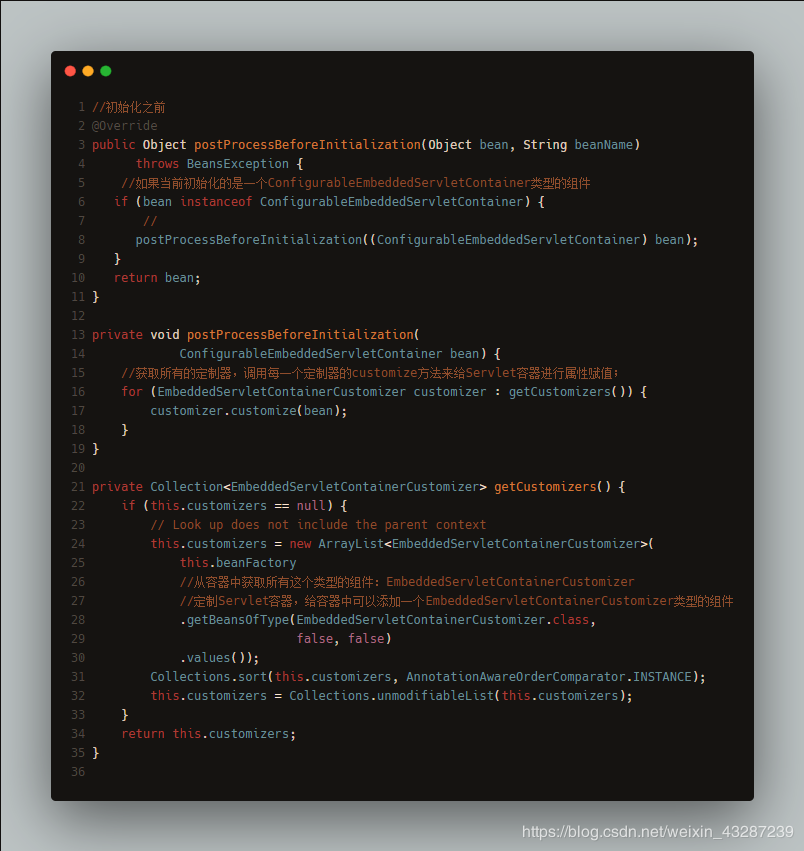
EmbeddedServletContainerFactory【TomcatEmbeddedServletContainerFactory】
EmbeddedServletContainerCustomizerBeanPostProcessor
EmbeddedServletContainerCustomizer
5)使用外置的Servlet容器
嵌入式Servlet容器:应用打成可执行的
jar
优点 : 简单、便携
缺点 :默认不支持JSP、优化定制比较复杂
步骤 :
-
创建一个war项目
-
将嵌入式的Tomcat指定为provided
<dependency>
  <groupId>org.springframework.boot</groupId>
  <artifactId>spring-boot-starter-tomcat</artifactId>
  <scope>provided</scope>
</dependency>
复制代码
-
编写一个
SpringBootServletInitializer的子类,并调用configure()方法public class ServletInitializer extends SpringBootServletInitializer { @Override protected SpringApplicationBuilder configure(SpringApplicationBuilder application) { //传入SpringBoot应用的主程序 return application.sources(SpringBoot04WebJspApplication.class); } } 复制代码 -
启动服务器就可以使用
原理 :
jar包 :执行SpringBoot主类的main方法,启动 Ioc 容器,创建嵌入式的Servlet容器
war包 :启动服务器,服务器启动SpringBoot应用 SpringBootServletInitializer ,启动 Ioc 容器
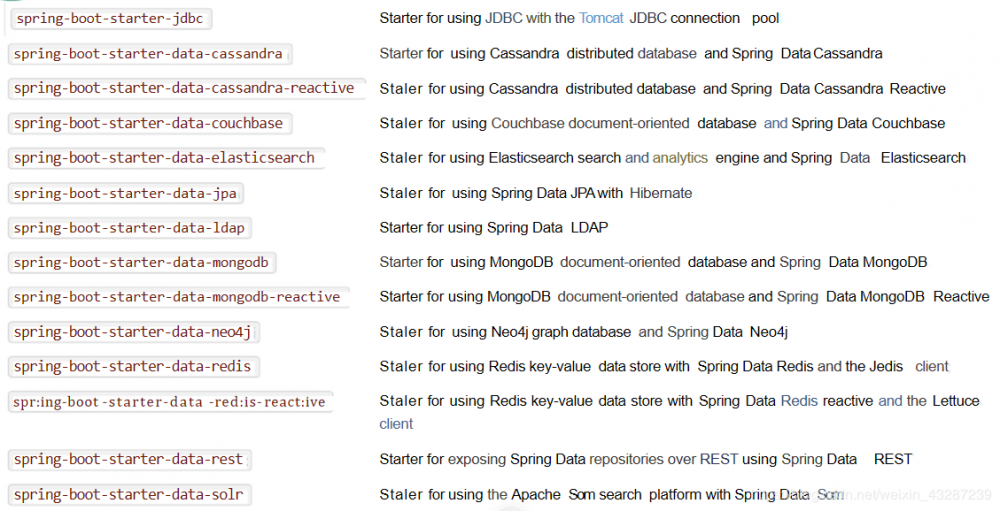
二、数据访问
对于数据访问层,无论是 SQL 还是 NOSQL , Spring Boot 默认采用整合 Spring Data 的方式进行统一处理,添加大量自动配置,屏蔽了很多设置。引入各种 xxxTemplate , xxxRepository 来简化我们对数据访问层的操作。对我们来说只需要进行简单的设置即可。
1)整合基本JDBC与数据源
- 引入starter :
spring-boot-starter-jdbc
<dependency>
    <groupId>org.springframework.boot</groupId>
    <artifactId>spring-boot-starter-jdbc</artifactId>
</dependency>
<dependency>
    <groupId>mysql</groupId>
    <artifactId>mysql-connector-java</artifactId>
    <scope>runtime</scope>
</dependency>
复制代码
- 配置
application.yml
spring:
  datasource:
    username: root
    password: 123456
    url: jdbc:mysql://192.168.15.22:3306/test
    driver-class-name: com.mysql.jdbc.Driver
复制代码
结论 :
org.apache.tomcat.jdbc.pool.DataSource
DataSourceProperties
自动配置原理 :
-
参考
DataSourceConfiguration,根据配置创建数据源,默认使用Tomcat连接池。可以使用spring.datasource.type指定自定义的数据源类型 -
SpringBoot默认可以支持:
org.apache.tomcat.jdbc.pool.DataSource
HikariDataSource
BasicDataSource
-
自定义数据源类型
@ConditionalOnMissingBean(DataSource.class) @ConditionalOnProperty(name = "spring.datasource.type") static class Generic { @Bean public DataSource dataSource(DataSourceProperties properties) { //使用DataSourceBuilder创建数据源,利用反射创建响应type的数据源,并且绑定相关属性 return properties.initializeDataSourceBuilder().build(); } } 复制代码 -
DataSourceInitializer:ApplicationListener作用 :
-
runSchemaScripts():运行建表语句 -
runDataScripts():运行插入数据的sql语句默认只需要将文件命名为 :
schema-*.sql、data-*.sql -
操作数据库:自动配置了JdbcTemplate操作数据库
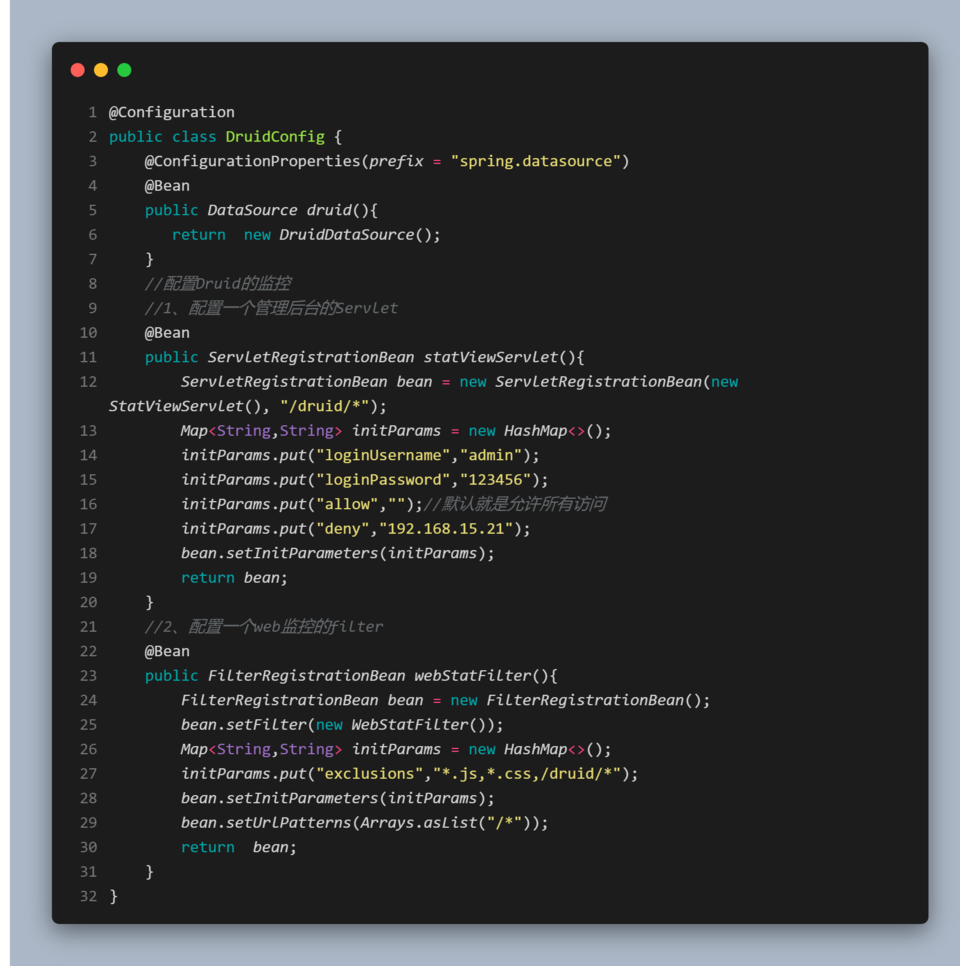
2)整合Druid数据源
- 引入druid数据源
<dependency>
    <groupId>com.alibaba</groupId>
    <artifactId>druid</artifactId>
    <version>1.1.8</version>
</dependency>
复制代码
- 配置文件
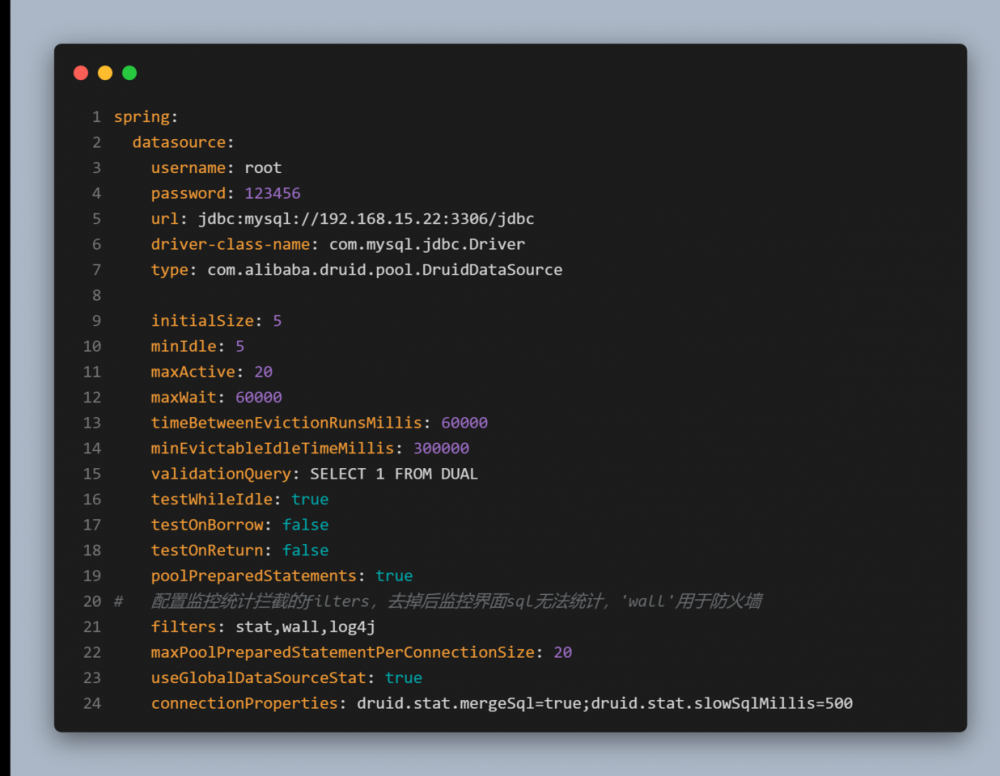
- 配置数据源
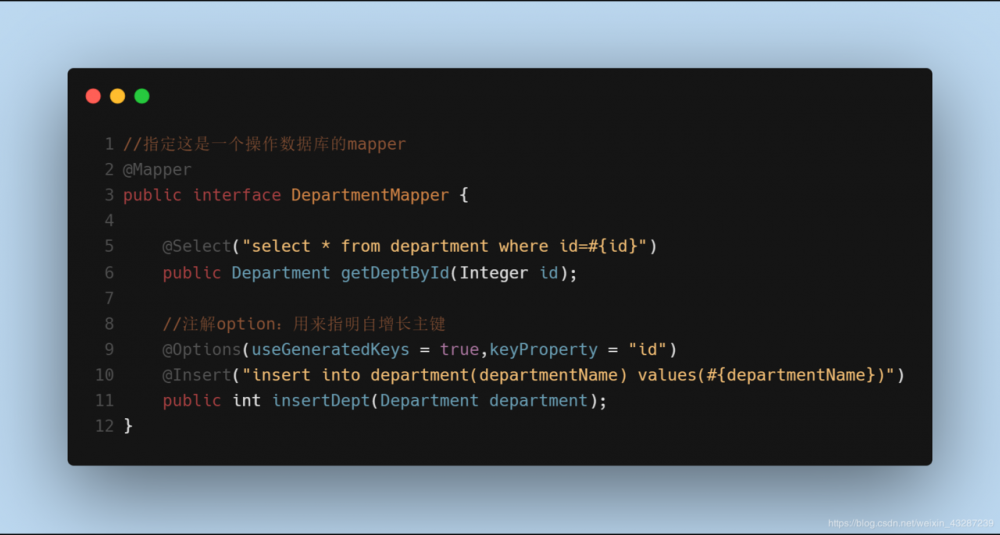
3)整合MyBatis
- 引入依赖:
<dependency>
    <groupId>org.mybatis.spring.boot</groupId>
    <artifactId>mybatis-spring-boot-starter</artifactId>
    <version>1.3.1</version>
</dependency>
复制代码
步骤 :
1)配置数据源相关属性
2)给数据库建表
3)创建JavaBean
4)注解使用
:
-
在容器中添加一个ConfigurationCustomizer
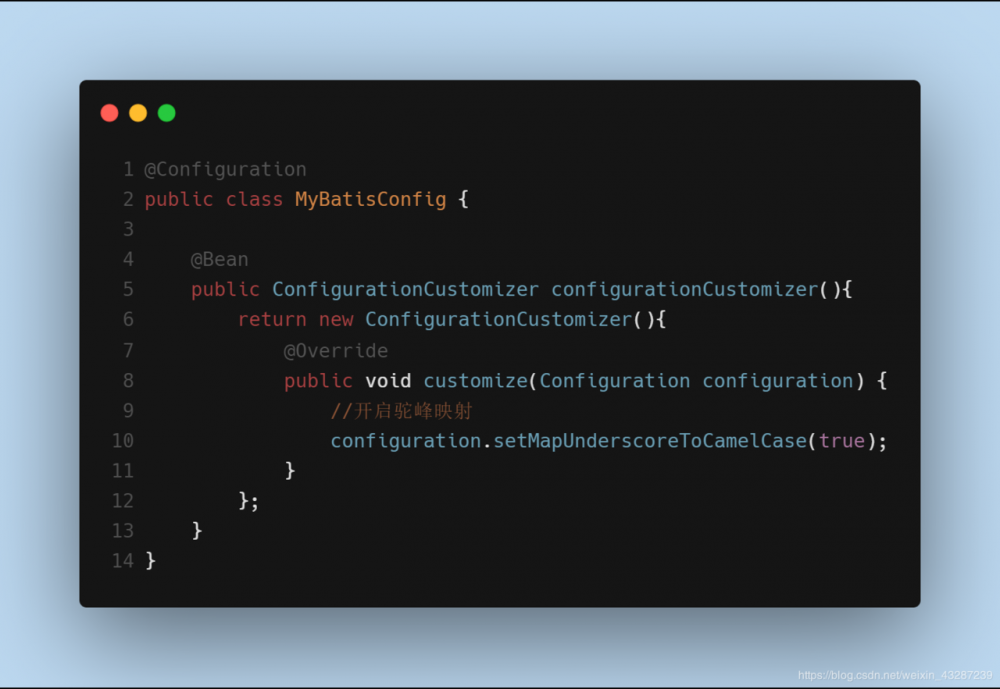
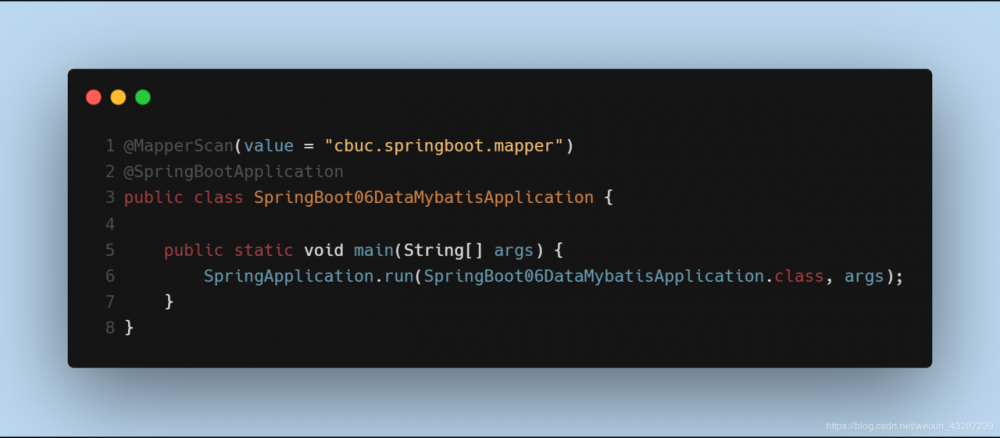
-
在启动类中添加MapperScan注解批量扫描所有的Mapper接口
5)配置文件使用
mybatis:
  #指定全局配置文件的位置
  config-location: classpath:mybatis/mybatis-config.xml
  #指定sql映射文件的位置
  mapper-locations: classpath:mybatis/mapper/*.xml
复制代码
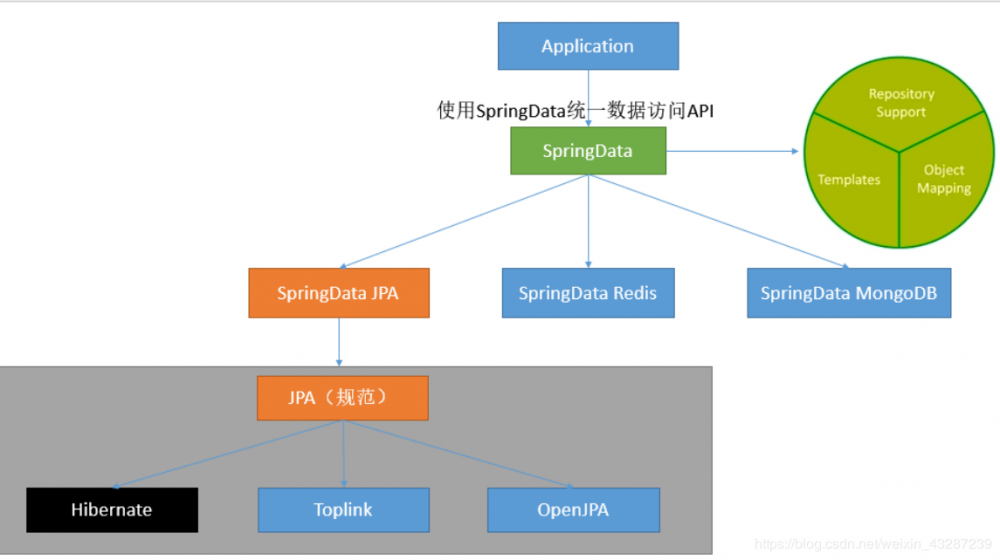
4)整合SpringData JPA
SpringData简介
“
Spring Data是一个用于简化数据库访问,并支持云服务的开源框架。其主要目标是使得对数据的访问变得方便快捷。
它可以极大的简化JPA的写法,可以在几乎不用写实现的情况下,实现对数据的访问和操作。除了CRUD外,还包括如分页、排序等一些常用的功能。
SpringData整合
- 编写一个实体类(bean)和数据表进行映射,并且配置好映射关系
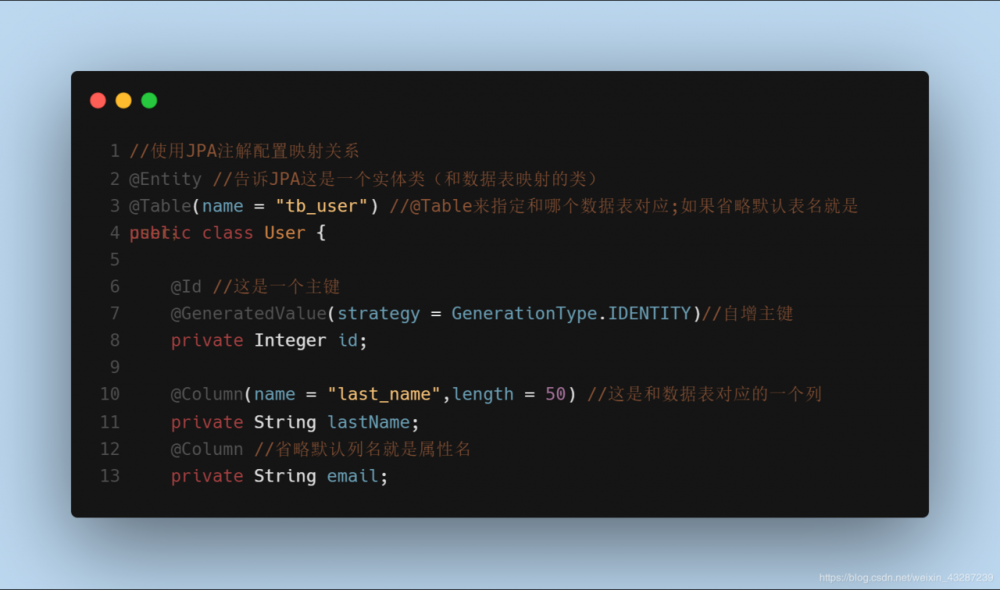
- 编写一个Dao接口来操作实体类对应的数据表(Repository)

- 配置JpaProperties
spring:
 jpa:
    hibernate:
      #更新或者创建数据表结构
      ddl-auto: update
      #控制台显示SQL
         show-sql: true
复制代码
5)事件监听机制
以下文件是配置在 META-INF/spring.factories
-
ApplicationContextInitializer

-
SpringApplicationRunListener

以上两个需要配置在( META-INF/spring.factories )
org.springframework.context.ApplicationContextInitializer=/
com.atguigu.springboot.listener.HelloApplicationContextInitializer

org.springframework.boot.SpringApplicationRunListener=/
com.atguigu.springboot.listener.HelloSpringApplicationRunListener
复制代码
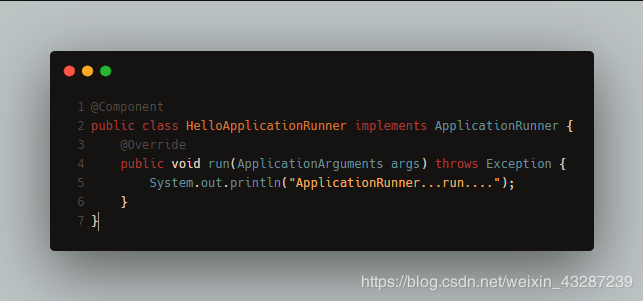
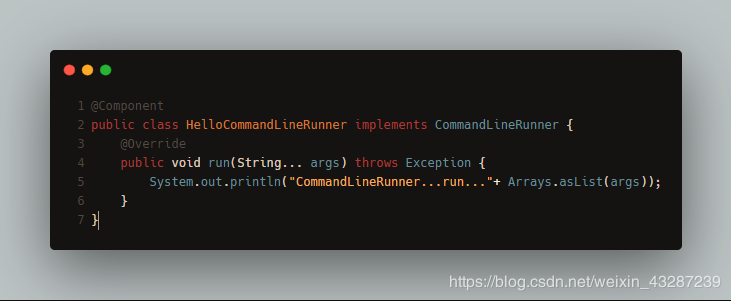
以下两个只需要放在ioc容器中
-
ApplicationRunner
-
CommandLineRunner

“
今天的你多努力一点,明天的你就能少说一句求人的话!
我是小菜,一个和你一起学习的男人。 :kiss:
正文到此结束
- 本文标签: id apr mysql CTO build 定制 bean JVM 配置 mybatis update http servlet MQ cat 代码 schema 服务器 Property js 数据库访问 map list java DDL jetty IO 互联网 druid IDE dataSource root JPA https springboot NOSQL XML spring src db mapper 数据库 JDBC 数据 开源 web ACE ip Spring Boot sql App 云 lib classpath ioc tar 连接池 UI 分页 apache Word tomcat
- 版权声明: 本文为互联网转载文章,出处已在文章中说明(部分除外)。如果侵权,请联系本站长删除,谢谢。
- 本文海报: 生成海报一 生成海报二
热门推荐


相关文章

近期评论
-
https://www.liuhaihua.cn/archives/40657.html 这篇博客中的图片打不开了
-
不会英语啊。
-
前100名用户会展示特殊的纪念徽章
-
-
https://pplx.ai/floraliu4199466 这个链接打不开是什么原因?
-
-
-
-
来看看,最近更新了一波,顺着友联过来的,几年过去了,网站越搞越好,厉害
-
哥太牛了
Loading...
![[HBLOG]公众号](https://www.liuhaihua.cn/img/qrcode_gzh.jpg)

