【Win10应用开发】相对布局(RelativePanel)
外面的雨下得很大,老周就决定雨下漫笔了。
今天咱们说一个新控件——RelativePanel。本质上,它就是一个面板,面板干啥用的?面板就是一个容器,里面可以放其他对象,就像我们小时候玩的七巧板一样,估计现在的孩子不玩了,现在的孩子除了游戏机就是游戏机,人生如戏啊,不对,应该叫人生如儿戏恰当一些。
RelativePanel控件公开了一堆附加属性,既然是附加了,当然就是在子元素上使用的了。这些属性我不再一一去说,相当没意思。以后也不要问我哪个类在哪个命名空间、哪个类有哪些属性之类的没水平问题,我不回答这些问题,VS那么强大你都不会利用。
RelativePanel是通过相对位置来布局的,也就是说,不管面板的大小如何改变,元素之间或者元素与面板之间的相对位置不会改变。 大体上可以分为两类:一类是子元素相对于面板的位置;另一类是子元素与其他子元素之间的位置 。
纸上谈X的话我就不多说了,老周理论水平比较差。还是动手干活充实一点。
先看下面这个例子:
<RelativePanel> <Button Content="起飞" RelativePanel.AlignRightWithPanel="True" RelativePanel.AlignBottomWithPanel="True"/> </RelativePanel>
这是一个典型的是相对于面板进行定位的,AlignRightWithPanel设置为true表示按钮对齐到面板的右侧;AlignBottomWithPanel属性值为true表示按钮对齐到面板的底部。综合起来就是按钮停靠在面板的右下角。
我们来看看结果。

现在你可以调整窗口的大小。
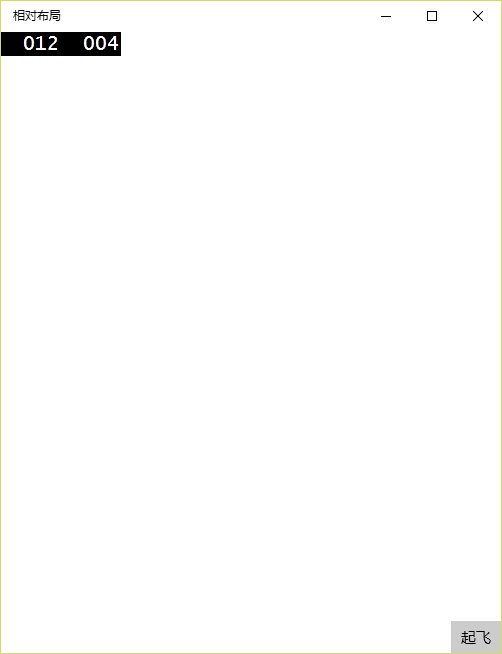
然后你会发现,“起飞”按钮始终处于面板的右下角。
下面再看一例。
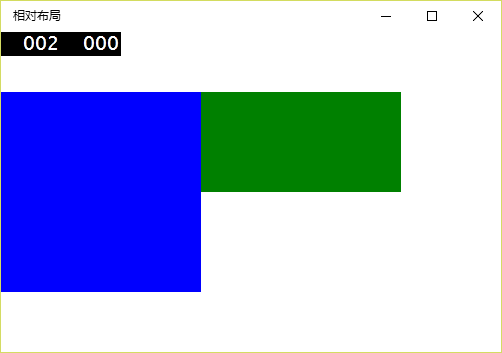
<RelativePanel> <Rectangle Width="200" Height="200" Fill="Blue" RelativePanel.AlignLeftWithPanel="True" RelativePanel.AlignVerticalCenterWithPanel="True" Name="r1"/> <Rectangle Width="200" Height="100" Fill="Green" RelativePanel.RightOf="r1" RelativePanel.AlignTopWith="r1" /> </RelativePanel>
这个例子中,面板里面有两个矩形。第一个矩形是相对于面板进行布局的,它对齐面板到左侧,并且在垂直方向上居中对齐。
第二个矩形是相对于第一个矩形来定位,RightOf属性指定一个参考元素,当前元素就位于属性指定的元素的右边。 在XAML文档中,直接引用目标元素的名字就可以了 。正因为如此,需要为第一个矩形取个名字r1。AlignTopWith属性指定,这个矩形的对齐是相对于第一个矩形而言的,对齐到第一个矩形的顶部。
运行后的结果如下:
下面给大家看一个更猛的例子。
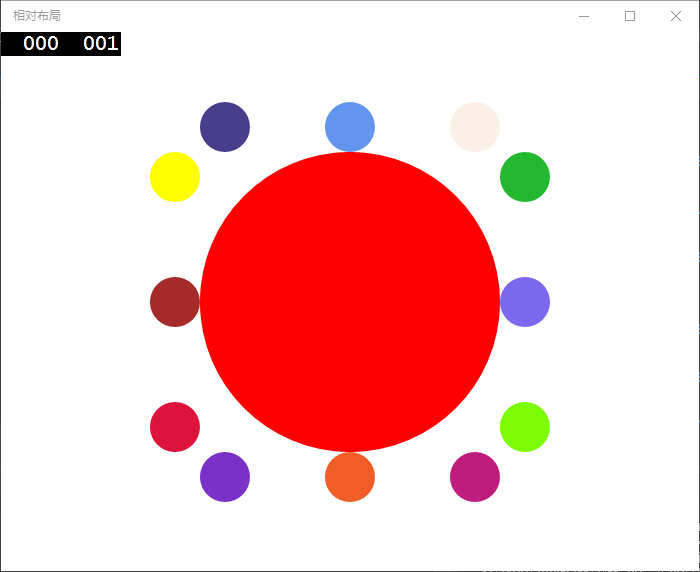
<RelativePanel> <!-- 中 --> <Ellipse Fill="Red" Name="ec" Width="300" Height="300" RelativePanel.AlignHorizontalCenterWithPanel="True" RelativePanel.AlignVerticalCenterWithPanel="True"/> <!-- 左 --> <Ellipse Fill="Yellow" Width="50" Height="50" RelativePanel.LeftOf="ec" RelativePanel.AlignTopWith="ec"/> <Ellipse Fill="Brown" Width="50" Height="50" RelativePanel.LeftOf="ec" RelativePanel.AlignVerticalCenterWith="ec"/> <Ellipse Fill="Crimson" Width="50" Height="50" RelativePanel.LeftOf="ec" RelativePanel.AlignBottomWith="ec"/> <!-- 上 --> <Ellipse Fill="DarkSlateBlue" Width="50" Height="50" RelativePanel.Above="ec" RelativePanel.AlignLeftWith="ec"/> <Ellipse Fill="CornflowerBlue" Width="50" Height="50" RelativePanel.Above="ec" RelativePanel.AlignHorizontalCenterWith="ec"/> <Ellipse Fill="Linen" Width="50" Height="50" RelativePanel.Above="ec" RelativePanel.AlignRightWith="ec"/> <!-- 右 --> <Ellipse Fill="#FF24B831" Width="50" Height="50" RelativePanel.RightOf="ec" RelativePanel.AlignTopWith="ec"/> <Ellipse Fill="MediumSlateBlue" Width="50" Height="50" RelativePanel.RightOf="ec" RelativePanel.AlignVerticalCenterWith="ec"/> <Ellipse Width="50" Height="50" Fill="LawnGreen" RelativePanel.RightOf="ec" RelativePanel.AlignBottomWith="ec"/> <!-- 下 --> <Ellipse Width="50" Height="50" Fill="#FF7B30C7" RelativePanel.Below="ec" RelativePanel.AlignLeftWith="ec"/> <Ellipse Fill="#FFF05D26" Height="50" Width="50" RelativePanel.Below="ec" RelativePanel.AlignHorizontalCenterWith="ec"/> <Ellipse Width="50" Height="50" Fill="#FFBF1D7D" RelativePanel.Below="ec" RelativePanel.AlignRightWith="ec"/> </RelativePanel>
面板中间位置是一个名为ec的圆,在ec周围有十二个小圆,积极团结在ec周围。在定位时,先确定小圆相对于大圆的位置,比如RelativePanel.Below表示该小圆位于大圆的下方。接着确定小圆相对于大圆的对齐方式,如RelativePanel.AlignBottomWith设置小圆在垂直方向上对齐到大圆的底部。
得到的结果如下图所示。
从上面这几个例子,大家可以发现,RelativePanel使用起来并不复杂,你只要把握各个附加属性的使用即可。
示例源码下载:http://files.cnblogs.com/files/tcjiaan/relativeLayoutSample.zip
正文到此结束
热门推荐


相关文章


Loading...
![[HBLOG]公众号](http://www.liuhaihua.cn/img/qrcode_gzh.jpg)

