iOS_Swift初识之使用三种回调方式自定义Button
最近在学习Swift ,发现青玉伏案大神早期用OC写的一篇博客-- IOS开发之自定义Button(集成三种回调模式) 很适合用来熟悉Swift的回调方式,于是我就用Swift翻版了一下,具体实现原理就不多说了,主要贴上Swift的代码给大家看看。由于刚开始了解Swift,有使用不恰当的地方请轻拍。。。。
上代码:
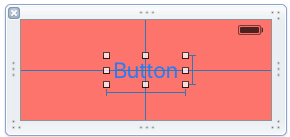
1、新建一个xib,拖一个UIView到界面上,绑定上自定义的UIView类,拖一个UILabel到view上,写上Button假装是个UIButton;并将label拖到代码当中

2、我这里回调三种Button点击事件,TouchDown、TouchUpInside、TouchUpOutside
A、首先是Target:
a、首先声明一个枚举来设定点击类型
enum MyControlEvents{ case TouchUpInside case TouchUpOutside case TouchDown } b、设置Target、action和Event三个属性
//声明三个属性、添加一个addTarget方法,注意Target和delegate一样要用weak修饰 weak var target:AnyObject? var action:Selector? var controlEvents:MyControlEvents? func addTarget(target:AnyObject!, action: Selector!, forMyControlEvents controlEvents: MyControlEvents! ){ self.target = target self.action = action self.controlEvents = controlEvents } c、在touch事件的代理里面实现Target方法、并把label的颜色改改,这样才像button,我把代理方法写在了extension延展里面,因为我见苹果都这样
extension MyViewButton{  override func touchesBegan(touches: Set<UITouch>, withEvent event: UIEvent?) {   self.titleLabel.textColor = UIColor.lightGrayColor()   if self.controlEvents == MyControlEvents.TouchDown{    self.target?.performSelector(self.action!, withObject: self)   }  }  override func touchesEnded(touches: Set<UITouch>, withEvent event: UIEvent?) {   self.titleLabel.textColor = UIColor.blueColor()   //let point:CGPoint = (touches as NSSet).anyObject()!.locationInView(self)、下面方法的合体   let view = (touches as NSSet).anyObject()   let point:CGPoint = view!.locationInView(self)   //判断Target类型和触摸点移出情况相匹配时执行target方法
     if CGRectContainsPoint(self.bounds, point) && self.controlEvents == MyControlEvents.TouchUpInside{    self.target?.performSelector(self.action!, withObject: self)   }else if !CGRectContainsPoint(self.bounds, point) && self.controlEvents == MyControlEvents.TouchUpOutside{    self.target?.performSelector(self.action!, withObject: self)   } }
d、在VC中实现,选择不同的点击类型即可监控不同的点击事件啦
class ViewController: UIViewController , MyViewButtonDelegate { var myButton:MyViewButton? override func viewDidLoad() { super.viewDidLoad() //从xib中加载我们自定义的view,我的xib叫做“View” let bundel:NSBundle = NSBundle.mainBundle() let views:Array = bundel.loadNibNamed("View", owner: nil, options: nil) self.myButton = views.last as? MyViewButton self.myButton?.frame = CGRectMake(80, 200, 200, 100) self.view.addSubview(self.myButton!) self.myButton?.addTarget(self, action: Selector!("didTapButton:"), forMyControlEvents: MyControlEvents.TouchUpInside) } 最后 实现点击方法即可
func didTapButton(button:MyViewButton){ print("VC点击了按钮---点击类型是/(button.controlEvents)") } B、协议
1、声明一个protocol,里面有三个可选实现的方法,并把自身当做参数带出去
objc protocol MyViewButtonDelegate:NSObjectProtocol{ optional func didTouchMyButton(button:MyViewButton) optional func didTouchUpInsideButton(button:MyViewButton) optional func didTouchUpOutsideButton(button:MyViewButton) } 2、声明一个delegate属性,同样是弱指针引用
weak var delegate:MyViewButtonDelegate!
3、同样在touch事件中实现
extension MyViewButton{ //调用协议方法时判断一下delegate和协议方法是否存在 override func touchesBegan(touches: Set<UITouch>, withEvent event: UIEvent?) { self.titleLabel.textColor = UIColor.lightGrayColor() if self.delegate != nil && self.delegate!.respondsToSelector("didTouchMyButton:"){ self.delegate?.didTouchMyButton!(self) } } override func touchesEnded(touches: Set<UITouch>, withEvent event: UIEvent?) { self.titleLabel.textColor = UIColor.blueColor() //let point:CGPoint = (touches as NSSet).anyObject()!.locationInView(self) let view = (touches as NSSet).anyObject() let point:CGPoint = view!.locationInView(self) if CGRectContainsPoint(self.bounds, point){ if self.delegate != nil && self.delegate!.respondsToSelector("didTouchUpInsideButton:"){ self.delegate?.didTouchUpInsideButton!(self) } }else{ if self.delegate != nil && self.delegate!.respondsToSelector("didTouchUpOutsideButton:"){ self.delegate?.didTouchUpOutsideButton!(self) } } } } 4、在VC中实现即可
class ViewController: UIViewController , MyViewButtonDelegate { override func viewDidLoad() { super.viewDidLoad() let bundel:NSBundle = NSBundle.mainBundle() let views:Array = bundel.loadNibNamed("View", owner: nil, options: nil) self.myButton = views.last as? MyViewButton self.myButton?.frame = CGRectMake(80, 200, 200, 100) self.view.addSubview(self.myButton!) //设置button的代理 self.myButton!.delegate = self } extension ViewController{ //实现代理方法 func didTouchMyButton(button: MyViewButton) { print("delegate--VC点击了button") } func didTouchUpInsideButton(button: MyViewButton) { print("delegate--TouchUpInside") } func didTouchUpOutsideButton(button: MyViewButton) { print("delegate--TouchUpOutside") } } C、闭包(block)
1、首先在自定义view里实现,相当于typedef一个block类型
typealias MyBlock = (button:MyViewButton)->Void
2、声明三个block属性,并且声明三个给block赋值方法
var TouchBlockHandel:MyBlock? var TouchUpInsideBlockHandel:MyBlock? var TouchUpOutsideBlockHandel:MyBlock? //也可以不写方法直接属性赋值 func setMyTouchBlock(block:MyBlock){ self.TouchBlockHandel = block } func setMyTouchUpInsideBlock(block:MyBlock){ self.TouchUpInsideBlockHandel = block } func setMyTouchUpOutsideBlock(block:MyBlock){ self.TouchUpOutsideBlockHandel = block } 3、在touch事件中实现block
extension MyViewButton{ override func touchesBegan(touches: Set<UITouch>, withEvent event: UIEvent?) { self.titleLabel.textColor = UIColor.lightGrayColor() self.TouchBlockHandel!(button: self) } override func touchesEnded(touches: Set<UITouch>, withEvent event: UIEvent?) { self.titleLabel.textColor = UIColor.blueColor() //let point:CGPoint = (touches as NSSet).anyObject()!.locationInView(self) let view = (touches as NSSet).anyObject() let point:CGPoint = view!.locationInView(self) if CGRectContainsPoint(self.bounds, point){ self.TouchUpInsideBlockHandel!(button: self) }else{ self.TouchUpOutsideBlockHandel!(button: self) } } 4、同样在VC中给三个block赋值即可
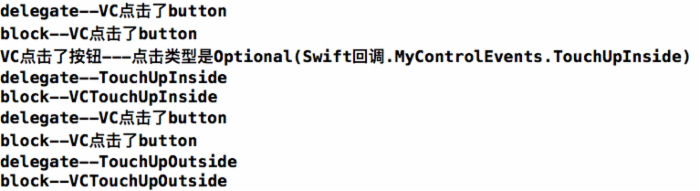
class ViewController: UIViewController , MyViewButtonDelegate { var myButton:MyViewButton? override func viewDidLoad() { super.viewDidLoad() let bundel:NSBundle = NSBundle.mainBundle() let views:Array = bundel.loadNibNamed("View", owner: nil, options: nil) self.myButton = views.last as? MyViewButton self.myButton?.frame = CGRectMake(80, 200, 200, 100) self.view.addSubview(self.myButton!) self.myButton?.setMyTouchBlock({ (button:MyViewButton) -> Void in print("block--VC点击了button") }) self.myButton?.setMyTouchUpInsideBlock({ (button:MyViewButton) -> Void in print("block--VCTouchUpInside") }) self.myButton?.setMyTouchUpOutsideBlock({ (button:MyViewButton) -> Void in print("block--VCTouchUpOutside") }) } } 最后来看看三个方法写在一起的打印结果。就添加了一个target监控TouchUpInside。总体来说和OC逻辑没有任何变化,只是语法上有所不同,block还是好用
好了,这样就结束了,今天下雪了,大家注意保暖!
正文到此结束
热门推荐


相关文章


Loading...
![[HBLOG]公众号](http://www.liuhaihua.cn/img/qrcode_gzh.jpg)

