插件研究代之dexmaker
最近在研究Android应用的插件化开发, 插件化都是在解决以下几个问题:
- 如何把插件apk中的代码和资源加载到当前虚拟机。
- 如何把插件apk中的四大组件注册到进程中。
- 如何防止插件apk中的资源和宿主apk中的资源引用冲突 。
我们已经解决了如何把apk中的代码和资源加载到当前应用的问题,上一篇文章中 使用代理的方式实现了插件Activity的注册 ,demo完成了插件框架的最简单的雏形。但是我们也说到代理方式实现的缺陷,于是本章继续来研究第二种中实现思路:“占坑”。
启动Activity是一个复杂的过程,有很多环节:Activity.startActivity()->Activity.startActivityForResult()->Instrument.excuteStartActivity()->ASM.startActivity()。大概又这么几个环节,详细了解可以参考文章: 《深入理解Activity的启动过程》 。 所谓“占坑”在宿主端的AndroidManifest.xml注册一个不存在的Activity,可以取名为StubActivity,同样启动插件的Activity都是启动StubActivity,然后在启动Activity的某个环节,我们找个“临时”演员来代替StubActivity,这个临时演员就是插件中定义的Activity,这叫“瞒天过海”。如何找“临时”演员?本章要讲的重点:使用 dexmaker 临时改造插件Activity。
什么是dexmaker
A Java-language API for doing compile time or runtime code generation targeting the Dalvik VM. Unlike cglib or ASM, this library creates Dalvik .dex files instead of Java .class files.It has a small, close-to-the-metal API. This API mirrors the Dalvik bytecode specification giving you tight control over the bytecode emitted. Code is generated instruction-by-instruction; you bring your own abstract syntax tree if you need one. And since it uses Dalvik’s dx tool as a backend, you get efficient register allocation and regular/wide instruction selection for free.
这是官方解释,简单来说就是dexmaker是运行在Android Dalvik VM上,利用Java编写,来动态生成DEX字节码的API。为我们在Android上实现AOP编程提供了很好的选择。
下面是dexmaker github的一个例子:
动态生成一个叫做HelloWorld的类,其中有个方法:hello
/** * Generates Dalvik bytecode equivalent to the following method. * public static void hello() { * int a = 0xabcd; * int b = 0xaaaa; * int c = a - b; * String s = Integer.toHexString(c); * System.out.println(s); * return; * } */ 实现代码:
public final class HelloWorldMaker { public static void main(String[] args) throws Exception { DexMaker dexMaker = new DexMaker(); // Generate a HelloWorld class. TypeId<?> helloWorld = TypeId.get("LHelloWorld;"); dexMaker.declare(helloWorld, "HelloWorld.generated", Modifier.PUBLIC, TypeId.OBJECT); generateHelloMethod(dexMaker, helloWorld); // Create the dex file and load it. File outputDir = new File("."); ClassLoader loader = dexMaker.generateAndLoad(HelloWorldMaker.class.getClassLoader(), outputDir, outputDir); Class<?> helloWorldClass = loader.loadClass("HelloWorld"); // Execute our newly-generated code in-process. helloWorldClass.getMethod("hello").invoke(null); } private static void generateHelloMethod(DexMaker dexMaker, TypeId<?> declaringType) { // Lookup some types we'll need along the way. TypeId<System> systemType = TypeId.get(System.class); TypeId<PrintStream> printStreamType = TypeId.get(PrintStream.class); // Identify the 'hello()' method on declaringType. MethodId hello = declaringType.getMethod(TypeId.VOID, "hello"); // Declare that method on the dexMaker. Use the returned Code instance // as a builder that we can append instructions to. Code code = dexMaker.declare(hello, Modifier.STATIC | Modifier.PUBLIC); // Declare all the locals we'll need up front. The API requires this. Local<Integer> a = code.newLocal(TypeId.INT); Local<Integer> b = code.newLocal(TypeId.INT); Local<Integer> c = code.newLocal(TypeId.INT); Local<String> s = code.newLocal(TypeId.STRING); Local<PrintStream> localSystemOut = code.newLocal(printStreamType); // int a = 0xabcd; code.loadConstant(a, 0xabcd); // int b = 0xaaaa; code.loadConstant(b, 0xaaaa); // int c = a - b; code.op(BinaryOp.SUBTRACT, c, a, b); // String s = Integer.toHexString(c); MethodId<Integer, String> toHexString = TypeId.get(Integer.class).getMethod(TypeId.STRING, "toHexString", TypeId.INT); code.invokeStatic(toHexString, s, c); // System.out.println(s); FieldId<System, PrintStream> systemOutField = systemType.getField(printStreamType, "out"); code.sget(systemOutField, localSystemOut); MethodId<PrintStream, Void> printlnMethod = printStreamType.getMethod( TypeId.VOID, "println", TypeId.STRING); code.invokeVirtual(printlnMethod, null, localSystemOut, s); // return; code.returnVoid(); } } dexmaker临时改造插件Activity
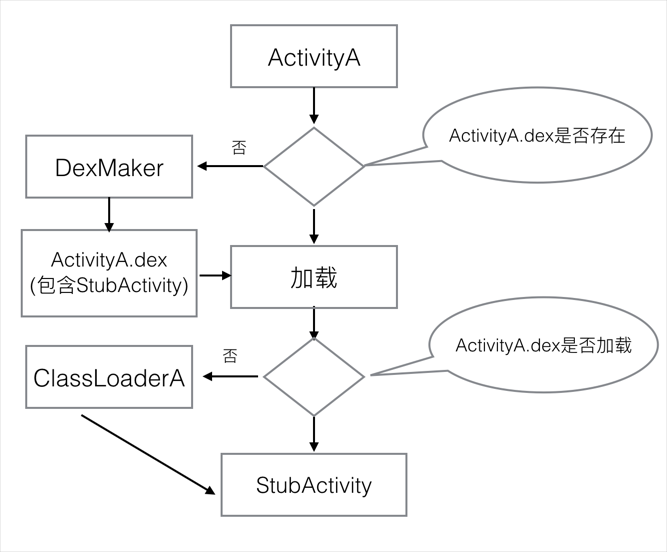
我们已经在宿主Apk的AndroidManifest.xml声明一个不存在的StubActivity,同样启动插件的Activity都是启动名为StubActivity的Activity,如果此时插件Apk中有一个ActivityA,要启动到ActivityA,我们先通过dexMaker生成一个名字和StubActivity一样的Activity类(.dex),这个类继承ActivityA,代码逻辑和ActivityA一样,但是要重写startActivityForResult()方法。在这个方法中注入如下重要逻辑:
一、通过 intent 获取目标Activity的名字,通过dexMaker生成一个名字和StubActivity一样的Activity。
二、加载新生成的StubActivity。
三、创建新的intent指向新生成的StubActivity并启动。
前面我们说到,插件的Activity都会生成一个名字和StubActivity一样的Activity,那么问题来了,包名类目都一样,我们如何区分插件中的ActivityA和ActivityB?
问题回到类加载器,在jvm中判断一个类是否是同一个类的标准是:一、 类名和包名一样。二、同一个类加载器加载的类。
所以解决的办法是,不同的Activity我们使用不同的类加载器。

到这里,思路已经比较清楚了,也许你会质疑:dexMaker生成StubActivity的过程比较耗时,这样启动插件Activity会不会很慢?这个问题好解决:
方案一:你可以在安装的时候一次生成。
方案二:你可以单独写一个工具,修改你的插件apk,预先生成Activity对应的.dex文件,在和apk重新打包成插件zip。
所以最后的加载流程可以是这样的:
和以往不同,由于文章涉及的东西比较多,暂时没有demo源码,重在思路的理解,有疑问欢迎联系我,一起讨论。我们完成了如何注册Activity的两种解决思路,后续文章我们继续研究插件化的最后一个问题:如何解决插件、宿主共享资源以及资源冲突问题。
正文到此结束
热门推荐


相关文章


Loading...
![[HBLOG]公众号](http://www.liuhaihua.cn/img/qrcode_gzh.jpg)

