基于TinyPng,自己开发一个IntelliJ插件
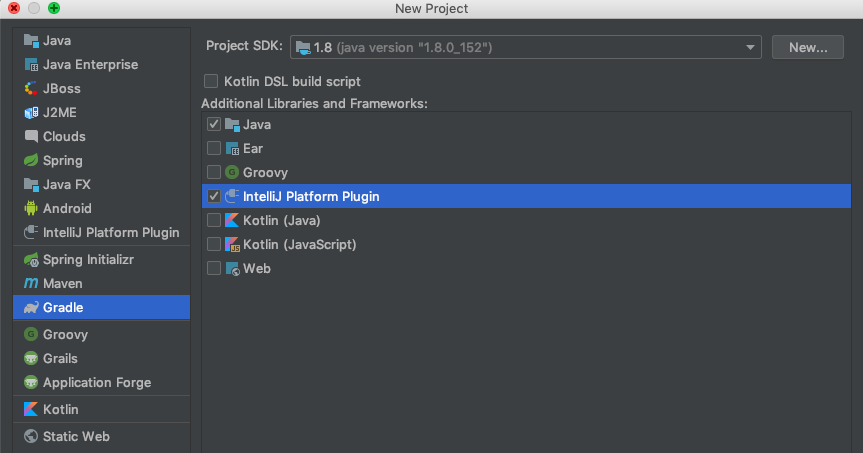
- 打开Intellij,选择file -> new project
- 从左侧的选项中 选择Gradle,然后选择IntelliJ Platform Plugin,然后你可以根据自己对选择,选择java、kotlin等
- GroupId - groupId 新项目。如果您计划在本地部署项目,则可以省略此字段。
ArtifactId - artifactId作为新项目的名称添加。
version 新项目。默认情况下,会自动指定此字段。
设置完成后点击 下一步
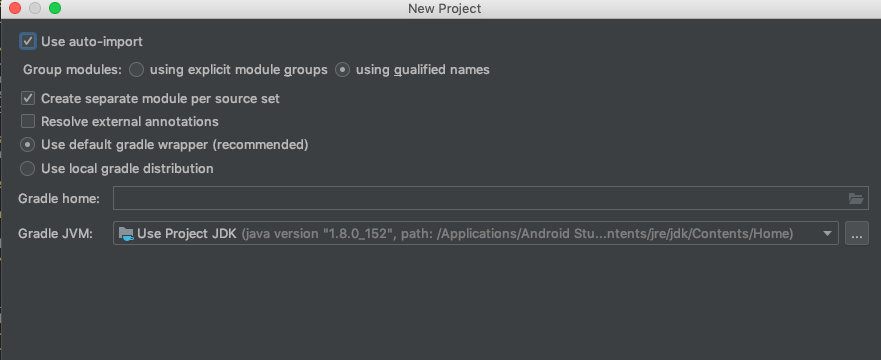
- 在向导的下一页上,为项目配置自动导入,Gradle版本等,使用默认选项即可
Hello My Plugin
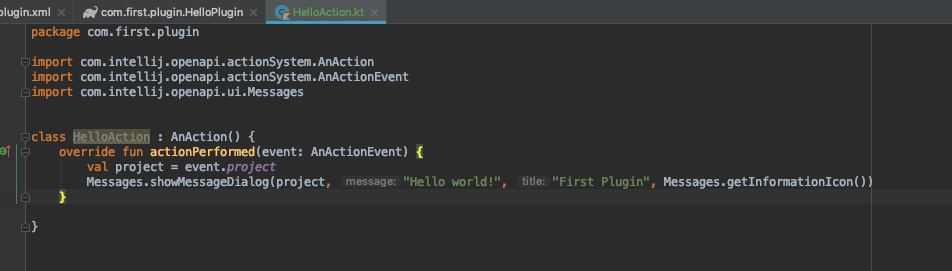
- 在src/main/java/目录下创建新的包,这里包名为之前输入的groupId:com.first.plugin
- 在IntelliJ中所有的行为都是继承自AnAction类,因此我们这里新建一个类继承AnAcction,并在其actionPerformed方法中弹出一个消息弹窗
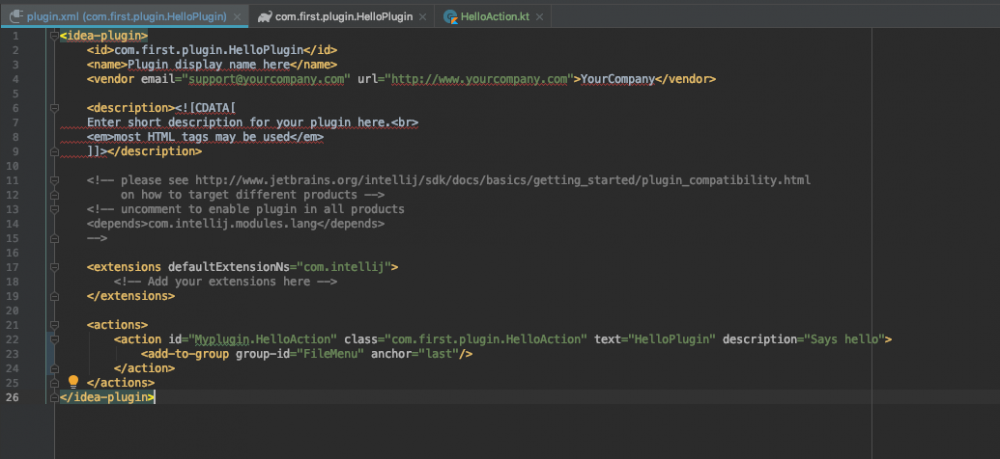
- Action编写好后,如同Android开发一样,我们需要在plugin.xml的actions标签中像Activity一样加入刚刚编写的Action。其中add-to-group代表我们需要把这个action加入到哪个位置。
- 完成上述步骤之后我们直接运行,即可打开一个ide进行运行我们刚刚写的那个action了。
用Gradle发布Plugin
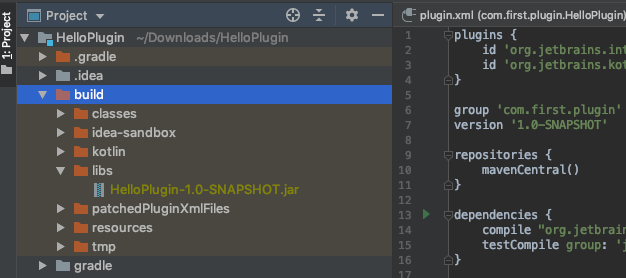
- 在build/libs目录下找到编译好的HelloPlugin.jar
- 登陆网站 plugins.jetbrains.com/ ,选择uploadPlugin,然后上传我们的jar包,填写完信息即可。注意要修改plugin.xml中的description和changeNotes,需要使用英文,否则会审核不过
- 上传确认以后会在2-3个工作日审核,审核完后就可以在intellij的plugin市场中找到我们的插件了。
学以致用
下面介绍一下如何基于知名图片压缩网站TinyPng开发一款图片压缩插件。效果如下:
添加依赖库
直接在lib中加入tinyPng提供的api jar包即可,这里为了便于开发,依赖了rxjava2
创建Action事件
像HelloAciton一样,创建CompressAction继承AnAction即可,然后我们定义一下事件的位置:鼠标右键和顶部Tools工具栏内。
在plugin.xml加入如下配置:
<actions>
    <action id="com.noober.plugin.tiny" class="com.noober.plugin.tiny.CompressAction" text="TinyCompress"
            description="a plugin to compress images">
        <add-to-group group-id="ProjectViewPopupMenu" anchor="after" relative-to-action="ReplaceInPath"/>
        <add-to-group group-id="ToolsMenu" anchor="last"/>
    </action>
</actions>
复制代码
获取选中的图片文件
private VirtualFile[] getSelectFiles(AnActionEvent e) {
    return DataKeys.VIRTUAL_FILE_ARRAY.getData(e.getDataContext());
}


private ArrayList<String> getFileArrayList(VirtualFile file) {
    ArrayList<String> pathList = new ArrayList<>();
    if (!file.isDirectory()) {
        if (file.getPath().endsWith(".jpg") || file.getPath().endsWith(".jpeg") || file.getPath().endsWith(".png")) {
            pathList.add(file.getPath());
        }
    } else {
        for (VirtualFile file1 : file.getChildren()) {
            pathList.addAll(getFileArrayList(file1));
        }
    }
    return pathList;
}
复制代码
通过getSelectFiles方法获取选中的文件夹的文件数组,然后进行遍历,我们通过getFileArrayList方法取出所有图片文件即可。
ArrayList<String> imagePaths = new ArrayList<>();
                        for (VirtualFile file : getSelectFiles(anActionEvent)) {
                            imagePaths.addAll(getFileArrayList(file));
                        }
复制代码
创建可输入的弹窗
弹窗ui交互如下:
- 因为TinyPng的使用需要输入专门的key,因此我们需要创建一个弹窗用于给开发者提供输入key。如果用户没有key,我们则提供一个默认的key给用户使用。
- 同时我们需要在开始上传压缩以及压缩完成之后给用户提醒,因此这里可以使用一个系统提供的Notifications控件。
- 如何压缩我们只需要使用TinyPng的Api即可。
继承DialogWrapper,重写createCenterPanel、doOKAction方法即可。
其中createCenterPanel用于创建图形界面,直接调用java swing的api即可,而doOKAction则是点击ok事件的回调方法。
完整代码如下:
public class SampleDialogWrapper extends DialogWrapper {

        String msg;

        public SampleDialogWrapper(String msg) {
            super(true);
            this.msg = msg;
            init();
            getCancelAction().setEnabled(false);
            setTitle("TinyCompress");
        }

        @Nullable
        @Override
        protected JComponent createCenterPanel() {
            //通过java swing的方法创建界面
            JPanel dialogPanel = new JPanel();
            jTextField = new JTextField(hint);
            dialogPanel.add(jTextField);
            return dialogPanel;
        }

        @Override
        protected void doOKAction() {
            super.doOKAction();
            String key;
            if(jTextField.getText().equals(hint)){
                key = "LHZoJXCysEceDReZIsQPWPxdODBxhavW";
            }else {
                key = jTextField.getText();
            }
            Observable.create((ObservableOnSubscribe<Boolean>) observableEmitter -> {
                observableEmitter.onNext(true);
                Tinify.setKey(key);
                //获取图片文件
                ArrayList<String> imagePaths = new ArrayList<>();
                for (VirtualFile file : getSelectFiles(anActionEvent)) {
                    imagePaths.addAll(getFileArrayList(file));
                }
                boolean result = true;
                for (String path : imagePaths) {
                    Source source;
                    try {
                            //进行图片压缩
                            source = Tinify.fromFile(path);
                            source.toFile(path);
                    } catch (Exception e1) {
                        e1.printStackTrace();
                        //如果是账户问题,比如key无效、使用次数达到限制,则不再调用api接口
                        if(e1 instanceof AccountException){
                            result = false;
                            observableEmitter.onError(e1);
                            break;
                        }else {
                            observableEmitter.onError(e1);
                        }

                    }
                }
                if(result){
                    observableEmitter.onComplete();
                }
            }).subscribe(result -> {
                if(result){
                    //弹出开始压缩的通知
                    Notifications.Bus.notify(new Notification(groupId, "TinyCompress", "start compress", NotificationType.INFORMATION, null));
                }
            }, error -> {
                //出错时弹出错误的通知
                Notifications.Bus.notify(new Notification(groupId, "TinyCompress", error.getMessage(), NotificationType.WARNING, null));

            }, () -> {
                //弹出压缩完成的通知
                Notifications.Bus.notify(new Notification(groupId, "TinyCompress", "compress complete", NotificationType.INFORMATION, null));
            });
        }
    }
复制代码
dialog写完之后,我们只需要重写AnAction的actionPerformed方法,将dialog展示即可。
@Override
public void actionPerformed(AnActionEvent e) {
    anActionEvent = e;
    SampleDialogWrapper startDialog = new SampleDialogWrapper("start compress");
    startDialog.show();
}
复制代码
收尾
代码已经完成,接下来我们只需要修改plugin.xml中的版本号、id、介绍以及更新说明即可。
结语
TinyCompress这个插件已经可以在android studio的plugin市场中搜到,欢迎大家使用。项目地址如下: github.com/JavaNoober/… 。
关于plugin更多的api,可以参考官方文档 IntelliJ Platform SDK 。
正文到此结束
热门推荐


相关文章


Loading...
![[HBLOG]公众号](http://www.liuhaihua.cn/img/qrcode_gzh.jpg)

