骚话@Autowired的底层工作原理,spring的自动装配
前情回顾
Spring拓展接口之BeanPostProcessor,我们来看看它的底层实现中讲到了spring对BeanPostProcessor的底层支持,并且知道了BeanPostProcessor的两个方法:postProcessBeforeInitialization、postProcessAfterInitialization的执行时机,没看的小伙伴可以回过头去看看。本来spring的自动装配是打算放到上一篇博文中详细讲解的,可后来觉得篇幅可能太大了,既然你们都感觉出来了,那我也就明人不说暗话了,之所以没放到上篇讲解,确实是因为篇幅太大了。好了,我们言归正传,之所以没放到上篇来讲,篇幅只是原因之
一,最主要的原因是发现我犯错了! 犯什么错了呢?
我想当然了! 理所当然的认为自动装配是在AutowiredAnnotationBeanPostProcessor的postProcessBeforeInitialization或postProcessAfterInitialization中实现的,我们来看下AutowiredAnnotationBeanPostProcessor类继承图
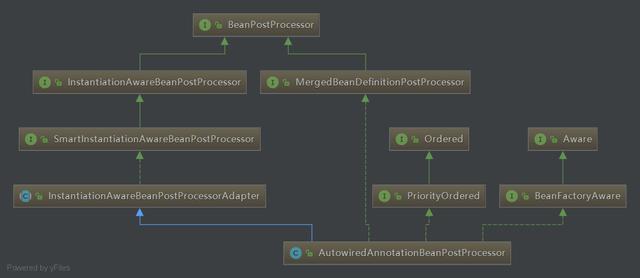
它间接实现了BeanPostProcessor,我们再去看下那两个方法(在父类InstantiationAwareBeanPostProcessorAdapter中)
@Override
public Object postProcessBeforeInitialization(Object bean, String beanName) throws BeansException {
 return bean;
}
@Override
public Object postProcessAfterInitialization(Object bean, String beanName) throws BeansException {
 return bean;
}
复制代码
竟然啥也没干,只是简单的return bean; 当自己深以为然的认知被推翻时,那感觉真是毙了狗了
所以自动装配不能和BeanPostProcessor放一块讲,不得不开两篇来分开讲,我们都知道:强扭的瓜不甜!
自动装配简单示例
我们先来看一个简单的自动装配的示例,完整实例代码:spring-boot-BeanPostProcessor
AnimalServiceImpl
@Service
public class AnimalServiceImpl implements IAnimalService {
 @Autowired
 private Dog dog;
 @Resource
 private Cat cat;
 @Inject
 private Pig pig;
 @Override
 public void printName() {
 System.out.println(dog.getName());
 System.out.println(cat.getName());
 System.out.println(pig.getName());
 }
}
复制代码
AnimalTest
@RunWith(SpringRunner.class)
@SpringBootTest(classes={Application.class})
public class AnimalTest {
 @Autowired
 private IAnimalService animalService;
 @Test
 public void test() {
 animalService.printName();
 }
}
复制代码
运行结果

我们在AnimalConfig中只是将Dog、Cat、Pig的实例注册到了spring容器,那为什么AnimalServiceImpl实例能够直接应用这些实例了,我们并没有手动的将这些实例赋值到AnimalServiceImpl实例呀? 这其实就是spring提供的自动装配功能,虽然我们没有手动的将这些实例赋值到AnimalServiceImpl实例,但是我们发现AnimalServiceImpl的属性实例上多了一些注解:@Autowired、@Resource、@Inject,spring通过这些注解自动完成了属性实例的注入,而不需要我们手动的去赋值了;那么spring是如何实现自动装配的呢? 我们慢慢往下看(注意:后文主要以@Autowired为例来讲解)
自动装配源码解析
AutowiredAnnotationBeanPostProcessor的实例化与注册
不管怎么说,AutowiredAnnotationBeanPostProcessor终归还是一个BeanPostProcessor,那么它的实例化与注册(注册到spring的beanFactory)过程与BeanPostProcessor的实例化与注册一样,在spring的启动过程中,刷新上下文(refresh)的时候,会调用registerBeanPostProcessors(beanFactory)方法完成BeanPostProcessor的实例化与注册,后续再调用finishBeanFactoryInitialization(beanFactory)实例化非延迟加载的单例bean时,会用到上述注册的BeanPostProcessor
AutowiredAnnotationBeanPostProcessor的构造方法值得我们看看
public AutowiredAnnotationBeanPostProcessor() {
 this.autowiredAnnotationTypes.add(Autowired.class);
 this.autowiredAnnotationTypes.add(Value.class);
 try {
 this.autowiredAnnotationTypes.add((Class<? extends Annotation>)
 ClassUtils.forName("javax.inject.Inject", AutowiredAnnotationBeanPostProcessor.class.getClassLoader()));
 logger.info("JSR-330 'javax.inject.Inject' annotation found and supported for autowiring");
 }
 catch (ClassNotFoundException ex) {
 // JSR-330 API not available - simply skip.
 }
}
复制代码
默认情况下,AutowiredAnnotationBeanPostProcessor支持@Autowired和@Value,如果类路径下有java.inject.Inject(也就是引入了javax.inject.jar),那么也支持@Inject注解,是不是与我们最初的认知有些不一样?
将支持的注解放到了autowiredAnnotationTypes属性中,后续会用到该属性
bean的实例化与依赖注入
默认情况下,spring会把spring容器中的bean当成non-lazy-init singleton来处理(有些特殊的bean除外),也就是说会在spring的启动过程中就会逐个实例化这些bean,并对这些bean进行依赖注入;当我们真正用到这些bean的时候,直接用就行,不用再去实例化,也不用再去注入bean的相关依赖,spring是不是很厉害?
具体是不是说的这样,大家准备好花生、瓜子和啤酒,好戏即将开始
我们先找到正确的入口,然后用下图省略掉无聊的前戏,直接进入高潮: doCreateBean
doCreateBean内容如下
protected Object doCreateBean(final String beanName, final RootBeanDefinition mbd, final @Nullable Object[] args)
 throws BeanCreationException {
 // Instantiate the bean.
 BeanWrapper instanceWrapper = null;
 if (mbd.isSingleton()) {
 instanceWrapper = this.factoryBeanInstanceCache.remove(beanName);
 }
 if (instanceWrapper == null) {
 // 创建bean实例
 instanceWrapper = createBeanInstance(beanName, mbd, args);
 }
 final Object bean = instanceWrapper.getWrappedInstance();
 Class<?> beanType = instanceWrapper.getWrappedClass();
 if (beanType != NullBean.class) {
 mbd.resolvedTargetType = beanType;
 }
 // Allow post-processors to modify the merged bean definition.
 // 允许后置处理器来修改bean定义
 synchronized (mbd.postProcessingLock) {
 if (!mbd.postProcessed) {
 try {
 // 调用MergedBeanDefinitionPostProcessor的postProcessMergedBeanDefinition方法
 // AutowiredAnnotationBeanPostProcessor实现了MergedBeanDefinitionPostProcessor,即MergedBeanDefinitionPostProcessor的MergedBeanDefinitionPostProcessor会被调用
 applyMergedBeanDefinitionPostProcessors(mbd, beanType, beanName);
 }
 catch (Throwable ex) {
 throw new BeanCreationException(mbd.getResourceDescription(), beanName,
 "Post-processing of merged bean definition failed", ex);
 }
 mbd.postProcessed = true;
 }
 }
 // Eagerly cache singletons to be able to resolve circular references 立即缓存单例以便能够解析循环引用
 // even when triggered by lifecycle interfaces like BeanFactoryAware.
 boolean earlySingletonExposure = (mbd.isSingleton() && this.allowCircularReferences &&
 isSingletonCurrentlyInCreation(beanName));
 if (earlySingletonExposure) {
 if (logger.isDebugEnabled()) {
 logger.debug("Eagerly caching bean '" + beanName +
 "' to allow for resolving potential circular references");
 }
 addSingletonFactory(beanName, () -> getEarlyBeanReference(beanName, mbd, bean));
 }
 // Initialize the bean instance.
 Object exposedObject = bean;
 try {
 // 填充bean,包含依赖注入
 populateBean(beanName, mbd, instanceWrapper);
 // 初始化bean,BeanPostProcessor的两个方法在此中被调用
 exposedObject = initializeBean(beanName, exposedObject, mbd);
 }
 catch (Throwable ex) {
 if (ex instanceof BeanCreationException && beanName.equals(((BeanCreationException) ex).getBeanName())) {
 throw (BeanCreationException) ex;
 }
 else {
 throw new BeanCreationException(
 mbd.getResourceDescription(), beanName, "Initialization of bean failed", ex);
 }
 }
 if (earlySingletonExposure) {
 Object earlySingletonReference = getSingleton(beanName, false);
 if (earlySingletonReference != null) {
 if (exposedObject == bean) {
 exposedObject = earlySingletonReference;
 }
 else if (!this.allowRawInjectionDespiteWrapping && hasDependentBean(beanName)) {
 String[] dependentBeans = getDependentBeans(beanName);
 Set<String> actualDependentBeans = new LinkedHashSet<>(dependentBeans.length);
 for (String dependentBean : dependentBeans) {
 if (!removeSingletonIfCreatedForTypeCheckOnly(dependentBean)) {
 actualDependentBeans.add(dependentBean);
 }
 }
 if (!actualDependentBeans.isEmpty()) {
 throw new BeanCurrentlyInCreationException(beanName,
 "Bean with name '" + beanName + "' has been injected into other beans [" +
 StringUtils.collectionToCommaDelimitedString(actualDependentBeans) +
 "] in its raw version as part of a circular reference, but has eventually been " +
 "wrapped. This means that said other beans do not use the final version of the " +
 "bean. This is often the result of over-eager type matching - consider using " +
 "'getBeanNamesOfType' with the 'allowEagerInit' flag turned off, for example.");
 }
 }
 }
 }
 // Register bean as disposable.
 try {
 registerDisposableBeanIfNecessary(beanName, bean, mbd);
 }
 catch (BeanDefinitionValidationException ex) {
 throw new BeanCreationException(
 mbd.getResourceDescription(), beanName, "Invalid destruction signature", ex);
 }
 return exposedObject;
}
复制代码
我们重点看下posProcessMergedBeanDefinition方法和populateBean方法
posProcessMergedBeanDefinition
可以看到会读取bean的field和method上的注解,并判断该注解是否在autowiredAnnotationTypes中,如果在则将field封装成AutowiredFiledElement对象、将method封装成AutoWiredMethodElement对象,并存放到InjectionMetadata对象的Set<InjectedElement> checkedElements属性中,最后将该InjectionMetadata对象缓存到了AutowiredAnnotationBeanPostProcessor的Map<String, InjectionMetadata> injectionMetadataCache属性中;说白了就是将bean中被@Autowried(当然还包括@Value、@Inject)修饰的field、method找出来,封装成InjectionMetadata对象并缓存起来,就这么简单。不仅仅是上图中的animalServiceImpl这一个bean,spring中所有的非延迟加载的bean都会走这个创建流程。是不是很简单,是不是干劲十足了
populateBean
调用AutowiredAnnotationBeanPostProcessor的postProcessPropertyValues方法,从injectionMetadataCache中获取当前bean的依赖信息,比如animalServiceImpl依赖的dog、pig(有人可能会有这样的疑问:cat呢? cat是被@Resource修饰的,而@Resource不是由AutowiredAnnotationBeanPostProcessor支持,后续会讲由谁支持),然后逐个将依赖bean注入到目标bean(将dog、pig实例注入到animalServiceImpl实例中);依赖bean从哪来呢?还是从beanFactory中获取,如果不存在,则又回到bean的创建过程把依赖bean(dog、pig)创建出来,流程与创建animalServiceImpl实例一模一样,也就说在animalServiceImpl实例的依赖注入过程中会把dog、pig对象也创建出来,而不是等到spring逐个实例化bean的过程中轮到dog、pig才实例化dog、pig,那后续轮到dog、pig时怎么办了,spring会把创建的bean缓存起来,下次就直接从缓存中取了。上图只演示Field的,Method也差不太多,就不演示了,都是通过反射实现的 。
总结
1、bean的创建与初始化
(1)instanceWrapper = createBeanInstance(beanName, mbd, args) 创建目标bean实例;
(2)applyMergedBeanDefinitionPostProcessors(mbd, beanType, beanName) 寻找目标bean的依赖;
(3)populateBean(beanName, mbd, instanceWrapper) 填充目标bean,完成依赖注入; (这里的循环依赖,有兴趣的可以自行去琢磨下)
(4)initializeBean(beanName, exposedObject, mbd) 初始化目标bean
2、自动装配与自动配置
自动配置一般而言说的是spring的@Autowired,是spring的特性之一,而自动配置是springboot的@Configuration,是springboot的特性之一
3、Spring支持几下几种自动装配的注解
@Autowired、@Inject、@Resource以及@Value,用的最多的应该是@Autowired(至少我是这样的),@Inject和@Value也是由AutowiredAnnotationBeanPostProcessor支持,而@Resource是由CommonAnnotationBeanPostProcessor支持(还支持@PostConstruct、@PreDestroy等注解)
关于@Value与@Autowired,不知道大家是否清楚他们之间的区别,不清楚的可以看看:Spring: @Value vs. @Autowired或者spring的官方文档,总结下:@Value >= @Autowired,只是平时应用中,@Value更多的是用来注入配置值(如:@Value("${db.url}")),而@Autowired则是bean对象的注入
正文到此结束
- 本文标签: spring struct map 解析 ACE IO synchronized ip cat App http cache 构造方法 db description CTO src bean equals 源码 tar CEO example Service bug 启动过程 代码 总结 Property springboot ssl CDN API final BeanDefinition id 2019 root js IDE value 处理器 工作原理 HashSet java https 配置 实例 trigger Collection 缓存
- 版权声明: 本文为互联网转载文章,出处已在文章中说明(部分除外)。如果侵权,请联系本站长删除,谢谢。
- 本文海报: 生成海报一 生成海报二
热门推荐


相关文章


Loading...
![[HBLOG]公众号](http://www.liuhaihua.cn/img/qrcode_gzh.jpg)

