带你一步一步手撕 Mybatis 源码加手绘流程图——构建部分
MyBatis 的前身是 Apache 的开源项目 iBatis。MyBatis 消除了几乎所有的 JDBC 代码和参数的手工设置以及对结果集的检索封装,是一个支持 普通 SQL 查询,存储过程和高级映射 的基于 Java 的优秀持久层框架。
MyBatis 配置
当阅读源码的时候我们不能深陷一些细节,我们应该先 鸟瞰全貌 ,这样能够帮助你从高维度理解框架。
因为这篇文章主要涉及配置文件对应的配置对象的初始化和构建,所以 执行部分 先不做介绍。我们首先放一张平时我们使用 Mybatis 的时候会编写的两个重要配置文件—— mybatis-config.xml 和 xxxMapper.xml 。
这里我们默认 mybatis 的配置文件为 mybatis-config.xml
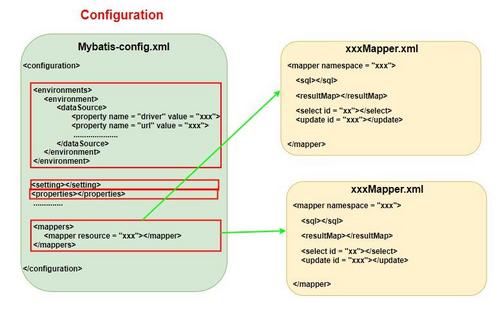
在 mybatis-config.xml 配置文件中,我们会有一个专门的 <mappers> 标签映射了相关的 mapper 映射文件。
其实,Mybatis的构建流程就是: 对配置文件解析成配置对象装入内存中 。
Mybatis是如何将配置文件解析成配置对象的
首先我们来思考一个问题: 这个配置对象什么时候会被使用到?
我们知道在 mybatis-config.xml 中配置了一些 类型处理器,类型别名,mappers,数据库连接信息等等 ,而这些东西在每次数据库连接进行 CRUD 操作的时候都需要用到,也就是在每次 SQL会话 中我们需要用到。
而在 Mybatis 中使用了一个 SqlSession 接口来表示和规范了 Sql会话,我们需要通过专门的 SqlSessionFactory 去创建,这里面是一种工厂模式。这里我简单画一下 UML 图,你可以回顾一下 工厂模式 ,但这不是这篇文章的重点。
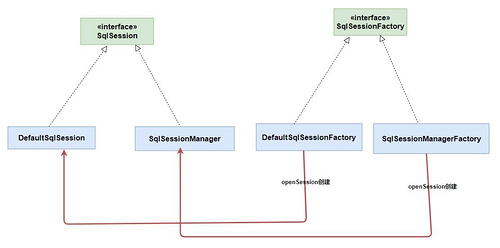
Mybatis使用了工厂模式还不止,在构造 SqlSessionFactory 的时候还使用了 SqlSessionFactoryBuilder 去构建 SqlSessionFactory 也就是使用了 构建者模式 。而又因为在创建 SqlSession 的时候我们需要传入我们的配置对象 Configuration ,而我们知道 mybatis-config.xml 配置文件中有许多标签,也就意味着当我们构造一个 Configuration 对象的时候会带有很多字段的解析,那么整个 Configuration 对象的构建是非常复杂的。在 Mybatis 中使用了 构建者模式 来解决这个问题。我们可以看一下源码。
// 这是在SqlSessionFactoryBuilder类中
// 在 SqlSessionFactoryBuilder 中会有很多build构造工厂的方法
// 其中这里是主线,因为其他build方法都会调用此方法
public SqlSessionFactory build(InputStream inputStream, String environment, Properties properties) {
try {
  // 通过配置文件解析成的流去创建
  // 构建Configuration对象的 builder类 XmlConfigBuilder
  // 之后会调用parse方法构建 Configuration 对象
  XMLConfigBuilder parser = new XMLConfigBuilder(inputStream, environment, properties);
  // 最终会调用参数为Configuration的build方法
  // 进行最终的SqlSessionFactory的构建
  return build(parser.parse());
} catch (Exception e) {
  throw ExceptionFactory.wrapException("Error building SqlSession.", e);
} finally {
  ErrorContext.instance().reset();
  try {
    inputStream.close();
  } catch (IOException e) {
    // Intentionally ignore. Prefer previous error.
  }
}
}
复制代码
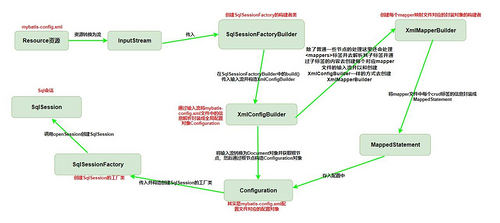
这样我们就可以画出一个简单的流程图了。
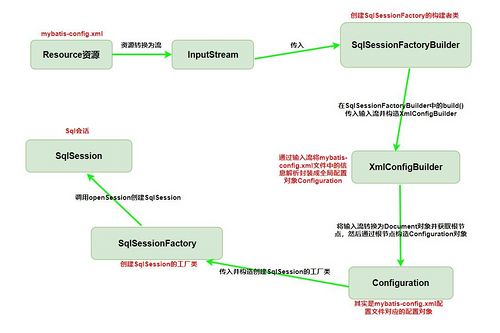
沿着主线走看 Mybatis 如何解析配置文件的
由上面的分析我们可以知道: 在 XMLConfigBuilder 类中的 parse() 方法进行了 Configuration 对象的解析和构建 。
我们来沿着这条路线进去看看底层原理是什么样的。
public Configuration parse() {
// 如果已经解析过了,报错
if (parsed) {
  throw new BuilderException("Each XMLConfigBuilder can only be used once.");
}
parsed = true;
// 根节点是configuration
// 解析还在这里
// 我需要在这里解释一下
// "/configuartion" 这个其实是xpath语法
// mybatis封装了 xpath解析器去解析 xml
parseConfiguration(parser.evalNode("/configuration"));
return configuration;
}

//解析配置
private void parseConfiguration(XNode root) {
try {
  //分步骤解析
  //issue #117 read properties first
  //1.properties
  propertiesElement(root.evalNode("properties"));
  //2.类型别名
  typeAliasesElement(root.evalNode("typeAliases"));
  //3.插件
  pluginElement(root.evalNode("plugins"));
  //4.对象工厂
  objectFactoryElement(root.evalNode("objectFactory"));
  //5.对象包装工厂
  objectWrapperFactoryElement(root.evalNode("objectWrapperFactory"));
  //6.设置
  settingsElement(root.evalNode("settings"));
  // read it after objectFactory and objectWrapperFactory issue #631
  //7.环境
  environmentsElement(root.evalNode("environments"));
  //8.databaseIdProvider
  databaseIdProviderElement(root.evalNode("databaseIdProvider"));
  //9.类型处理器
  typeHandlerElement(root.evalNode("typeHandlers"));
  //10.映射器
  mapperElement(root.evalNode("mappers"));
} catch (Exception e) {
  throw new BuilderException("Error parsing SQL Mapper Configuration. Cause: " + e, e);
}
}
复制代码
看到这些有没有觉得很熟悉?
其实就是 配置文件中的一些标签配置。我们画张图来对应一下就一目了然了。
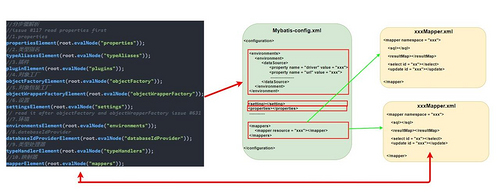
比较重要的 mappers
如上图所示,在整个 Configuration 配置对象的构建过程中需要涉及到很多标签的解析,所以 Mybatis 巧妙地利用了 构建者模式,而这么多配置信息在这篇文章中我不能一一去进行源码分析(有很多都是细枝末节的东西,我们只需要大概知道干什么就行了),所以我挑了最重要的 <mappers> 标签的解析去进行源码分析。
我们再次进入源码查看,这回是 XmlConfigBuilder 中的 mapperElement(XNode parent) 方法。当然我们最好对照着配置信息格式去看
<mappers>
  <!-- 这几种配置方式 结合下面源码看 -->
  <mapper resource="org/mybatis/builder/AuthorMapper.xml"/>
  <mapper class="org.mybatis.builder.BlogMapper"/>
  <package name="org.mybatis.builder"/>
</mappers>
复制代码
private void mapperElement(XNode parent) throws Exception {
if (parent != null) {
  for (XNode child : parent.getChildren()) {
    if ("package".equals(child.getName())) {
      // 自动扫描包下所有映射器
      String mapperPackage = child.getStringAttribute("name");
      configuration.addMappers(mapperPackage);
    } else {
      String resource = child.getStringAttribute("resource");
      String url = child.getStringAttribute("url");
      String mapperClass = child.getStringAttribute("class");
      if (resource != null && url == null && mapperClass == null) {
        // 使用类路径
        ErrorContext.instance().resource(resource);
        InputStream inputStream = Resources.getResourceAsStream(resource);
        // 映射器比较复杂,调用XMLMapperBuilder
        // 注意在for循环里每个mapper都重新new一个XMLMapperBuilder,来解析
        // 注意构建者里面还传入了 configuration
        // 也就是说 mapper映射文件 对应的配置对象也需要封装在 configuration中
        XMLMapperBuilder mapperParser = new XMLMapperBuilder(inputStream, configuration, resource, configuration.getSqlFragments());
        mapperParser.parse();
      } else if (resource == null && url != null && mapperClass == null) {
        // 使用绝对url路径
        ErrorContext.instance().resource(url);
        InputStream inputStream = Resources.getUrlAsStream(url);
        // 映射器比较复杂,调用XMLMapperBuilder
        XMLMapperBuilder mapperParser = new XMLMapperBuilder(inputStream, configuration, url, configuration.getSqlFragments());
        mapperParser.parse();
      } else if (resource == null && url == null && mapperClass != null) {
        // 使用java类名
        Class<?> mapperInterface = Resources.classForName(mapperClass);
        //直接把这个映射加入配置
        configuration.addMapper(mapperInterface);
      } else {
        throw new BuilderException("A mapper element may only specify a url, resource or class, but not more than one.");
      }
    }
  }
}
}
复制代码
我们会对 mappers 标签里面的子标签进行遍历,对于除了 package 的三种资源标识(resource,url,class)来说,每个 mapper 子标签都会构建一个 XMLMapperBuilder 去构建解析对应的 mapper 映射配置文件。 其实这些 资源标志 就是让程序去寻找到对应的 xxxMapper.xml 映射文件,然后同样适用构建者模式去构建 xxxMapper.xml 对应的配置对象 。
我们来看一下 XmlMapperBuilder 构建者是如何构建相应的 “Mapper” 配置对象的。
public void parse() {
// 如果没有加载过再加载,防止重复加载
if (!configuration.isResourceLoaded(resource)) {
  //主线在这里 配置 mapper
  configurationElement(parser.evalNode("/mapper"));
  // 标记一下,已经加载过了
  configuration.addLoadedResource(resource);
  // 绑定映射器到namespace
  bindMapperForNamespace();
}
// 可以忽略
parsePendingResultMaps();
parsePendingChacheRefs();
parsePendingStatements();
}

private void configurationElement(XNode context) {
try {
  //1.配置namespace
  // 这步骤也是挺关键 先记住 namespace这个东西
  String namespace = context.getStringAttribute("namespace");
  if (namespace.equals("")) {
    throw new BuilderException("Mapper's namespace cannot be empty");
  }
  builderAssistant.setCurrentNamespace(namespace);
  // 缓存 可以先不管
  //2.配置cache-ref
  cacheRefElement(context.evalNode("cache-ref"));
  //3.配置cache
  cacheElement(context.evalNode("cache"));
  //4.配置parameterMap(已经废弃,老式风格的参数映射)
  parameterMapElement(context.evalNodes("/mapper/parameterMap"));
  // mybatis 非常非常重要的功能
  //5.配置resultMap(高级功能)
  resultMapElements(context.evalNodes("/mapper/resultMap"));
  //6.配置sql(定义可重用的 SQL 代码段)
  sqlElement(context.evalNodes("/mapper/sql"));
  //7.配置select|insert|update|delete
  // 这里是真正的主线
  // 这里会根据前面的sql片段创建在Mapper中真正的配置对象 MappedStatement
  buildStatementFromContext(context.evalNodes("select|insert|update|delete"));
} catch (Exception e) {
  throw new BuilderException("Error parsing Mapper XML. Cause: " + e, e);
}
}

// 传入 select|insert|update|delete 标签的 节点列表进行构建 Statement
private void buildStatementFromContext(List<XNode> list) {
  // 判断DatabaseId
  if (configuration.getDatabaseId() != null) {
    buildStatementFromContext(list, configuration.getDatabaseId());
  }
  // 都是调用这个方法
  buildStatementFromContext(list, null);
}

private void buildStatementFromContext(List<XNode> list, String requiredDatabaseId) {
for (XNode context : list) {
  // 构建所有语句,一个mapper下可以有很多select
  // 这里又使用了构造者模式
  // 语句比较复杂,核心都在这里面,所以调用XMLStatementBuilder
  final XMLStatementBuilder statementParser = new XMLStatementBuilder(configuration, builderAssistant, context, requiredDatabaseId);
  try {
    // 主线
    // 核心XMLStatementBuilder.parseStatementNode
    statementParser.parseStatementNode();
  } catch (IncompleteElementException e) {
      // 如果出现SQL语句不完整,把它记下来,塞到configuration去
    configuration.addIncompleteStatement(statementParser);
  }
}
}
复制代码
上面那么长的一大串代码其实就是一个链式调用。我们画一下流程便于你理解。
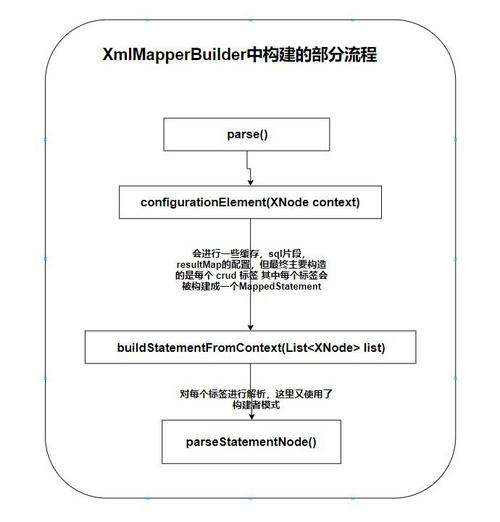
接下来就到了 XMLStatementBuilder 这个类中去构建 MappedStatement 对象了。
// 紧接着上面的解析构建方法
public void parseStatementNode() {
    String id = context.getStringAttribute("id");
    String databaseId = context.getStringAttribute("databaseId");

    // 如果databaseId不匹配,退出
    if (!databaseIdMatchesCurrent(id, databaseId, this.requiredDatabaseId)) {
      return;
    }

    //暗示驱动程序每次批量返回的结果行数
    Integer fetchSize = context.getIntAttribute("fetchSize");
    //超时时间
    Integer timeout = context.getIntAttribute("timeout");
    //引用外部 parameterMap,已废弃
    String parameterMap = context.getStringAttribute("parameterMap");
    // 前面三个不太重要
    //参数类型 这个在参数映射的时候挺重要
    String parameterType = context.getStringAttribute("parameterType");
    Class<?> parameterTypeClass = resolveClass(parameterType);
    //引用外部的 resultMap(高级功能) 非常重要了
    //算是 Mybatis 中核心功能了
    String resultMap = context.getStringAttribute("resultMap");
    //结果类型
    String resultType = context.getStringAttribute("resultType");
    //脚本语言,mybatis3.2的新功能 不重要
    String lang = context.getStringAttribute("lang");
    //得到语言驱动 不重要
    LanguageDriver langDriver = getLanguageDriver(lang);

    Class<?> resultTypeClass = resolveClass(resultType);
    //结果集类型,FORWARD_ONLY|SCROLL_SENSITIVE|SCROLL_INSENSITIVE 中的一种
    String resultSetType = context.getStringAttribute("resultSetType");
    //语句类型, STATEMENT|PREPARED|CALLABLE 的一种
    // 获取 Statement类型 这个是需要和 JDBC做映射的
    StatementType statementType = StatementType.valueOf(context.getStringAttribute("statementType", StatementType.PREPARED.toString()));
    ResultSetType resultSetTypeEnum = resolveResultSetType(resultSetType);

    //获取命令类型(select|insert|update|delete)
    String nodeName = context.getNode().getNodeName();
    SqlCommandType sqlCommandType = SqlCommandType.valueOf(nodeName.toUpperCase(Locale.ENGLISH));
    boolean isSelect = sqlCommandType == SqlCommandType.SELECT;
    boolean flushCache = context.getBooleanAttribute("flushCache", !isSelect);
    //是否要缓存select结果
    boolean useCache = context.getBooleanAttribute("useCache", isSelect);
    //仅针对嵌套结果 select 语句适用:如果为 true,就是假设包含了嵌套结果集或是分组了,这样的话当返回一个主结果行的时候,就不会发生有对前面结果集的引用的情况。
    //这就使得在获取嵌套的结果集的时候不至于导致内存不够用。默认值:false。
    boolean resultOrdered = context.getBooleanAttribute("resultOrdered", false);

    // Include Fragments before parsing
    // 解析之前先解析<include>SQL片段 这个在前面 XMLMapperBuilder
    // 中已经构建完成,这里需要调用并解析
    XMLIncludeTransformer includeParser = new XMLIncludeTransformer(configuration, builderAssistant);
    includeParser.applyIncludes(context.getNode());

    // Parse selectKey after includes and remove them.
    //解析之前先解析<selectKey> selectKey主要涉及需要某些特殊关系来设置主键的值
    processSelectKeyNodes(id, parameterTypeClass, langDriver);

    // Parse the SQL (pre: <selectKey> and <include> were parsed and removed)
    // 做了解
    //解析成SqlSource,一般是DynamicSqlSource
    // 其实不管 Dynamic 还是 Raw 最终都会解析成 static
    SqlSource sqlSource = langDriver.createSqlSource(configuration, context, parameterTypeClass);
    String resultSets = context.getStringAttribute("resultSets");
    //(仅对 insert 有用) 标记一个属性, MyBatis 会通过 getGeneratedKeys 或者通过 insert 语句的 selectKey 子元素设置它的值
    String keyProperty = context.getStringAttribute("keyProperty");
    //(仅对 insert 有用) 标记一个属性, MyBatis 会通过 getGeneratedKeys 或者通过 insert 语句的 selectKey 子元素设置它的值
    String keyColumn = context.getStringAttribute("keyColumn");
    KeyGenerator keyGenerator;
    String keyStatementId = id + SelectKeyGenerator.SELECT_KEY_SUFFIX;
    keyStatementId = builderAssistant.applyCurrentNamespace(keyStatementId, true);
    if (configuration.hasKeyGenerator(keyStatementId)) {
      keyGenerator = configuration.getKeyGenerator(keyStatementId);
    } else {
      keyGenerator = context.getBooleanAttribute("useGeneratedKeys",
          configuration.isUseGeneratedKeys() && SqlCommandType.INSERT.equals(sqlCommandType))
          ? new Jdbc3KeyGenerator() : new NoKeyGenerator();
    }
    // 真正的主线在这里
	//调用助手类去真正创建MappedStatement然后加入配置Configuration中
    builderAssistant.addMappedStatement(id, sqlSource, statementType, sqlCommandType,
        fetchSize, timeout, parameterMap, parameterTypeClass, resultMap, resultTypeClass,
        resultSetTypeEnum, flushCache, useCache, resultOrdered,
        keyGenerator, keyProperty, keyColumn, databaseId, langDriver, resultSets);
}
复制代码
这个 parseStatementNode 方法比较长,但其实你可以发现这里无非就是 对 每个CRUD(这里指 select delete update insert标签) 标签做了具体的解析 ,其中比较重要的就几种,比如 ParameterType,ResultMap,解析成SqlSource(Sql的封装),sql片段的解析。。。 其他的其实都是支线了,你可以自行去了解。
在做完属性的一些解析后, XMLStatementBuilder 会将这些属性再 委托 给助手对象 MapperBuilderAssistant 去进行构建 MappedStatement 。
// 好多参数。。
public MappedStatement addMappedStatement(
      String id,
      SqlSource sqlSource,
      StatementType statementType,
      SqlCommandType sqlCommandType,
      Integer fetchSize,
      Integer timeout,
      String parameterMap,
      Class<?> parameterType,
      String resultMap,
      Class<?> resultType,
      ResultSetType resultSetType,
      boolean flushCache,
      boolean useCache,
      boolean resultOrdered,
      KeyGenerator keyGenerator,
      String keyProperty,
      String keyColumn,
      String databaseId,
      LanguageDriver lang,
      String resultSets) {

    if (unresolvedCacheRef) {
      throw new IncompleteElementException("Cache-ref not yet resolved");
    }

    //为id加上namespace前缀
    // 这里就有意思了
    // 还记的上面说的 namespace 吗?
    // 这里会使用 CRUD本身标签的id 加上namespace构建独一无二的id
    // 主要是因为所有mapper文件中的 crud 标签配置对象都是直接存储
    // 在 configuration 中的 ,为了防止有些 标签id会重复
    id = applyCurrentNamespace(id, false);
    // 是否是select语句
    boolean isSelect = sqlCommandType == SqlCommandType.SELECT;

    // 很经典的构造者模式了,返回需要被构建的对象就可以链式调用
    MappedStatement.Builder statementBuilder = new MappedStatement.Builder(configuration, id, sqlSource, sqlCommandType);
    statementBuilder.resource(resource);
    statementBuilder.fetchSize(fetchSize);
    statementBuilder.statementType(statementType);
    statementBuilder.keyGenerator(keyGenerator);
    statementBuilder.keyProperty(keyProperty);
    statementBuilder.keyColumn(keyColumn);
    statementBuilder.databaseId(databaseId);
    statementBuilder.lang(lang);
    statementBuilder.resultOrdered(resultOrdered);
    statementBuilder.resulSets(resultSets);
    setStatementTimeout(timeout, statementBuilder);

    //1.参数映射 这里很重要
    // 因为 parameterMap 被弃用 所以这里一般为空
    // 而真正传入的其实应该是 parameterType 这个 Class
    setStatementParameterMap(parameterMap, parameterType, statementBuilder);
    //2.结果映射 也很重要
    setStatementResultMap(resultMap, resultType, resultSetType, statementBuilder);
    setStatementCache(isSelect, flushCache, useCache, currentCache, statementBuilder);

    MappedStatement statement = statementBuilder.build();
    //建造好调用configuration.addMappedStatement
    // 加入configuration 这里整个构建流程就算基本结束了。。
    configuration.addMappedStatement(statement);
    return statement;
}
复制代码
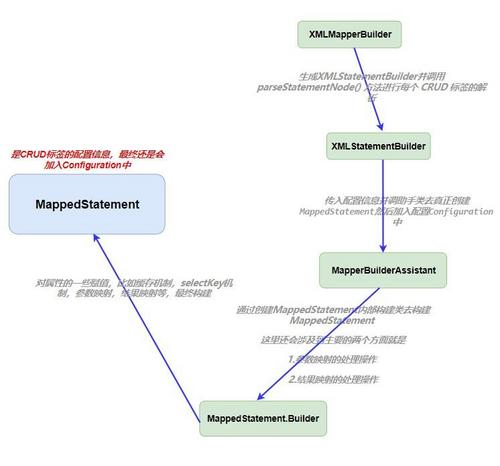
我们发现最终是通过 XMLMapperBuilder 的助手类去构建 MappedStatement 并传入 Configuration 中的。我们这时候可以将上面一张流程图更加细化一些。
参数映射和结果映射
参数映射流程
我们来看一下刚刚的还未分析完的参数映射代码
private void setStatementParameterMap(
      String parameterMap,
      Class<?> parameterTypeClass,
      MappedStatement.Builder statementBuilder) {
    // 给parameterMap加上namespace 但是因为parameterMap被弃用 所以一般返回null
    parameterMap = applyCurrentNamespace(parameterMap, true);

    if (parameterMap != null) {
      try {
        statementBuilder.parameterMap(configuration.getParameterMap(parameterMap));
      } catch (IllegalArgumentException e) {
        throw new IncompleteElementException("Could not find parameter map " + parameterMap, e);
      }
    } else if (parameterTypeClass != null) {
      // 解析 parameterType生成的类对象
      List<ParameterMapping> parameterMappings = new ArrayList<ParameterMapping>();
      // 构造ParameterMap类内部的构建类
      // 这里主要是 parameterTypeClass 的赋值 而parameterMapping仅作为一个空列表传入
      ParameterMap.Builder inlineParameterMapBuilder = new ParameterMap.Builder(
          configuration,
          statementBuilder.id() + "-Inline",
          parameterTypeClass,
          parameterMappings);
      // 通过内部构建类构建ParameterMap并传入配置对象中
      statementBuilder.parameterMap(inlineParameterMapBuilder.build());
    }
}
复制代码
因为 parameterMap 弃用,所以设置参数大部分是围绕着 parameterType 走的,总结来说就是通过 parameterType 去构建一个 ParameterMap 对象(这里是使用的 ParameterMap 中的 内部构建者 构建的)。然后将这个 ParameterMap 对象存储在 MappedStatement 中。
其实这个 ParameterMap 对象也就三个字段,甚至我们仅仅需要两个。我这里简单写一个 ParameterMap 类。
public class ParameterMap {
  private String id;
  private Class<?> type;
  // 其实如果 parameterMapping 弃用了这个字段也没什么用了
  // 估计后面会进行重构
  private List<ParameterMapping> parameterMappings;
}
复制代码
官方文档已经要删除这个元素了。

结果映射流程
说完了参数映射,其实结果映射也大同小异。
private void setStatementResultMap(
      String resultMap,
      Class<?> resultType,
      ResultSetType resultSetType,
      MappedStatement.Builder statementBuilder) {
    // 应用 namespace
    resultMap = applyCurrentNamespace(resultMap, true);

    List<ResultMap> resultMaps = new ArrayList<ResultMap>();
    if (resultMap != null) {
      // 进行ResultMap的解析
      // 这里通过,分割 你可以写成 xxxResultMap,xxxResultMap 但我还没发现有人使用过
      String[] resultMapNames = resultMap.split(",");
      for (String resultMapName : resultMapNames) {
        try {
          // 这里其实就是通过 resultMapName
          // 去原来已经在 configuration解析完成的 <resultMap> 标签
          // 配置中获取相应的 resultMap然后加入 resultMaps中
          resultMaps.add(configuration.getResultMap(resultMapName.trim()));
        } catch (IllegalArgumentException e) {
          throw new IncompleteElementException("Could not find result map " + resultMapName, e);
        }
      }
    } else if (resultType != null) {
      // resultType解析
      //<select id="selectUsers" resultType="User">
      //这种情况下,MyBatis 会在幕后自动创建一个 ResultMap,基于属性名来映射列到 JavaBean 的属性上。
      //如果列名没有精确匹配,你可以在列名上使用 select 字句的别名来匹配标签。
      //创建一个inline result map, 把resultType设上就OK了,
      //然后后面被DefaultResultSetHandler.createResultObject()使用
      //DefaultResultSetHandler.getRowValue()使用
      ResultMap.Builder inlineResultMapBuilder = new ResultMap.Builder(
          configuration,
          statementBuilder.id() + "-Inline",
          resultType,
          new ArrayList<ResultMapping>(),
          null);
      // 最后还是封装成了 resultMap 集合
      resultMaps.add(inlineResultMapBuilder.build());
    }
    // 将 resultMap 集合加入配置
    statementBuilder.resultMaps(resultMaps);
    // 这个直接加入配置
    statementBuilder.resultSetType(resultSetType);
}
复制代码
最新版本的结果映射写在了构建流程中。

总的说来也就是 获取 resultMap或者resultType中的值 然后通过这个值构建ResultMap传入 MappedStatement配置中去 。
这个时候我们就可以画出大概的 MappedStatement 对象的构建流程图了。
正文到此结束
- 本文标签: http SqlSessionFactoryBuilder iBATIS 缓存 源码 cat 代码 XML 总结 ask ORM IO ResultSet root 数据库 开源项目 Select final DDL bean cache Statement apache find IDE parse 参数 src Property plugin JDBC update 数据 遍历 mybatis build 处理器 sqlsession equals java https UI 解析 插件 文章 XMLStatementBuilder ArrayList db 配置 App list Java类 ACE mapper session tk node map CTO value provider 删除 SqlSessionFactory id stream tab sql 时间 key 开源
- 版权声明: 本文为互联网转载文章,出处已在文章中说明(部分除外)。如果侵权,请联系本站长删除,谢谢。
- 本文海报: 生成海报一 生成海报二
热门推荐


相关文章


Loading...
![[HBLOG]公众号](http://www.liuhaihua.cn/img/qrcode_gzh.jpg)

