源码分析Dubbo服务消费端启动流程
通过前面文章详解,我们知道Dubbo服务消费者标签dubbo:reference最终会在Spring容器中创建一个对应的ReferenceBean实例,而ReferenceBean实现了Spring生命周期接口:InitializingBean,接下来应该看一下其afterPropertiesSet方法的实现。
1、源码分析ReferenceBean#afterPropertiesSet
ReferenceBean#afterPropertiesSet
if (getConsumer() == null) {
            Map<String, ConsumerConfig> consumerConfigMap = applicationContext == null ? null : BeanFactoryUtils.beansOfTypeIncludingAncestors(applicationContext,
                 ConsumerConfig.class, false, false);
            if (consumerConfigMap != null && consumerConfigMap.size() > 0) {
                ConsumerConfig consumerConfig = null;
                for (ConsumerConfig config : consumerConfigMap.values()) {
                    if (config.isDefault() == null || config.isDefault().booleanValue()) {
                        if (consumerConfig != null) {
                            throw new IllegalStateException("Duplicate consumer configs: " + consumerConfig + " and " + config);
                        }
                        consumerConfig = config;
                    }
                }
                if (consumerConfig != null) {
                    setConsumer(consumerConfig);
                }
            }
        }
复制代码
Step1:如果consumer为空,说明dubbo:reference标签未设置consumer属性,如果一个dubbo:consumer标签,则取该实例,如果存在多个dubbo:consumer 配置,则consumer必须设置,否则会抛出异常:"Duplicate consumer configs"。
Step2:如果application为空,则尝试从BeanFactory中查询dubbo:application实例,如果存在多个dubbo:application配置,则抛出异常:"Duplicate application configs"。
Step3:如果ServiceBean的module为空,则尝试从BeanFactory中查询dubbo:module实例,如果存在多个dubbo:module,则抛出异常:"Duplicate module configs: "。
Step4:尝试从BeanFactory中加载所有的注册中心,注意ServiceBean的List< RegistryConfig> registries属性,为注册中心集合。
Step5:尝试从BeanFacotry中加载一个监控中心,填充ServiceBean的MonitorConfig monitor属性,如果存在多个dubbo:monitor配置,则抛出"Duplicate monitor configs: "。
ReferenceBean#afterPropertiesSet
Boolean b = isInit();
if (b == null && getConsumer() != null) {
      b = getConsumer().isInit();
}
if (b != null && b.booleanValue()) {
      getObject();
}
复制代码
Step6:判断是否初始化,如果为初始化,则调用getObject()方法,该方法也是FactoryBean定义的方法,ReferenceBean是dubbo:reference所真实引用的类(interface)的实例工程,getObject发返回的是interface的实例,而不是ReferenceBean实例。
1.1 源码分析getObject()
public Object getObject() throws Exception {
        return get();
}
复制代码
ReferenceBean#getObject()方法直接调用其父类的get方法,get方法内部调用init()方法进行初始化
1.2 源码分析ReferenceConfig#init方法
ReferenceConfig#init
if (initialized) {
     return;
 }
initialized = true;
if (interfaceName == null || interfaceName.length() == 0) {
      throw new IllegalStateException("<dubbo:reference interface=/"/" /> interface not allow null!");
}
复制代码
Step1:如果已经初始化,直接返回,如果interfaceName为空,则抛出异常。
ReferenceConfig#init调用ReferenceConfig#checkDefault
private void checkDefault() {
        if (consumer == null) {
            consumer = new ConsumerConfig();
        }
        appendProperties(consumer);
    }
复制代码
Step2:如果dubbo:reference标签也就是ReferenceBean的consumer属性为空,调用appendProperties方法,填充默认属性,其具体加载顺序:
- 从系统属性加载对应参数值,参数键:dubbo.consumer.属性名,从系统属性中获取属性值的方法为:System.getProperty(key)。
- 加载属性配置文件的值。属性配置文件,可通过系统属性:dubbo.properties.file,如果该值未配置,则默认取dubbo.properties属性配置文件。 ReferenceConfig#init
appendProperties(this);
复制代码
Step3:调用appendProperties方法,填充ReferenceBean的属性,属性值来源与step2一样,当然只填充ReferenceBean中属性为空的属性。
ReferenceConfig#init
if (getGeneric() == null && getConsumer() != null) {
      setGeneric(getConsumer().getGeneric());
}
if (ProtocolUtils.isGeneric(getGeneric())) {
      interfaceClass = GenericService.class;
} else {
      try {
              interfaceClass = Class.forName(interfaceName, true, Thread.currentThread().getContextClassLoader());
      } catch (ClassNotFoundException e) {
                throw new IllegalStateException(e.getMessage(), e);
      }
      checkInterfaceAndMethods(interfaceClass, methods);
}
复制代码
Step4:如果使用返回引用,将interface值替换为GenericService全路径名,如果不是,则加载interfacename,并检验dubbo:reference子标签dubbo:method引用的方法是否在interface指定的接口中存在。
ReferenceConfig#init
String resolve = System.getProperty(interfaceName);      // @1
String resolveFile = null;
if (resolve == null || resolve.length() == 0) {                       // @2
     resolveFile = System.getProperty("dubbo.resolve.file");    // @3 start
     if (resolveFile == null || resolveFile.length() == 0) {
          File userResolveFile = new File(new File(System.getProperty("user.home")), "dubbo-resolve.properties");
          if (userResolveFile.exists()) {
               resolveFile = userResolveFile.getAbsolutePath();
          }
     }    // @3 end
     if (resolveFile != null && resolveFile.length() > 0) {    // @4
          Properties properties = new Properties();
          FileInputStream fis = null;
          try {
               fis = new FileInputStream(new File(resolveFile));
               properties.load(fis);
           } catch (IOException e) {
               throw new IllegalStateException("Unload " + resolveFile + ", cause: " + e.getMessage(), e);
           } finally {
               try {
                    if (null != fis) fis.close();
                } catch (IOException e) {
                    logger.warn(e.getMessage(), e);
               }
           }
          resolve = properties.getProperty(interfaceName);
      }
 }
 if (resolve != null && resolve.length() > 0) {  // @5
      url = resolve;
      if (logger.isWarnEnabled()) {
         if (resolveFile != null && resolveFile.length() > 0) {
             logger.warn("Using default dubbo resolve file " + resolveFile + " replace " + interfaceName + "" + resolve + " to p2p invoke remote service.");
         } else {
            logger.warn("Using -D" + interfaceName + "=" + resolve + " to p2p invoke remote service.");
        }
    }
}
复制代码
Step5:处理dubbo服务消费端resolve机制,也就是说消息消费者只连服务提供者,绕过注册中心。
代码@1:从系统属性中获取该接口的直连服务提供者,如果存在 -Dinterface=dubbo://127.0.0.1:20880,其中interface为dubbo:reference interface属性的值。
代码@2:如果未指定-D属性,尝试从resolve配置文件中查找,从这里看出-D的优先级更高。
代码@3:首先尝试获取resolve配置文件的路径,其来源可以通过-Ddubbo.resolve.file=文件路径名来指定,如果未配置该系统参数,则默认从${user.home}/dubbo-resolve.properties,如果过文件存在,则设置resolveFile的值,否则resolveFile为null。
代码@4:如果resolveFile不为空,则加载resolveFile文件中内容,然后通过interface获取其配置的直连服务提供者URL。
代码@5:如果resolve不为空,则填充ReferenceBean的url属性为resolve(点对点服务提供者URL),打印日志,点对点URL的来源(系统属性、resolve配置文件)。
ReferenceConfig#init
checkApplication();
checkStubAndMock(interfaceClass);
复制代码
Step6:校验ReferenceBean的application是否为空,如果为空,new 一个application,并尝试从系统属性(优先)、资源文件中填充其属性;同时校验stub、mock实现类与interface的兼容性。系统属性、资源文件属性的配置如下: application dubbo.application.属性名,例如 dubbo.application.name
ReferenceConfig#init
Map<String, String> map = new HashMap<String, String>();
Map<Object, Object> attributes = new HashMap<Object, Object>();
map.put(Constants.SIDE_KEY, Constants.CONSUMER_SIDE);
map.put(Constants.DUBBO_VERSION_KEY, Version.getVersion());
map.put(Constants.TIMESTAMP_KEY, String.valueOf(System.currentTimeMillis()));
if (ConfigUtils.getPid() > 0) {
     map.put(Constants.PID_KEY, String.valueOf(ConfigUtils.getPid()));
}
复制代码
Step7:构建Map,封装服务消费者引用服务提供者URL的属性,这里主要填充side:consume(消费端)、dubbo:2.0.0(版本)、timestamp、pid:进程ID。
ReferenceConfig#init
if (!isGeneric()) {
    String revision = Version.getVersion(interfaceClass, version);
    if (revision != null && revision.length() > 0) {
         map.put("revision", revision);
    }
    String[] methods = Wrapper.getWrapper(interfaceClass).getMethodNames();
    if (methods.length == 0) {
           logger.warn("NO method found in service interface " + interfaceClass.getName());
           map.put("methods", Constants.ANY_VALUE);
     } else {
          map.put("methods", StringUtils.join(new HashSet<String>(Arrays.asList(methods)), ","));
     }

}
复制代码
Step8:如果不是泛化引用,增加methods:interface的所有方法名,多个用逗号隔开。 ReferenceConfig#init
map.put(Constants.INTERFACE_KEY, interfaceName);
appendParameters(map, application);
appendParameters(map, module);
appendParameters(map, consumer, Constants.DEFAULT_KEY);
appendParameters(map, this);
复制代码
Step9:用Map存储application配置、module配置、默认消费者参数(ConsumerConfig)、服务消费者dubbo:reference的属性。 ReferenceConfig#init
String prefix = StringUtils.getServiceKey(map);
if (methods != null && !methods.isEmpty()) {
    for (MethodConfig method : methods) {
         appendParameters(map, method, method.getName());
         String retryKey = method.getName() + ".retry";
         if (map.containsKey(retryKey)) {
              String retryValue = map.remove(retryKey);
              if ("false".equals(retryValue)) {
                  map.put(method.getName() + ".retries", "0");
              }
         }
         appendAttributes(attributes, method, prefix + "." + method.getName());
         checkAndConvertImplicitConfig(method, map, attributes);
   }
}
复制代码
Step10:获取服务键值 /{group}/interface:版本,如果group为空,则为interface:版本,其值存为prifex,然后将dubbo:method的属性名称也填入map中,键前缀为dubbo.method.methodname.属性名。dubbo:method的子标签dubbo:argument标签的属性也追加到attributes map中,键为 prifex + methodname.属性名。
ReferenceConfig#init
String hostToRegistry = ConfigUtils.getSystemProperty(Constants.DUBBO_IP_TO_REGISTRY);
if (hostToRegistry == null || hostToRegistry.length() == 0) {
      hostToRegistry = NetUtils.getLocalHost();
} else if (isInvalidLocalHost(hostToRegistry)) {
      throw new IllegalArgumentException("Specified invalid registry ip from property:" + Constants.DUBBO_IP_TO_REGISTRY + ", value:" +
           hostToRegistry);
}
map.put(Constants.REGISTER_IP_KEY, hostToRegistry);
复制代码
Step11:填充register.ip属性,该属性是消息消费者连接注册中心的IP,并不是注册中心自身的IP。 ReferenceConfig#init
ref = createProxy(map);
复制代码
Step12:调用createProxy方法创建消息消费者代理,下面详细分析其实现细节。 ReferenceConfig#init
ConsumerModel consumerModel = new ConsumerModel(getUniqueServiceName(), this, ref, interfaceClass.getMethods());
ApplicationModel.initConsumerModel(getUniqueServiceName(), consumerModel);
复制代码
Step13:将消息消费者缓存在ApplicationModel中。
1.2.1 源码分析ReferenceConfig#createProxy方法
ReferenceConfig#createProxy
URL tmpUrl = new URL("temp", "localhost", 0, map);
final boolean isJvmRefer;
if (isInjvm() == null) {
    if (url != null && url.length() > 0) { // if a url is specified, don't do local reference
          isJvmRefer = false;
    } else if (InjvmProtocol.getInjvmProtocol().isInjvmRefer(tmpUrl)) {
         // by default, reference local service if there is
         isJvmRefer = true;
    } else {
         isJvmRefer = false;
    }
} else {
    isJvmRefer = isInjvm().booleanValue();
}
复制代码
Step1:判断该消费者是否是引用本(JVM)内提供的服务。 如果dubbo:reference标签的injvm(已过期,被local属性替换)如果不为空,则直接取该值,如果该值未配置,则判断ReferenceConfig的url属性是否为空,如果不为空,则isJvmRefer =false,表明该服务消费者将直连该URL的服务提供者;如果url属性为空,则判断该协议是否是isInjvm,其实现逻辑:获取dubbo:reference的scop属性,根据其值判断:
- 如果为空,isJvmRefer为false。
- 如果协议为injvm,就是表示为本地协议,既然提供了本地协议的实现,则无需配置isJvmRefer该标签为true,故,isJvmRerfer=false。
- 如果scope=local或injvm=true,isJvmRefer=true。
- 如果scope=remote,isJvmRefer设置为false。
- 如果是泛化引用,isJvmRefer设置为false。
- 其他默认情况,isJvmRefer设置为true。
ReferenceConfig#createProxy
if (isJvmRefer) {
   URL url = new URL(Constants.LOCAL_PROTOCOL, NetUtils.LOCALHOST, 0, interfaceClass.getName()).addParameters(map);
   invoker = refprotocol.refer(interfaceClass, url);
   if (logger.isInfoEnabled()) {
         logger.info("Using injvm service " + interfaceClass.getName());
   }
}
复制代码
Step2:如果消费者引用本地JVM中的服务,则利用InjvmProtocol创建Invoker,dubbo中的invoker主要负责服务调用的功能,是其核心实现,后续会在专门的章节中详细分析,在这里我们需要知道,会创建于协议相关的Invoker即可。
ReferenceConfig#createProxy
if (url != null && url.length() > 0) { // user specified URL, could be peer-to-peer address, or register center's address.
     String[] us = Constants.SEMICOLON_SPLIT_PATTERN.split(url);   // @1
     if (us != null && us.length > 0) {
           for (String u : us) {
                  URL url = URL.valueOf(u);
                  if (url.getPath() == null || url.getPath().length() == 0) {
                       url = url.setPath(interfaceName);
                  }
                 if (Constants.REGISTRY_PROTOCOL.equals(url.getProtocol())) {   // @2
                      urls.add(url.addParameterAndEncoded(Constants.REFER_KEY, StringUtils.toQueryString(map)));
                  } else {
                      urls.add(ClusterUtils.mergeUrl(url, map));  // @3
                 }
             }
       }
}
复制代码
Step3:处理直连情况,与step2互斥。
代码@1:对直连URL进行分割,多个直连URL用分号隔开,如果URL中不包含path属性,则为URL设置path属性为interfaceName。
代码@2:如果直连提供者的协议为registry,则对url增加refer属性,其值为消息消费者所有的属性。(表示从注册中心发现服务提供者)
代码@3:如果是其他协议提供者,则合并服务提供者与消息消费者的属性,并移除服务提供者默认属性。以default开头的属性。
ReferenceConfig#createProxy
List<URL> us = loadRegistries(false);   // @1
if (us != null && !us.isEmpty()) {
     for (URL u : us) {
           URL monitorUrl = loadMonitor(u);   // @2
           if (monitorUrl != null) {
                 map.put(Constants.MONITOR_KEY, URL.encode(monitorUrl.toFullString()));   // @3
            }
            urls.add(u.addParameterAndEncoded(Constants.REFER_KEY, StringUtils.toQueryString(map)));  // @4
       }
}
if (urls == null || urls.isEmpty()) {
       throw new IllegalStateException("No such any registry to reference " + interfaceName + " on the consumer " + NetUtils.getLocalHost() + " use dubbo version " + Version.getVersion() + ", please config <dubbo:registry
          address=/".../" /> to your spring config.");
}
复制代码
Step4:普通消息消费者,从注册中心订阅服务。
代码@1:获取所有注册中心URL,其中参数false表示消费端,需要排除dubbo:registry subscribe=false的注册中心,其值为false表示不接受订阅。
代码@2:根据注册中心URL,构建监控中心URL。
代码@3:如果监控中心不为空,在注册中心URL后增加属性monitor。
代码@4:在注册中心URL中,追加属性refer,其值为消费端的所有配置组成的URL。
ReferenceConfig#createProxy
if (urls.size() == 1) {
    invoker = refprotocol.refer(interfaceClass, urls.get(0));     // @1
} else {
    List<Invoker<?>> invokers = new ArrayList<Invoker<?>>();    // @2,多个服务提供者URL,集群模式
    URL registryURL = null;
    for (URL url : urls) {
         invokers.add(refprotocol.refer(interfaceClass, url));    // @2
         if (Constants.REGISTRY_PROTOCOL.equals(url.getProtocol())) {
               registryURL = url; // use last registry url
          }
     }
     if (registryURL != null) { // registry url is available
          // use AvailableCluster only when register's cluster is available
          URL u = registryURL.addParameter(Constants.CLUSTER_KEY, AvailableCluster.NAME);
          invoker = cluster.join(new StaticDirectory(u, invokers));    // @3
     } else { // not a registry url
          invoker = cluster.join(new StaticDirectory(invokers));
     }
 }
复制代码
Step5:根据URL获取对应协议的Invoker。 代码@1:如果只有一个服务提供者URL,则直接根据协议构建Invoker,具体有如下协议:
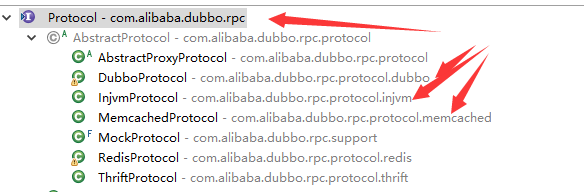
代码@2:如果有多个服务提供者,则众多服务提供者构成一个集群。 首先根据协议构建服务Invoker,默认Dubbo基于服务注册于发现,在服务消费端不会指定url属性,从注册中心获取服务提供者列表,此时的URL:registry://开头,url中会包含register属性,其值为注册中心的类型,例如zookeeper,将使用RedisProtocol构建Invoker,该方法将自动发现注册在注册中心的服务提供者,后续文章将会zookeeper注册中心为例,详细分析其实现原理。 代码@3:返回集群模式实现的Invoker,Dubbo中的Invoker类继承体系如下:
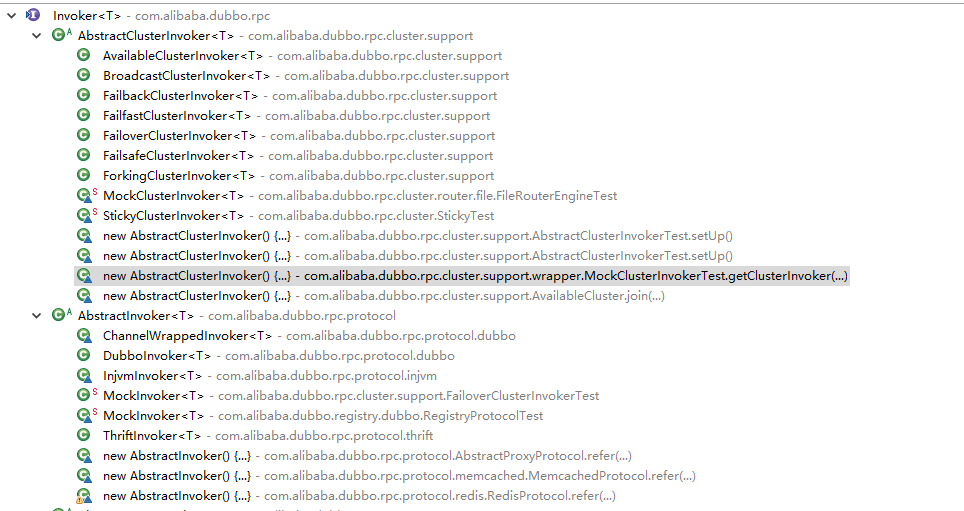
集群模式的Invoker和单个协议Invoker一样实现Invoker接口,然后在集群Invoker中利用Directory保证一个一个协议的调用器,十分的巧妙,在后续章节中将重点分析Dubbo Invoker实现原理,包含集群实现机制。
ReferenceConfig#createProxy
Boolean c = check;
if (c == null && consumer != null) {
      c = consumer.isCheck();
}
if (c == null) {
      c = true; // default true
}
if (c && !invoker.isAvailable()) {
       throw new IllegalStateException("Failed to check the status of the service " + interfaceName + ". No provider available for the service " + (group
              == null ? "" : group + "/") + interfaceName + (version == null ? "" : ":" + version) + " from the url " + invoker.getUrl() + " to the consumer " +
             NetUtils.getLocalHost() + " use dubbo version " + Version.getVersion());
}
复制代码
代码@4:如果dubbo:referecnce的check=true或默认为空,则需要判断服务提供者是否存在。
ReferenceConfig#createProxy
return (T) proxyFactory.getProxy(invoker);
AbstractProxyFactory#getProxy
public <T> T getProxy(Invoker<T> invoker) throws RpcException {
        Class<?>[] interfaces = null;
        String config = invoker.getUrl().getParameter("interfaces");     // @1
        if (config != null && config.length() > 0) {
            String[] types = Constants.COMMA_SPLIT_PATTERN.split(config);
            if (types != null && types.length > 0) {
                interfaces = new Class<?>[types.length + 2];
                interfaces[0] = invoker.getInterface();
                interfaces[1] = EchoService.class;        // @2
                for (int i = 0; i < types.length; i++) {
                    interfaces[i + 1] = ReflectUtils.forName(types[i]);
                }
            }
        }
        if (interfaces == null) {
            interfaces = new Class<?>[]{invoker.getInterface(), EchoService.class};
        }
        return getProxy(invoker, interfaces);    // @3
    }
复制代码
根据invoker获取代理类,其实现逻辑如下:
代码@1:从消费者URL中获取interfaces的值,用,分隔出单个服务应用接口。
代码@2:增加默认接口EchoService接口。
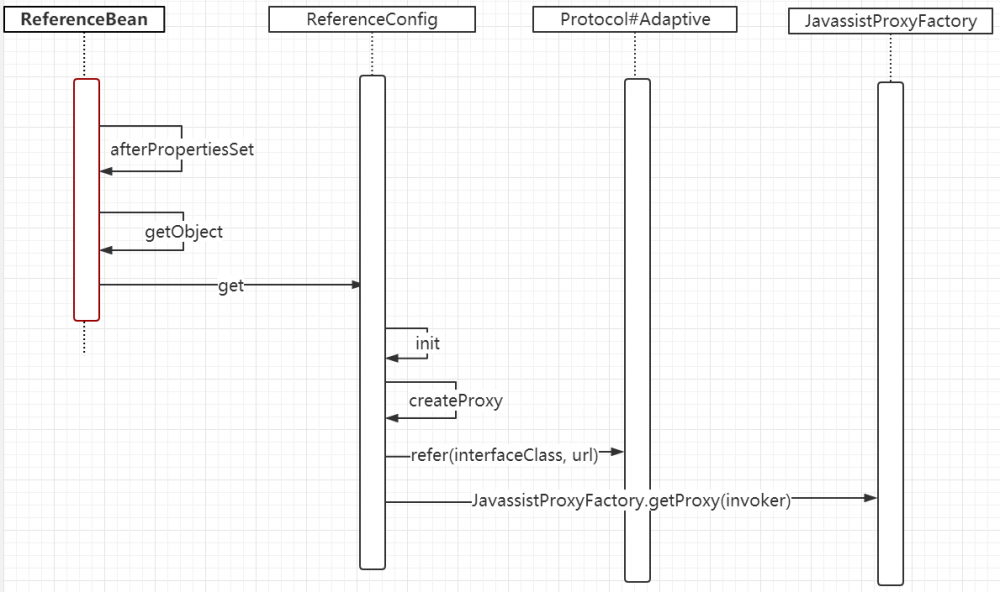
代码@3:根据需要实现的接口,使用jdk或Javassist创建代理类。 最后给出消息消费者启动时序图:
本节关于Dubbo服务消费者(服务调用者)的启动流程就梳理到这里,下一篇将重点关注Invoker(服务调用相关的实现细节)。
作者介绍:丁威,《RocketMQ技术内幕》作者,RocketMQ 社区布道师,公众号: 中间件兴趣圈 维护者,目前已陆续发表源码分析Java集合、Java 并发包(JUC)、Netty、Mycat、Dubbo、RocketMQ、Mybatis等源码专栏。可以点击链接加入 中间件知识星球 ,一起探讨高并发、分布式服务架构,交流源码。

正文到此结束
- 本文标签: ssl tar redis key consumer Property 分布式 JVM rand java UI 实例 provider message id equals HashSet spring https 配置 URLs dubbo 文章 Java集合 ArrayList 并发 ip map App final ACE MQ HashMap stream remote zookeeper CTO 参数 生命 IO 服务注册 retry tab 集群 代码 mybatis http bean 注册中心 缓存 源码 cat Netty list src constant 高并发 协议 进程 IDE value 详细分析 Service RocketMQ Proxy
- 版权声明: 本文为互联网转载文章,出处已在文章中说明(部分除外)。如果侵权,请联系本站长删除,谢谢。
- 本文海报: 生成海报一 生成海报二
热门推荐


相关文章


Loading...
![[HBLOG]公众号](http://www.liuhaihua.cn/img/qrcode_gzh.jpg)

