Android项目开发全程(四)-- 将网络返回的json字符串轻松转换成listview列表
前面几篇博文介绍了从项目搭建到获取网络字符串,对一个项目的前期整体工作进行了详细的介绍,本篇接着上篇介绍一下怎么样优雅将网络返回的json字符串轻松转换成listview列表。
先上图,看一下效果。


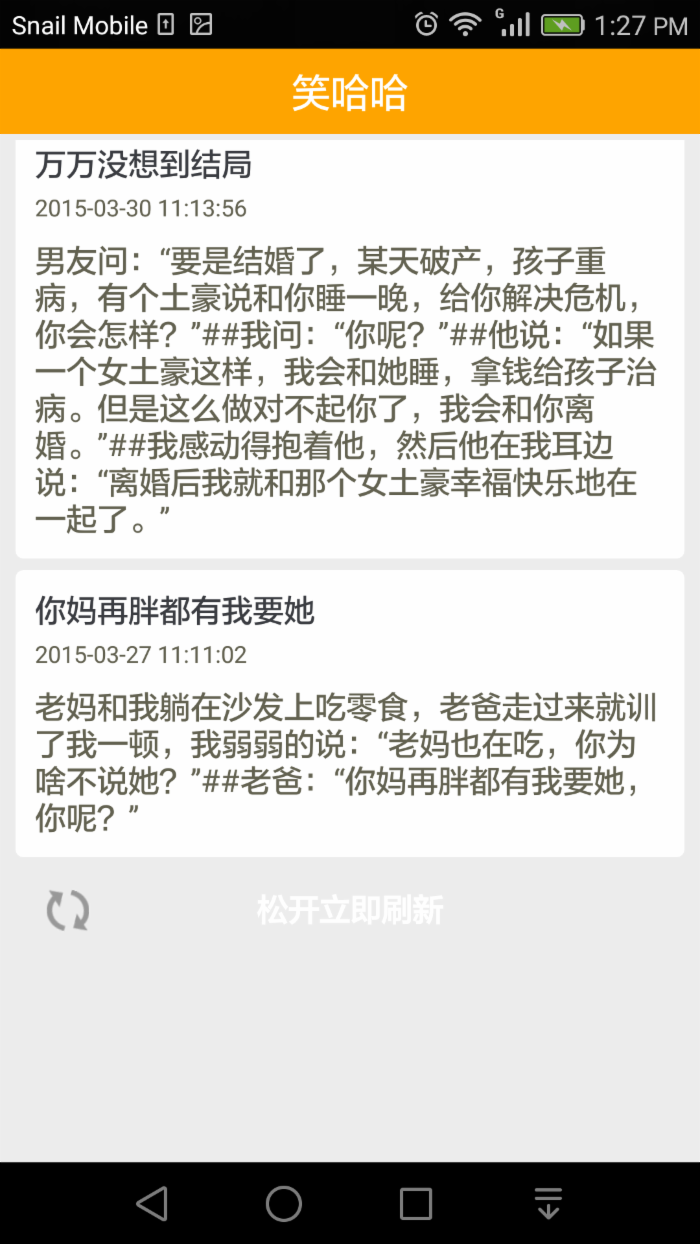
包括下拉刷新和上拉加载更多两个功能,怎样还算可以吧~,比起前几篇博文中的那一大片一大片的“乱码”看起来是不是舒服多了。
一、对界面面布局
1、Android默认的标题栏不太好看,咱们需要换成自己的。在AndroidManifest.xml文件中将APP主题设为NoTitleBar
1 <application 2 android:allowBackup="true" 3 android:icon="@drawable/ic_launcher" 4 android:label="@string/app_name" 5 android:theme="@android:style/Theme.NoTitleBar" > 6 </application>
2、然后在每个局部文件中加上自己创建的标题,为了以后便于管理,最好将标题作为一个单独的布局文件(title_layout.xml),然后通过include引用。
1 <LinearLayout xmlns:android="http://schemas.android.com/apk/res/android" 2 xmlns:tools="http://schemas.android.com/tools" 3 android:layout_width="match_parent" 4 android:layout_height="44dp" 5 android:orientation="horizontal" > 6 <TextView 7 android:id="@+id/app_title" 8 android:layout_width="fill_parent" 9 android:layout_height="44dp" 10 android:gravity="center" 11 android:background="#FFA500" 12 android:textColor="#FFF" 13 android:textSize="20dp" 14 android:text="@string/app_name" /> 15 </LinearLayout>
3、创建主界面(activity_main.xml)
1 <LinearLayout xmlns:android="http://schemas.android.com/apk/res/android" 2 xmlns:tools="http://schemas.android.com/tools" 3 android:layout_width="match_parent" 4 android:layout_height="match_parent" 5 android:background="#ededed" 6 android:orientation="vertical" > 7 <!--引用标题栏--> 8 <include layout="@layout/title_layout"/> 9 <!-- 第三方类库的listview,可下拉刷新,上拉加载更多 --> 10 <com.handmark.pulltorefresh.library.PullToRefreshListView 11 android:id="@+id/pull_refresh_list" 12 android:layout_width="fill_parent" 13 android:layout_height="fill_parent" 14 android:layout_weight="1.0" 15 android:layout_marginTop="3dp" 16 android:cacheColorHint="#00000000" 17 android:divider="@null" 18 android:fadingEdge="none" 19 android:fastScrollEnabled="false" 20 android:footerDividersEnabled="false" 21 android:headerDividersEnabled="false" 22 android:scrollbars="none" 23 android:smoothScrollbar="true"/> 24 </LinearLayout>
这里通过include引用了title_layout.xml文件,listview控件使用的第三方类库PullToRefresh,下载时会一并给出。
4、创建listview的item布局(item_main.xml)
1 <LinearLayout xmlns:android="http://schemas.android.com/apk/res/android" 2 xmlns:tools="http://schemas.android.com/tools" 3 android:layout_width="match_parent" 4 android:layout_height="wrap_content" 5 android:paddingTop="3dp" 6 android:paddingBottom="3dp" 7 android:paddingLeft="8dp" 8 android:paddingRight="8dp" 9 android:orientation="vertical" > 10 11 <LinearLayout 12 android:layout_width="match_parent" 13 android:layout_height="wrap_content" 14 android:padding="10dp" 15 android:background="@drawable/bg_shape" 16 android:orientation="vertical" > 17 18 <TextView 19 android:id="@+id/tv_title" 20 android:layout_width="fill_parent" 21 android:layout_height="wrap_content" 22 android:singleLine="true" 23 android:textColor="#3b3d42" 24 android:textSize="16dp" /> 25 26 <TextView 27 android:id="@+id/tv_time" 28 android:layout_width="fill_parent" 29 android:layout_height="wrap_content" 30 android:layout_marginTop="3dp" 31 android:textColor="#636251" 32 android:textSize="12dp" /> 33 <TextView 34 android:id="@+id/tv_content" 35 android:layout_width="fill_parent" 36 android:layout_height="wrap_content" 37 android:textColor="#636251" 38 android:textSize="16dp" 39 android:layout_marginTop="8dp" /> 40 </LinearLayout> 41 </LinearLayout>
二、创建Adapter(MainAdapter.java)
1 public class MainAdapter extends BaseAdapter { 2 private Context context; 3 private List<Map<String, Object>> list; 4 private LayoutInflater inflater; 5 public MainAdapter(Context context, List<Map<String, Object>> list) { 6 this.context = context; 7 inflater = inflater.from(context); 8 this.list = list; 9 } 10 @Override 11 public int getCount() { 12 // TODO Auto-generated method stub 13 return list.size(); 14 } 15 16 @Override 17 public Object getItem(int arg0) { 18 // TODO Auto-generated method stub 19 return list.get(arg0); 20 } 21 22 @Override 23 public long getItemId(int arg0) { 24 // TODO Auto-generated method stub 25 return arg0; 26 } 27 28 @Override 29 public View getView(int position, View convertView, ViewGroup parent) { 30 // TODO Auto-generated method stub 31 Holder holder = null; 32 Map<String, Object> map = list.get(position); 33 if(holder == null){ 34 holder = new Holder(); 35 convertView = inflater.inflate(R.layout.item_main, null); 36 holder.title = (TextView) convertView.findViewById(R.id.tv_title); 37 holder.time = (TextView) convertView.findViewById(R.id.tv_time); 38 holder.content = (TextView) convertView.findViewById(R.id.tv_content); 39 convertView.setTag(holder); 40 } 41 holder.title.setText(map.get("title").toString()); 42 holder.time.setText(map.get("publishDate").toString()); 43 holder.content.setText(map.get("content").toString()); 44 return convertView; 45 } 46 47 class Holder { 48 public TextView title; 49 public TextView time; 50 public TextView content; 51 } 52 }
这里的MainAdapter继承了BaseAdapter,为listview提供适配器。
三、在MainActivity操作数据(分步讲解)
1、初始化pullRefreshList(是一个PullToRefreshListView,第三方类库PullToRefresh,可上拉刷新,下拉加载更多)
1 //初始化pullRefreshList 2 public void initListView(){ 3 pullRefreshList.setMode(Mode.BOTH); 4 layoutProxy = pullRefreshList.getLoadingLayoutProxy(true, false); 5 layoutProxy.setPullLabel("下拉刷新"); 6 layoutProxy.setReleaseLabel("松开立即刷新"); 7 layoutProxy.setRefreshingLabel("正在载入"); 8 layoutProxybottom = pullRefreshList.getLoadingLayoutProxy(false, true); 9 layoutProxybottom.setPullLabel("上拉加载更多"); 10 layoutProxybottom.setReleaseLabel("松开立即刷新"); 11 layoutProxybottom.setRefreshingLabel("正在载入"); 12 pullRefreshList.setOnRefreshListener(new MyRefresh()); 13 listView = pullRefreshList.getRefreshableView(); 14 lists = new ArrayList<Map<String,Object>>(); 15 adapter = new MainAdapter(getApplicationContext(), lists); 16 listView.setAdapter(adapter); 17 }
2、设置pullRefreshList的刷新监听器,当上拉是表示刷新,将参数page设为第一页,提交请求。当下拉时表示加载更多,将page+1,然后提交请求。
1 class MyRefresh implements OnRefreshListener2<ListView>{ 2 //上拉是回调此方法 3 @Override 4 public void onPullDownToRefresh(PullToRefreshBase<ListView> refreshView) { 5 page = 1; 6 getNetData.getLaughBy360(REQUEST_360LAUGH_CODE, page + ""); 7 } 8 //下拉时回调此方法 9 @Override 10 public void onPullUpToRefresh(PullToRefreshBase<ListView> refreshView) { 11 if(page < 34){ //目前接口中一个有34页数据 12 page += 1; 13 getNetData.getLaughBy360(REQUEST_360LAUGH_CODE, page + ""); 14 mHandler.sendEmptyMessage(DIALOG_SHOW); 15 } else { 16 pullRefreshList.onRefreshComplete(); 17 Toast.makeText(getApplicationContext(), "已经是最后一页了", Toast.LENGTH_SHORT).show(); 18 } 19 } 20 }
3、在网络请求的回调方法中,利用jackson工具的ObjectMapper可以很容易的将json字符串转换成Map(也可根据需要转换成List、对象等等)
1 public void onCallBackSuccessed(int notify, String result) { 2 if(notify == REQUEST_360LAUGH_CODE){ 3 try { 4 //使用Jackson工具的ObjectMapper直接将json字符串转换成Map格式 5 Map<String, Object> map = objectMapper.readValue(result, Map.class); 6 List<Map<String, Object>> list = (List<Map<String, Object>>) map.get("jokes"); 7 if(page == 1) { 8 lists.clear(); 9 } 10 if(list.size() == 0){ 11 Toast.makeText(getApplicationContext(), "木有笑话了", Toast.LENGTH_SHORT).show(); 12 } else { 13 lists.addAll(list); 14 //改变adapter数据 15 adapter.notifyDataSetChanged(); 16 } 17 } catch (JsonParseException e) { 18 // TODO Auto-generated catch block 19 e.printStackTrace(); 20 } catch (JsonMappingException e) { 21 // TODO Auto-generated catch block 22 e.printStackTrace(); 23 } catch (IOException e) { 24 // TODO Auto-generated catch block 25 e.printStackTrace(); 26 } 27 } 28 mHandler.sendEmptyMessage(DIALOG_CONCEL); 29 pullRefreshList.onRefreshComplete(); 30 }
分析一下,这里每次从网络上获取的结果转成后都先加入到一个临时的list中,当page=1时,说明此事是上拉刷新或者首次请求。这时候将直接将lists清空来接受最新数据,当page !=1 时说明是加载更多的请求,无需清空lists,如果新返回的数据不为空则将list加入到lists中,然后通知adapter数据改变。
别忘了设置onRefreshComplete完成刷新状态。
最后,整个的MainActivity.java如下:
1 package com.laughdemo.main; 2 import java.io.IOException; 3 import java.util.ArrayList; 4 import java.util.List; 5 import java.util.Map; 6 import net.tsz.afinal.annotation.view.ViewInject; 7 import org.codehaus.jackson.JsonParseException; 8 import org.codehaus.jackson.map.JsonMappingException; 9 import android.os.Bundle; 10 import android.widget.ListView; 11 import android.widget.Toast; 12 import com.handmark.pulltorefresh.library.ILoadingLayout; 13 import com.handmark.pulltorefresh.library.PullToRefreshBase; 14 import com.handmark.pulltorefresh.library.PullToRefreshBase.Mode; 15 import com.handmark.pulltorefresh.library.PullToRefreshBase.OnRefreshListener2; 16 import com.handmark.pulltorefresh.library.PullToRefreshListView; 17 import com.laughdemo.adapter.MainAdapter; 18 import com.laughdemo.http.DataCallBack; 19 import com.laughdemo.http.GetNetData; 20 import com.laughdemo.utils.Constants; 21 /** 22 * 主窗体类 23 * @author 刘伟 2015.7.3 24 * 25 */ 26 public class MainActivity extends BaseActivity implements Constants, DataCallBack{ 27 final String TAG = "MainActivity"; 28 GetNetData getNetData; 29 MainAdapter adapter; 30 private int page = 1; 31 ListView listView; 32 List<Map<String, Object>> lists; 33 private ILoadingLayout layoutProxy; 34 private ILoadingLayout layoutProxybottom; 35 @ViewInject(id=R.id.pull_refresh_list) PullToRefreshListView pullRefreshList; 36 @Override 37 protected void onCreate(Bundle savedInstanceState) { 38 super.onCreate(savedInstanceState); 39 setContentView(R.layout.activity_main); 40 initListView(); 41 getNetData = new GetNetData(this); 42 getNetData.getLaughBy360(REQUEST_360LAUGH_CODE, page + ""); 43 mHandler.sendEmptyMessage(DIALOG_SHOW); 44 } 45 46 //初始化pullRefreshList 47 public void initListView(){ 48 pullRefreshList.setMode(Mode.BOTH); 49 layoutProxy = pullRefreshList.getLoadingLayoutProxy(true, false); 50 layoutProxy.setPullLabel("下拉刷新"); 51 layoutProxy.setReleaseLabel("松开立即刷新"); 52 layoutProxy.setRefreshingLabel("正在载入"); 53 layoutProxybottom = pullRefreshList.getLoadingLayoutProxy(false, true); 54 layoutProxybottom.setPullLabel("上拉加载更多"); 55 layoutProxybottom.setReleaseLabel("松开立即刷新"); 56 layoutProxybottom.setRefreshingLabel("正在载入"); 57 pullRefreshList.setOnRefreshListener(new MyRefresh()); 58 listView = pullRefreshList.getRefreshableView(); 59 lists = new ArrayList<Map<String,Object>>(); 60 adapter = new MainAdapter(getApplicationContext(), lists); 61 listView.setAdapter(adapter); 62 } 63 64 class MyRefresh implements OnRefreshListener2<ListView>{ 65 66 @Override 67 public void onPullDownToRefresh(PullToRefreshBase<ListView> refreshView) { 68 page = 1; 69 getNetData.getLaughBy360(REQUEST_360LAUGH_CODE, page + ""); 70 } 71 72 @Override 73 public void onPullUpToRefresh(PullToRefreshBase<ListView> refreshView) { 74 if(page < 34){ 75 page += 1; 76 getNetData.getLaughBy360(REQUEST_360LAUGH_CODE, page + ""); 77 mHandler.sendEmptyMessage(DIALOG_SHOW); 78 } else { 79 pullRefreshList.onRefreshComplete(); 80 Toast.makeText(getApplicationContext(), "已经是最后一页了", Toast.LENGTH_SHORT).show(); 81 } 82 } 83 } 84 @Override 85 public void onCallBackSuccessed(int notify, String result) { 86 if(notify == REQUEST_360LAUGH_CODE){ 87 try { 88 //使用Jackson工具的ObjectMapper直接将json字符串转换成Map格式 89 Map<String, Object> map = objectMapper.readValue(result, Map.class); 90 List<Map<String, Object>> list = (List<Map<String, Object>>) map.get("jokes"); 91 if(page == 1) { 92 lists.clear(); 93 } 94 if(list.size() == 0){ 95 Toast.makeText(getApplicationContext(), "木有笑话了", Toast.LENGTH_SHORT).show(); 96 } else { 97 lists.addAll(list); 98 //改变adapter数据 99 adapter.notifyDataSetChanged(); 100 } 101 } catch (JsonParseException e) { 102 // TODO Auto-generated catch block 103 e.printStackTrace(); 104 } catch (JsonMappingException e) { 105 // TODO Auto-generated catch block 106 e.printStackTrace(); 107 } catch (IOException e) { 108 // TODO Auto-generated catch block 109 e.printStackTrace(); 110 } 111 } 112 mHandler.sendEmptyMessage(DIALOG_CONCEL); 113 pullRefreshList.onRefreshComplete(); 114 } 115 @Override 116 public void onCallBackFailed(int notify) { 117 mHandler.sendEmptyMessage(DIALOG_CONCEL); 118 pullRefreshList.onRefreshComplete(); 119 Toast.makeText(getApplicationContext(), "网络连接失败", Toast.LENGTH_LONG).show(); 120 } 121 }
到这里,这个小项目的整个流程也可以算是介绍完了。有需要项目源码的可以直接留下邮箱索要,也可以去下载:http://download.csdn.net/detail/u012950035/8871581
本篇博文是在前几篇的基础上接着做的,如有不明白的地方还需参考前几篇:
《 Android项目开发全程(一)--创建工程 》
《 Android项目开发全程(二)--Afinal用法简单介绍 》
《 Android项目开发全程(三)-- 项目的前期搭建、网络请求封装是怎样实现的 》
注:欢迎转载,转载是请附上本文链接。
正文到此结束
热门推荐


相关文章


Loading...
![[HBLOG]公众号](http://www.liuhaihua.cn/img/qrcode_gzh.jpg)

