gitlab-ci配置python代码风格检查
之前关注了下持续集成相关的东西, 做了 jenkins 和 gitlab-ci 两套东西对比, 发现其实对于轻量级的持续集成, gitlab-ci 刚刚好, 风格检查/运行自动化测试/自动部署/提单等等, 通过简单几步就可以实现. 所以最终放弃了 jenkins 方案(环境/插件/维护等, 会耗费相对更多的时间, 违背了解决问题的初衷)
以下, 简要描述了如何搭建一套 python 代码风格检查的流程
一. gitlab-ci简介
- gitlab-ci 简介
- gitlab-ci 文档
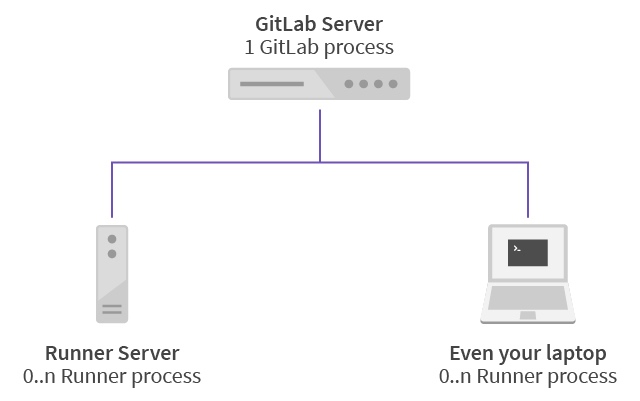
即, 除了我们本身部署的 gitlab 服务器, 我们还需要部署至少一台 runner 机器
二. gitlab-ci-multi-runner 配置
1. 部署runner
官方的安装 文档 . 根据部署系统选择对应部署文档.
这里演示的是 centos 下部署
- 确认部署机器(不和重要业务放在一起, runner可能占用资源)
- 添加repo到文件
/etc/yum.repos.d/gitlab-ci-multi-runner.repo
[gitlab-ci-multi-runner]
name=gitlab-ci-multi-runner
baseurl=http://mirrors.tuna.tsinghua.edu.cn/gitlab-ci-multi-runner/yum/el6
repo_gpgcheck=0
gpgcheck=0
enabled=1
gpgkey=https://packages.gitlab.com/gpg.key
- 执行
$ yum makecache
$ yum install gitlab-ci-multi-runner

# 可以指定版本
$ yum install gitlab-ci-multi-runner-1.6.1-1.x86_64
-
获取
token: 到gitlab进入admin area-overview-Runners, 获取token -
执行注册
$ gitlab-ci-multi-runner register

Running in system-mode.

Please enter the gitlab-ci coordinator URL (e.g. https://gitlab.com/):
http://mygitlab.com/ci                 # 地址, 注意填写正确
Please enter the gitlab-ci token for this runner:
DX_XXXXXXXXXXXXXXXXX                   # token, 从 gitlab 项目/管理区域获取
Please enter the gitlab-ci description for this runner:
[argus-master]: runner for open_paas   # 描述
Please enter the gitlab-ci tags for this runner (comma separated):
open_paas,shell                        # tag
Registering runner... succeeded                     runner=DX_VDrXj
Please enter the executor: docker, shell, docker+machine, docker-ssh+machine, kubernetes, docker-ssh, parallels, ssh, virtualbox:
shell                                  # runner执行类型, 选shell
Runner registered successfully. Feel free to start it, but if it's running already the config should be automatically reloaded!
- 启动, 以
root权限
$ gitlab-ci-multi-runner  start
$ ps aux | grep gitlab-ci-multi-runner | grep -v 'grep'
2. pep8检查环境配置
在 runner 运行的机器上, 部署对应 python 环境. 这里我使用的是 stackless-python , 可以根据自身机器环境配置. 建议用 virtualenv 虚拟环境
在 runner 机器上安装 python2.7 及 flake8
# install python2.7
# download stackless-279-export.tar.xz from https://bitbucket.org/stackless-dev/stackless/wiki/Download
tar -xf stackless-279-export.tar.xz
cd stackless-279-export
mkdir -p /data/gitlab-runner/env/ && ./configure --prefix=/data/gitlab-runner/env/ && make && make install

# install pip
cd /data/gitlab-runner/
wget https://bootstrap.pypa.io/get-pip.py --no-check-certificate

# install flake8
env/bin/python get-pip.py
env/bin/pip install flake8 pep8-naming
三. 在项目中使用 flake8 进行风格检查
需要在项目根目录下增加两个文件: .flake8 及 .gitlab-ci.yml , 提交到 gitlab .
可以设置为项目初始化模板
1. 在项目中新增 .flake8 配置文件
[flake8]
ignore = W292
exclude =
    *migrations*,
    # python related
    *.pyc,
    .git,
    __pycache__,

max-line-length=120
max-complexity=12
format=pylint
show_source = True
statistics = True
count = True
说明:
注意, .flake8里面不要带中文
ignore = 忽略错误类型
exclude = 不检查的文件正则列表
max-line-length = 单行最大字符数120
max-complexity = 代码复杂度等级
format = 展示格式
show_source = 显示源代码
statistics = 展示统计
count = 展示总错误数
本地运行:
$ pip install flake8 pep8-naming
$ flake8 .
2. 在项目中新增 .gitlab-ci.yml 配置文件
注意, 这里将 runner 上的虚拟环境安装在了 /data/gitlab-runner , 需要自行根据 runner 机器上python环境进行变更
before_script:
  - source /data/gitlab-runner/env/bin/activate
  - which python
  - python --version
  - pip install flake8 pep8-naming


pep8:
  script:
    - flake8 .
3. 配置项目的runner 及测试
- 给项目增加runnser: 到
gitlab-projects- 点击到达项目主页 -settings-runners- 配置shard runners - 测试: 提交一次代码, 查看
gitlab-projects- 项目主页 -Pipelines - 配置邮件接收人: 项目管理员可以开启邮件通知:
project-settings-Services-Builds Emails. 重要 启用build emails服务,build之后发送报告
之后, 将可以在 gitlab 项目主页, 看到每一次代码提交后的风格检查结果
四. reference
- gitlab-ci-multi-runner文档
- flake8-options
the end!
后续, 将介绍, 配置进行单元测试(测试用例/覆盖率等), 部署等.
正文到此结束
- 本文标签: 自动化 python grep 管理 ssh build ip executor 安装 Kubernetes 测试 项目管理 tar Bootstrap 目录 Uber shell cache centos HTML 服务器 http PaaS 插件 mail ORM cat 时间 root 统计 https Master UI key jenkins Service description 代码 wget src git IO 配置 Docker
- 版权声明: 本文为互联网转载文章,出处已在文章中说明(部分除外)。如果侵权,请联系本站长删除,谢谢。
- 本文海报: 生成海报一 生成海报二
热门推荐


相关文章

近期评论
-
出现OpenClaw "device signature expired"。the Gateway rejects if Math.abs(Date.now() - signedAt) > 10 * 60 * 1000 (10 minutes)
-
-
想购买您这个站,我的联系方式QQ741756694微信同步 能卖联系
-
-
-
博主的博客用的什么技术栈,内容都是干货,赞
-
-
https://www.liuhaihua.cn/archives/40657.html 这篇博客中的图片打不开了
-
不会英语啊。
-
Loading...
![[HBLOG]公众号](https://www.liuhaihua.cn/img/qrcode_gzh.jpg)

