SpringCloud Hystrix 源码解析 —— 断路器 HystrixCircuitBreaker
摘要: 原创出处 http://www.iocoder.cn/Hystrix/circuit-breaker/ 「芋道源码」欢迎转载,保留摘要,谢谢!
本文主要基于 Hystrix 1.5.X 版本
- 1. 概述
- 2. HystrixCircuitBreaker
- 3. HystrixCircuitBreaker.Factory
- 4. HystrixCircuitBreakerImpl
- 4.1 构造方法
- 4.2 #subscribeToStream()
- 4.3 #attemptExecution()
- 4.4 #markSuccess()
- 4.5 #markNonSuccess()
- 4.6 #allowRequest()
- 4.7 #isOpen()
- 666. 彩蛋

������关注 微信公众号:【芋道源码】 有福利:
- RocketMQ / MyCAT / Sharding-JDBC 所有 源码分析文章列表
- RocketMQ / MyCAT / Sharding-JDBC 中文注释源码 GitHub 地址
- 您对于源码的疑问每条留言 都 将得到 认真 回复。 甚至不知道如何读源码也可以请教噢 。
- 新的 源码解析文章 实时 收到通知。 每周更新一篇左右 。
- 认真的 源码交流微信群。
1. 概述
本文主要分享 断路器 HystrixCircuitBreaker 。
HystrixCircuitBreaker 有三种状态 :
-
CLOSED:关闭 -
OPEN:打开 -
HALF_OPEN:半开
其中,断路器处于 OPEN 状态时,链路处于 非健康 状态,命令执行时,直接调用 回退 逻辑,跳过 正常 逻辑。
HystrixCircuitBreaker 状态变迁如下图 :
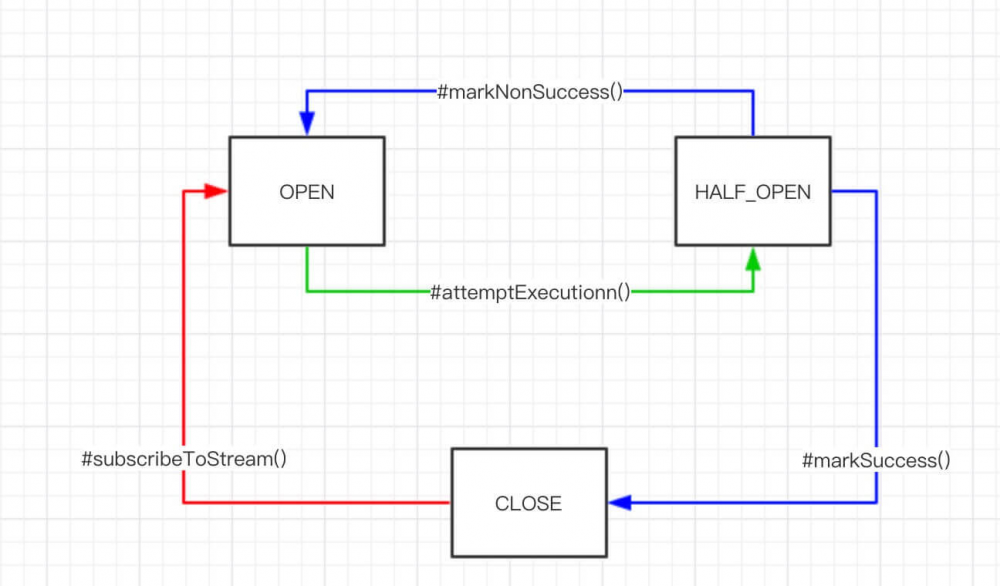
-
红线:初始时,断路器处于
CLOSED状态,链路处于 健康 状态。当满足如下条件,断路器从CLOSED变成OPEN状态:- 周期 ( 可配,
HystrixCommandProperties.default_metricsRollingStatisticalWindow = 10000 ms)内,总请求数超过一定 量 ( 可配,HystrixCommandProperties.circuitBreakerRequestVolumeThreshold = 20) 。 - 错误 请求占总请求数超过一定 比例 ( 可配,
HystrixCommandProperties.circuitBreakerErrorThresholdPercentage = 50%) 。
- 周期 ( 可配,
-
绿线:断路器处于
OPEN状态,命令执行时,若当前时间超过断路器 开启 时间一定时间(HystrixCommandProperties.circuitBreakerSleepWindowInMilliseconds = 5000 ms),断路器变成HALF_OPEN状态, 尝试 调用 正常 逻辑,根据执行是否成功, 打开或关闭 熔断器【 蓝线 】。
推荐 Spring Cloud 书籍:
- 请支持正版。下载盗版, 等于主动编写低级 BUG 。
- 程序猿DD —— 《Spring Cloud微服务实战》
- 周立 —— 《Spring Cloud与Docker微服务架构实战》
- 两书齐买,京东包邮。
2. HystrixCircuitBreaker
com.netflix.hystrix.HystrixCircuitBreaker ,Hystrix 断路器 接口 。定义接口如下代码 :
public interface HystrixCircuitBreaker{

 /**
* Every {@link HystrixCommand} requests asks this if it is allowed to proceed or not. It is idempotent and does
* not modify any internal state, and takes into account the half-open logic which allows some requests through
* after the circuit has been opened
*
* @return boolean whether a request should be permitted
*/
 boolean allowRequest();

 /**
* Whether the circuit is currently open (tripped).
*
* @return boolean state of circuit breaker
*/
 boolean isOpen();

 /**
* Invoked on successful executions from {@link HystrixCommand} as part of feedback mechanism when in a half-open state.
*/
 void markSuccess();

 /**
* Invoked on unsuccessful executions from {@link HystrixCommand} as part of feedback mechanism when in a half-open state.
*/
 void markNonSuccess();

 /**
* Invoked at start of command execution to attempt an execution. This is non-idempotent - it may modify internal
* state.
*/
 boolean attemptExecution();
}
-
#allowRequest()和#attemptExecution()方法,方法目的基本类似,差别在于当断路器满足 尝试关闭 条件时,前者不会将断路器不会修改状态(CLOSE => HALF-OPEN),而后者会。
HystrixCircuitBreaker 有两个子类实现 :
- NoOpCircuitBreaker : 空 的断路器实现,用于不开启断路器功能的情况。
- HystrixCircuitBreakerImpl : 完整 的断路器实现。
在 AbstractCommand 创建时,初始化 HystrixCircuitBreaker ,代码如下 :
/* package */abstract class AbstractCommand<R> implements HystrixInvokableInfo<R>, HystrixObservable<R>{

 /**
* 断路器
*/
 protected final HystrixCircuitBreaker circuitBreaker;

 protected AbstractCommand(HystrixCommandGroupKey group, HystrixCommandKey key, HystrixThreadPoolKey threadPoolKey, HystrixCircuitBreaker circuitBreaker, HystrixThreadPool threadPool,
HystrixCommandProperties.Setter commandPropertiesDefaults, HystrixThreadPoolProperties.Setter threadPoolPropertiesDefaults,
HystrixCommandMetrics metrics, TryableSemaphore fallbackSemaphore, TryableSemaphore executionSemaphore,
HystrixPropertiesStrategy propertiesStrategy, HystrixCommandExecutionHook executionHook){

 // ... 省略无关代码

 // 初始化 断路器
 this.circuitBreaker = initCircuitBreaker(this.properties.circuitBreakerEnabled().get(), circuitBreaker, this.commandGroup, this.commandKey, this.properties, this.metrics);
 // ... 省略无关代码
 }

 private static HystrixCircuitBreaker initCircuitBreaker(boolean enabled, HystrixCircuitBreaker fromConstructor,
HystrixCommandGroupKey groupKey, HystrixCommandKey commandKey,
HystrixCommandProperties properties, HystrixCommandMetrics metrics){
 if (enabled) {
 if (fromConstructor == null) {
 // get the default implementation of HystrixCircuitBreaker
 return HystrixCircuitBreaker.Factory.getInstance(commandKey, groupKey, properties, metrics);
 } else {
 return fromConstructor;
 }
 } else {
 return new NoOpCircuitBreaker();
 }
 }

}
- 当
HystrixCommandProperties.circuitBreakerEnabled = true时,即断路器功能 开启 ,使用 Factory 获得 HystrixCircuitBreakerImpl 对象。在「3. HystrixCircuitBreaker.Factory」详细解析。 - 当
HystrixCommandProperties.circuitBreakerEnabled = false时,即断路器功能 关闭 ,创建 NoOpCircuitBreaker 对象。另外,NoOpCircuitBreaker 代码简单到脑残,点击 链接 查看实现。
3. HystrixCircuitBreaker.Factory
com.netflix.hystrix.HystrixCircuitBreaker.Factory ,HystrixCircuitBreaker 工厂 ,主要用于:
- 创建 HystrixCircuitBreaker 对象,目前只创建 HystrixCircuitBreakerImpl 。
-
HystrixCircuitBreaker 容器,基于 HystrixCommandKey 维护了 HystrixCircuitBreaker 单例对象 的映射。代码如下 :
private static ConcurrentHashMap<String, HystrixCircuitBreaker> circuitBreakersByCommand = new ConcurrentHashMap<String, HystrixCircuitBreaker>();
整体代码灰常清晰,点击 链接 查看代码。
4. HystrixCircuitBreakerImpl
com.netflix.hystrix.HystrixCircuitBreaker.HystrixCircuitBreakerImpl , 完整 的断路器实现。
我们来逐个方法看看 HystrixCircuitBreakerImpl 的具体实现。
4.1 构造方法
构造方法,代码如下 :
/* package */class HystrixCircuitBreakerImpl implements HystrixCircuitBreaker{
 private final HystrixCommandProperties properties;
 private final HystrixCommandMetrics metrics;

 enum Status {
 CLOSED, OPEN, HALF_OPEN
 }

 private final AtomicReference<Status> status = new AtomicReference<Status>(Status.CLOSED);
 private final AtomicLong circuitOpened = new AtomicLong(-1);
 private final AtomicReference<Subscription> activeSubscription = new AtomicReference<Subscription>(null);

 protected HystrixCircuitBreakerImpl(HystrixCommandKey key, HystrixCommandGroupKey commandGroup, final HystrixCommandProperties properties, HystrixCommandMetrics metrics){
 this.properties = properties;
 this.metrics = metrics;

 //On a timer, this will set the circuit between OPEN/CLOSED as command executions occur
 Subscription s = subscribeToStream();
 activeSubscription.set(s);
 }
}
- Status 枚举类 ,断路器的三种状态。
-
status属性,断路器的状态。 -
circuitOpened属性,断路器打开,即状态变成OPEN的时间。 -
activeSubscription属性,基于 Hystrix Metrics 对请求量统计 Observable 的订阅,在「4.2 #subscribeToStream()」详细解析。
4.2 #subscribeToStream()
#subscribeToStream() 方法,向 Hystrix Metrics 对请求量统计 Observable 的发起订阅。代码如下 :
private Subscription subscribeToStream(){
 1: private Subscription subscribeToStream(){
 2: /*
3: * This stream will recalculate the OPEN/CLOSED status on every onNext from the health stream
4: */
 5: return metrics.getHealthCountsStream()
 6: .observe()
 7: .subscribe(new Subscriber<HealthCounts>() {
 8: @Override
 9: public void onCompleted(){
 10:
 11: }
 12:
 13: @Override
 14: public void onError(Throwable e){
 15:
 16: }
 17:
 18: @Override
 19: public void onNext(HealthCounts hc){
 20: System.out.println("totalRequests" + hc.getTotalRequests()); // 芋艿,用于调试
 21: // check if we are past the statisticalWindowVolumeThreshold
 22: if (hc.getTotalRequests() < properties.circuitBreakerRequestVolumeThreshold().get()) {
 23: // we are not past the minimum volume threshold for the stat window,
 24: // so no change to circuit status.
 25: // if it was CLOSED, it stays CLOSED
 26: // if it was half-open, we need to wait for a successful command execution
 27: // if it was open, we need to wait for sleep window to elapse
 28: } else {
 29: if (hc.getErrorPercentage() < properties.circuitBreakerErrorThresholdPercentage().get()) {
 30: //we are not past the minimum error threshold for the stat window,
 31: // so no change to circuit status.
 32: // if it was CLOSED, it stays CLOSED
 33: // if it was half-open, we need to wait for a successful command execution
 34: // if it was open, we need to wait for sleep window to elapse
 35: } else {
 36: // our failure rate is too high, we need to set the state to OPEN
 37: if (status.compareAndSet(Status.CLOSED, Status.OPEN)) {
 38: circuitOpened.set(System.currentTimeMillis());
 39: }
 40: }
 41: }
 42: }
 43: });
 44: }
-
第 5 至 7 行 :向 Hystrix Metrics 对请求量统计 Observable 的发起订阅。这里的 Observable 基于 RxJava Window 操作符。
FROM 《ReactiveX文档中文翻译》「Window」
定期将来自原始 Observable 的数据分解为一个 Observable 窗口,发射这些窗口,而不是每次发射一项数据
- 简单来说,固定间隔,
#onNext()方法将 不断 被调用,每次计算断路器的状态。
- 简单来说,固定间隔,
-
第 22 行 :判断 周期 ( 可配,
HystrixCommandProperties.default_metricsRollingStatisticalWindow = 10000 ms)内,总请求数超过一定 量 ( 可配,HystrixCommandProperties.circuitBreakerRequestVolumeThreshold = 20) 。- 这里要注意下,请求次数统计的是周期内,超过周期的不计算在内。例如说,
00:00内发起了 N 个请求,00:11不计算这 N 个请求。
- 这里要注意下,请求次数统计的是周期内,超过周期的不计算在内。例如说,
-
第 29 行 : 错误 请求占总请求数超过一定 比例 ( 可配,
HystrixCommandProperties.circuitBreakerErrorThresholdPercentage = 50%) 。 -
第 37 至 39 行 :满足断路器 打开 条件, CAS 修改状态(
CLOSED => OPEN),并设置打开时间(circuitOpened) 。 -
【 补充 】第 5 至 7 行 ::smiling_imp: 怕写在上面,大家有压力。Hystrix Metrics 对请求量统计 Observable 使用了 两种 RxJava Window 操作符 :
-
Observable#window(timespan, unit)方法, 固定 周期( 可配,HystrixCommandProperties.metricsHealthSnapshotIntervalInMilliseconds = 500 ms),发射 Observable 窗口。点击 BucketedCounterStream 构造方法 查看调用处的代码。 -
Observable#window(count, skip)方法,每发射 一次 (skip) Observable 忽略count( 可配,HystrixCommandProperties.circuitBreakerRequestVolumeThreshold = 20) 个数据项。 为什么 ?答案在 第 22 行的代码 ,周期内达到一定请求量是 断路器打开的一个条件 。点击 BucketedRollingCounterStream 构造方法 查看调用处的代码。
-
目前该方法有 两处 调用 :
- ,在创建 HystrixCircuitBreakerImpl 时,向 Hystrix Metrics 对请求量统计 Observable 的发起订阅。固定间隔,计算断路器是否要关闭(
CLOSE)。 - ,清空 Hystrix Metrics 对请求量统计 Observable 的 统计信息 ,取消 原有 订阅,并发起 新的 订阅。
4.3 #attemptExecution()
如下是 AbstractCommand#applyHystrixSemantics(_cmd) 方法,对 HystrixCircuitBreakerImpl#attemptExecution 方法的调用的代码 :
private Observable<R> applyHystrixSemantics(final AbstractCommand<R> _cmd){

 // ... 省略无关代码

 /* determine if we're allowed to execute */
 if (circuitBreaker.attemptExecution()) {
 // 执行【正常逻辑】
 } else {
 // 执行【回退逻辑】
 }
}
- 使用
HystrixCircuitBreakerImpl#attemptExecution方法,判断是否可以执行 正常逻辑 。
#attemptExecution 方法,代码如下 :
 1: @Override
 2: public boolean attemptExecution(){
 3: // 强制 打开
 4: if (properties.circuitBreakerForceOpen().get()) {
 5: return false;
 6: }
 7: // 强制 关闭
 8: if (properties.circuitBreakerForceClosed().get()) {
 9: return true;
10: }
11: // 打开时间为空
12: if (circuitOpened.get() == -1) {
13: return true;
14: } else {
15: // 满足间隔尝试断路器时间
16: if (isAfterSleepWindow()) {
17: //only the first request after sleep window should execute
18: //if the executing command succeeds, the status will transition to CLOSED
19: //if the executing command fails, the status will transition to OPEN
20: //if the executing command gets unsubscribed, the status will transition to OPEN
21: if (status.compareAndSet(Status.OPEN, Status.HALF_OPEN)) {
22: return true;
23: } else {
24: return false;
25: }
26: } else {
27: return false;
28: }
29: }
30: }
- 第 4 至 6 行 :当
HystrixCommandProperties.circuitBreakerForceOpen = true( 默认值 :false) 时,即断路器强制 打开 ,返回false。当该配置接入配置中心后,可以动态实现 打开 熔断。 为什么会有该配置 ?当 HystrixCircuitBreaker 创建完成后,无法 动态 切换 NoOpCircuitBreaker 和 HystrixCircuitBreakerImpl ,通过该配置以实现类似效果。 - 第 8 至 10 行 :当
HystrixCommandProperties.circuitBreakerForceClose = true( 默认值 :false) 时,即断路器强制 关闭 ,返回true。当该配置接入配置中心后,可以动态实现 关闭 熔断。 为什么会有该配置 ?当 HystrixCircuitBreaker 创建完成后,无法 动态 切换 NoOpCircuitBreaker 和 HystrixCircuitBreakerImpl ,通过该配置以实现类似效果。 - 第 12 至 13 行 :断路器 打开 时间(
circuitOpened) 为”空”,返回true。 - 第 16 至 28 行 :调用
#isAfterSleepWindow()方法,判断 是否满足尝试调用正常逻辑的间隔时间 。当满足,使用 CAS 方式修改断路器状态(OPEN => HALF_OPEN),从而保证有且仅有 一个线程 能够尝试调用正常逻辑。
#isAfterSleepWindow() 方法,代码如下 :
private boolean isAfterSleepWindow(){
 final long circuitOpenTime = circuitOpened.get();
 final long currentTime = System.currentTimeMillis();
 final long sleepWindowTime = properties.circuitBreakerSleepWindowInMilliseconds().get();
 return currentTime > circuitOpenTime + sleepWindowTime;
}
- 在 当前时间 超过断路器打开时间
HystrixCommandProperties.circuitBreakerSleepWindowInMilliseconds( 默认值,5000 ms),返回true。
4.4 #markSuccess()
当尝试调用正常逻辑 成功 时,调用 #markSuccess() 方法, 关闭 断路器。代码如下 :
 1: @Override
 2: public void markSuccess(){
 3: if (status.compareAndSet(Status.HALF_OPEN, Status.CLOSED)) {
 4: // 清空 Hystrix Metrics 对请求量统计 Observable 的**统计信息**
 5: //This thread wins the race to close the circuit - it resets the stream to start it over from 0
 6: metrics.resetStream();
 7: // 取消原有订阅
 8: Subscription previousSubscription = activeSubscription.get();
 9: if (previousSubscription != null) {
10: previousSubscription.unsubscribe();
11: }
12: // 发起新的订阅
13: Subscription newSubscription = subscribeToStream();
14: activeSubscription.set(newSubscription);
15: // 设置断路器打开时间为空
16: circuitOpened.set(-1L);
17: }
18: }
- 第 3 行 :使用 CAS 方式,修改断路器状态(
HALF_OPEN => CLOSED)。 - 第 6 行 :清空 Hystrix Metrics 对请求量统计 Observable 的 统计信息 。
- 第 8 至 14 行 :取消 原有 订阅,发起 新的 订阅。
- 第 16 行 :设置断路器打开时间为”空” 。
如下两处调用了 #markNonSuccess() 方法 :
-
markEmits -
markOnCompleted
4.5 #markNonSuccess()
当尝试调用正常逻辑 失败 时,调用 #markNonSuccess() 方法, 重新打开 断路器。代码如下 :
1: @Override
2: public void markNonSuccess(){
3: if (status.compareAndSet(Status.HALF_OPEN, Status.OPEN)) {
4: //This thread wins the race to re-open the circuit - it resets the start time for the sleep window
5: circuitOpened.set(System.currentTimeMillis());
6: }
7: }
- 第 3 行 :使用 CAS 方式,修改断路器状态(
HALF_OPEN => OPEN)。 - 第 5 行 :设置设置断路器打开时间为当前时间。这样,
#attemptExecution()过一段时间,可以再次 尝试 执行正常逻辑。
如下两处调用了 #markNonSuccess() 方法 :
-
handleFallback -
unsubscribeCommandCleanup
4.6 #allowRequest()
#allowRequest() 和 #attemptExecution() 方法,方法目的基本类似,差别在于当断路器满足 尝试关闭 条件时,前者不会将断路器不会修改状态( CLOSE => HALF-OPEN ),而后者会。点击 链接 查看代码实现。
4.7 #isOpen()
#isOpen() 方法,比较简单,点击 链接 查看代码实现。
666. 彩蛋
呼呼,相对比较干净的一篇文章,满足。
胖友,分享一波朋友圈可好!
正文到此结束
- 本文标签: ask MQ cat GitHub 翻译 key https 下载 Hystrix UI CEO db 统计 IO 压力 SDN java Docker git 文章 bug 配置 注释 cmd src ioc 线程 IDE spring 解析 struct ACE RocketMQ map 时间 源码 final tar Atom 数据 rmi App ip http id 京东 代码 中文翻译 程序猿 微信公众号 sharding 调试 CTO
- 版权声明: 本文为互联网转载文章,出处已在文章中说明(部分除外)。如果侵权,请联系本站长删除,谢谢。
- 本文海报: 生成海报一 生成海报二
热门推荐


相关文章

近期评论
-
出现OpenClaw "device signature expired"。the Gateway rejects if Math.abs(Date.now() - signedAt) > 10 * 60 * 1000 (10 minutes)
-
-
想购买您这个站,我的联系方式QQ741756694微信同步 能卖联系
-
-
-
博主的博客用的什么技术栈,内容都是干货,赞
-
-
https://www.liuhaihua.cn/archives/40657.html 这篇博客中的图片打不开了
-
不会英语啊。
-
Loading...
![[HBLOG]公众号](https://www.liuhaihua.cn/img/qrcode_gzh.jpg)

