JAVAEE——宜立方商城06:Redis安装、数据类型和持久化方案、Redis集群分析与搭建、实现缓存和同步
1. 学习计划
1、首页轮播图展示
2、Redis 服务器搭建
3、向业务逻辑中添加缓存。
4、 使用 redis 做缓存
5、缓存同步。
2.首页轮播图动态展示
2.1. 功能分析
根据分类 id 查询内容列表,把内容展示到首页。
内容分类 id 需要是固定的。可以配置到属性文件中。
展示首页之前,先查询内容列表,然后展示到首页。
2.2. Dao 层
单表查询。可以使用逆向工程。
2.3. Service 层
参数:内容分类 id
返回值: List<TbContent>
业务逻辑:
根据分类 id 查询内容列表。
@Override
    public List<TbContent> getContentList(long cid) {
        //根据分类id查询内容列表
        //设置查询条件
        TbContentExample example = new TbContentExample();
        Criteria criteria = example.createCriteria();
        criteria.andCategoryIdEqualTo(cid);
        //执行查询
        List<TbContent> list = contentMapper.selectByExample(example);
        return list;
    }
需要把接口安装到本地仓库。
2.4. 表现层
引用服务:
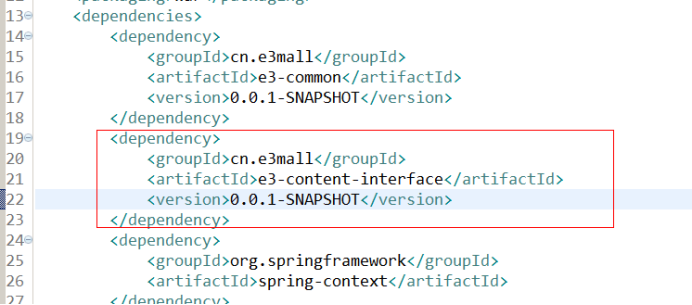
Springmvc.xml 中添加引用:

需要在展示首页的 Controller 中添加业务逻辑。
3. Redis 的安装
3.1. Redis 的安装
Redis 是 c 语言开发的。
安装 redis 需要 c 语言的编译环境。如果没有 gcc 需要在线安装。 yum install gcc-c++
安装步骤:
第一步: redis 的源码包上传到 linux 系统。
第二步:解压缩 redis 。 (tar zxf)
第三步:编译。进入 redis 源码目录。 make
第四步:安装。 make install PREFIX=/usr/local/redis
PREFIX 参数指定 redis 的安装目录。一般软件安装到 /usr 目录下
3.2. 连接 redis
3.2.1. redis 的启动:
前端启动:在 redis 的安装目录下直接启动 redis-server
[root@localhost bin]# ./redis-server
后台启动:
把 /root/redis-3.0.0/redis.conf 复制到 /usr/local/redis/bin 目录下
[root@localhost redis-3.0.0]# cp redis.conf /usr/local/redis/bin/
修改配置文件:
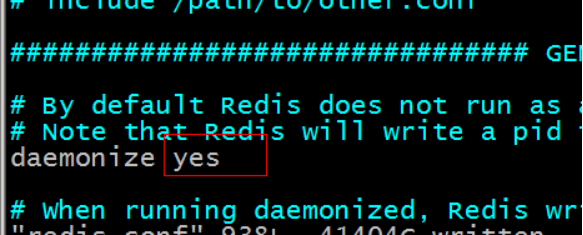
[root@localhost bin]# ./redis-server redis.conf
查看 redis 进程:
[root@localhost bin]# ps aux|grep redis
root 5190 0.1 0.3 33936 1712 ? Ssl 18:23 0:00 ./redis-server *:6379
root 5196 0.0 0.1 4356 728 pts/0 S+ 18:24 0:00 grep redis
[root@localhost bin]#
3.2.2. Redis-cli
[root@localhost bin]# ./redis-cli
默认连接 localhost 运行在 6379 端口的 redis 服务。
[root@localhost bin]# ./redis-cli -h 192.168.25.129 -p 6379
-h :连接的服务器的地址
-p :服务的端口号
关闭 redis : [root@localhost bin]# ./redis-cli shutdown
3.3. Redis 五种数据类型
String : key-value (做缓存)
Redis 中所有的数据都是字符串。命令不区分大小写, key 是区分大小写的。 Redis 是单线程的。 Redis 中不适合保存内容大的数据。
get 、 set 、
incr :加一(生成 id )
Decr :减一
Keys * 看全部
Hash : key-fields-values (做缓存)
相当于一个 key 对于一个 map , map 中还有 key-value
使用 hash 对 key 进行归类。
Hset :向 hash 中添加内容
Hget :从 hash 中取内容
List :有顺序可重复
192.168.25.129:6379> lpush list1 a b c d
(integer) 4
192.168.25.129:6379> lrange list1 0 -1
1) "d"
2) "c"
3) "b"
4) "a"
192.168.25.129:6379> rpush list1 1 2 3 4
(integer) 8
192.168.25.129:6379> lrange list1 0 -1
1) "d"
2) "c"
3) "b"
4) "a"
5) "1"
6) "2"
7) "3"
8) "4"
192.168.25.129:6379>
192.168.25.129:6379> lpop list1
"d"
192.168.25.129:6379> lrange list1 0 -1
1) "c"
2) "b"
3) "a"
4) "1"
5) "2"
6) "3"
7) "4"
192.168.25.129:6379> rpop list1
"4"
192.168.25.129:6379> lrange list1 0 -1
1) "c"
2) "b"
3) "a"
4) "1"
5) "2"
6) "3"
192.168.25.129:6379>
Set :元素无顺序,不能重复
192.168.25.129:6379> sadd set1 a b c c c d
(integer) 4
192.168.25.129:6379> smembers set1
1) "b"
2) "c"
3) "d"
4) "a"
192.168.25.129:6379> srem set1 a
(integer) 1
192.168.25.129:6379> smembers set1
1) "b"
2) "c"
3) "d"
192.168.25.129:6379>
还有集合运算命令,自学。
SortedSet ( zset ):有顺序,不能重复
192.168.25.129:6379> zadd zset1 2 a 5 b 1 c 6 d
(integer) 4
192.168.25.129:6379> zrange zset1 0 -1
1) "c"
2) "a"
3) "b"
4) "d"
192.168.25.129:6379> zrem zset1 a
(integer) 1
192.168.25.129:6379> zrange zset1 0 -1
1) "c"
2) "b"
3) "d"
192.168.25.129:6379> zrevrange zset1 0 -1
1) "d"
2) "b"
3) "c"
192.168.25.129:6379> zrange zset1 0 -1 withscores
1) "c"
2) "1"
3) "b"
4) "5"
5) "d"
6) "6"
192.168.25.129:6379> zrevrange zset1 0 -1 withscores
1) "d"
2) "6"
3) "b"
4) "5"
5) "c"
6) "1"
192.168.25.129:6379>
3.4. Key 命令
设置 key 的过期时间。
Expire key second :设置 key 的过期时间
Ttl key :查看 key 的有效期
Persist key :清除 key 的过期时间。 Key 持久化。
192.168.25.129:6379> expire Hello 100
(integer) 1
192.168.25.129:6379> ttl Hello
(integer) 77
Persist key 持久化回去
4. Redis 的持久化方案
Redis 的所有数据都是保存到内存中的。
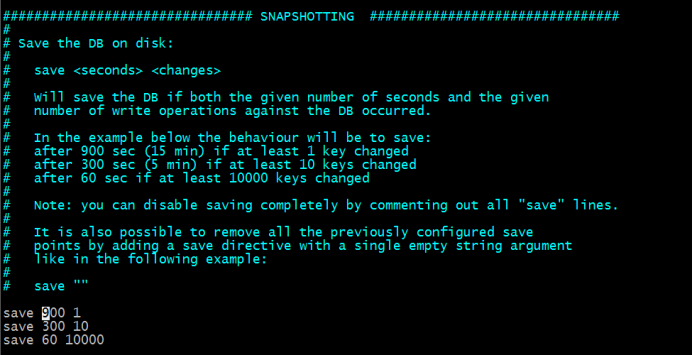
Rdb :快照形式,定期把内存中当前时刻的数据保存到磁盘。 Redis 默认支持的持久化方案。
aof 形式: append only file 。把所有对 redis 数据库操作的命令,增删改操作的命令。保存到文件中。数据库恢复时把所有的命令执行一遍即可。
在 redis.conf 配置文件中配置。
Rdb :
Aof 的配置:
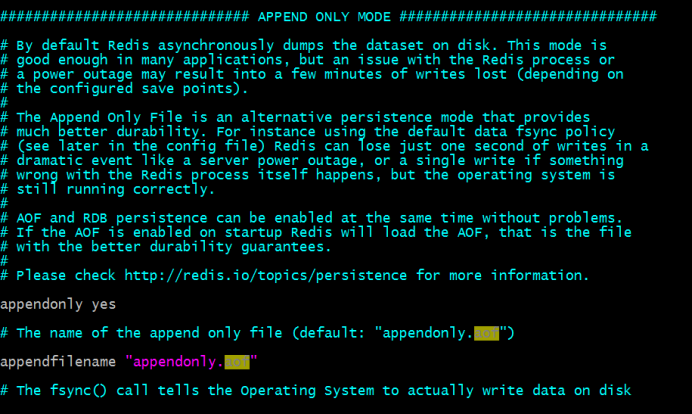
两种持久化方案同时开启使用 aof 文件来恢复数据库。
5. Redis 集群的搭建
5.1. redis-cluster 架构图
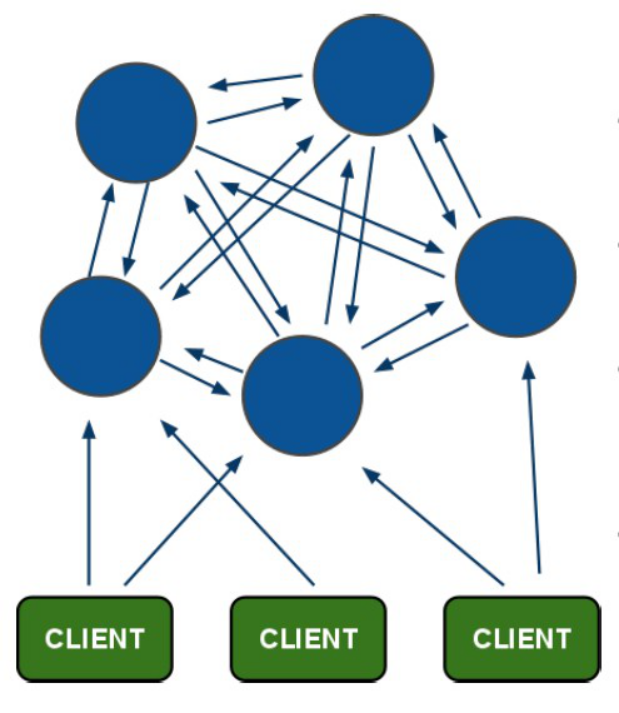
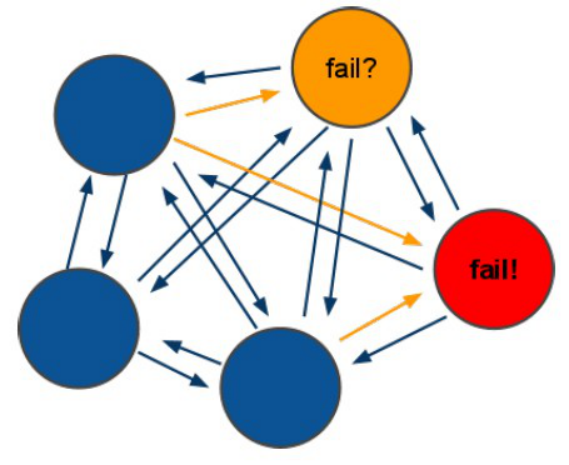
redis-cluster投票: 容错
架构细节 :
(1) 所有的 redis 节点彼此互联 (PING-PONG 机制 ), 内部使用二进制协议优化传输速度和带宽 .
(2) 节点的 fail 是通过集群中超过半数的节点检测失效时才生效 .
(3) 客户端与 redis 节点直连 , 不需要中间 proxy 层 . 客户端不需要连接集群所有节点 , 连接集群中任何一个可用节点即可
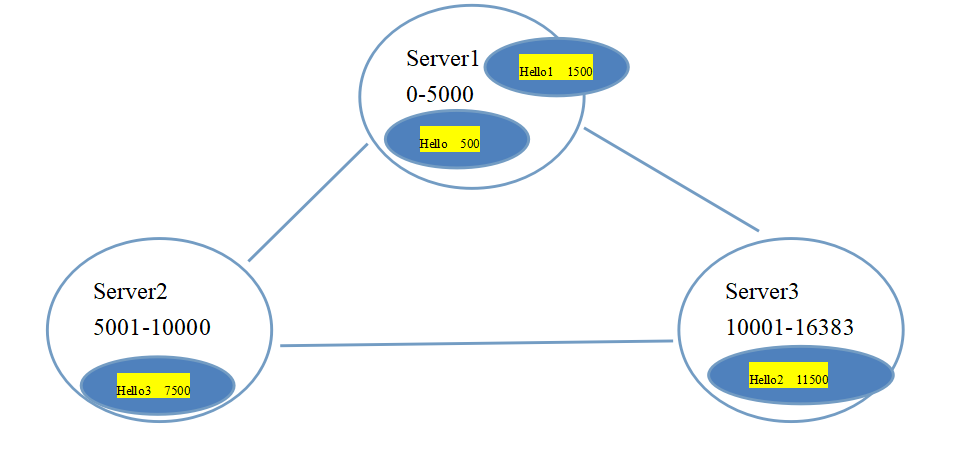
(4)redis-cluster 把所有的物理节点映射到 [0-16383]slot 上 ,cluster 负责维护 node<->slot<->value
Redis 集群中内置了 16384 个哈希槽,当需要在 Redis 集群中放置一个 key-value 时, redis 先对 key 使用 crc16 算法算出一个结果,然后把结果对 16384 求余数,这样每个 key 都会对应一个编号在 0-16383 之间的哈希槽, redis 会根据节点数量大致均等的将哈希槽映射到不同的节点
5.2. Redis 集群的搭建
Redis 集群中至少应该有三个节点。要保证集群的高可用,需要每个节点有一个备份机。
Redis 集群至少需要 6 台服务器。
搭建伪分布式。可以使用一台虚拟机运行 6 个 redis 实例。需要修改 redis 的端口号 7001-7006
5.2.1. 集群搭建环境
1 、使用 ruby 脚本搭建集群。需要 ruby 的运行环境。
安装 ruby
yum install ruby
yum install rubygems
2、 安装 ruby 脚本运行使用的包。
[root@localhost ~]# gem install redis-3.0.0.gem
Successfully installed redis-3.0.0
1 gem installed
Installing ri documentation for redis-3.0.0...
Installing RDoc documentation for redis-3.0.0...
[root@localhost ~]#
[root@localhost ~]# cd redis-3.0.0/src
[root@localhost src]# ll *.rb
-rwxrwxr-x. 1 root root 48141 Apr 1 2015 redis-trib.rb
5.2.2. 搭建步骤
需要 6 台 redis 服务器。搭建伪分布式。
需要 6 个 redis 实例。
需要运行在不同的端口 7001-7006
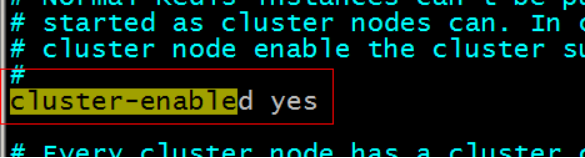
第一步:创建 6 个 redis 实例,每个实例运行在不同的端口。需要修改 redis.conf 配置文件。配置文件中还需要把 cluster-enabled yes 前的注释去掉。
第二步:启动每个 redis 实例。
第三步:使用 ruby 脚本搭建集群。
./redis-trib.rb create --replicas 1 192.168.25.129:7001 192.168.25.129:7002 192.168.25.129:7003 192.168.25.129:7004 192.168.25.129:7005 192.168.25.129:7006
创建关闭集群的脚本:
[root@localhost redis-cluster]# vim shutdow-all.sh
redis01/redis-cli -p 7001 shutdown
redis01/redis-cli -p 7002 shutdown
redis01/redis-cli -p 7003 shutdown
redis01/redis-cli -p 7004 shutdown
redis01/redis-cli -p 7005 shutdown
redis01/redis-cli -p 7006 shutdown
[root@localhost redis-cluster]# chmod u+x shutdow-all.sh
注意: port 和 nodes 文件,不能设置成相同 nodes 名字的,而且端口也设置成不一样。
[root@localhost redis-cluster]# ./redis-trib.rb create --replicas 1 192.168.25.129:7001 192.168.25.129:7002 192.168.25.129:7003 192.168.25.129:7004 192.168.25.129:7005 192.168.25.129:7006
>>> Creating cluster
Connecting to node 192.168.25.129:7001: OK
Connecting to node 192.168.25.129:7002: OK
Connecting to node 192.168.25.129:7003: OK
Connecting to node 192.168.25.129:7004: OK
Connecting to node 192.168.25.129:7005: OK
Connecting to node 192.168.25.129:7006: OK
>>> Performing hash slots allocation on 6 nodes...
Using 3 masters:
192.168.25.129:7001
192.168.25.129:7002
192.168.25.129:7003
Adding replica 192.168.25.129:7004 to 192.168.25.129:7001
Adding replica 192.168.25.129:7005 to 192.168.25.129:7002
Adding replica 192.168.25.129:7006 to 192.168.25.129:7003
M: 2e48ae301e9c32b04a7d4d92e15e98e78de8c1f3 192.168.25.129:7001
slots:0-5460 (5461 slots) master
M: 8cd93a9a943b4ef851af6a03edd699a6061ace01 192.168.25.129:7002
slots:5461-10922 (5462 slots) master
M: 2935007902d83f20b1253d7f43dae32aab9744e6 192.168.25.129:7003
slots:10923-16383 (5461 slots) master
S: 74f9d9706f848471583929fc8bbde3c8e99e211b 192.168.25.129:7004
replicates 2e48ae301e9c32b04a7d4d92e15e98e78de8c1f3
S: 42cc9e25ebb19dda92591364c1df4b3a518b795b 192.168.25.129:7005
replicates 8cd93a9a943b4ef851af6a03edd699a6061ace01
S: 8b1b11d509d29659c2831e7a9f6469c060dfcd39 192.168.25.129:7006
replicates 2935007902d83f20b1253d7f43dae32aab9744e6
Can I set the above configuration? (type 'yes' to accept): yes
>>> Nodes configuration updated
>>> Assign a different config epoch to each node
>>> Sending CLUSTER MEET messages to join the cluster
Waiting for the cluster to join.....
>>> Performing Cluster Check (using node 192.168.25.129:7001)
M: 2e48ae301e9c32b04a7d4d92e15e98e78de8c1f3 192.168.25.129:7001
slots:0-5460 (5461 slots) master
M: 8cd93a9a943b4ef851af6a03edd699a6061ace01 192.168.25.129:7002
slots:5461-10922 (5462 slots) master
M: 2935007902d83f20b1253d7f43dae32aab9744e6 192.168.25.129:7003
slots:10923-16383 (5461 slots) master
M: 74f9d9706f848471583929fc8bbde3c8e99e211b 192.168.25.129:7004
slots: (0 slots) master
replicates 2e48ae301e9c32b04a7d4d92e15e98e78de8c1f3
M: 42cc9e25ebb19dda92591364c1df4b3a518b795b 192.168.25.129:7005
slots: (0 slots) master
replicates 8cd93a9a943b4ef851af6a03edd699a6061ace01
M: 8b1b11d509d29659c2831e7a9f6469c060dfcd39 192.168.25.129:7006
slots: (0 slots) master
replicates 2935007902d83f20b1253d7f43dae32aab9744e6
[OK] All nodes agree about slots configuration.
>>> Check for open slots...
>>> Check slots coverage...
[OK] All 16384 slots covered.
[root@localhost redis-cluster]#
5.3. 集群的使用方法
Redis-cli 连接集群。
[root@localhost redis-cluster]# redis01/redis-cli -p 7002 -c
-c :代表连接的是 redis 集群
6.Jedis
需要把 jedis 依赖的 jar 包添加到工程中。 Maven 工程中需要把 jedis 的坐标添加到依赖。
推荐添加到服务层。E3-content-Service 工程中。
6.1. 连接单机版
第一步:创建一个 Jedis 对象。需要指定服务端的 ip 及端口。
第二步:使用 Jedis 对象操作数据库,每个 redis 命令对应一个方法。
第三步:打印结果。
第四步:关闭 Jedis
@Test
    public void testJedis() throws Exception {
        // 第一步:创建一个Jedis对象。需要指定服务端的ip及端口。
        Jedis jedis = new Jedis("192.168.25.129", 6379);
        // 第二步:使用Jedis对象操作数据库,每个redis命令对应一个方法。
        String result = jedis.get("hello");
        // 第三步:打印结果。
        System.out.println(result);
        // 第四步:关闭Jedis
        jedis.close();
    }
6.2. 连接单机版使用连接池
第一步:创建一个 JedisPool 对象。需要指定服务端的 ip 及端口。
第二步:从 JedisPool 中获得 Jedis 对象。
第三步:使用 Jedis 操作 redis 服务器。
第四步:操作完毕后关闭 jedis 对象,连接池回收资源。
第五步:关闭 JedisPool 对象。
@Test
    public void testJedisPool() throws Exception {
        // 第一步:创建一个JedisPool对象。需要指定服务端的ip及端口。
        JedisPool jedisPool = new JedisPool("192.168.25.129", 6379);
        // 第二步:从JedisPool中获得Jedis对象。
        Jedis jedis = jedisPool.getResource();
        // 第三步:使用Jedis操作redis服务器。
        jedis.set("jedis", "test");
        String result = jedis.get("jedis");
        System.out.println(result);
        // 第四步:操作完毕后关闭jedis对象,连接池回收资源。
        jedis.close();
        // 第五步:关闭JedisPool对象。
        jedisPool.close();
    }
6.3. 连接集群版
第一步:使用 JedisCluster 对象。需要一个 Set<HostAndPort> 参数。 Redis 节点的列表。
第二步:直接使用 JedisCluster 对象操作 redis 。在系统中单例存在。
第三步:打印结果
第四步:系统关闭前,关闭 JedisCluster 对象。
@Test
    public void testJedisCluster() throws Exception {
        // 第一步:使用JedisCluster对象。需要一个Set<HostAndPort>参数。Redis节点的列表。
        Set<HostAndPort> nodes = new HashSet<>();
        nodes.add(new HostAndPort("192.168.25.129", 7001));
        nodes.add(new HostAndPort("192.168.25.129", 7002));
        nodes.add(new HostAndPort("192.168.25.129", 7003));
        nodes.add(new HostAndPort("192.168.25.129", 7004));
        nodes.add(new HostAndPort("192.168.25.129", 7005));
        nodes.add(new HostAndPort("192.168.25.129", 7006));
        JedisCluster jedisCluster = new JedisCluster(nodes);
        // 第二步:直接使用JedisCluster对象操作redis。在系统中单例存在。
        jedisCluster.set("hello", "100");
        String result = jedisCluster.get("hello");
        // 第三步:打印结果
        System.out.println(result);
        // 第四步:系统关闭前,关闭JedisCluster对象。
        jedisCluster.close();
    }
7. 向业务逻辑中添加缓存
7.1. 接口封装
常用的操作 redis 的方法提取出一个接口,分别对应单机版和集群版创建两个实现类。
7.1.1. 接口定义
public interface JedisClient {

    String set(String key, String value);
    String get(String key);
    Boolean exists(String key);
    Long expire(String key, int seconds);
    Long ttl(String key);
    Long incr(String key);
    Long hset(String key, String field, String value);
    String hget(String key, String field);
    Long hdel(String key, String... field);
}
7.1.2. 单机版实现类
public class JedisClientPool implements JedisClient {

    @Autowired
    private JedisPool jedisPool;

    @Override
    public String set(String key, String value) {
        Jedis jedis = jedisPool.getResource();
        String result = jedis.set(key, value);
        jedis.close();
        return result;
    }

    @Override
    public String get(String key) {
        Jedis jedis = jedisPool.getResource();
        String result = jedis.get(key);
        jedis.close();
        return result;
    }

    @Override
    public Boolean exists(String key) {
        Jedis jedis = jedisPool.getResource();
        Boolean result = jedis.exists(key);
        jedis.close();
        return result;
    }

    @Override
    public Long expire(String key, int seconds) {
        Jedis jedis = jedisPool.getResource();
        Long result = jedis.expire(key, seconds);
        jedis.close();
        return result;
    }

    @Override
    public Long ttl(String key) {
        Jedis jedis = jedisPool.getResource();
        Long result = jedis.ttl(key);
        jedis.close();
        return result;
    }

    @Override
    public Long incr(String key) {
        Jedis jedis = jedisPool.getResource();
        Long result = jedis.incr(key);
        jedis.close();
        return result;
    }

    @Override
    public Long hset(String key, String field, String value) {
        Jedis jedis = jedisPool.getResource();
        Long result = jedis.hset(key, field, value);
        jedis.close();
        return result;
    }

    @Override
    public String hget(String key, String field) {
        Jedis jedis = jedisPool.getResource();
        String result = jedis.hget(key, field);
        jedis.close();
        return result;
    }

    @Override
    public Long hdel(String key, String... field) {
        Jedis jedis = jedisPool.getResource();
        Long result = jedis.hdel(key, field);
        jedis.close();
        return result;
    }

}
配置: applicationContext-redis.xml
<?xml version="1.0" encoding="UTF-8"?>
<beans xmlns="http://www.springframework.org/schema/beans"
    xmlns:context="http://www.springframework.org/schema/context" xmlns:p="http://www.springframework.org/schema/p"
    xmlns:aop="http://www.springframework.org/schema/aop" xmlns:tx="http://www.springframework.org/schema/tx"
    xmlns:xsi="http://www.w3.org/2001/XMLSchema-instance"
    xsi:schemaLocation="http://www.springframework.org/schema/beans http://www.springframework.org/schema/beans/spring-beans4.2.xsd
    http://www.springframework.org/schema/context http://www.springframework.org/schema/context/spring-context4.2.xsd
    http://www.springframework.org/schema/aop http://www.springframework.org/schema/aop/spring-aop4.2.xsd http://www.springframework.org/schema/tx http://www.springframework.org/schema/tx/spring-tx4.2.xsd
    http://www.springframework.org/schema/util http://www.springframework.org/schema/util/spring-util4.2.xsd">

    <!-- 配置单机版的连接 -->
    <bean id="jedisPool" class="redis.clients.jedis.JedisPool">
        <constructor-arg name="host" value="192.168.25.129"></constructor-arg>
        <constructor-arg name="port" value="6379"></constructor-arg>
    </bean>
    <bean id="jedisClientPool" class="cn.e3mall.jedis.JedisClientPool"/>

</beans>
7.1.3. 集群版实现类
package cn.e3mall.jedis;

import org.springframework.beans.factory.annotation.Autowired;

import redis.clients.jedis.JedisCluster;

public class JedisClientCluster implements JedisClient {

    @Autowired
    private JedisCluster jedisCluster;

    @Override
    public String set(String key, String value) {
        return jedisCluster.set(key, value);
    }

    @Override
    public String get(String key) {
        return jedisCluster.get(key);
    }

    @Override
    public Boolean exists(String key) {
        return jedisCluster.exists(key);
    }

    @Override
    public Long expire(String key, int seconds) {
        return jedisCluster.expire(key, seconds);
    }

    @Override
    public Long ttl(String key) {
        return jedisCluster.ttl(key);
    }

    @Override
    public Long incr(String key) {
        return jedisCluster.incr(key);
    }

    @Override
    public Long hset(String key, String field, String value) {
        return jedisCluster.hset(key, field, value);
    }

    @Override
    public String hget(String key, String field) {
        return jedisCluster.hget(key, field);
    }

    @Override
    public Long hdel(String key, String... field) {
        return jedisCluster.hdel(key, field);
    }

}
Spring 的配置:
<!-- 集群版的配置 -->
    <bean id="jedisCluster" class="redis.clients.jedis.JedisCluster">
        <constructor-arg>
            <set>
                <bean class="redis.clients.jedis.HostAndPort">
                    <constructor-arg name="host" value="192.168.25.129"></constructor-arg>
                    <constructor-arg name="port" value="7001"></constructor-arg>
                </bean>
                <bean class="redis.clients.jedis.HostAndPort">
                    <constructor-arg name="host" value="192.168.25.129"></constructor-arg>
                    <constructor-arg name="port" value="7002"></constructor-arg>
                </bean>
                <bean class="redis.clients.jedis.HostAndPort">
                    <constructor-arg name="host" value="192.168.25.129"></constructor-arg>
                    <constructor-arg name="port" value="7003"></constructor-arg>
                </bean>
                <bean class="redis.clients.jedis.HostAndPort">
                    <constructor-arg name="host" value="192.168.25.129"></constructor-arg>
                    <constructor-arg name="port" value="7004"></constructor-arg>
                </bean>
                <bean class="redis.clients.jedis.HostAndPort">
                    <constructor-arg name="host" value="192.168.25.129"></constructor-arg>
                    <constructor-arg name="port" value="7005"></constructor-arg>
                </bean>
                <bean class="redis.clients.jedis.HostAndPort">
                    <constructor-arg name="host" value="192.168.25.129"></constructor-arg>
                    <constructor-arg name="port" value="7006"></constructor-arg>
                </bean>
            </set>
        </constructor-arg>
    </bean>
    <bean id="jedisClientCluster" class="cn.e3mall.jedis.JedisClientCluster"/>
注意:单机版和集群版不能共存,使用单机版时注释集群版的配置。使用集群版,把单机版注释。
7.2. 封装代码测试
@Test
    public void testJedisClient() throws Exception {
        //初始化Spring容器
        ApplicationContext applicationContext = new ClassPathXmlApplicationContext("classpath:spring/applicationContext-redis.xml");
        //从容器中获得JedisClient对象
        JedisClient jedisClient = applicationContext.getBean(JedisClient.class);
        jedisClient.set("first", "100");
        String result = jedisClient.get("first");
        System.out.println(result);


    }
7.3. 添加缓存
7.3.1. 功能分析
查询内容列表时添加缓存。
1、查询数据库之前先查询缓存。
2、查询到结果,直接响应结果。
3、查询不到,缓存中没有需要查询数据库。
4、把查询结果添加到缓存中。
5、返回结果。
向 redis 中添加缓存:
Key : cid
Value :内容列表。需要把 java 对象转换成 json 。
使用 hash 对 key 进行归类。
HASH_KEY:HASH
|--KEY:VALUE
|--KEY:VALUE
|--KEY:VALUE
|--KEY:VALUE
注意:添加缓存不能影响正常业务逻辑。
7.3.2. 代码实现
@Override
    public List<TbContent> getContentList(long cid) {
        //查询缓存
        try {
            String json = jedisClient.hget(CONTENT_KEY, cid + "");
            //判断json是否为空
            if (StringUtils.isNotBlank(json)) {
                //把json转换成list
                List<TbContent> list = JsonUtils.jsonToList(json, TbContent.class);
                return list;
            }
        } catch (Exception e) {
            e.printStackTrace();
        }
        //根据cid查询内容列表
        TbContentExample example = new TbContentExample();
        //设置查询条件
        Criteria criteria = example.createCriteria();
        criteria.andCategoryIdEqualTo(cid);
        //执行查询
        List<TbContent> list = contentMapper.selectByExample(example);
        //向缓存中添加数据
        try {
            jedisClient.hset(CONTENT_KEY, cid + "", JsonUtils.objectToJson(list));
        } catch (Exception e) {
            e.printStackTrace();
        }
        return list;
    }
7.4. 缓存同步
对内容信息做增删改操作后只需要把对应缓存删除即可。
可以根据 cid 删除。
@Override
    public E3Result addContent(TbContent content) {
        //补全属性
        content.setCreated(new Date());
        content.setUpdated(new Date());
        //插入数据
        contentMapper.insert(content);
        //缓存同步
        jedisClient.hdel(CONTENT_KEY, content.getCategoryId().toString());

        return E3Result.ok();
    }
正文到此结束
- 本文标签: id classpath Document js 软件 apr http mapper 服务器 时间 连接池 db XML 数据库 schema 内容展示 spring UI 服务端 测试 HTML https SpringMVC 集群 core ORM 备份 代码 高可用 node json grep 同步 2015 rmi 配置 Master 协议 App HashSet struct list cat src bean root IDE 分布式 端口 实例 tar 开发 ACE 目录 安装 AOP 编译 CTO 缓存 ip value 进程 client Service update redis jedispool 源码 Select 参数 linux map 删除 IO ssl 注释 Proxy maven key 线程 example message java 数据
- 版权声明: 本文为互联网转载文章,出处已在文章中说明(部分除外)。如果侵权,请联系本站长删除,谢谢。
- 本文海报: 生成海报一 生成海报二
热门推荐


相关文章

近期评论
-
出现OpenClaw "device signature expired"。the Gateway rejects if Math.abs(Date.now() - signedAt) > 10 * 60 * 1000 (10 minutes)
-
-
想购买您这个站,我的联系方式QQ741756694微信同步 能卖联系
-
-
-
博主的博客用的什么技术栈,内容都是干货,赞
-
-
https://www.liuhaihua.cn/archives/40657.html 这篇博客中的图片打不开了
-
不会英语啊。
-
Loading...
![[HBLOG]公众号](https://www.liuhaihua.cn/img/qrcode_gzh.jpg)

