从源码角度看JNI
Android NDK开发中,常常因为效率、安全等原因,需要借助JNI的机制调用到Native环境中进行c/cpp操作,常见的Java层需要调用Native层的代码时的标准流程是这样的:
- 调用loadLibrary,依靠
dlxxx系列方法加载动态链接库,然后调用库中的JNI_Onload方法,解析并保存头文件中的符号表 - JAVA层调用事先声明的native方法
- 虚拟机通过预先加载的符号表调用Native层代码,同时会实例化一个JNIEnv指针,Native层可以借用它调用JAVA层的代码
这篇文章里,我将会提供典型的JAVA与Native使用JNI接口实现双向调用的实例,同时也会从源码的角度分析两种JNI动态注册的原理
架构图
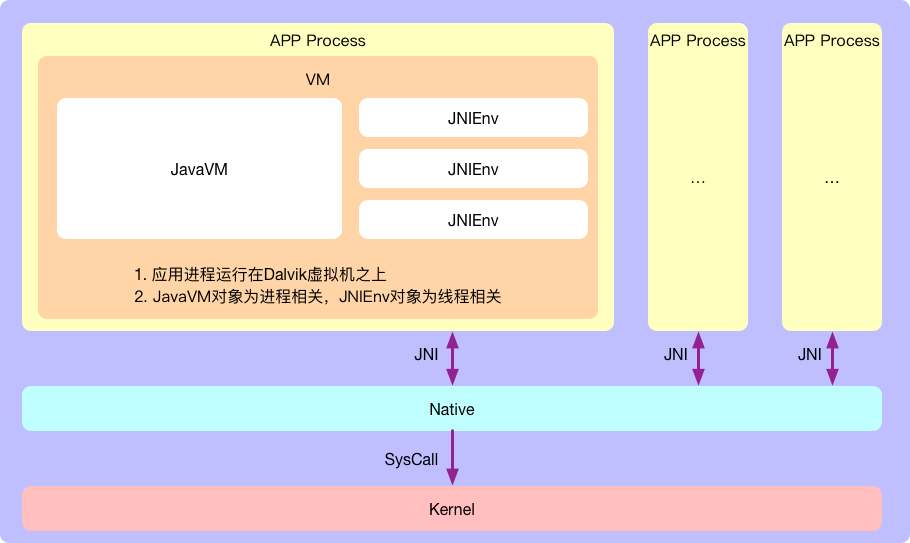
- Android应用进程各自运行在专属的虚拟机中
- 通过JNIEnv,进程可以在Native环境中使用JNI接口对JAVA层进行方法调用等操作
- JNI技术是JAVA与Native之间相互调用的”桥梁”
- 系统SysCall机制,Native层可以调用到Kernel层
示例
下面的示例中分别会给出从JAVA调用到Native、从Native调用到JAVA的两个典型示例
在JAVA中调用Native方法
- 从JAVA调用到Native的第一步是需要创建JAVA project,并进行native方法声明与调用
public class HelloJniextends AppCompatActivity{

    @Override
    protected void onCreate(Bundle savedInstanceState){
        super.onCreate(savedInstanceState);
        setContentView(R.layout.activity_hello_jni);
        TextView tv = (TextView)findViewById(R.id.hello_textview);
        // 通过JNI调用native方法
        tv.setText(stringFromJNI());
    }

    // 声明native方法
    public native String stringFromJNI();

    // 初始化动态so库
    static {
        System.loadLibrary("hello-jni");
    }
}
- 在cpp中实现native方法
Java_com_example_hellojni_HelloJni_stringFromJNI
#include<jni.h>
#include<string>
#include"format.h"

extern "C" {

JNIEXPORT jstring JNICALLJava_com_example_hellojni_HelloJni_stringFromJNI( JNIEnv * env, jobject obj )
{
  std::string hello = fmt::format(
    "Hello from C++ Format! GCC version: {}.{}", __GNUC__, __GNUC_MINOR__);
  return env->NewStringUTF(hello.c_str());
}

}
和使用 RegisterMethodsOrDie 方法进行注册不同,这个示例使用了 JNIEXPORT 和 JNICALL 的命名规则进行native方法的初始化,通过这种特殊的规则,虚拟机可以在不主动调用注册方法的前提下进行静态注册
- 使用makefile编译动态so库
LOCAL_PATH := $(call my-dir)
include $(CLEAR_VARS)

$(call import-add-path,$(LOCAL_PATH))

LOCAL_MODULE    := hello-jni
LOCAL_SRC_FILES := hello-jni.cpp
LOCAL_WHOLE_STATIC_LIBRARIES := cppformat_static

include $(BUILD_SHARED_LIBRARY)

$(call import-module,../../cppformat)
在Native中调用JAVA方法
- 声明一个类及方法
public class JniHandle{
    public String getStringForJava(){
        return "string from method in java";
    }
}
- 在Native中使用JNI调用
getStringForJavaJAVA方法
JNIEXPORT void JNICALL
Java_com_example_hellojni_callJavaMethodFromJni(JNIEnv *env, jclass type) {
	// 通过JNIEnv获取到jclass
    jclass jniHandle = (*env)->FindClass(env, "com/example/JniHandle");
    if (NULL == jniHandle) {
        LOGW("can't find jniHandle");
        return;
    }
    jmethodID constructor = (*env)->GetMethodID(env, jniHandle, "<init>", "()V");
    if (NULL == constructor) {
        LOGW("can't constructor JniHandle");
        return;
    }
    // 创建一个JniHanlde的实例
    jobject jniHandleObject = (*env)->NewObject(env, jniHandle, constructor);
    if (NULL == jniHandleObject) {
        LOGW("can't new JniHandle");
        return;
    }
    // 通过JNIEnv获取到jmethod
    jmethodID getStringForJava = (*env)->GetMethodID(env, jniHandle, "getStringForJava", ()Ljava/lang/String;");
    if (NULL == getStringForJava) {
        LOGW("can't find method of getStringForJava");
        (*env)->DeleteLocalRef(env, jniHandle);
        (*env)->DeleteLocalRef(env, jniHandleObject);
        return;
    }
    // 调用该JAVA方法
    jstring result = (*env)->CallObjectMethod(env, jniHandleObject, getStringForJava);
    const char *resultChar = (*env)->GetStringUTFChars(env, result, NULL);
    // 释放局部引用
    (*env)->DeleteLocalRef(env, jniHandle);
    (*env)->DeleteLocalRef(env, jniHandleObject);
    (*env)->DeleteLocalRef(env, result);
}
例子中我给出了静态注册的常规写法,下面详细分析下动态注册在Android源码中的两种常用场景:开机JNI初始化与调用 System.loadLibrary 加载动态库
开机JNI初始化
安卓系统开机过程中,会先启动Init进程,随后再拉起zygote进程。我们知道所有的APP应用进程都是通过fork zygote进程创建的,所以zygote进程在启动的过程中做了虚拟机初始化的操作,这其中就包括了framework所需要的所有JNI接口的注册
frameworks/base/cmds/app_process/app_main.cpp
int main(int argc, char* const argv[])
{
	AppRuntime runtime(argv[0], computeArgBlockSize(argc, argv));
	...
	if (zygote) {
        runtime.start("com.android.internal.os.ZygoteInit", args, zygote);
    }
	...
}
在init拉起zygote后,会运行zygote的可执行程序app_main
frameworks/base/core/jni/AndroidRuntime.cpp
void AndroidRuntime::start(const char* className, const Vector<String8>& options, bool zygote)
{
	...
    if (startReg(env) < 0) {
        ALOGE("Unable to register all android natives/n");
        return;
    }
	...
}

// 声明函数
extern int register_android_os_MessageQueue(JNIEnv* env);

static const RegJNIRec gRegJNI[] = {
	...
	// 初始化函数指针
	REG_JNI(register_android_os_MessageQueue),
	...
}

/*static*/ int AndroidRuntime::startReg(JNIEnv* env)
{
    ...
    // 注册framework所需要的JNI接口
    if (register_jni_procs(gRegJNI, NELEM(gRegJNI), env) < 0) {
        env->PopLocalFrame(NULL);
        return -1;
    }
    ...

    return 0;
}

static int register_jni_procs(const RegJNIRec array[],size_t count, JNIEnv* env)
{
    for (size_t i = 0; i < count; i++) {
    	// 触发对应的注册函数
        if (array[i].mProc(env) < 0) {
            return -1;
        }
    }
    return 0;
}
可以看到这个JNI注册的核心其实就是遍历RegJNIRec数组并触发RegJNIRec.mProc的调用
gRegJNI数组声明中频繁的使用到了 REG_JNI 这个宏,这里特别的看一下它的实现:
#defineREG_JNI(name) { name }
struct RegJNIRec {
    int (*mProc)(JNIEnv*);
};
REG_JNI 的声明使用了填充结构,这里以 register_android_os_MessageQueue 为例,实际上是让mProc指向了它的函数指针,当调用 register_jni_procs 时,会触发 register_android_os_MessageQueue 这个extern函数,当程序执行这个它时,会自动调用到 android_os_MessageQueue 下的对应函数:
frameworks/base/core/jni/android_os_MessageQueue.cpp
#include"core_jni_helpers.h"

static const JNINativeMethod gMessageQueueMethods[] = {
    /* name, signature, funcPtr */
    { "nativeInit", "()J", (void*)android_os_MessageQueue_nativeInit },
    { "nativeDestroy", "(J)V", (void*)android_os_MessageQueue_nativeDestroy },
    { "nativePollOnce", "(JI)V", (void*)android_os_MessageQueue_nativePollOnce },
    { "nativeWake", "(J)V", (void*)android_os_MessageQueue_nativeWake },
    { "nativeIsPolling", "(J)Z", (void*)android_os_MessageQueue_nativeIsPolling },
    { "nativeSetFileDescriptorEvents", "(JII)V",
            (void*)android_os_MessageQueue_nativeSetFileDescriptorEvents}
};

int register_android_os_MessageQueue(JNIEnv* env){
	// 将JNI方法与对应的android.os.MessageQueue java类中的native方法进行绑定
    int res = RegisterMethodsOrDie(env, "android/os/MessageQueue", gMessageQueueMethods, NELEM(gMessageQueueMethods));
    ...
    return res;
}
大致来看,各个 register_xxx 方法其实都是调用到了在 core_jni_helpers.h 头文件中声明的 RegisterMethodsOrDie 内联方法:
frameworks/base/core/jni/core_jni_helpers.h
static inline int RegisterMethodsOrDie(JNIEnv* env,const char* className,const JNINativeMethod* gMethods, int numMethods){
    int res = AndroidRuntime::registerNativeMethods(env, className, gMethods, numMethods);
    LOG_ALWAYS_FATAL_IF(res < 0, "Unable to register native methods.");
    return res;
}
frameworks/base/core/jni/AndroidRuntime.cpp
/*static*/ int AndroidRuntime::registerNativeMethods(JNIEnv* env,
    const char* className, const JNINativeMethod* gMethods, int numMethods)
{
    return jniRegisterNativeMethods(env, className, gMethods, numMethods);
}
AndroidRuntime实际上是调用了JNIHelp中外联的 jniRegisterNativeMethods 方法
libnativehelper/JNIHelp.cpp
extern "C" int jniRegisterNativeMethods(C_JNIEnv* env,const char* className,const JNINativeMethod* gMethods, int numMethods)
{
    JNIEnv* e = reinterpret_cast<JNIEnv*>(env);

    scoped_local_ref<jclass> c(env, findClass(env, className));
    if (c.get() == NULL) {
        ...
    }

	// 调用_JNI_ENV结构体的函数成员变量方法
    if ((*env)->RegisterNatives(e, c.get(), gMethods, numMethods) < 0) {
        ...
    }

    return 0;
}
这里需要查看JNIENV结构的定义:
libnativehelper/include/nativehelper/jni.h
struct _JNIEnv;
typedef _JNIEnv JNIEnv;

struct _JNIEnv {
    /* do not rename this; it does not seem to be entirely opaque */
    const struct JNINativeInterface* functions;
    ...
    jintRegisterNatives(jclass clazz,const JNINativeMethod* methods,
        jint nMethods)
    // 这里实际上是委托给JNINativeInterface进行处理
    { return functions->RegisterNatives(this, clazz, methods, nMethods);}
}

struct JNINativeInterface {
	...
    jint        (*RegisterNatives)(JNIEnv*, jclass, const JNINativeMethod*, jint);
	...
}
JNINativeInterface的 RegisterNatives 函数指针实际上是指向虚拟机内部定义的RegisterNatives函数,这个指向过程和虚拟机的启动过程有关,这里先不分析,直接看该函数的实现::
art/runtime/jni_internal.cc
static jint RegisterNatives(JNIEnv* env, jclass java_class,const JNINativeMethod* methods, jint method_count){
    return RegisterNativeMethods(env, java_class, methods, method_count, true);
}

static jint RegisterNativeMethods(JNIEnv* env, jclass java_class,const JNINativeMethod* methods, jint method_count, bool return_errors){
    ...
    for (jint i = 0; i < method_count; ++i) {
        const char* name = methods[i].name;
        const char* sig = methods[i].signature;
        const void* fnPtr = methods[i].fnPtr;
        ...
        // 获取到ArtMethod
        ArtMethod* m = nullptr;
        for (mirror::Class* current_class = c;
             current_class != nullptr;
             current_class = current_class->GetSuperClass()) {
            // Search first only comparing methods which are native.
            m = FindMethod<true>(current_class, name, sig);
            if (m != nullptr) {
                break;
            }
			...
        }
        ...
        // 委托给ArtMethod进行注册
        m->RegisterNative(fnPtr, is_fast);
    }
    return JNI_OK;
}
art/runtime/art_method.cc
void ArtMethod::RegisterNative(const void* native_method, bool is_fast) {
  ...
  SetEntryPointFromJni(native_method);
}

void SetEntryPointFromJni(const void* entrypoint){
    ...
        SetEntryPointFromJniPtrSize(entrypoint, sizeof(void*));
}

ALWAYS_INLINEvoid SetEntryPointFromJniPtrSize(const void* entrypoint,size_t pointer_size){
    SetNativePointer(EntryPointFromJniOffset(pointer_size), entrypoint, pointer_size);
}

// 获取entry_point_from_jni_的offset
static MemberOffset EntryPointFromJniOffset(size_t pointer_size){
    return MemberOffset(PtrSizedFieldsOffset(pointer_size) + OFFSETOF_MEMBER(
        PtrSizedFields, entry_point_from_jni_) / sizeof(void*) * pointer_size);
}

template<typename T>
ALWAYS_INLINEvoid SetNativePointer(MemberOffset offset, T new_value,size_t pointer_size){
    // 获取jni偏移地址
    const auto addr = reinterpret_cast<uintptr_t>(this) + offset.Uint32Value();
    // 对jni地址进行更新
    if (pointer_size == sizeof(uint32_t)) {
        uintptr_t ptr = reinterpret_cast<uintptr_t>(new_value);
        *reinterpret_cast<uint32_t*>(addr) = dchecked_integral_cast<uint32_t>(ptr);
    } else {
        *reinterpret_cast<uint64_t*>(addr) = reinterpret_cast<uintptr_t>(new_value);
    }
}
最终register方法会调用到虚拟机,并对对应ArtMethod的 entry_point_from_jni_ 进行更新
对开机framework JNI初始化流程做个总结:
- 开机时系统启动init进程,然后启动zygote进程
- zygote进程是所有APP进程的父进程,在启动的过程中会去启动虚拟机并初始化framework JNI的注册
- zygote通过调用给定的
register_xxx系列方法,对各个模块进行注册 - 各个模块都会调用
RegisterMethodsOrDie对JNINativeMethod数组进行注册 - 调用最终会深入到虚拟机,通过
SetNativePointer方法更新各个ArtMethod的entry_point_from_jni_入口指针
自此JNI注册操作完成,在调用到JAVA中的native方法后,虚拟机自动调用到JNI实现,后续再会介绍JAVA层如何调用到Native层的
System.loadLibrary()原理
除了frameowork开机对必备的JNI接口初始化以外,APP自身也会有使用JNI接口的需求,这就需要使用到常用的 System.loadLibrary() 方法:
libcore/ojluni/src/main/java/java/lang/System.java
public static void loadLibrary(String libname){
    Runtime.getRuntime().loadLibrary0(VMStack.getCallingClassLoader(), libname);
}
loadLibrary的操作是委托Runtime进行完成的
libcore/ojluni/src/main/java/java/lang/Runtime.java
synchronized void loadLibrary0(ClassLoader loader, String libname){
    ...
    String libraryName = libname;
    ...
    // 调用System的native方法进行map
    String filename = System.mapLibraryName(libraryName);
    List<String> candidates = new ArrayList<String>();
    String lastError = null;
    // 获取so库的目录路径
    for (String directory : getLibPaths()) {
        String candidate = directory + filename;
        candidates.add(candidate);

        if (IoUtils.canOpenReadOnly(candidate)) {
        	// 拼接路径完成后进行load
            String error = doLoad(candidate, loader);
            if (error == null) {
                return; // We successfully loaded the library. Job done.
            }
            lastError = error;
        }
    }
	...
}

private String doLoad(String name, ClassLoader loader){
    ...
    synchronized (this) {
        return nativeLoad(name, loader, librarySearchPath);
    }
}

// 调用到native中进行load
private static native String nativeLoad(String filename, ClassLoader loader, String librarySearchPath);
调用 System.loadLibrary() 后,实际上在JAVA层只是做了些库路径的拼接操作,最终还是在native中实现的库加载
libcore/ojluni/src/main/native/Runtime.c
JNIEXPORT jstring JNICALL
Runtime_nativeLoad(JNIEnv* env, jclass ignored, jstring javaFilename,
                   jobject javaLoader, jstring javaLibrarySearchPath)
{
    return JVM_NativeLoad(env, javaFilename, javaLoader, javaLibrarySearchPath);
}
随后调用到虚拟机进行加载
art/runtime/openjdkjvm/OpenjdkJvm.cc
JNIEXPORT jstringJVM_NativeLoad(JNIEnv* env,
                                 jstring javaFilename,
                                 jobject javaLoader,
                                 jstring javaLibrarySearchPath) {
  ScopedUtfCharsfilename(env, javaFilename);
  ...

  std::string error_msg;
  {
    art::JavaVMExt* vm = art::Runtime::Current()->GetJavaVM();
    // 委托给JavaVMExt进行加载
    bool success = vm->LoadNativeLibrary(env,
                                         filename.c_str(),
                                         javaLoader,
                                         javaLibrarySearchPath,
                                         &error_msg);
  }
}
art/runtime/java_vm_ext.cc
bool JavaVMExt::LoadNativeLibrary(JNIEnv* env,
                                  const std::string& path,
                                  jobject class_loader,
                                  jstring library_path,
                                  std::string* error_msg) {
      // 打开动态so库
      void* handle = android::OpenNativeLibrary(env, runtime_->GetTargetSdkVersion(), path_str, class_loader, library_path);
      ...
      // 获取动态库中JNI_OnLoad方法,并调用进行JNI初始化
      sym = library->FindSymbol("JNI_OnLoad", nullptr);
      ...
      typedef int(*JNI_OnLoadFn)(JavaVM*,void*);
      JNI_OnLoadFn jni_on_load = reinterpret_cast<JNI_OnLoadFn>(sym);
      int version = (*jni_on_load)(this, nullptr);
}
在 JNI_OnLoad 方法中,一般也是需要调用 RegisterNativeMethods 方法来实现native方法与java与native层的JNI映射
总结一下 System.loadLibrary() 的操作流程:
System.loadLibrary()
LoadNativeLibrary
JNI_OnLoad
可以看到,无论是framework初始化、还是APP主动加载动态库,要想使用JNI就必须调用 RegisterNatives 系列方法初始化JNI映射
正文到此结束
- 本文标签: 源码 core IO 进程 Android 目录 详细分析 Job https synchronized IDE value 启动过程 src NIO find App Java类 文章 struct JVM UI 实例 编译 lib ORM tar CTO 总结 ip ACE ArrayList map 遍历 ssl build queue 需求 开发 cmd http id 安全 解析 java example message js 代码 list
- 版权声明: 本文为互联网转载文章,出处已在文章中说明(部分除外)。如果侵权,请联系本站长删除,谢谢。
- 本文海报: 生成海报一 生成海报二
热门推荐


相关文章

近期评论
-
出现OpenClaw "device signature expired"。the Gateway rejects if Math.abs(Date.now() - signedAt) > 10 * 60 * 1000 (10 minutes)
-
-
想购买您这个站,我的联系方式QQ741756694微信同步 能卖联系
-
-
-
博主的博客用的什么技术栈,内容都是干货,赞
-
-
https://www.liuhaihua.cn/archives/40657.html 这篇博客中的图片打不开了
-
不会英语啊。
-
Loading...
![[HBLOG]公众号](https://www.liuhaihua.cn/img/qrcode_gzh.jpg)

