springboot系列文章之启动时初始化数据
在我们用springboot搭建项目的时候,有时候会碰到在项目启动时初始化一些操作的需求,针对这种需求springboot为我们提供了以下几种方案供我们选择:
-
ApplicationRunner与CommandLineRunner接口 -
InitializingBean接口 - Spring的事件机制
ApplicationRunner与CommandLineRunner
如果需要在 SpringApplication 启动时执行一些特殊的代码,你可以实现 ApplicationRunner 或 CommandLineRunner 接口, 这两个接口工作方式相同,都只提供单一的run方法,而且该方法仅在SpringApplication.run(...)完成之前调用,更准确的说是在构造SpringApplication实例完成之后调用run()的时候,具体分析见后文 ,所以这里将他们分为一类。
ApplicationRunner
构造一个类实现ApplicationRunner接口
@Component
public class ApplicationRunnerTest implements ApplicationRunner {

    @Override
    public void run(ApplicationArguments args) throws Exception {
        System.out.println("ApplicationRunner");
    }
}
复制代码
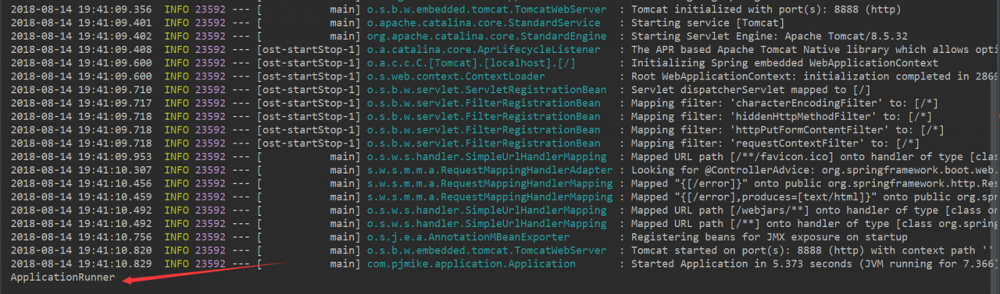
项目启动测试结果如图:
CommandLineRunner
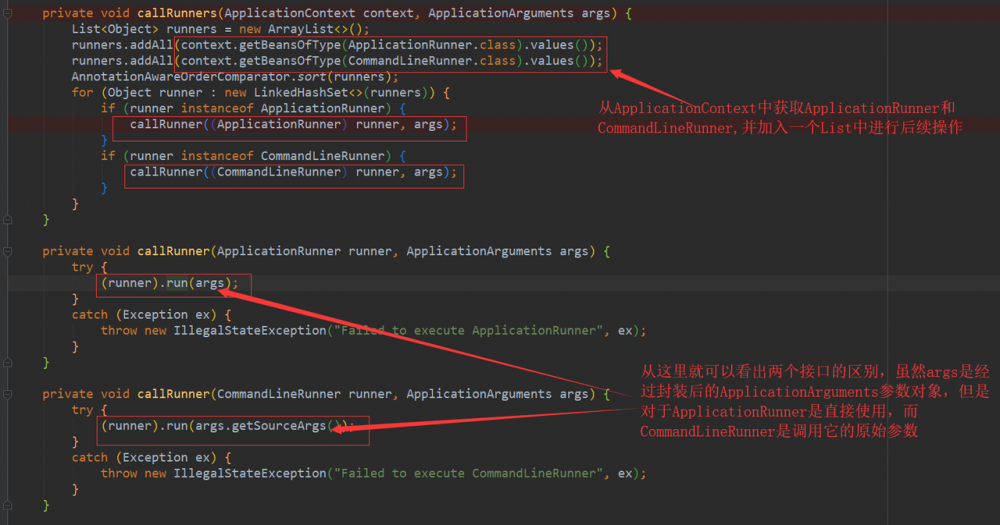
对于这两个接口而言,我们可以通过Order注解或者使用Ordered接口来指定调用顺序, @Order() 中的值越小,优先级越高
@Component
@Order(1)
public class CommandLineRunnerTest implements CommandLineRunner {

    @Override
    public void run(String... args) throws Exception {
        System.out.println("CommandLineRunner...");
    }
}

复制代码
当然我们也可以同时使用 ApplicationRunner 和 CommandLineRunner ,默认情况下前者比后者先执行,但是这没有必要,使用一个就好了
两者的联系与区别
前面就提到过,两个接口都有run()方法,只不过它们的参数不一样,CommandLineRunner的参数是最原始的参数,没有进行任何处理,ApplicationRunner的参数是ApplicationArguments,是对原始参数的进一步封装
源码跟踪
接下来我们简要跟踪一下源码看 ApplicationRunner(CommandLineRunner) 是如何被调用的。
Springboot在启动的时候,都会构造一个 SpringApplication 实例,至于这个实例怎么构造的,这里不去探究了,有感兴趣的可以去看下源码。这里主要看 ApplicationRunner 是如何被调用的,而它的调用就是在 SpringApplication 这个实例调用run方法中。
@SpringBootApplication
public class Application {


    public static void main(String[] args) {
        SpringApplication.run(Application.class, args);
    }
}
复制代码
进入run方法
public static ConfigurableApplicationContext run(Class<?> primarySource,
			String... args) {
		return run(new Class<?>[] { primarySource }, args);
	}

复制代码
执行SpringApplication的run方法
public static ConfigurableApplicationContext run(Class<?>[] primarySources,
			String[] args) {
		return new SpringApplication(primarySources).run(args);
	}

复制代码
一路点击run()来到这里
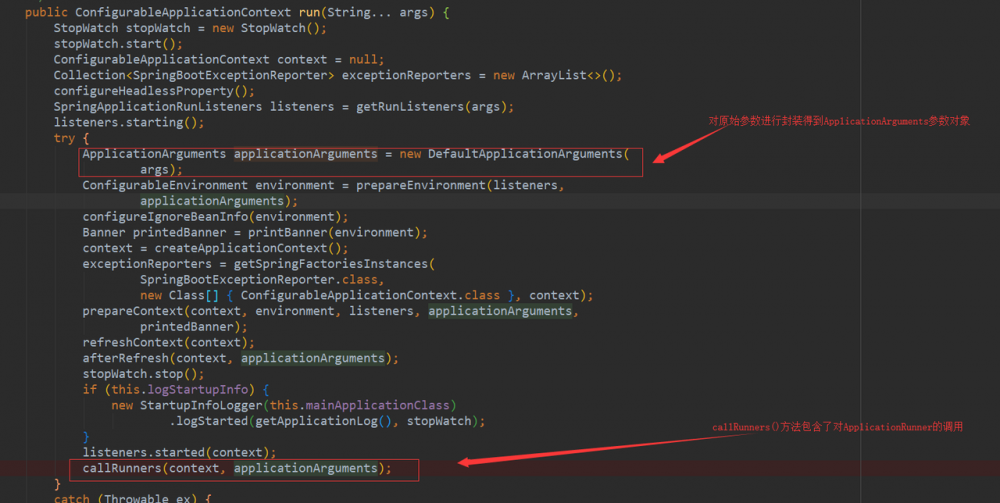
发现对ApplicationRunner的调用实际上在callRunners方法中
InitializingBean
InitializingBean 接口为 bean 提供了初始化方法的方式,它只包括 afterPropertiesSet() 方法。
在spring初始化bean的时候,如果bean实现了 InitializingBean 接口,在对象的所有属性被初始化后之后才会调用afterPropertiesSet()方法
@Component
public class InitialingzingBeanTest implements InitializingBean {

    @Override
    public void afterPropertiesSet() throws Exception {
        System.out.println("InitializingBean..");
    }
}
复制代码

当然,我们可以看出spring初始化bean肯定会在 ApplicationRunner和CommandLineRunner接口调用之前。
当然有一点我们要注意的是,尽管使用 initialingBean 接口可以实现初始化动作,但是官方并不建议我们使用 InitializingBean 接口,因为它将你的代码耦合在Spring代码中,官方的建议是在bean的配置文件指定 init-method 方法,或者在 @Bean 中设置 init-method 属性,这同样可以实现我们的需求

Spring的事件机制
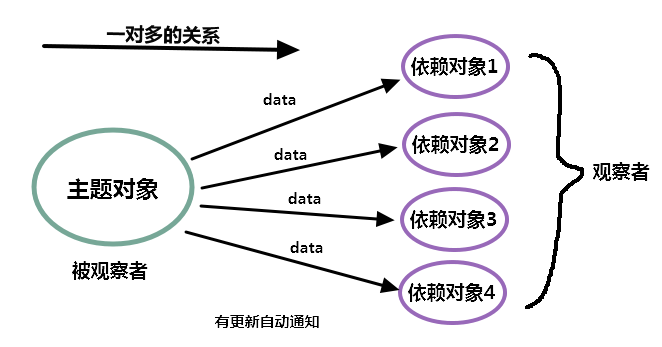
Spring的事件机制实际上是设计模式中观察者模式的典型应用,在Head First 设计模式中是这样定义观察者模式的:
观察者模式定义了一个一对多的依赖关系,让一个或多个观察者对象监听一个主题对象。这样一来,当被观察者状态改变时,需要通知相应的观察者,使这些观察者能够自动更新
基础概念
Spring的事件驱动模型由三部分组成
- 事件:
ApplicationEvent,继承自JDK的EventObject,所有事件都要继承它,也就是被观察者 - 事件发布者:
ApplicationEventPublisher及ApplicationEventMulticaster接口,使用这个接口,就可以发布事件了 - 事件监听者:
ApplicationListener,继承JDK的EventListener,所有监听者都继承它,也就是我们所说的观察者,当然我们也可以使用注解@EventListener,效果是一样的
事件
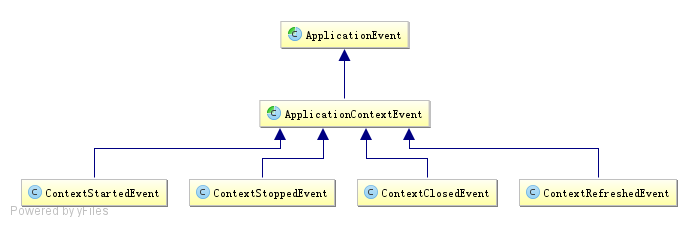
在Spring框架中,默认对ApplicationEvent事件提供了如下支持:
- ContextStartedEvent:ApplicationContext启动后触发的事件
- ContextStoppedEvent:ApplicationContext停止后触发的事件
- ContextRefreshedEvent: ApplicationContext初始化或刷新完成后触发的事件 ;(容器初始化完成后调用,所以我们可以利用这个事件做一些初始化操作)
- ContextClosedEvent:ApplicationContext关闭后触发的事件;(如web容器关闭时自动会触发spring容器的关闭,如果是普通java应用,需要调用ctx.registerShutdownHook();注册虚拟机关闭时的钩子才行)
构造一个类继承ApplicationEvent
public class TestEvent extends ApplicationEvent {

    private static final long serialVersionUID = -376299954511699499L;
    private String message;
    /**
     * Create a new ApplicationEvent.
     *
     * @param source the object on which the event initially occurred (never {@code null})
     */
    public TestEvent(Object source) {
        super(source);
    }

    public void getMessage() {
        System.out.println(message);
    }

    public void setMessage(String message) {
        this.message = message;
    }

}

复制代码
创建事件监听者
有两种方法可以创建监听者,一种是直接实现ApplicationListener的接口,一种是使用注解 @EventListener , 注解是添加在监听方法上的 ,下面的例子是直接实现的接口
@Component
public class ApplicationListenerTest implements ApplicationListener<TestEvent> {
    @Override
    public void onApplicationEvent(TestEvent testEvent)
    {
        testEvent.getMessage();
    }
}
复制代码
事件发布
对于事件发布,代表者是 ApplicationEventPublisher 和 ApplicationEventMulticaster ,系统提供的实现如下
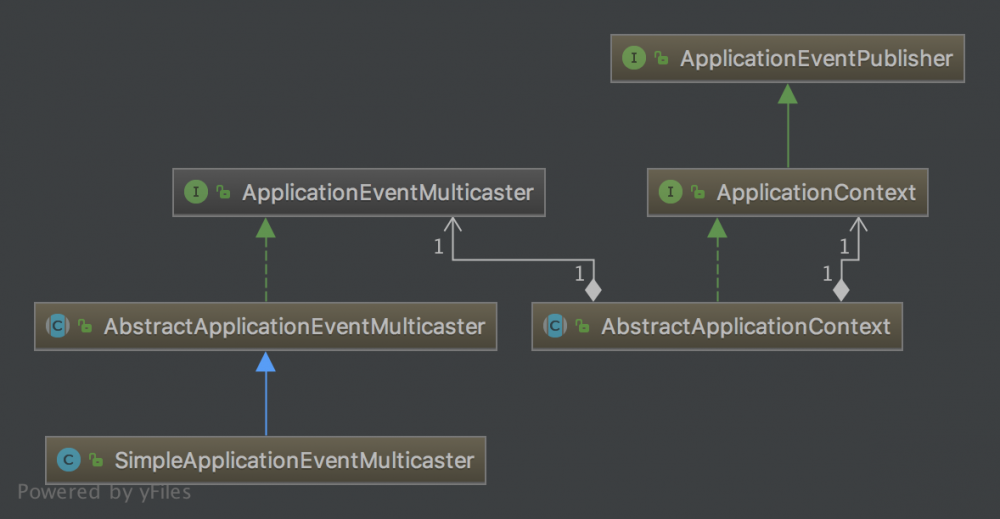
ApplicationContext接口继承了ApplicationEventPublisher,并在AbstractApplicationContext实现了具体代码,实际执行是委托给ApplicationEventMulticaster(可以认为是多播)
下面是一个事件发布者的测试实例:
@RunWith(SpringRunner.class)
@SpringBootTest
public class EventTest {
    @Autowired
    private ApplicationContext applicationContext;

    @Test
    public void publishTest() {
        TestEvent testEvent = new TestEvent("");
        testEvent.setMessage("hello world");
        applicationContext.publishEvent(testEvent);
    }
}
//output:
hello world
复制代码
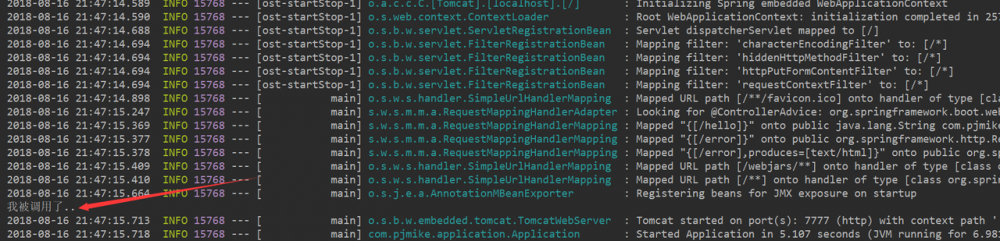
利用ContextRefreshedEvent事件进行初始化操作
前面做了这么多铺垫,下面进入今天的主题,利用Spring的事件机制进行初始化一些操作,实际上就是前面提到了,利用 ContextRefreshedEvent 事件进行初始化,该事件是 ApplicationContext 初始化完成后调用的事件,所以我们可以利用这个事件,对应实现一个监听器,在其 onApplicationEvent() 方法里初始化操作
@Component
public class ApplicationListenerTest implements ApplicationListener<ContextRefreshedEvent> {

    @Override
    public void onApplicationEvent(ContextRefreshedEvent event) {
        System.out.println("我被调用了..");
    }
}
复制代码
注意: 在传统的基于XML配置的Spring项目中会存在二次调用的问题,即调用两次该方法,原因是在传统的Spring MVC项目中,系统存在两个容器,一个root容器,一个project-servlet.xml对应的子容器,在初始化这两个容器的时候都会调用该方法一次,所以有二次调用的问题,而对于基于Springboot的项目不存在这个问题
正文到此结束
热门推荐


相关文章

近期评论
-
出现OpenClaw "device signature expired"。the Gateway rejects if Math.abs(Date.now() - signedAt) > 10 * 60 * 1000 (10 minutes)
-
-
想购买您这个站,我的联系方式QQ741756694微信同步 能卖联系
-
-
-
博主的博客用的什么技术栈,内容都是干货,赞
-
-
https://www.liuhaihua.cn/archives/40657.html 这篇博客中的图片打不开了
-
不会英语啊。
-
Loading...
![[HBLOG]公众号](https://www.liuhaihua.cn/img/qrcode_gzh.jpg)

