朱晔和你聊Spring系列S1E3:Spring咖啡罐里的豆子
标题中的咖啡罐指的是Spring容器,容器里装的当然就是被称作Bean的豆子。本文我们会以一个最基本的例子来熟悉Spring的容器管理和扩展点。
为什么要让容器来管理对象?
首先我们来聊聊这个问题,为什么我们要用Spring来管理对象(的生命周期和对象之间的关系)而不是自己new一个对象呢?大家可能会回答是方便,为了解耦。我个人觉得除了这两个原因之外,还有就是给予了我们更多可能性。如果我们以容器为依托来管理所有的框架、业务对象,那么不仅仅我们可以无侵入调整对象的关系,还有可能无侵入随时调整对象的属性甚至悄悄进行对象的替换。这就给了我们无限多的可能性,大大方便了框架的开发者在程序背后实现一些扩展。不仅仅Spring Core本身以及Spring Boot大量依赖Spring这套容器体系,一些外部框架也因为这个原因可以和Spring进行无缝整合。 Spring可以有三种方式来配置Bean,分别是最早期的XML方式、后来的注解方式以及现在最流行的Java代码配置方式。
Bean的回调事件
在前文parent模块(空的一个SpringBoot应用程序)的基础上,我们先来创建一个beans模块:
<?xml version="1.0" encoding="UTF-8"?>
<project xmlns="http://maven.apache.org/POM/4.0.0" xmlns:xsi="http://www.w3.org/2001/XMLSchema-instance"
         xsi:schemaLocation="http://maven.apache.org/POM/4.0.0 http://maven.apache.org/xsd/maven-4.0.0.xsd">
    <modelVersion>4.0.0</modelVersion>

    <groupId>me.josephzhu</groupId>
    <artifactId>spring101-beans</artifactId>
    <version>0.0.1-SNAPSHOT</version>
    <packaging>jar</packaging>

    <name>spring101-beans</name>
    <description></description>

    <parent>
        <groupId>me.josephzhu</groupId>
        <artifactId>spring101</artifactId>
        <version>0.0.1-SNAPSHOT</version>
    </parent>

    <build>
        <plugins>
            <plugin>
                <groupId>org.springframework.boot</groupId>
                <artifactId>spring-boot-maven-plugin</artifactId>
            </plugin>
        </plugins>
    </build>
</project>
复制代码
然后来创建我们的豆子:
package me.josephzhu.spring101beans;

import org.springframework.beans.factory.DisposableBean;
import org.springframework.beans.factory.InitializingBean;
import org.springframework.stereotype.Component;

import javax.annotation.PostConstruct;
import javax.annotation.PreDestroy;

@Component
public class MyService implements InitializingBean, DisposableBean {

    public int increaseCounter() {
        this.counter++;
        return counter;
    }

    public int getCounter() {
        return counter;
    }

    public void setCounter(int counter) {
        this.counter = counter;
    }

    private int counter=0;

    public MyService(){
        counter++;
        System.out.println(this + "#constructor:" + counter);
    }

    public String hello(){
        return this + "#hello:" + counter;
    }

    @PreDestroy
    public void preDestroy() {
        System.out.println(this + "#preDestroy:" + counter);

    }

    @Override
    public void afterPropertiesSet() {
        counter++;
        System.out.println(this + "#afterPropertiesSet:" + counter);
    }

    @PostConstruct
    public void postConstruct(){
        counter++;
        System.out.println(this + "#postConstruct:" + counter);
    }

    @Override
    public void destroy() {
        System.out.println(this + "#destroy:" + counter);

    }
}
复制代码
这里可以看到,我们的服务中有一个counter字段,默认是0。这个类我们实现了InitializingBean接口和DisposableBean接口,同时还创建了两个方法分别加上了@PostConstruct和@PreDestroy注解。这两套实现方式都可以在对象的额外初始化功能和释放功能,注解的实现不依赖Spring的接口,侵入性弱一点。 接下去,我们创建一个Main类来测试一下:
package me.josephzhu.spring101beans;

import org.springframework.beans.factory.annotation.Autowired;
import org.springframework.boot.CommandLineRunner;
import org.springframework.boot.SpringApplication;
import org.springframework.boot.autoconfigure.SpringBootApplication;
import org.springframework.context.ApplicationContext;

import javax.annotation.Resource;

@SpringBootApplication
public class Spring101BeansApplication implements CommandLineRunner {

    @Autowired
    private ApplicationContext applicationContext;
    @Resource
    private MyService helloService;
    @Autowired
    private MyService service;

    public static void main(String[] args) {
        SpringApplication.run(Spring101BeansApplication.class, args);
    }

    @Override
    public void run(String... args) throws Exception {
        System.out.println("====================");
        applicationContext.getBeansOfType(MyService.class).forEach((name, service)->{
            System.out.println(name + ":" + service);
        });

        System.out.println("====================");
        System.out.println(helloService.hello());
        System.out.println(service.hello());
    }
}
复制代码
ApplicationContext直接注入即可,不一定需要用ApplicationContextAware方式来获取。执行程序后可以看到输出如下:
me.josephzhu.spring101beans.MyService@7fb4f2a9#constructor:1
me.josephzhu.spring101beans.MyService@7fb4f2a9#postConstruct:2
me.josephzhu.spring101beans.MyService@7fb4f2a9#afterPropertiesSet:3
====================
myService:me.josephzhu.spring101beans.MyService@7fb4f2a9
====================
me.josephzhu.spring101beans.MyService@7fb4f2a9#hello:3
me.josephzhu.spring101beans.MyService@7fb4f2a9#hello:3
me.josephzhu.spring101beans.MyService@7fb4f2a9#preDestroy:3
me.josephzhu.spring101beans.MyService@7fb4f2a9#destroy:3
复制代码
这里我们使用@Resource注解和@Autowired注解分别引用了两次对象,可以看到由于Bean默认配置为singleton单例,所以容器中MyService类型的对象只有一份,代码输出也可以证明这点。此外,我们也通过输出看到了构造方法以及两套Bean回调的次序是:
- 类自己的构造方法
- @PostConstruct注释的方法
- InitializingBean接口实现的方法
- @PreDestroy注释的方法
- DisposableBean接口实现的方法
Java 代码方式创建Bean
从刚才的输出中可以看到,在刚才的例子中,我们为Bean打上了@Component注解,容器为我们创建了名为myService的MyService类型的Bean。现在我们再来用Java代码方式来创建相同类型的Bean,创建如下的文件:
package me.josephzhu.spring101beans;

import org.springframework.context.annotation.Bean;
import org.springframework.context.annotation.Configuration;
import org.springframework.context.annotation.Primary;

@Configuration
public class ApplicationConfig {

    @Bean(initMethod = "init")
    public MyService helloService(){
        MyService myService = new MyService();
        myService.increaseCounter();
        return myService;
    }

}
复制代码
这里可以看到在定义Bean的时候我们关联了一个initMethod,因此我们需要修改Bean加上这个方法:
public void init() {
    counter++;
    System.out.println(this + "#init:" + counter);

}
复制代码
现在我们运行代码看看结果,得到了如下错误:
Field service in me.josephzhu.spring101beans.Spring101BeansApplication required a single bean, but 2 were found:
	- myService: defined in file [/Users/zyhome/IdeaProjects/spring101/spring101-beans/target/classes/me/josephzhu/spring101beans/MyService.class]
	- helloService: defined by method 'helloService' in class path resource [me/josephzhu/spring101beans/ApplicationConfig.class]
复制代码
出现错误的原因是@Autowired了一个MyService,@Resource注解因为使用Bean的名称来查找Bean,所以并不会出错,而@Autowired因为根据Bean的类型来查抄Bean找到了两个匹配所有出错了,解决方式很简单,我们在多个Bean里选一个作为主Bean。我们修改一下MyService加上注解:
@Component
@Primary
public class MyService implements InitializingBean, DisposableBean
复制代码
这样,我们的@Resource根据名字匹配到的是我们@Configuration出来的Bean,而@Autowired根据类型+Primary匹配到了@Component注解定义的Bean,重新运行代码来看看是不是这样:
me.josephzhu.spring101beans.MyService@6cd24612#constructor:1
me.josephzhu.spring101beans.MyService@6cd24612#postConstruct:3
me.josephzhu.spring101beans.MyService@6cd24612#afterPropertiesSet:4
me.josephzhu.spring101beans.MyService@6cd24612#init:5
me.josephzhu.spring101beans.MyService@7486b455#constructor:1
me.josephzhu.spring101beans.MyService@7486b455#postConstruct:2
me.josephzhu.spring101beans.MyService@7486b455#afterPropertiesSet:3
====================
myService:me.josephzhu.spring101beans.MyService@7486b455
helloService:me.josephzhu.spring101beans.MyService@6cd24612
====================
me.josephzhu.spring101beans.MyService@6cd24612#hello:5
me.josephzhu.spring101beans.MyService@7486b455#hello:3
me.josephzhu.spring101beans.MyService@7486b455#preDestroy:3
me.josephzhu.spring101beans.MyService@7486b455#destroy:3
me.josephzhu.spring101beans.MyService@6cd24612#preDestroy:5
me.josephzhu.spring101beans.MyService@6cd24612#destroy:5
复制代码
从输出中我们注意到几点:
- 先输出的的确是helloService,说明@Resource引入的是我们Java代码配置的MyService,helloService由于在我们配置的多调用了一次increaseCounter()以及关联的initMethod,所以counter的值是5
- initMethod执行的顺序在@PostConstruct注释的方法和InitializingBean接口实现的方法之后
- 虽然我们的MySerive的两种Bean的定义都是单例,但是这不代表我们的Bean就是一套,在这里我们通过代码配置和注解方式在容器内创建了两套MyService类型的Bean,它们都经历了自己的初始化过程。通过@Resource和@Autowired引入到了是不同的Bean,当然也就是不同的对象 你还可以试试在使用@Autowired引入MyService的时候直接指定需要的Bean:
@Autowired
@Qualifier("helloService")
private MyService service;
复制代码
两个重要的扩展点
我们来继续探索Spring容器提供给我们的两个有关Bean的重要扩展点。
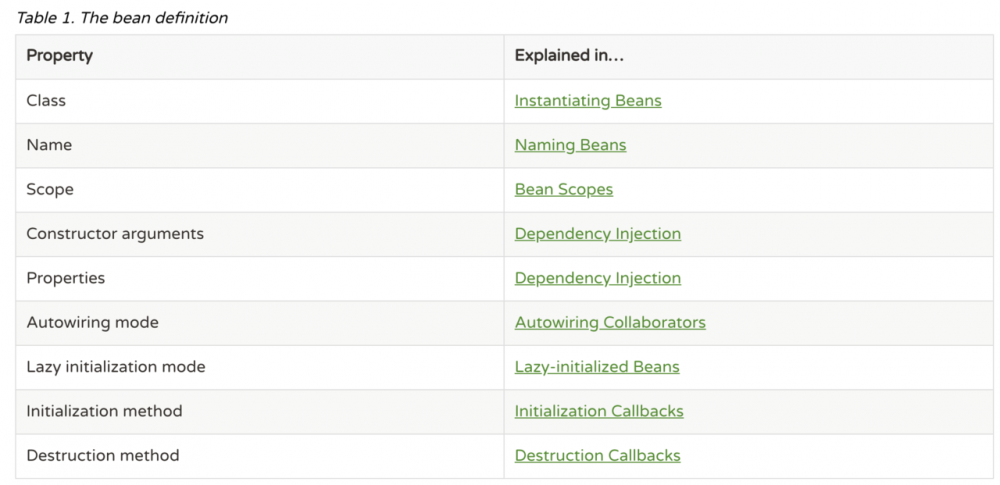
- 用于修改Bean定义的BeanFactoryPostProcessor。所谓修改定义就是修改Bean的元数据,元数据有哪些呢?如下图所示,类型、名字、实例化方式、构造参数、属性、Autowire模式、懒初始化模式、初始析构方法。实现了这个接口后,我们就可以修改这些已经定义的元数据,实现真正的动态配置。这里需要注意,我们不应该在这个接口的实现中去实例化Bean,否则这相当于提前进行了实例化会破坏Bean的生命周期。
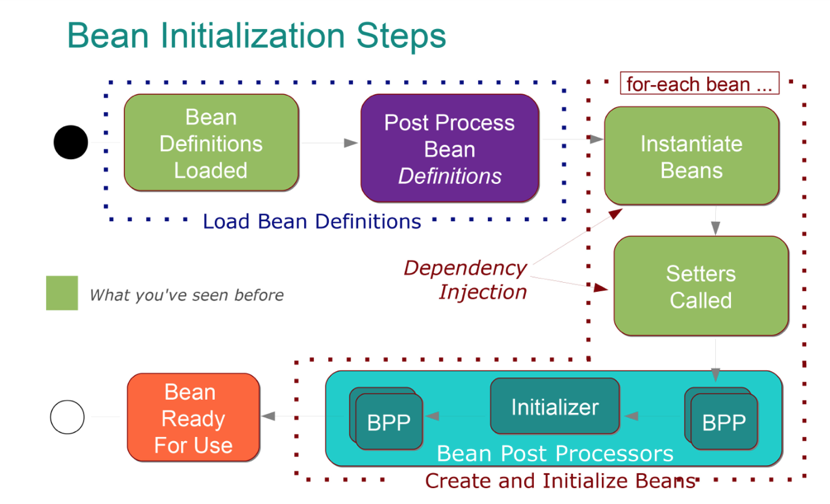
- 用于修改Bean实例的BeanPostProcessor。在这个阶段其实Bean已经实例化了,我们可以进行一些额外的操作对Bean进行修改。如下图,我们可以清晰的看到Bean的生命周期如下(BeanPostProcessor缩写为BPP):
- Bean定义加载
- BeanFactoryPostProcessor来修改Bean定义
- Bean逐一实例化
- BeanPostProcessor预处理
- Bean初始化
- BeanPostProcessor后处理
好,我们现在来实现这两种类型的处理器,首先是用于修改Bean定义的处理器:
package me.josephzhu.spring101beans;

import org.springframework.beans.BeansException;
import org.springframework.beans.factory.config.BeanDefinition;
import org.springframework.beans.factory.config.BeanFactoryPostProcessor;
import org.springframework.beans.factory.config.ConfigurableListableBeanFactory;
import org.springframework.stereotype.Component;

@Component
public class MyBeanFactoryPostProcessor implements BeanFactoryPostProcessor {
    @Override
    public void postProcessBeanFactory(ConfigurableListableBeanFactory configurableListableBeanFactory) throws BeansException {
        BeanDefinition beanDefinition = configurableListableBeanFactory.getBeanDefinition("helloService");
        if (beanDefinition != null) {
            beanDefinition.setScope("prototype");
            beanDefinition.getPropertyValues().add("counter", 10);
        }
        System.out.println("MyBeanFactoryPostProcessor");
    }
}
复制代码
这里,我们首先找到了我们的helloService(Java代码配置的那个Bean),然后修改了它的属性和Scope(还记得吗,在之前的图中我们可以看到,这两项都是Bean的定义,定义相当于类描述,实例当然就是类实例了)。 然后,我们再来创建一个修改Bean实例的处理器:
package me.josephzhu.spring101beans;

import org.springframework.beans.BeansException;
import org.springframework.beans.factory.config.BeanPostProcessor;
import org.springframework.stereotype.Component;

@Component
public class MyBeanPostProcessor implements BeanPostProcessor {
    @Override
    public Object postProcessAfterInitialization(Object bean, String beanName) throws BeansException {
        if (bean instanceof MyService) {
            System.out.println(bean + "#postProcessAfterInitialization:" + ((MyService)bean).increaseCounter());
        }
        return bean;
    }

    @Override
    public Object postProcessBeforeInitialization(Object bean, String beanName) throws BeansException {
        if (bean instanceof MyService) {
            System.out.println(bean + "#postProcessBeforeInitialization:" + ((MyService)bean).increaseCounter());
        }
        return bean;
    }
}
复制代码
实现比较简单,在这个处理器的两个接口我们都调用了一次增加计数器的操作。我们运行代码来看一下这两个处理器执行的顺序是否符合刚才那个图的预期:
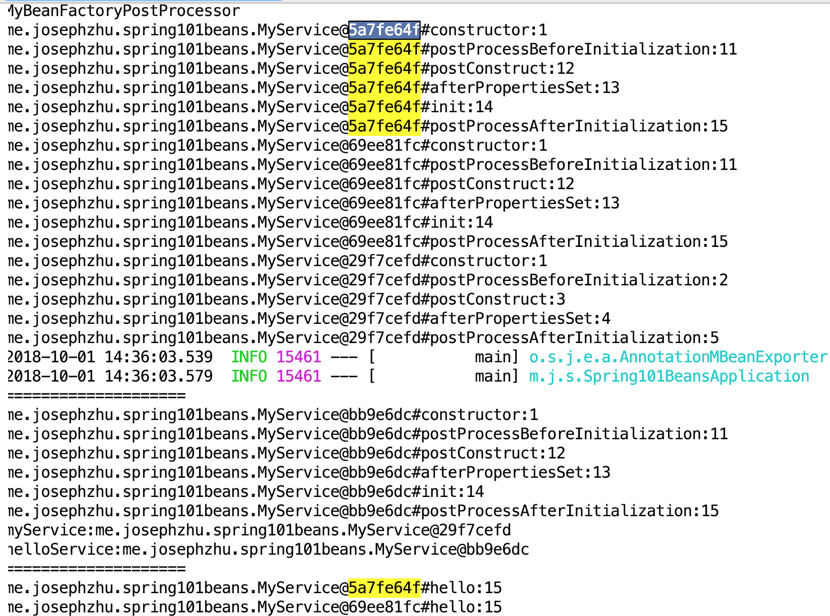
MyBeanFactoryPostProcessor
me.josephzhu.spring101beans.MyService@41330d4f#constructor:1
me.josephzhu.spring101beans.MyService@41330d4f#postProcessBeforeInitialization:11
me.josephzhu.spring101beans.MyService@41330d4f#postConstruct:12
me.josephzhu.spring101beans.MyService@41330d4f#afterPropertiesSet:13
me.josephzhu.spring101beans.MyService@41330d4f#init:14
me.josephzhu.spring101beans.MyService@41330d4f#postProcessAfterInitialization:15
me.josephzhu.spring101beans.MyService@6f36c2f0#constructor:1
me.josephzhu.spring101beans.MyService@6f36c2f0#postProcessBeforeInitialization:11
me.josephzhu.spring101beans.MyService@6f36c2f0#postConstruct:12
me.josephzhu.spring101beans.MyService@6f36c2f0#afterPropertiesSet:13
me.josephzhu.spring101beans.MyService@6f36c2f0#init:14
me.josephzhu.spring101beans.MyService@6f36c2f0#postProcessAfterInitialization:15
me.josephzhu.spring101beans.MyService@3b35a229#constructor:1
me.josephzhu.spring101beans.MyService@3b35a229#postProcessBeforeInitialization:2
me.josephzhu.spring101beans.MyService@3b35a229#postConstruct:3
me.josephzhu.spring101beans.MyService@3b35a229#afterPropertiesSet:4
me.josephzhu.spring101beans.MyService@3b35a229#postProcessAfterInitialization:5
====================
me.josephzhu.spring101beans.MyService@6692b6c6#constructor:1
me.josephzhu.spring101beans.MyService@6692b6c6#postProcessBeforeInitialization:11
me.josephzhu.spring101beans.MyService@6692b6c6#postConstruct:12
me.josephzhu.spring101beans.MyService@6692b6c6#afterPropertiesSet:13
me.josephzhu.spring101beans.MyService@6692b6c6#init:14
me.josephzhu.spring101beans.MyService@6692b6c6#postProcessAfterInitialization:15
myService:me.josephzhu.spring101beans.MyService@3b35a229
helloService:me.josephzhu.spring101beans.MyService@6692b6c6
====================
me.josephzhu.spring101beans.MyService@41330d4f#hello:15
me.josephzhu.spring101beans.MyService@6f36c2f0#hello:15
me.josephzhu.spring101beans.MyService@3b35a229#preDestroy:5
me.josephzhu.spring101beans.MyService@3b35a229#destroy:5
复制代码
这个输出结果有点长,第一行就输出了MyBeanFactoryPostProcessor这是预料之中,Bean定义的修改肯定是最先发生的。我们看下输出的规律,1、11、12、13、14、15出现了三次,之所以从1跳到了11是因为我们的BeanFactoryPostProcessor修改了其中的counter属性的值为10。这说明了,我们的helloService的初始化进行了三次:
- 第一套指针地址是5a7fe64f,对应输出第一个hello(),这是我们@Resource引入的
- 第二套指针地址是69ee81fc,对应输出第二个hello(),这是我们@Autowird+@Qualifier引入的(刚才一节最后我们指定了helloService)
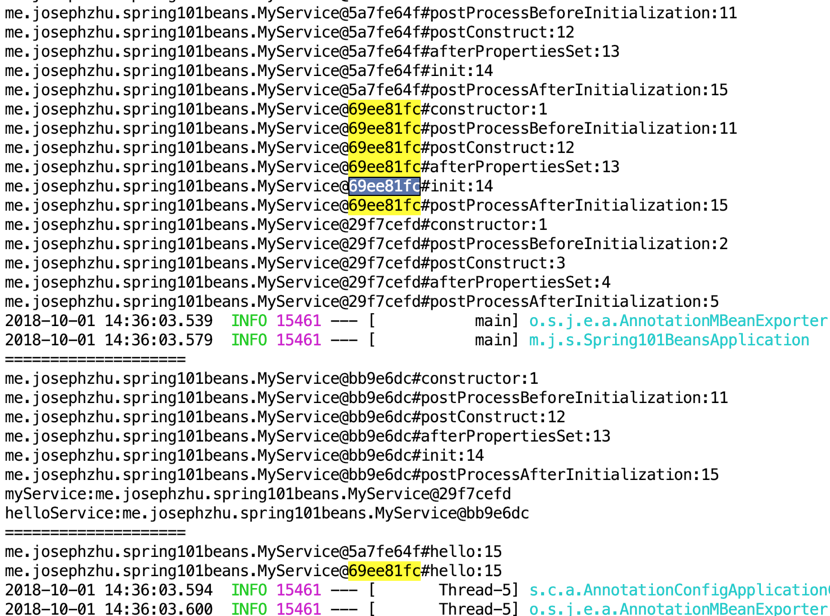
- 第三套指针地址是29f7cefd,这是我们getBeansOfType的时候创建的,对应下面Key-Value的输出:
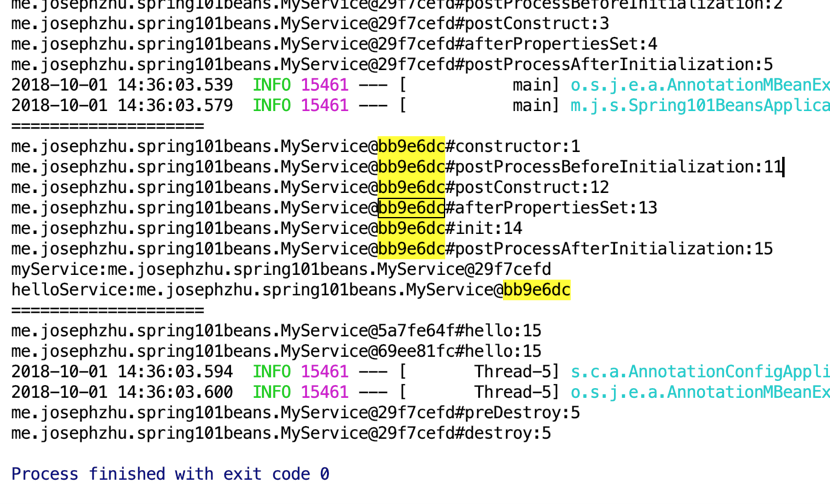
这里的输出说明了几点:
- 我们的BeanFactoryPostProcessor生效了,不但修改了helloService的Scope为prototype而且修改了它的counter属性
- 对于Scope=ptototype的Bean,显然在每次使用Bean的时候都会新建一个实例
- BeanPostProcessor两个方法的顺序结合一开始说的Bean事件回调的顺序整体如下:
- 类自己的构造方法
- BeanFactoryPostProcessor接口实现的postProcessBeforeInitialization()方法
- @PostConstruct注释的方法
- InitializingBean接口实现的afterPropertiesSet()方法
- Init-method定义的方法
- BeanFactoryPostProcessor接口实现的postProcessAfterInitialization()方法
- @PreDestroy注释的方法
- DisposableBean接口实现的destroy()方法
最后,我们可以修改BeanFactoryPostProcessor中的代码把prototype修改为singleton看看是否我们的helloService这个Bean恢复为了单例:
MyBeanFactoryPostProcessor
me.josephzhu.spring101beans.MyService@51891008#constructor:1
me.josephzhu.spring101beans.MyService@51891008#postProcessBeforeInitialization:11
me.josephzhu.spring101beans.MyService@51891008#postConstruct:12
me.josephzhu.spring101beans.MyService@51891008#afterPropertiesSet:13
me.josephzhu.spring101beans.MyService@51891008#init:14
me.josephzhu.spring101beans.MyService@51891008#postProcessAfterInitialization:15
me.josephzhu.spring101beans.MyService@49c90a9c#constructor:1
me.josephzhu.spring101beans.MyService@49c90a9c#postProcessBeforeInitialization:2
me.josephzhu.spring101beans.MyService@49c90a9c#postConstruct:3
me.josephzhu.spring101beans.MyService@49c90a9c#afterPropertiesSet:4
me.josephzhu.spring101beans.MyService@49c90a9c#postProcessAfterInitialization:5
====================
myService:me.josephzhu.spring101beans.MyService@49c90a9c
helloService:me.josephzhu.spring101beans.MyService@51891008
====================
me.josephzhu.spring101beans.MyService@51891008#hello:15
me.josephzhu.spring101beans.MyService@51891008#hello:15
me.josephzhu.spring101beans.MyService@49c90a9c#preDestroy:5
me.josephzhu.spring101beans.MyService@49c90a9c#destroy:5
me.josephzhu.spring101beans.MyService@51891008#preDestroy:15
me.josephzhu.spring101beans.MyService@51891008#destroy:15
复制代码
本次输出结果的hello()方法明显是同一个bean,结果中也没出现三次1、11、12、13、14、15。
正文到此结束
- 本文标签: ip 生命 UI Spring Boot CTO 测试 schema description Service NSA Qualifier key http 配置 id CEO apache 开发 tar Property IDE 构造方法 XML pom core apr IO 注释 java 参数 https BeanDefinition 数据 回答 实例 maven src 标题 plugin 代码 spring list struct 处理器 开发者 springboot App tab build cat bean 管理 value
- 版权声明: 本文为互联网转载文章,出处已在文章中说明(部分除外)。如果侵权,请联系本站长删除,谢谢。
- 本文海报: 生成海报一 生成海报二
热门推荐


相关文章

近期评论
-
出现OpenClaw "device signature expired"。the Gateway rejects if Math.abs(Date.now() - signedAt) > 10 * 60 * 1000 (10 minutes)
-
-
想购买您这个站,我的联系方式QQ741756694微信同步 能卖联系
-
-
-
博主的博客用的什么技术栈,内容都是干货,赞
-
-
https://www.liuhaihua.cn/archives/40657.html 这篇博客中的图片打不开了
-
不会英语啊。
-
Loading...
![[HBLOG]公众号](https://www.liuhaihua.cn/img/qrcode_gzh.jpg)

