Spring Cloud 微服务实战详细笔记
本文是看某课网关于 SpringCloud 微服务实战的视频总结的笔记,其中涉及了
- Eureka Server 和 Eureka Client 的配置
- Eureka Server 高可用性
- 服务间通信的两种方式:RestTemplate 和 Feign
- RabbitMQ 的安装和使用
- 配置中心的使用
- Spring Cloud Stream 的使用
- 服务网关 Zuul 的各种用法
由于是随堂笔记,写的有点随意,大佬们见谅~
文中提到的大部分技术都会在我的一个开源项目中用到,这个项目后端业务逻辑部分已经基本写完了,就差权限验证、网关配置和后期优化啦,感兴趣的大佬可以看看。
项目地址: github.com/cachecats/c…
一、关于命令行
启动 SpringBoot 项目
java -jar test.jar
复制代码
启动 SpringBoot 项目并指定端口
java -jar -Dserver.port=8899 test.jar
复制代码
启动 SpringBoot 项目并指定后台运行
nohup java -jar test.jar > /dev/null 2>&1 &
复制代码
查看进程
ps -ef | grep eureka
复制代码
杀死进程
kill -9 进程号
复制代码
在本地安装项目到本地 maven 仓库
mvn -Dmaven.test.skip=true -U clean install
复制代码
二、Eureka Server
2.1 新建
选 CloudDiscovery -> Eureka Server
注意 SpringBoot 版本
2.2 配置
在启动类 Application 上加注解
@EnableEurekaServer
复制代码
在配置文件 application.yml 注册服务
eureka:
  client:
    service-url:
      defaultZone: http://localhost:8080/eureka/
复制代码
启动项目,浏览器输入地址 http://localhost:8080 即可看到项目正常启动,并将自己注册上去了
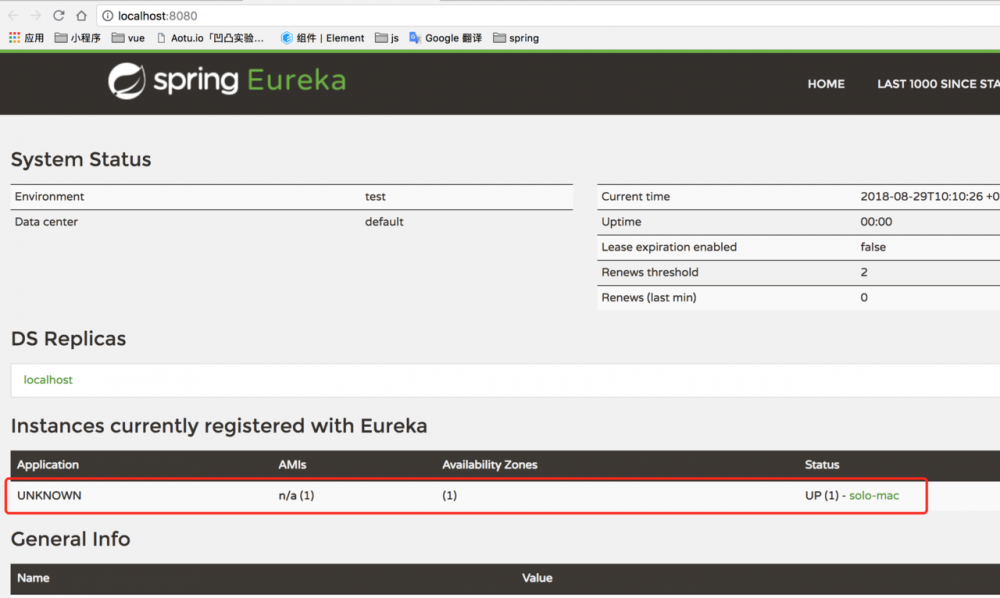
ApplicationName 是 UNKNOWN ,想改应用名字的话在 application.yml 做以下配置
eureka:
  client:
    service-url:
      defaultZone: http://localhost:8080/eureka/
spring:
  application:
    name: eureka
复制代码
再启动项目,浏览器中查看,名字正确显示
如果不想让注册中心出现在注册列表中,配置 register-with-eureka: false
eureka:
  client:
    service-url:
      defaultZone: http://localhost:8080/eureka/   #配置默认注册地址
    register-with-eureka: false  #不让该服务显示在应用列表中
spring:
  application:
    name: eureka  #配置应用名字
复制代码
三、Eureka Client
3.1 新建项目
选 CloudDiscovery -> Eureka Discovery
注意 SpringBoot 和 SpringCloud 版本与server一致
3.2 配置
- 入口
Application添加注解@EnableDiscoveryClient
@SpringBootApplication
@EnableDiscoveryClient
public class ClientApplication {

    public static void main(String[] args) {
        SpringApplication.run(ClientApplication.class, args);
    }
}
复制代码
- 配置 server 地址
eureka:
  client:
    service-url:
      defaultZone: http://localhost:8761/eureka/
spring:
  application:
    name: client
复制代码
- 自定义链接地址,配置完后浏览器地址会变成
http://clientname:8080/
eureka:
  instance:
    hostname: clientName
复制代码
- 如果频繁重启 client 服务,会出现如下警告

这是 SpringCloud 的自我保护机制,就是不管这个服务在不在线,都把它当成在线。开发环境中为了调试方便可以关闭这个功能,注意生产环境一定要打开。
在 server 的 applicaitono.yml 中做如下配置
eureka:
  server:
    enable-self-preservation: false
复制代码
四、Eureka Server 高可用性
目前是 Client 注册到一个 Eureka Server 上,如果这个 Server 挂掉了怎么办呢?
可以启动多个 Eureka Server ,让他们相互注册。
这里演示启动三个 Eureka Server 相互注册,并把 Client 分别注册到这三个 Server 上。
配置 server
分别在 8761, 8762, 8763 三个端口上启动 EurekaApplication 、 EurekaApplication2 、 EurekaApplication3 三个服务,在三个服务的 applicaiton.yml 中分别配置其他两个服务的地址。
如 EurekaApplication 就配 http://localhost:8762/eureka/,http://localhost:8763/eureka/ ,
EurekaApplication2 就配 http://localhost:8761/eureka/,http://localhost:8763/eureka/ ,
EurekaApplication3 就配 http://localhost:8761/eureka/,http://localhost:8762/eureka/ ,
EurekaApplication 的 applicaiton.yml 如下:
eureka:
  client:
    service-url:
      defaultZone: http://localhost:8762/eureka/,http://localhost:8763/eureka/
复制代码
这样就把三个服务互相关联上了。
配置 client
然后在 Client 的 applicaiton.yml 中把三个服务地址都配上
eureka:
  client:
    service-url:
      defaultZone: http://localhost:8761/eureka/,http://localhost:8762/eureka/,http://localhost:8763/eureka/
复制代码
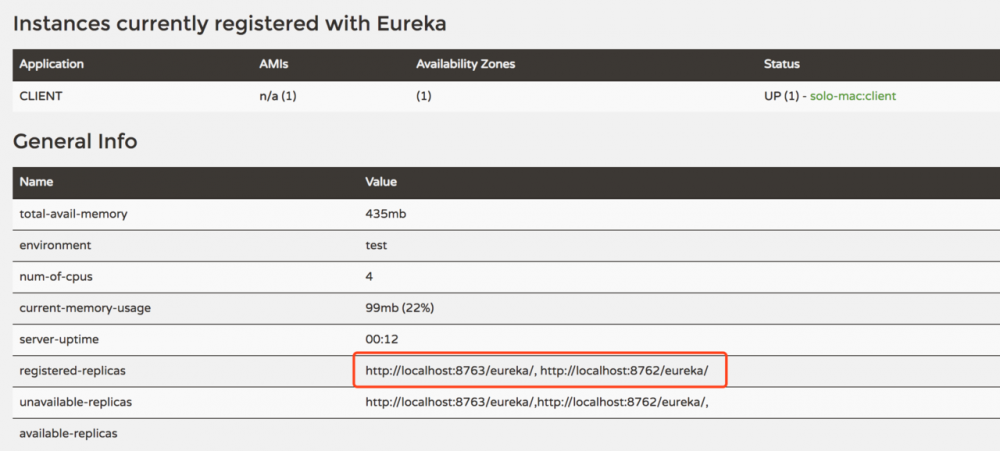
查看 EurekaApplication ,发现注册到了8762 和 8763 上。三个server只要还有一个活着,服务就不会挂。
五、应用间通信
应用间通信有两种主流通信方式:
HTTP代表: SpringCloud
RPC代表: Dubbo
SpringCloud 中服务间两种 restful 调用方式
- RestTemplate
- Feign
5.1 RestTemplate 方式
RestTemplate 调用一共有三种方法,下面一一介绍。
先在要提供数据的应用里写个 Controller 暴露接口,叫 ServerController 吧
@RestController
@RequestMapping("/product")
public class ServerController {

    @GetMapping("/msg")
    public String getMsg(){
        return "I am product msg";
    }
}
复制代码
然后在需要接收数据的应用写个 Controller ,叫 ClientController
5.1.1 方法一
直接使用 RestTemplate 手动写入提供数据的 url 地址
@RestController
@RequestMapping("/order")
@Slf4j
public class ClientController {

    @GetMapping("/getmsg")
    public String getMsg(){
        RestTemplate restTemplate = new RestTemplate();
        String result = restTemplate.getForObject("http://localhost:8080/product/msg", String.class);
        log.info("result={}", result);
        return result;
    }
}
复制代码
5.1.2 方法二
不手动输入 url 地址,使用 LoadBalancerClient 通过应用名动态获取,然后再使用 RestTemplate 。
loadBalancerClient.choose("product"); 这个 product 是提供数据的应用 id
@RestController
@RequestMapping("/order")
@Slf4j
public class ClientController {

    @Autowired
    LoadBalancerClient loadBalancerClient;

    @GetMapping("/getmsg")
    public String getMsg(){
        ServiceInstance serviceInstance = loadBalancerClient.choose("product");
        String url = String.format("http://%s:%s/product/msg", serviceInstance.getHost(), serviceInstance.getPort());
        RestTemplate restTemplate = new RestTemplate();
        String result = restTemplate.getForObject(url, String.class);
        return result;
    }
}
复制代码
5.1.3方法三
用 @LoadBalanced 注解
新建 RestTemplateConfig 类
@Component
public class RestTemplateConfig {

    @Bean
    @LoadBalanced
    public RestTemplate restTemplate(){
        return new RestTemplate();
    }
}
复制代码
然后在 ClientController 中使用。
restTemplate.getForObject("http://product/product/msg", String.class); url 中的两个 product ,第一个表示应用名,第二个是 api 的地址。如果 api 地址是 /abc ,那 url 就是 http://product/abc
@RestController
@RequestMapping("/order")
@Slf4j
public class ClientController {

    @Autowired
    RestTemplate restTemplate;

    @GetMapping("/getmsg")
    public String getMsg(){
        String result = restTemplate.getForObject("http://product/product/msg", String.class);
        return result;
    }
}
复制代码
5.2 Feign 方式
使用 Feign 有以下几个步骤
步骤一:引入依赖
<dependency>
    <groupId>org.springframework.cloud</groupId>
    <artifactId>spring-cloud-starter-openfeign</artifactId>
</dependency>
复制代码
注意
这里注意一个问题,有的视频和文章里引的依赖是 spring-cloud-starter-feign ,刚开始我引的也是这个,可是死活引不进来。这时到 maven 仓库mvnrepository.com/ 里看一下,搜 spring-cloud-starter-feign 看到上面写着:
Spring Cloud Starter Feign (deprecated, please use spring-cloud-starter-openfeign)
说 spring-cloud-starter-feign 已经废弃了,请使用 spring-cloud-starter-openfeign 。
我用的 SpringCloud 版本比较高,可能不支持 spring-cloud-starter-feign 了。
步骤二:配置 @EnableFeignClients 注解
在程序的入口类配置 @EnableFeignClients 注解
@SpringBootApplication
@EnableDiscoveryClient
@EnableFeignClients
public class OrderApplication {
    public static void main(String[] args) {
        SpringApplication.run(OrderApplication.class, args);
    }
}
复制代码
找不到 @EnableFeignClients 的话请检查依赖是否引对,版本是否正确。
步骤三:创建封装接口
import org.springframework.cloud.openfeign.FeignClient;
import org.springframework.stereotype.Component;
import org.springframework.web.bind.annotation.GetMapping;

@FeignClient(name = "product")
@Component
public interface ProductClient {

    @GetMapping("/product/msg")
    String getMsg();
}
复制代码
接口上加 @FeignClient 注解,括号里的 name = "product" 声明了要去应用名为 product 的应用找数据(应用名大小写不敏感)。
@GetMapping("/product/msg") 注明请求方式和路径。
所以 getMsg() 方法的意思是要请求 product 应用里 api 为 /product/msg 的字符串。
步骤四:调用
@RestController
@RequestMapping("/order")
@Slf4j
public class ClientController {

    @Autowired
    ProductClient productClient;

    @GetMapping("/getmsg")
    public String getMsg(){
        return productClient.getMsg();
    }
}
复制代码
注入第三步创建的 ProductClient ,然后直接调用接口里定义的方法即可。
我这里注入 ProductClient 编辑器会报错,但不影响编译。
Could not autowire. No beans of 'ProductClient' type found
复制代码
看着不顺眼就在 ProductClient 上加了个 @Component 注解。
最后总结下 Feign :
- 声明式 REST 客户端(伪RPC)
- 采用了基于接口的注解
六、安装 RabbitMQ
本文用 Docker 安装 RabbitMQ,Docker教程看这里
打开 RabbitMQ 官方下载页面 www.rabbitmq.com/download.ht… Docker
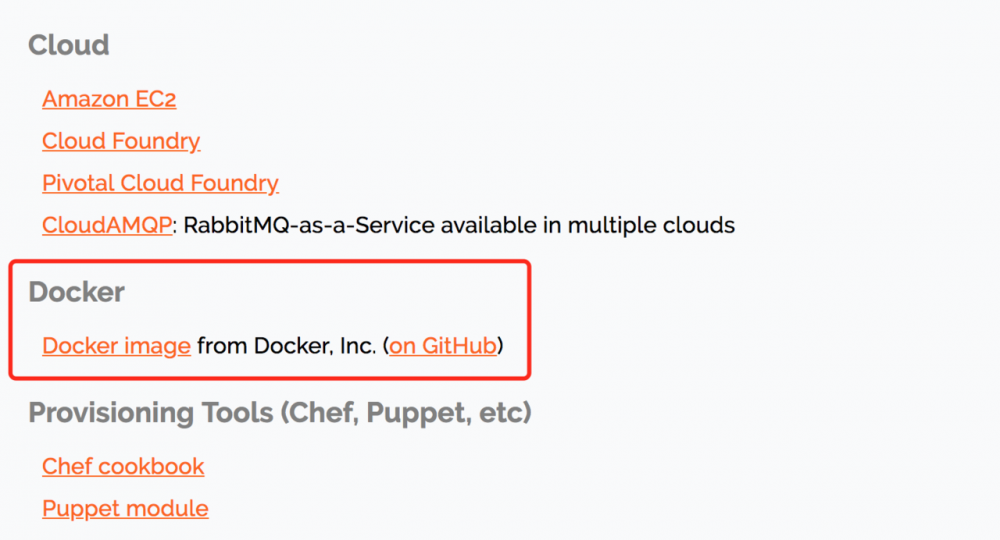
点击 Docker image 链接进入到详情页
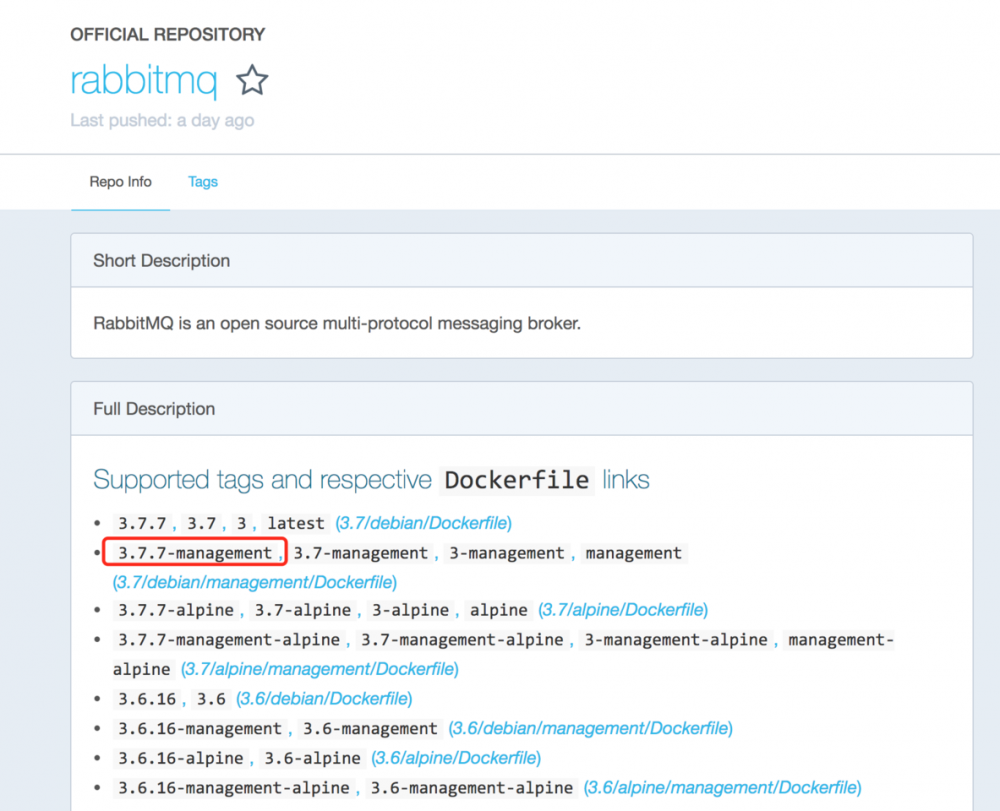
可以看到最新版本是 3.7.7 ,复制 3.7.7-management ,在命令行敲以下代码并运行
docker run -d --hostname my-rabbit -p 5672:5672 -p 15672:15672 rabbitmq:3.7.7-management
复制代码
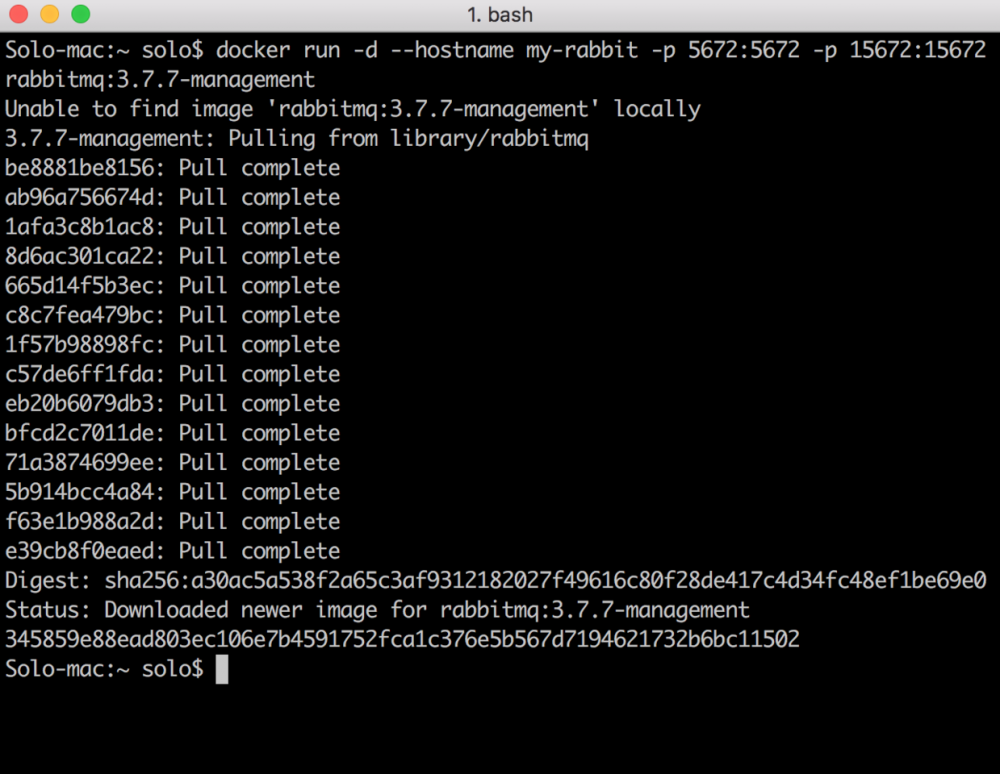
使用 docker ps 来查看我们正在运行的容器
Solo-mac:~ solo$ docker ps
CONTAINER ID        IMAGE                       COMMAND                  CREATED             STATUS              PORTS                                                                                        NAMES
345859e88ead        rabbitmq:3.7.7-management   "docker-entrypoint.s…"   2 minutes ago       Up 2 minutes        4369/tcp, 5671/tcp, 0.0.0.0:5672->5672/tcp, 15671/tcp, 25672/tcp, 0.0.0.0:15672->15672/tcp   goofy_volhard
复制代码
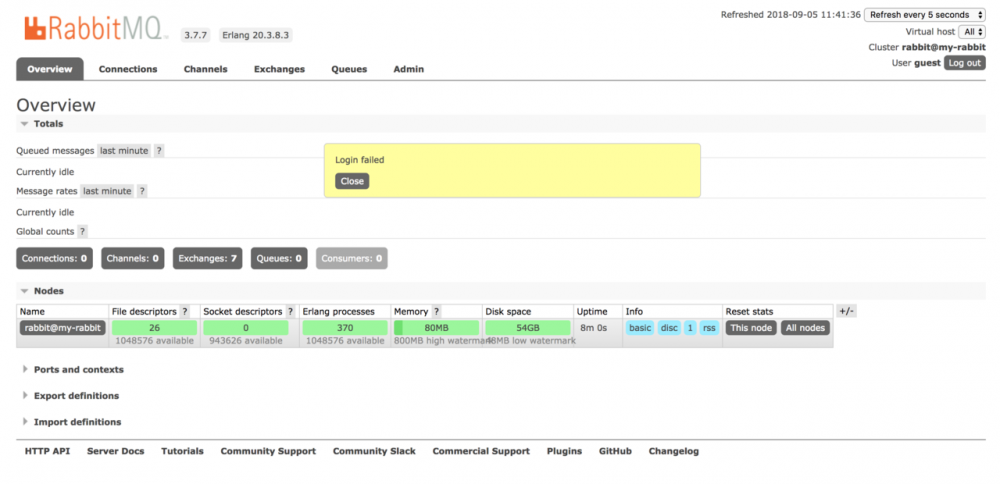
浏览器输入 http://localhost:15672 打开 RabbitMQ ,第一次会让输用户名密码,用户名和密码都是 guest , 输入之后进入管理界面
到此 RabbitMQ 安装完成。
七、配置中心
7.1 配置中心服务端配置
-
新建项目 config
勾选 Cloud Config -> Config Server 和 Cloud Discovery -> Eureka Discovery
复制代码
-
在启动类上添加注解
@SpringBootApplication @EnableDiscoveryClient @EnableConfigServer public class ConfigApplication { public static void main(String[] args) { SpringApplication.run(ConfigApplication.class, args); } } 复制代码 -
在 github 上或码云上新建一个项目,将
order项目的application.yml配置文件传上去,用来测试。 -
配置项目的
application.yml文件eureka: client: service-url: defaultZone: http://localhost:8761/eureka/ server: port: 8081 spring: application: name: config cloud: config: server: git: uri: https://gitee.com/xxxxxxx username: xxxxxx password: xxxxxx basedir: xxxxxx #本地的路径 复制代码uri 是仓库地址,username 和 password 是仓库的用户名密码
-
配置完成后启动项目,可以在注册中心看到项目注册上去了,浏览器中访问
http://localhost:8081/order-a.yml,也能正常读取 git 上的配置文件。访问地址输入的后缀是 '/order-a.yml', 这里解释一下。
/{name}-{profiles}.yml
/{label}/{name}-{profiles}.yml

name: 服务名,这里是 order
profiles 环境
label 分支(branch) 不写的话默认是 master 分支
复制代码
7.2 配置中心客户端配置
用 order 项目作为客户端
- 在 order 的 server 模块的
pom.xml文件里添加config-client依赖
<dependency>
    <groupId>org.springframework.cloud</groupId>
    <artifactId>spring-cloud-config-client</artifactId>
</dependency>
复制代码
-
将
application.yml改名为bootstrap.yml -
配置
bootstrap.ymlspring: application: name: order cloud: config: discovery: enabled: true service-id: config #配置中心server的应用名 profile: dev eureka: client: service-url: defaultZone: http://localhost:8761/eureka/ 复制代码
配置完后启动项目,可以正常运行。
注意:
- 不要忘记改配置文件名为
bootstrap.yml - 在本地配置文件中配置 eureka 的 service-url,而不是从 config 中读取,原因是如果eureka 的端口号不是默认的 8761 ,会找不到。
- 如果git上有
order.yml,order-dev.yml,配置的是order-dev.yml,那加载的时候也会默认加载order.yml并将两个文件合并。利用这一特性,可以在order.yml里写公共配置。
7.3 Spring Cloud Bus 自动刷新配置
7.3.1 config 项目添加spring cloud bus 依赖
在 config 项目添加 spring cloud bus 依赖
<dependency>
    <groupId>org.springframework.cloud</groupId>
    <artifactId>spring-cloud-starter-bus-amqp</artifactId>
</dependency>
复制代码
启动项目,在 RabbitMQ 控制台查看,有一个连接,说明配置成功。

7.3.2 order 项目添加spring cloud bus 依赖
同上在 order 的 server 模块里添加依赖
<dependency>
    <groupId>org.springframework.cloud</groupId>
    <artifactId>spring-cloud-starter-bus-amqp</artifactId>
</dependency>
复制代码
运行再看 RabbitMQ ,出现两个连接

7.3.3 配置自动刷新
配置 config 项目的 application.yml 文件,将 bus-refresh 接口暴露出来
management:
  endpoints:
    web:
      exposure:
        include: "*"
复制代码
在 order 中新建一个 controller,用来读取远程配置里的 env 字段
value方式取配置
@RestController
@RequestMapping("/env")
@RefreshScope
public class EnvController {

    @Value("${env}")
    private String env;

    @GetMapping("/print")
    public String print(){
        return env;
    }
}
复制代码
注意一定要加 @RefreshScope 注解,否则不会自动刷新配置
再次启动两个项目,访问 http://localhost:8899/env/print ,得到结果是 git 上配置的 env 的值。
更改 git 上 env 的值,发送 post 请求 http://127.0.0.1:8081/actuator/bus-refresh 刷新消息队列,再刷新 http://localhost:8899/env/print 会看到没有重启项目但 env 的值改变了。
前缀方式取配置
git 配置
env: dev5

girl:
  name: lili
  age: 18
复制代码
新建类 GirlConfig
@Data
@Component
@ConfigurationProperties("girl")
@RefreshScope
public class GirlConfig {

    private String name;

    private Integer age;
}
复制代码
新建 GirlController
@RestController
public class GirlController {

    @Autowired
    GirlConfig girlConfig;

    @GetMapping("girl/print")
    public String print(){
        return "name= " + girlConfig.getName() + ", age= " + girlConfig.getAge();
    }
}
复制代码
浏览器输入 http://localhost:8899/girl/print ,得到结果 name= lili, age= 18 。
跟上面一样改变 git 的配置,发送 post 请求 http://127.0.0.1:8081/actuator/bus-refresh 刷新消息队列,可以看到得到的结果也跟着改变了。
如果发请求 http://127.0.0.1:8081/actuator/bus-refresh 返回值是 500,那就是 bus 没配好。最后可能的原因是版本问题,把 SpringBoot 版本改成 2.0.0.BUILD-SNAPSHOT , SpringCloud 版本改成 Finchley.BUILD-SNAPSHOT 应该就没问题了。
八、RabbitMQ 的基本使用
在 order 项目中演示
先在配置文件中配置 rabbitmq 的信息。这些配置可以放到远程 git 上
spring:
  rabbitmq:
    host: localhost
    port: 5672
    username: guest
    password: guest
复制代码
8.1 基本使用
接收消息有三种基本用法
方法1:必须提前声明队列
myQueue
/**
 * RabbitMQ 消息接收者
 */
@Slf4j
@Component
public class MqReceiver {

    @RabbitListener(queues = "myQueue")
    public void process(String msg){
        log.info("reveicer: " + msg);
    }
}
复制代码
-
创建消息发送者,简单起见在测试类里写个方法
/**
 * RabbitMQ 消息发送方
 */
@Component
public class RabbitMQTest extends OrderApplicationTests {

    @Autowired
    AmqpTemplate amqpTemplate;

    @Test
    public void test1(){
        amqpTemplate.convertAndSend("myQueue", "now " + new Date());
    }
}
复制代码
运行测试,控制台成功打印出收到的消息。
方法2:自动创建队列
先将方法一创建的队列 myQueue 删除,发送方不变,改一下接收方
@RabbitListener(queuesToDeclare = @Queue("myQueue"))
public void process(String msg){
	log.info("reveicer: " + msg);
}
复制代码
用 queuesToDeclare 会自动创建队列。
方法3:自动创建队列,并将 queue 和 exchange 绑定
先将队列 myQueue 删除,发送方不变,改一下接收方
@RabbitListener(bindings = @QueueBinding(
        value = @Queue("myQueue"),
        exchange = @Exchange("myExchange")
))
public void process(String msg){
    log.info("reveicer: " + msg);
}
复制代码
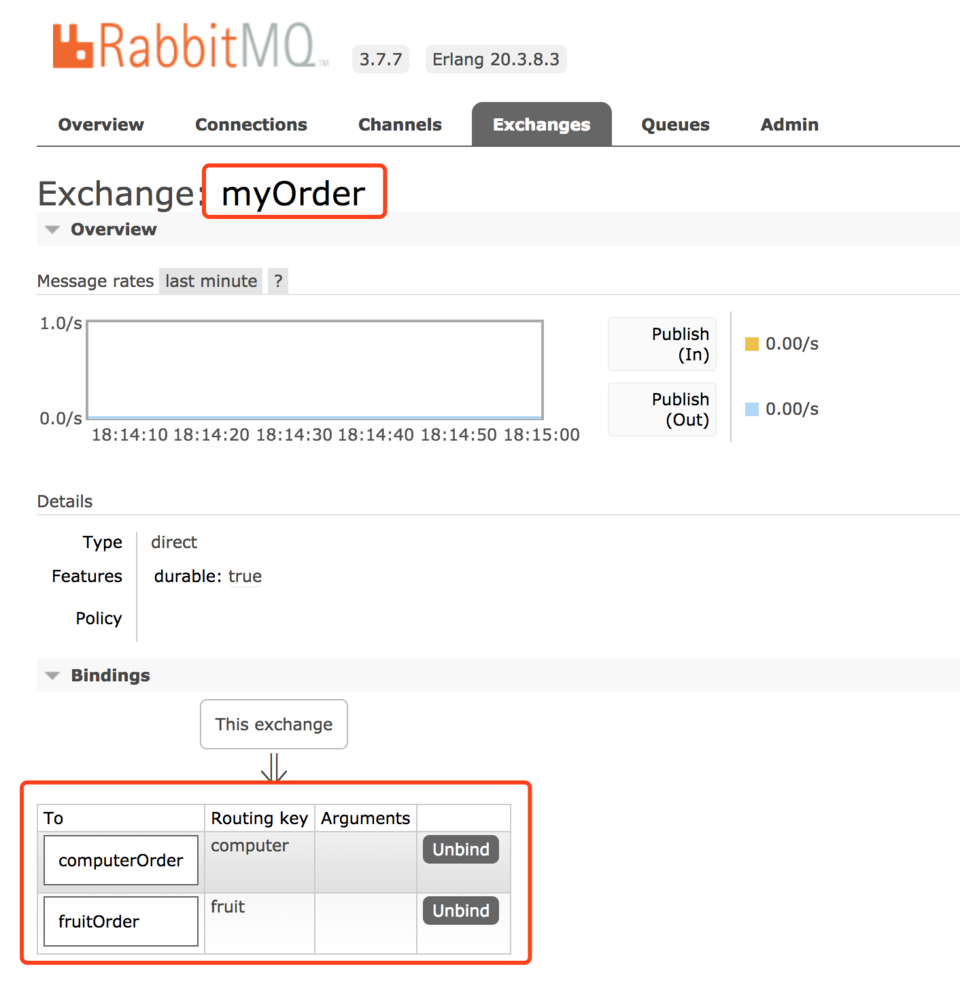
8.2 消息分组
假设订单服务有两个分组,数码供应商和水果供应商。下单之后是电脑的订单会被发给数码供应商,是水果的订单会被发给水果供应商。两个供应商各自接收各自的消息。
接收者
/**
     * 数码供应商接收消息
     * @param msg
     */
    @RabbitListener(bindings = @QueueBinding(
            exchange = @Exchange("myOrder"),
            key = "computer",
            value = @Queue("computerOrder")
    ))
    public void processComputer(String msg){
        log.info("computerOrder reveicer: " + msg);
    }

    /**
     * 水果供应商接收消息
     * @param msg
     */
    @RabbitListener(bindings = @QueueBinding(
            exchange = @Exchange("myOrder"),
            key = "fruit",
            value = @Queue("fruitOrder")
    ))
    public void processFruit(String msg){
        log.info("fruitOrder reveicer: " + msg);
    }
复制代码
消息发送者
@Test
public void send(){
	amqpTemplate.convertAndSend("myOrder", "computer", "now " + new Date());
}
复制代码
这里发送的是电脑的订单, convertAndSend() 三个参数依次是 exchange , routingKey , message
发送消息之后只有 computerOrder 接收到了消息。
查看 RabbitMQ 控制体台可以清楚的看到 exchange 和 queue 的关系
九、Spring Cloud Stream
Spring Cloud Stream is a framework for building highly scalable event-driven microservices connected with shared messaging systems.
复制代码
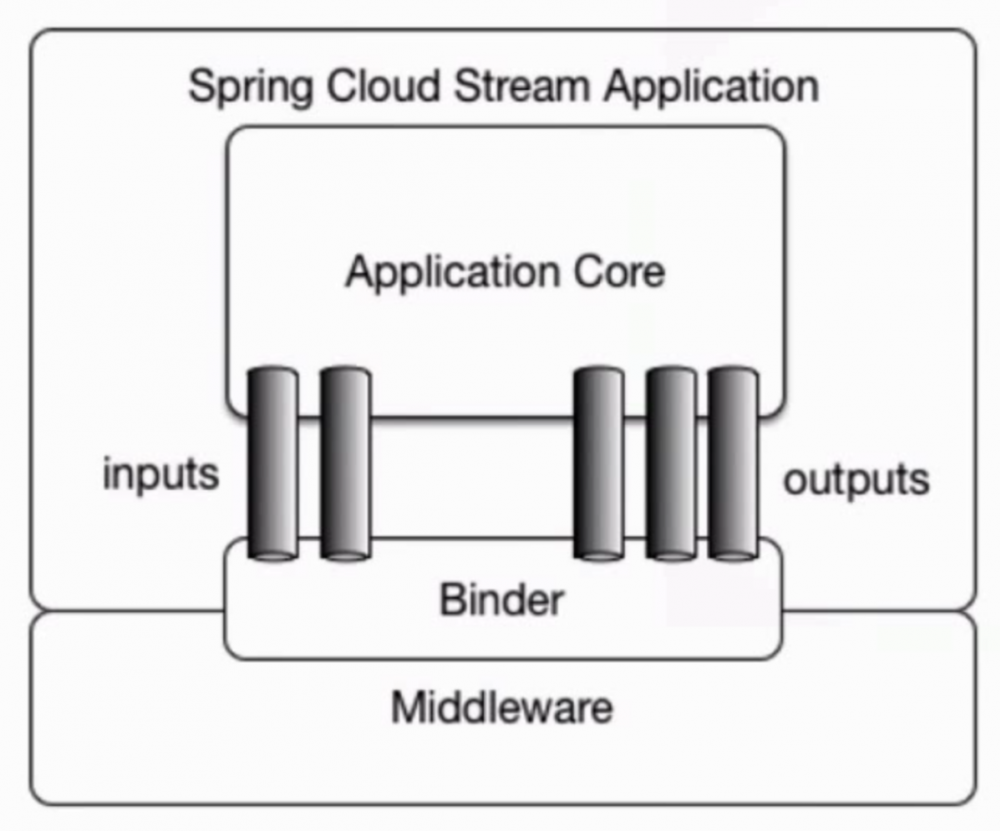
Spring Cloud Stream 目前支持的消息中间件只有 RabbitMQ 和 Kafka
9.1 使用步骤
下面结合 RabbitMQ 演示 Spring Cloud Stream 的用法
-
引入依赖
<dependency> <groupId>org.springframework.cloud</groupId> <artifactId>spring-cloud-starter-stream-rabbit</artifactId> </dependency> 复制代码 -
配置 RabbitMQ,跟上节一样
spring: rabbitmq: host: localhost port: 5672 username: guest password: guest 复制代码 -
创建接口 StreamClient
import org.springframework.cloud.stream.annotation.Input; import org.springframework.cloud.stream.annotation.Output; import org.springframework.messaging.MessageChannel; import org.springframework.messaging.SubscribableChannel; public interface StreamClient { String INPUT = "messageInput"; String OUTPUT = "messageOut"; @Input(INPUT) SubscribableChannel input(); @Output(OUTPUT) MessageChannel output(); } 复制代码 -
创建消息接受者,这里先接收字符串
@Component @EnableBinding(StreamClient.class) @Slf4j public class StreamReceiver { @StreamListener(StreamClient.OUTPUT) public void process(String obj){ log.info("StreamReceiver: " + obj); } } 复制代码 -
创建消息发送者
import com.solo.order.message.StreamClient;
import org.springframework.beans.factory.annotation.Autowired;
import org.springframework.messaging.support.MessageBuilder;
import org.springframework.web.bind.annotation.GetMapping;
import org.springframework.web.bind.annotation.RestController;
import java.util.Date;

@RestController
public class SendMessageController {

    @Autowired
    private StreamClient streamClient;

    @GetMapping("/sendMessage")
    public void send() {
        String message = "now: " + new Date();
        streamClient.output().send(MessageBuilder.withPayload(message).build());
    }
}
复制代码
注意 MessageBuilder 别引错包了
9.2 消息分组
如果同时开启了多个实例,有可能多个实例都收到消息,为避免这个问题,可以用消息分组。
在配置文件里添加
spring:
  cloud:
    #消息分组
    stream:
      bindings:
        messageInput:  #自己定义的队列名
          group: order # group 名可以随意起
复制代码
9.3 发送接收对象
改造消息接收者
/**
* 接收对象
* @param dto
*/
@StreamListener(StreamClient.OUTPUT)
public void process(OrderDTO dto){
	log.info("StreamReceiver: " + dto);
}
复制代码
改造消息发送者
/**
* 发送对象
*/
@GetMapping("/sendMessage")
public void send() {
    OrderDTO dto = new OrderDTO();
    dto.setOrderId("12345678");
    streamClient.output().send(MessageBuilder.withPayload(dto).build());
}
复制代码
如果想在 MQ 控制台看到序列化之后的 json 字符串而不是对象名,更改配置如下
spring:
  cloud:
    #消息分组
    stream:
      bindings:
        messageInput:  #自己定义的队列名
          group: order # group 名可以随意起
 		  content-type: application/json  #让mq里显示json字符串而不是对象
复制代码
添加 content-type: application/json
9.4 收到消息后回应
在 StreamClient 里添加两个接口
public interface StreamClient {

    String INPUT = "messageInput";
    String OUTPUT = "messageOut";
    String INPUT2 = "messageInput2";
    String OUTPUT2 = "messageOut2";

    @Input(INPUT)
    SubscribableChannel input();

    @Output(OUTPUT)
    MessageChannel output();

    @Input(INPUT2)
    SubscribableChannel input2();

    @Output(OUTPUT2)
    MessageChannel output2();

}
复制代码
消息接收者做如下更改
@StreamListener(StreamClient.OUTPUT)
@SendTo(StreamClient.OUTPUT2)
public String process(OrderDTO dto){
    log.info("StreamReceiver: " + dto);
    return "Received...";
}

@StreamListener(StreamClient.OUTPUT2)
public void process2(String msg){
	log.info("StreamReceiver2: " + msg);
}
复制代码
主要是添加一个 @SendTo(StreamClient.OUTPUT2) 注解,然后返回需要的值。再定义一个接收 StreamClient.OUTPUT2 的接收者。
十、Redis 安装与简单使用
10.1 安装
通过 Docker 安装并启动
docker run -d -p 6379:6379 redis:4.0.8
复制代码
mac 下的 redis 可视化工具: Redis Desktop Manager ,简称 RDM
10.2 使用
先添加依赖
<dependency>
     <groupId>org.springframework.boot</groupId>
     <artifactId>spring-boot-starter-data-redis</artifactId>
 </dependency>
复制代码
然后配置 redis 的地址和端口号
spring:
    redis:
      host: localhost
      port: 6379
复制代码
十一、服务网关 Zuul
11.1 简介
服务网关的要素
- 稳定性,高可用
- 性能、并发
- 安全性
- 扩展性
常用网关方案
- Nginx + Lua
- Kong ( 基于 Nginx + Lua )
- Tyk
- Spring Cloud Zuul
Zuul 的特点
- 路由 + 过滤器
- 核心是一系列的过滤器
Zuul 的四种过滤器 API
- 前置(Pre)
- 路由(Route)
- 后置(Post)
- 错误(Error)
11.2 用 Zuul 实现简单的路由转发
新建项目 api-gateway ,勾选 Cloud Config -> Config Client,CloudDiscovery -> Eureka Discovery,Cloud Routing -> Zuul 三个选项,点下一步完成创建
修改 application.properties 文件为 bootstrap.yml 并做如下配置
spring:
  application:
    name: api-gateway

  cloud:
    config:
      discovery:
        enabled: true
        service-id: config
      profile: dev

eureka:
  client:
    service-url:
      defaultZone: http://localhost:8761/eureka/
复制代码
入口类添加 @EnableZuulProxy 注解
@SpringBootApplication
@EnableZuulProxy
public class ApiGatewayApplication {

    public static void main(String[] args) {
        SpringApplication.run(ApiGatewayApplication.class, args);
    }
}
复制代码
在端口 9000 启动项目,就可以通过网关访问其他项目的 api 啦
如要访问 product 项目的 product/list 接口,直接在浏览器输入 http://localhost:9000/product/product/list 即可。
访问格式是 http://localhost:9000/应用id/api地址
11.3 自定义路由
bootstrap.yml 添加
zuul:
  routes:
    myProduct:  #自己定义的名字
      path: /myProduct/**
      serviceId: product
复制代码
即可通过 http://localhost:9000/myProduct/product/list 访问上面的接口
简洁写法
zuul:
  routes:
    product: /myProduct/**
复制代码
11.4 排除某些路由
排除掉 /product/list ,使它不能被访问
zuul:
  routes:
  # 简介写法
    product: /myProduct/**
  # 排除某些路由
  ignored-patterns:
    - /**/product/list
复制代码
11.5 Cookie 和动态路由
读取Cookie
默认会过滤掉 cookie,如果想拿到cookie,设置 sensitiveHeaders: 为空即可
zuul:
  routes:
    myProduct:
      path: /myProduct/**
      serviceId: product
      sensitiveHeaders:
复制代码
全局设置敏感头
zuul:
  # 全局设置敏感头
  sensitive-headers:
复制代码
动态配置路由
在 Git 上新建 api-gateway-dev.yml 将 zuul 的配置移到 git 上
新建配置类或直接在入口类上写前缀方式取配置
@SpringBootApplication
@EnableZuulProxy
public class ApiGatewayApplication {

    public static void main(String[] args) {
        SpringApplication.run(ApiGatewayApplication.class, args);
    }

    @ConfigurationProperties("zuul")
    @RefreshScope
    public ZuulProperties ZuulProperties(){
        return new ZuulProperties();
    }
}
复制代码
11.6 Pre 和 Post 过滤器
用 Pre 过滤器实现 token 校验
下面用 Zuul 的 pre 过滤器实现请求的 token 校验
新建 TokenFilter
import com.netflix.zuul.ZuulFilter;
import com.netflix.zuul.context.RequestContext;
import com.netflix.zuul.exception.ZuulException;
import org.springframework.http.HttpStatus;
import org.springframework.stereotype.Component;
import org.springframework.util.StringUtils;

import javax.servlet.http.HttpServletRequest;

import static org.springframework.cloud.netflix.zuul.filters.support.FilterConstants.PRE_DECORATION_FILTER_ORDER;
import static org.springframework.cloud.netflix.zuul.filters.support.FilterConstants.PRE_TYPE;

@Component
public class TokenFilter extends ZuulFilter {

    @Override
    public String filterType() {

        return PRE_TYPE;
    }

    @Override
    public int filterOrder() {
        return PRE_DECORATION_FILTER_ORDER - 1;
    }

    @Override
    public boolean shouldFilter() {
        return true;
    }

    @Override
    public Object run() throws ZuulException {
        RequestContext requestContext = RequestContext.getCurrentContext();
        HttpServletRequest request = requestContext.getRequest();
        //这里从url里获取,也可以从
        String token = request.getParameter("token");
        if (StringUtils.isEmpty(token)){
            requestContext.setSendZuulResponse(false);
            requestContext.setResponseStatusCode(HttpStatus.UNAUTHORIZED.value());
        }
        return null;
    }
}
复制代码
没有携带 token 的请求将会报 401 错误。
用 Post 过滤器在返回头里加内容
新建 AddResponseFilter
import com.netflix.zuul.ZuulFilter;
import com.netflix.zuul.context.RequestContext;
import com.netflix.zuul.exception.ZuulException;
import org.springframework.cloud.netflix.zuul.filters.support.FilterConstants;
import org.springframework.stereotype.Component;

import javax.servlet.http.HttpServletResponse;
import java.util.UUID;

@Component
public class AddResponseFilter extends ZuulFilter {

    @Override
    public String filterType() {
        return FilterConstants.POST_TYPE;
    }

    @Override
    public int filterOrder() {
        return FilterConstants.SEND_RESPONSE_FILTER_ORDER - 1;
    }

    @Override
    public boolean shouldFilter() {
        return true;
    }

    @Override
    public Object run() throws ZuulException {
        RequestContext requestContext = RequestContext.getCurrentContext();
        HttpServletResponse response = requestContext.getResponse();
        response.addHeader("X-Foo", UUID.randomUUID().toString());
        return null;
    }
}
复制代码
在返回头里加了 X-Foo ,重启项目请求接口发现值被成功添加了进去
11.7 Zuul 限流
import com.google.common.util.concurrent.RateLimiter;
import com.netflix.zuul.ZuulFilter;
import com.netflix.zuul.exception.ZuulException;
import com.solo.apigateway.exception.RateLimitException;

import static org.springframework.cloud.netflix.zuul.filters.support.FilterConstants.PRE_TYPE;
import static org.springframework.cloud.netflix.zuul.filters.support.FilterConstants.SERVLET_DETECTION_FILTER_ORDER;

/**
 * 限流拦截器. 令牌桶, 用 google 的 guava 实现
 */
public class RateLimitFilter extends ZuulFilter {

    public static final RateLimiter RATE_LIMITER = RateLimiter.create(100);

    @Override
    public String filterType() {
        return PRE_TYPE;
    }

    @Override
    public int filterOrder() {
        return SERVLET_DETECTION_FILTER_ORDER - 1;
    }

    @Override
    public boolean shouldFilter() {
        return true;
    }

    @Override
    public Object run() throws ZuulException {
        if (RATE_LIMITER.tryAcquire()){
            throw new RateLimitException();
        }
        return null;
    }
}
复制代码
十二、Zuul 鉴权和添加用户服务
待完善
十三、Zuul 跨域
跨域问题的解决方法有很多种,可以在单个接口上加注解,也可以在 Zuul 网关上统一处理
13.1 在接口上添加注解实现跨域
在接口上添加 @CrossOrigin 注解即可使这个接口实现跨域
13.2 Zuul 解决跨域
import org.springframework.context.annotation.Bean;
import org.springframework.context.annotation.Configuration;
import org.springframework.web.cors.CorsConfiguration;
import org.springframework.web.cors.UrlBasedCorsConfigurationSource;
import org.springframework.web.filter.CorsFilter;

import java.util.Arrays;

/**
 * 跨域配置
 */
@Configuration
public class CorsConfig {

    @Bean
    public CorsFilter corsFilter() {
        final UrlBasedCorsConfigurationSource source = new UrlBasedCorsConfigurationSource();
        final CorsConfiguration config = new CorsConfiguration();
        config.setAllowCredentials(true); //是否支持 cookie 跨域
        config.setAllowedHeaders(Arrays.asList("*"));
        config.setAllowedOrigins(Arrays.asList("*"));
        config.setAllowedMethods(Arrays.asList("*"));
        config.setMaxAge(300l); //缓存时间。在这个时间段内,相同的跨域请求将不再检查

        source.registerCorsConfiguration("/**", config);
        return new CorsFilter(source);
    }
}
复制代码
随着开源项目的进行,后期会写多篇文章结合项目实战详细介绍这些技术,欢迎关注~
项目地址: github.com/cachecats/c…
正文到此结束
- 本文标签: REST rabbitmq cat client 配置中心 IDE 时间 queue 测试 并发 XML Master https final Spring cloud 配置 Word spring Proxy RESTful DOM bean pom Eureka springboot 进程 build Config Server redis 代码 message 编译 stream 消息队列 MQ git 开发 springcloud 安装 删除 云 注册中心 管理 App constant maven list 高可用 grep dubbo zuul 数据 下载 Nginx 微服务 GitHub Docker IO ip 解决方法 token map http amqp 开源项目 CTO Service db value id tar 开源 Netflix 调试 文章 web 限流 Google json cache servlet 参数 Lua 安全 src bus Bootstrap TCP scala 端口 tag key 服务端 js 总结 Feign UI ACE java 缓存 API 实例 ORM
- 版权声明: 本文为互联网转载文章,出处已在文章中说明(部分除外)。如果侵权,请联系本站长删除,谢谢。
- 本文海报: 生成海报一 生成海报二
热门推荐


相关文章

近期评论
-
出现OpenClaw "device signature expired"。the Gateway rejects if Math.abs(Date.now() - signedAt) > 10 * 60 * 1000 (10 minutes)
-
-
想购买您这个站,我的联系方式QQ741756694微信同步 能卖联系
-
-
-
博主的博客用的什么技术栈,内容都是干货,赞
-
-
https://www.liuhaihua.cn/archives/40657.html 这篇博客中的图片打不开了
-
不会英语啊。
-
Loading...
![[HBLOG]公众号](https://www.liuhaihua.cn/img/qrcode_gzh.jpg)

