HashMap 源码分析
HashMap 应该是开发中最常用的数据结构之一了,理解其原理能让我们在合适的时机用正确的方式使用它。
目录
一、结构
- 内部类及成员变量
- 构造方法
- 图解
二、调用原理
- put
- get
- remove
- 迭代
三、总结
一、结构
1. 内部类及成员变量
Node 内部类:单链表数据结构,是理解 HashMap 结构的关键,内部存储:hash(对 key 的 hashCode值的高低位异或,后面有解释)、key(传进来的键)、value(传进来的值)、next(指向下一个 Node 节点)。
TreeNode 内部类:红黑树数据结构,这里对红黑树做一个简单的解释,它是一种平衡二叉搜索树,二叉搜索树即是每个节点的左子节点的值小于父节点的值,右子节点的值大于父节点的值,平衡的意义在于二叉树插入的数据如果一直是最小或最大的值,那么其实他会退化成链表,因此需要插入的时候做一些调整,尽量能达到左右子树的平衡。说了这么多,为什么要转换成红黑树?因为完全二叉树的查找效率是 O(logn), 比链表的查找效率 O(n) 快太多了,所以一旦碰撞变多,散列表的单链表查找效率就会变慢。红黑树非常复杂,若是对其有兴趣可以专门去研究下,不建议在看 HashMap 的时候去理解它。。本文讲解会对这块内容跳过。
table:散列表,用 Node<K,V>[] 声明,表示一个数组,我们把每个条目称作 bucket 桶,把桶内单链表 node 的每个元素称之为节点。
size:所有键值对的数量,即节点的个数。
modCount:散列表内修改次数,用来判断 HashMap 是否被多线程修改中,如果是则要抛出异常。
threshold:阈值 = capacity(容量) * loadFactor(装载因子),当数组中元素数量超过这个值说明该扩容了,初始容量默认是 16,要根据自己的业务场景设置一个适合的容量大小,太大会造成内存消耗以及迭代耗时,太小会造成多次扩容。
loadFactor:装载因子,由它决定阈值,默认是0.75。loadFactor 也要适合自己业务场景来自定义,一般情况用默认的没问题。
2. 构造方法
public HashMap(int initialCapacity, float loadFactor) {
    if (initialCapacity < 0)
        throw new IllegalArgumentException("Illegal initial capacity: " +
                                           initialCapacity);
    if (initialCapacity > MAXIMUM_CAPACITY)
        initialCapacity = MAXIMUM_CAPACITY;
    if (loadFactor <= 0 || Float.isNaN(loadFactor))
        throw new IllegalArgumentException("Illegal load factor: " +
                                           loadFactor);
    this.loadFactor = loadFactor;
    this.threshold = tableSizeFor(initialCapacity);
}
复制代码
如果不指定此构造方法的两个参数,那么就是使用默认的 capacity = 16 和 loadFactor = 0.75, 这段代码判断了初始容量的合法性以及保存装载因子,tableSizeFor 这个方法主要是调整下初始容量,HashMap 强制容量是2的幂次方,如果给了 13 的初始容量,那么这个方法就会调整为 16。
3. 图解
下图能比较清晰的看到 HashMap 的结构:
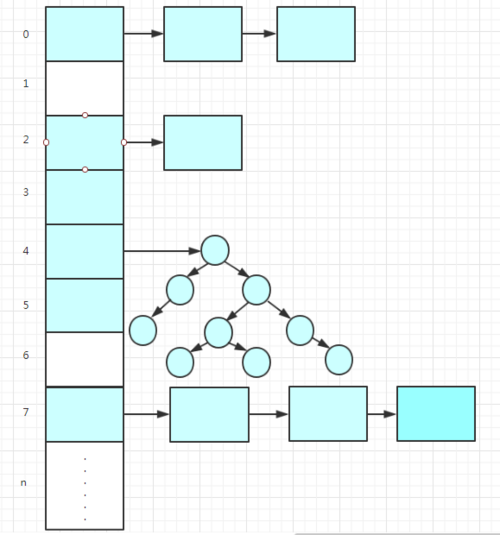
蓝色矩阵代表 Node 单链表, 蓝色圆形代表 TreeNode 红黑树。正常情况下都会是单链表,当单链表节点的数量超过 8 个的时候会转换成红黑树的结构(这个只是随便画的。。),红黑树虽说定义是平衡二叉树,但他不一定是完全二叉树,只是相对来说保持平衡。
二、调用原理
1. put
public V put(K key, V value) {
    return putVal(hash(key), key, value, false, true);
}
复制代码
直接调用了 putVal 去做真正的存储工作,在此之前先看下 hash(key) 方法。
static final int hash(Object key) {
    int h;
    return (key == null) ? 0 : (h = key.hashCode()) ^ (h >>> 16);
}
复制代码
这个 hash 函数可以说是极其精美了,获取了 key 的 hashCode 将其高16位与低16位异或得到最终的 hash 值。对高低位异或的原因是,key 的散列值最终需要对数组长度取模,这个时候如果很多 key 的散列值低位都相同咋办?因此和高位异或就能让高位也参与计算,会降低碰撞的概率。而这么做并不是说让碰撞的概率很小,只是这样能大大降低概率而且计算还非常简洁,不会耗费性能。如果碰撞多了,那就用红黑树来解决。
final V putVal(int hash, K key, V value, boolean onlyIfAbsent,
               boolean evict) {
    Node<K,V>[] tab; Node<K,V> p; int n, i;
    // 如果散列表是空的,表示这是第一次调用 put 那就创建一个散列表, resize 方法后面解释
    if ((tab = table) == null || (n = tab.length) == 0)
        n = (tab = resize()).length;
    // 对 hash 值取模,找到散列表中对应的索引,如果此索引下没有元素,
    // 那么新建一个 Node 节点将hash、key、value保存进去
    if ((p = tab[i = (n - 1) & hash]) == null)
        tab[i] = newNode(hash, key, value, null);
    else {
        Node<K,V> e; K k;
        // 每个数组对应索引的元素都是一个单链表或红黑树,
        // 根据 hash 值和 key 判断 put 进来的 key 是否已存在,若存在则替换 value。
        if (p.hash == hash &&
            ((k = p.key) == key || (key != null && key.equals(k))))
            e = p;
        // 红黑树结构的插入
        else if (p instanceof TreeNode)
            e = ((TreeNode<K,V>)p).putTreeVal(this, tab, hash, key, value);
        // 数组的 Node 节点是存在的,并且单链表的头结点并不是要插入的节点,
        // 那么遍历这个单链表,如果找到相同点则替换,没找到就插入到尾部
        else {
            for (int binCount = 0; ; ++binCount) {
                if ((e = p.next) == null) {
                    p.next = newNode(hash, key, value, null);
                    // 如果单链表的节点数达到 8 个,就将单链表转换成红黑树
                    if (binCount >= TREEIFY_THRESHOLD - 1) // -1 for 1st
                        treeifyBin(tab, hash);
                    break;
                }
                if (e.hash == hash &&
                    ((k = e.key) == key || (key != null && key.equals(k))))
                    break;
                p = e;
            }
        }
        // 找到相同 key 的节点,那么就替换原来的值,
        // onlyIfAbsent可以控制不替换原来的值
        if (e != null) { // existing mapping for key
            V oldValue = e.value;
            if (!onlyIfAbsent || oldValue == null)
                e.value = value;
            // 空实现,只有在LinkedHashMap会用到,因此不用管
            afterNodeAccess(e);
            return oldValue;
        }
    }
    ++modCount;
    // 若达到阈值,则扩容
    if (++size > threshold)
        resize();
    afterNodeInsertion(evict);
    return null;
}
复制代码
代码中的注释已经对每个关键的部分做了解释。 put 可以简单分为三个阶段:
- 首次 put 创建散列表。
- 插入的节点若存在则替换原有节点的值,否则插到单链表的尾部或红黑树中。
- 若超出阈值则扩容。
final Node<K,V>[] resize() {
    Node<K,V>[] oldTab = table;
    int oldCap = (oldTab == null) ? 0 : oldTab.length;
    int oldThr = threshold;
    int newCap, newThr = 0;
    // 之前散列表已经被创建
    if (oldCap > 0) {
        // 大于最大容量,就永远不扩容了
        if (oldCap >= MAXIMUM_CAPACITY) {
            threshold = Integer.MAX_VALUE;
            return oldTab;
        }
        // 新容量是老容量的2倍
        else if ((newCap = oldCap << 1) < MAXIMUM_CAPACITY &&
                 oldCap >= DEFAULT_INITIAL_CAPACITY)
            newThr = oldThr << 1; // double threshold
    }
    // 表示散列表还未被创建,新容量就等于用户设置的初始容量
    else if (oldThr > 0) // initial capacity was placed in threshold
        newCap = oldThr;
    // 散列表未被创建,用户又没有设置初始容量,那就用默认的
    else {               // zero initial threshold signifies using defaults
        newCap = DEFAULT_INITIAL_CAPACITY;
        newThr = (int)(DEFAULT_LOAD_FACTOR * DEFAULT_INITIAL_CAPACITY);
    }
    if (newThr == 0) {
        float ft = (float)newCap * loadFactor;
        newThr = (newCap < MAXIMUM_CAPACITY && ft < (float)MAXIMUM_CAPACITY ?
                  (int)ft : Integer.MAX_VALUE);
    }
    threshold = newThr;
    @SuppressWarnings({"rawtypes","unchecked"})
        Node<K,V>[] newTab = (Node<K,V>[])new Node[newCap];
    table = newTab;
    if (oldTab != null) {
        for (int j = 0; j < oldCap; ++j) {
            Node<K,V> e;
            if ((e = oldTab[j]) != null) {
                oldTab[j] = null;
                // 单链表节点只有一个,那就直接重新计算 bucket 索引 index 并移交到新散列表
                if (e.next == null)
                    newTab[e.hash & (newCap - 1)] = e;
                // 红黑树移到新散列表,暂不深究
                else if (e instanceof TreeNode)
                    ((TreeNode<K,V>)e).split(this, newTab, j, oldCap);
                else { // preserve order
                    Node<K,V> loHead = null, loTail = null;
                    Node<K,V> hiHead = null, hiTail = null;
                    Node<K,V> next;
                    do {
                        next = e.next;
                        // 单链表loHead从老散列表移到新散列表中 index 不变
                        if ((e.hash & oldCap) == 0) {
                            if (loTail == null)
                                loHead = e;
                            else
                                loTail.next = e;
                            loTail = e;
                        }
                        // 单链表hiHead从老散列表移到新散列表中 index + oldCap
                        else {
                            if (hiTail == null)
                                hiHead = e;
                            else
                                hiTail.next = e;
                            hiTail = e;
                        }
                    } while ((e = next) != null);
                    if (loTail != null) {
                        loTail.next = null;
                        newTab[j] = loHead;
                    }
                    if (hiTail != null) {
                        hiTail.next = null;
                        // 即使索引变化也是有规律的
                        newTab[j + oldCap] = hiHead;
                    }
                }
            }
        }
    }
    return newTab;
}
复制代码
resize 扩容方法主要做两件事:
- 新容量扩充为老容量的2倍,阈值也增大两倍。若是首次创建则新容量为初始容量。然后通过新容量创建新散列表。
- 将老散列表的元素移到新散列表中。这里有个规律:由于容量是2倍增长,因此元素的 hash 值取模要么结果不变,要么 索引 = 原索引 + 老容量大小。
以下是扩容图解:
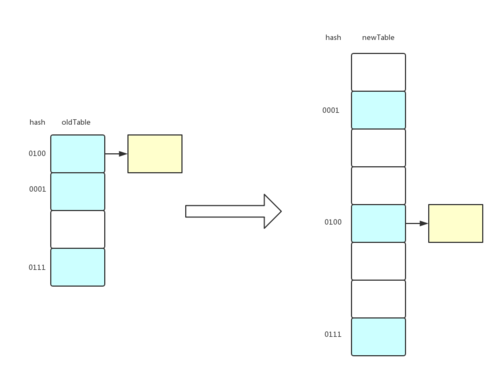
蓝色矩阵表示早已添加到散列表的节点,黄色矩阵表示刚插入的一个节点。
假定 HashMap 的初始容量 capacity 是 4, loadFactor 是 0.75 , 此时插入一个节点,那么容量就超出阈值(4 * 0.75 = 3),于是就发生扩容了。图上的 hash 那一列表示 key 的 hashCode 后四位(hashCode本来是32位,为了节省空间只写后4位),可以看到根据 hash & (capacity - 1), 就可以知道各个节点索引位置,如 0001 & 0011 = 0001 即 index 为 1 这个位置。因此当容量增加两倍后 (capacity - 1) = 0111, 可以发现和老容量的差别就在于右数第三位从 0 变成了1, 所以 key 的 hashCode & (capacity - 1) 其他位都是一样的,只是右数第三位要么是 0 要么是 1, 如果 hashCode 的右数第三位是 1 代表索引在原来的基础上增加原来容量的大小即 + 4, 如果是 0 那么还是在原来的索引上,直接放到新散列表的对应位置,这个操作只会遍历数组长度,而不会对单链表的每个节点重新计算索引,节省了时间,对性能有提高。
2. get
final Node<K,V> getNode(int hash, Object key) {
    Node<K,V>[] tab; Node<K,V> first, e; int n; K k;
    // 散列表不为空并且通过 hash 找到对应 bucket 的位置
    if ((tab = table) != null && (n = tab.length) > 0 &&
        (first = tab[(n - 1) & hash]) != null) {
        // 单链表头节点就是要找的目标节点
        if (first.hash == hash && // always check first node
            ((k = first.key) == key || (key != null && key.equals(k))))
            return first;
        if ((e = first.next) != null) {
            // 已经转换成红黑树了
            if (first instanceof TreeNode)
                return ((TreeNode<K,V>)first).getTreeNode(hash, key);
            // 在链表内遍历查找
            do {
                if (e.hash == hash &&
                    ((k = e.key) == key || (key != null && key.equals(k))))
                    return e;
            } while ((e = e.next) != null);
        }
    }
    return null;
}
复制代码
同样代码做了清晰的注释。调用 get 方法后会计算出 key 的 hash 值并调用 getNode 方法,getNode 里面做的事情也非常清楚,找到对应 bucket 下是否有节点,如果有则从单链表内遍历查找或在红黑树内查找。
3. remove
final Node<K,V> removeNode(int hash, Object key, Object value,
                           boolean matchValue, boolean movable) {
    Node<K,V>[] tab; Node<K,V> p; int n, index;
    if ((tab = table) != null && (n = tab.length) > 0 &&
        (p = tab[index = (n - 1) & hash]) != null) {
        Node<K,V> node = null, e; K k; V v;
        // 以下部分与 get 查找基本一样,找到要删除的节点
        if (p.hash == hash &&
            ((k = p.key) == key || (key != null && key.equals(k))))
            node = p;
        else if ((e = p.next) != null) {
            if (p instanceof TreeNode)
                node = ((TreeNode<K,V>)p).getTreeNode(hash, key);
            else {
                do {
                    if (e.hash == hash &&
                        ((k = e.key) == key ||
                         (key != null && key.equals(k)))) {
                        node = e;
                        break;
                    }
                    p = e;
                } while ((e = e.next) != null);
            }
        }
        // 找到 key 对应的节点,还要看看 value 的情况。
        if (node != null && (!matchValue || (v = node.value) == value ||
                             (value != null && value.equals(v)))) {
            // 红黑树删除
            if (node instanceof TreeNode)
                ((TreeNode<K,V>)node).removeTreeNode(this, tab, movable);
            // 要删除的节点处在单链表的头节点
            else if (node == p)
                tab[index] = node.next;
            // 前驱节点指向目标节点的后一个节点,这个操作表示移除了 node 节点
            else
                p.next = node.next;
            ++modCount;
            --size;
            afterNodeRemoval(node);
            return node;
        }
    }
    return null;
}
复制代码
remove 做了两件事:
- 前半部分代码和 get 方法很类似,其实本质上就是找到想要移除的节点,p 节点是 node 节点的前驱节点。
- 根据找到的目标节点 node,如果用户使用 remove 时传入了 key 和 value,那么还需要匹配 value 才行,匹配成功后用 p 节点指向 node 节点的后一个节点即可,这样 node 节点就会被删除。红黑树删除源码不深究。
4. 迭代
Map<String, String> map = new HashMap<>();

// foreach 遍历 entries
for(Map.Entry<String,String> entry: map.entrySet()) {
    System.out.println("key = " + entry.getKey() + ", value = " + entry.getValue());
}

// foreach 遍历 keys
for(String key: map.keySet()) {
    System.out.println("key = " + key);
}

// foreach 遍历 values
for(String value: map.values()) {
    System.out.println("value = " + value);
}

// iterator 遍历 entries
Iterator<Map.Entry<String,String>> iterator = map.entrySet().iterator();
while(iterator.hasNext()) {
    Map.Entry<String,String> entry = iterator.next();
    System.out.println("key = " + entry.getKey() + ", value = " + entry.getValue());
}

// iterator 遍历 keys
Iterator<String> iteratorKey = map.keySet().iterator();
while(iteratorKey.hasNext()) {
    String key= iteratorKey.next();
    System.out.println("key = " + key);
}

// iterator 遍历 values
Iterator<String> iteratorValue = map.values().iterator();
while(iteratorValue.hasNext()) {
    String value= iteratorValue.next();
    System.out.println("value = " + value);
}
复制代码
HashMap 提供了多种迭代方式,这里只分析一种迭代方式。
public Set<Map.Entry<K,V>> entrySet() {
    Set<Map.Entry<K,V>> es;
    return (es = entrySet) == null ? (entrySet = new EntrySet()) : es;
}
复制代码
直接创建一个 EntrySet 对象,看看是啥东西:
final class EntrySet extends AbstractSet<Map.Entry<K,V>> {
    public final Iterator<Map.Entry<K,V>> iterator() {
        return new EntryIterator();
    }

    public final void forEach(Consumer<? super Map.Entry<K,V>> action) {
        Node<K,V>[] tab;
        if (action == null)
            throw new NullPointerException();
        if (size > 0 && (tab = table) != null) {
            int mc = modCount;
            // Android-changed: Detect changes to modCount early.
            for (int i = 0; (i < tab.length && modCount == mc); ++i) {
                for (Node<K,V> e = tab[i]; e != null; e = e.next)
                    action.accept(e);
            }
            if (modCount != mc)
                throw new ConcurrentModificationException();
        }
    }
}
复制代码
关键就两个方法,一个是 foreach 迭代,从示例上看是非常简洁的,但性能貌似比 iterator 慢一些。HashMap 是不同步的,迭代的过程中是不允许多线程操作,这个时候 modCount 变量就排上用场了,如果发现 modCount 在迭代完后和迭代前不相等就会抛出 ConcurrentModificationException 异常。
iterator 返回一个 EntryIterator 对象:
final class EntryIterator extends HashIterator
    implements Iterator<Map.Entry<K,V>> {
    public final Map.Entry<K,V> next() { return nextNode(); }
}

abstract class HashIterator {
    Node<K,V> next;        // next entry to return
    Node<K,V> current;     // current entry
    int expectedModCount;  // for fast-fail
    int index;             // current slot

    HashIterator() {
        expectedModCount = modCount;
        Node<K,V>[] t = table;
        current = next = null;
        index = 0;
        if (t != null && size > 0) { // advance to first entry
            do {} while (index < t.length && (next = t[index++]) == null);
        }
    }

    public final boolean hasNext() {
        return next != null;
    }

    final Node<K,V> nextNode() {
        Node<K,V>[] t;
        Node<K,V> e = next;
        if (modCount != expectedModCount)
            throw new ConcurrentModificationException();
        if (e == null)
            throw new NoSuchElementException();
        if ((next = (current = e).next) == null && (t = table) != null) {
            do {} while (index < t.length && (next = t[index++]) == null);
        }
        return e;
    }
}
复制代码
调用 next 方法实际上是调用了这里的 nextNode 方法,如果下一个条目不为 null, 那么直接返回对应的节点即可,如果下个节点为空,则需要循环遍历直到找到不为 null 的节点附给 next, 保证下次返回节点的正确性。
三、总结
用问答的形式来总结下本文的内容以及 HashMap 常见的问题。
- 装载因子的作用是什么? loadFactor 用于计算 HashMap 的阈值,当散列表内的节点个数超过阈值时,散列表就会进行扩容。
- 碰撞过多怎么办/扩容的原理?当节点数超过阈值,内部会新建一个比原来散列表大小大两倍的新散列表,然后将老散列表内的节点重新散列到新散列表中。
- 当散列表一个 bucket 桶上的单链表过长导致查询效率过低怎么办?jdk1.8 加入了红黑树解决此问题,当单链表长度超过 8 的时候会转换成红黑树,红黑树的查询效率是O(logn),但由于红黑树结构更消耗内存,因此单链表超过 8 个节点才会转成红黑树。
- HashMap 和 HashTable 的区别?HashMap 相对 HashTable 的区别就在于不同步以及可以用null键。但为什么一般不用HashTable呢,因为HashTable用的是 synchronized 关键字,特别耗时,所以一般同步也就会用 concurrentHashMap。而且 HashMap 真的想同步的话,也可以用 Collections.synchronizedMap(new HashMap) 。
- 存储键值对的流程是怎样的?调用 put 方法,如果散列表为空则创建,首先根据 key 计算得出 hash 值,又根据 hash 得出对应的桶的位置,若这个桶上还没有节点,那么直接添加到桶中,如果有节点则遍历单链表或红黑树,发现有相同 hash 值和相同 key 的节点,直接替换它的 value,如果没有找到相同节点就加入到单链表的尾部。最后如果节点数量超过阈值,那么扩容。
- hash 函数为什么高低位异或?数组的长度一般来说都不大,如果直接拿 key 的 hashCode 来取模,那么都是拿二进制的低位进行与运算,会有很大几率产生碰撞,高16位和低16位异或就会让高位也参与计算,此时碰撞概率会大大减少。
- 初始容量是否有必要设置?有必要,在大概知道数据量的前提下,尽量设置对应的容量,减少扩容次数,扩容耗费性能。
- HashMap 的工作原理?HashMap 是一个键值对存储的数据结构,其内部结构是一个散列表。当执行 put 操作时,会根据 key 计算得出 hash 值,又根据 hash 得出对应的桶的位置,若这个桶上还没有节点,那么直接添加到桶中,如果有节点则遍历单链表或红黑树,发现有相同 hash 值和相同 key 的节点,直接替换它的 value,如果没有找到相同节点就加入到单链表的尾部(红黑树)。最后如果节点数量超过阈值即 loadFactor * capacity,那么扩容两倍。当执行 get 获取时,会计算出 key 的 hash 值,找到对应 bucket 桶的 index,如果该索引下没有节点则直接返回null,如果有节点则在单链表内遍历查找或在红黑树内查找。
暂时就想到这些问题了。
正文到此结束
- 本文标签: 构造方法 时间 key http HashMap map CTO final IO node equals 代码 Collections src 本质 cat CEO 开发 Action tab 索引 多线程 遍历 同步 id 线程 tk 空间 参数 ACE 源码 ConcurrentHashMap 数据 Android consumer 工作原理 synchronized 注释 value 删除 目录 HashTable UI App 总结 Collection https
- 版权声明: 本文为互联网转载文章,出处已在文章中说明(部分除外)。如果侵权,请联系本站长删除,谢谢。
- 本文海报: 生成海报一 生成海报二
热门推荐


相关文章

近期评论
-
出现OpenClaw "device signature expired"。the Gateway rejects if Math.abs(Date.now() - signedAt) > 10 * 60 * 1000 (10 minutes)
-
-
想购买您这个站,我的联系方式QQ741756694微信同步 能卖联系
-
-
-
博主的博客用的什么技术栈,内容都是干货,赞
-
-
https://www.liuhaihua.cn/archives/40657.html 这篇博客中的图片打不开了
-
不会英语啊。
-
Loading...
![[HBLOG]公众号](https://www.liuhaihua.cn/img/qrcode_gzh.jpg)

