Spring IOC容器实现机制
Spring官方关于容器启动的科普性图示:
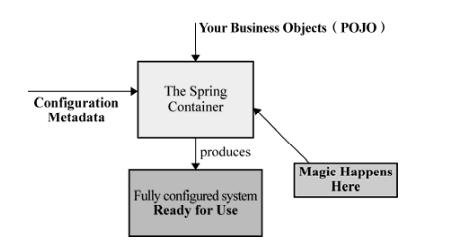
。
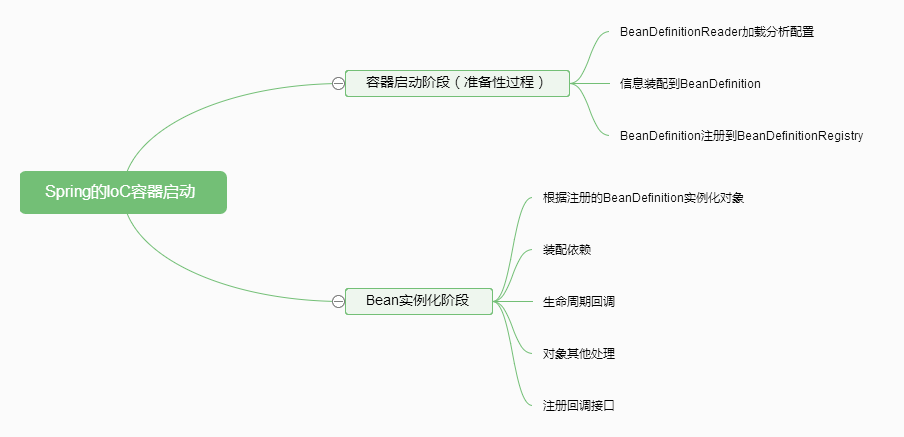
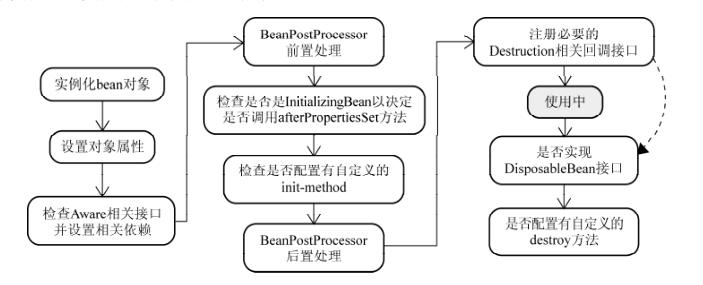
下图是容器启动的各个阶段图示:
其中提到的相关接口和类的关系如下图:
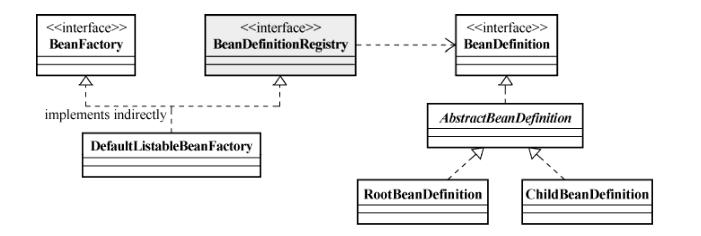
以上类图中 BeanDefinitionRegistry 依赖 BeanDefinition ,其他都是 实现 关系。
BeanFactoryPostProcessor容器扩展机制(第一阶段后)
该机制允许我们在容器实例化相应对象之前,对注册到容器的 BeanDefinition 所保存的信息做相应的修改。也就是在容 器实现的第一阶段最后加入一道工序。

BeanFactoryPostProcessor注册方式
BeanFactory 硬编码注册 BeanFactoryPostProcessor :
// 声明将被后处理的BeanFactory实例
ConfigurableListableBeanFactory beanFactory = new XmlBeanFactory(new ClassPathResource("..."));
// 声明要使用的BeanFactoryPostProcessor
PropertyPlaceholderConfigurer propertyPostProcessor = new PropertyPlaceholderConfigurer();
propertyPostProcessor.setLocation(new ClassPathResource("..."));
// 执行后处理操作
propertyPostProcessor.postProcessBeanFactory(beanFactory);
复制代码
ApplicationContext 配置文件注册 BeanFactoryPostProcessor :
<bean class="org.springframework.beans.factory.config.PropertyPlaceholderConfigurer">
        <property name="locations">
            <list>
                <value>conf/jdbc.properties</value>
                <value>conf/mail.properties</value>
            </list>
        </property>
    </bean>
复制代码
各常用实现类说明
1. PropertyPlaceholderConfigurer
将 XML配置文件 与具体参数 property 分离,在XML中使用占位符匹配 properties文件 中的具体参数,如以下形式:
//XML数据源配置
    <bean id="dataSource" class="org.apache.commons.dbcp.BasicDataSource">
        <property name="url">
            <value>${jdbc.url}</value>
        </property>
        <property name="driverClassName">
            <value>${jdbc.driver}</value>
        </property>
        <property name="username">
            <value>${jdbc.username}</value>
        </property>
        <property name="password">
            <value>${jdbc.password}</value>
        </property>
    </bean>
复制代码
//properties文件对应参数
jdbc.url=jdbc:mysql://server/MAIN?useUnicode=true&characterEncoding=ms932&failOverReadOnly=false&roundRobinLoadBalance=true
jdbc.driver=com.mysql.jdbc.Driver
jdbc.username=your username=your password jdbc.password
复制代码
PropertyPlaceholderConfigurer 还会检查Java的 System 类中的 Properties ,可以通过 setSystemPropertiesMode() 或者 setSystemPropertiesModeName() 来控制是否加载或者覆盖 System 相应 Properties 的行为。其提供三种模式:
public class PropertyPlaceholderConfigurer extends PlaceholderConfigurerSupport {
    //不使用System的Properties配置项
    public static final int SYSTEM_PROPERTIES_MODE_NEVER = 0;
    //默认模式。properties中找不到对应参数(配置项),则去System的Properties找。
    public static final int SYSTEM_PROPERTIES_MODE_FALLBACK = 1;
    //优先使用System的Properties配置项
    public static final int SYSTEM_PROPERTIES_MODE_OVERRIDE = 2;
    }
复制代码
2. PropertyOverrideConfigurer
可以通过 PropertyOverrideConfigurer 对容器中配置的任何你想处理的 bean 定义的 property 信息(不需要使用占位符)进行覆盖替换。
例如,对于上文的 XML数据源配置 ,作如下配置:
注册 PropertyOverrideConfigurer :
<bean class="org.springframework.beans.factory.config.PropertyOverrideConfigurer">
        <property name="location" value="pool-adjustment.properties"/>
    </bean>
复制代码
pool-adjustment.properties 内容:
#键参数值对格式为:beanName.propertyName=value
dataSource.minEvictableIdleTimeMillis=1000
dataSource.maxActive=50
复制代码
即可替换 dataSource 的对应参数。
未使用PropertyOverrideConfigurer进行设置的参数依旧使用bean定义中的参数;多个参数对同一个property值进行设置时,以最后一个为准
3. CustomEditorConfigurer
通过XML定义的 bean 以及其 property 都需要由String转换成对应的各式类型对象,这个工作即是由 JavaBean 的 PropertyEditor 来完成(Spring也提供了自身实现的一些 PropertyEditor ,大多位于 org.springframework.beans.propertyeditors )。
部分 PropertyEditor (容器默认加载):

- StringArrayPropertyEditor:将符合 CSV 格式的字符串转换成
String[]数组的形式,默认是以逗号(,)分隔的字符串。 - ClassEditor:根据
String类型的class名称,直接将其转换成相应的Class对象。 - FileEditor:对应
java.io.File类型的PropertyEditor,负责资源定位。 - LocaleEditor:针对
java.util.Locale类型的PropertyEditor。 - PatternEditor:针对Java SE 1.4之后才引入的
java.util.regex.Pattern的PropertyEditor。
自定义 PropertyEditor :
两种方式:
- 直接实现
java.beans.PropertyEditor - 继承
java.beans.PropertyEditorSupport,只需要实现setAsText(String)方法。
如下为定制日期格式的 PropertyEditorSupport 实现:
public class DatePropertyEditor extends PropertyEditorSupport {
    private String datePattern;

    @Override
    public void setAsText(String text) throws IllegalArgumentException {
        DateTimeFormatter dateTimeFormatter = DateTimeFormat.forPattern(getDatePattern());
        Date dateValue = dateTimeFormatter.parseDateTime(text).toDate();
        setValue(dateValue);
    }

    public String getDatePattern() {
        return datePattern;
    }

    public void setDatePattern(String datePattern) {
        this.datePattern = datePattern;
    }

    public DatePropertyEditor(String datePattern){
        this.datePattern = datePattern;
    }
}
复制代码
通过 CustomEditorConfigurer 注册自定义的 PropertyEditor
- 容器为
BeanFactory时,硬编码注册:
XmlBeanFactory beanFactory = new XmlBeanFactory(new ClassPathResource("……"));
CustomEditorConfigurer ceConfigurer = new CustomEditorConfigurer();

Map customerEditors = new HashMap();
customerEditors.put(java.util.Date.class, new DatePropertyEditor("yyyy/MM/dd"));
ceConfigurer.setCustomEditors(customerEditors);

ceConfigurer.postProcessBeanFactory(beanFactory);
复制代码
- 容器为
ApplicationContext时,作为bean注册:
<bean class="org.springframework.beans.factory.config.CustomEditorConfigurer">
        //Spring2.0前使用customEditors
        <property name="customEditors">
            <map>
                <entry key="java.util.Date">
                    <ref bean="datePropertyEditor"/>
                </entry>
            </map>
        </property>
    </bean>

    <bean id="datePropertyEditor" class="...DatePropertyEditor">
        <property name="datePattern">
            <value>yyyy/MM/dd</value>
        </property>
    </bean>
复制代码
Spring2.0后提倡使用 propertyEditorRegistrars 属性来指定自定义的 PropertyEditor :
需额外实现 PropertyEditorRegistrar :
public class DatePropertyEditorRegistrar implements PropertyEditorRegistrar {
    private PropertyEditor propertyEditor;

    public void registerCustomEditors(PropertyEditorRegistry peRegistry) {
        peRegistry.registerCustomEditor(java.util.Date.class, getPropertyEditor());
    }

    public PropertyEditor getPropertyEditor() {
        return propertyEditor;
    }

    public void setPropertyEditor(PropertyEditor propertyEditor) {
        this.propertyEditor = propertyEditor;
    }
}
复制代码
此时的 bean 注册:
<bean class="org.springframework.beans.factory.config.CustomEditorConfigurer">
        <property name="propertyEditorRegistrars">
            //多个PropertyEditorRegistrar可以在list里一一指定
            <list>
                <ref bean="datePropertyEditorRegistrar"/>
            </list>
        </property>
    </bean>
    //Spring2.0后提倡使用DatePropertyEditor
    <bean id="datePropertyEditorRegistrar" class="...DatePropertyEditorRegistrar">
        <property name="propertyEditor">
            <ref bean="datePropertyEditor"/>
        </property>
    </bean>
    <bean id="datePropertyEditor" class="...DatePropertyEditor">
        <property name="datePattern">
            <value>yyyy/MM/dd</value>
        </property>
    </bean>
复制代码
BeanFactoryPostProcessor工作机制类图:
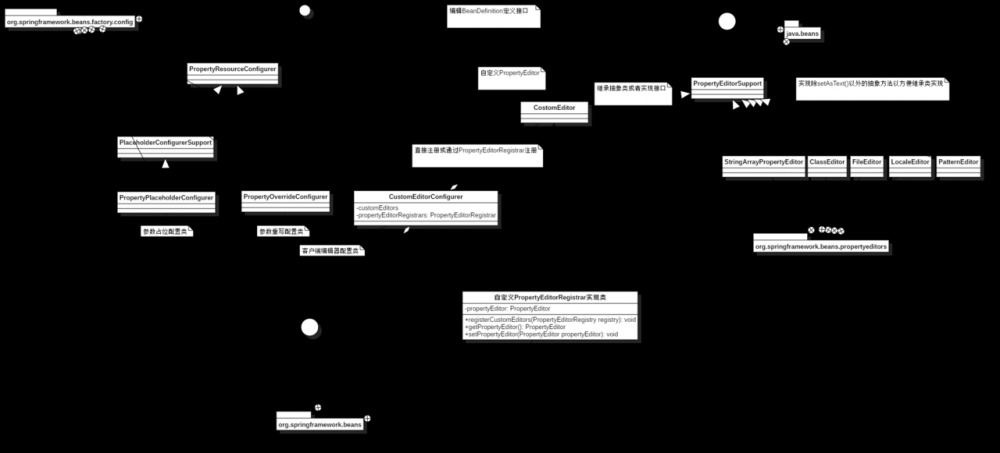
BeanFactoryPostProcessor
及其子类,右侧为`PropertyEditor及其子类,下方为自定义CostomEditor注册机制实现。
bean生命周期(第二阶段)
当请求方通过 BeanFactory 的 getBean() 方法来请求某个对象实例的时候,才有可能触发Bean实例化阶段的活动。
- 客户端对象显式调用
- 容器内部隐式调用
- 对于 BeanFactory 来说,对象实例化默认采用延迟初始化。当初始化A对象时,会隐式初始化A的依赖对象B。
- ApplicationContext 启动之后会实例化所有的bean定义。当初始化A对象时,会隐式初始化A的依赖对象B。
bean 实例化过程:
org.springframework.beans.factory.support.AbstractBeanFactory 查看 getBean() ; org.springframework.beans.factory.support.AbstractAutowireCapableBeanFactory 查看 createBean() ;
getBean() 大致逻辑:(待阅源码)
Bean的实例化与 BeanWrapper
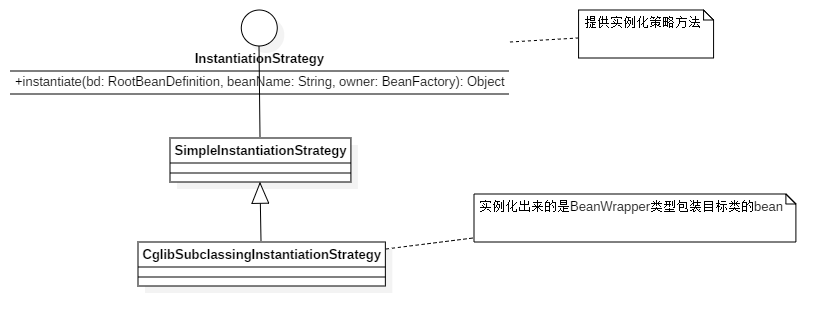
可以通过反射或者CGLIB动态字节码生成来初始化相应的bean实例或者动态生成其子类。
spring默认使用 CglibSubclassingInstantiationStrategy 生产被 BeanWrapperImpl 包装的目标类的 bean 。
InstantiationStrategy类图:
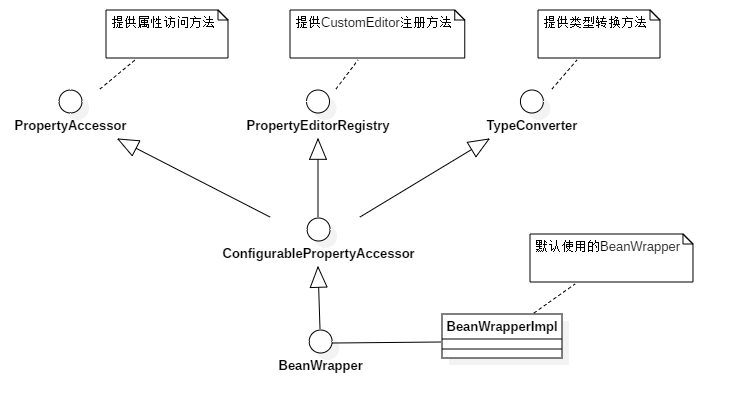
BeanWrapper和他的爸爸们:
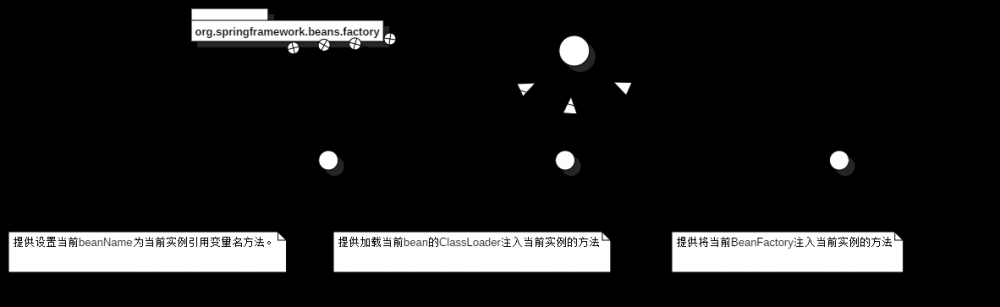
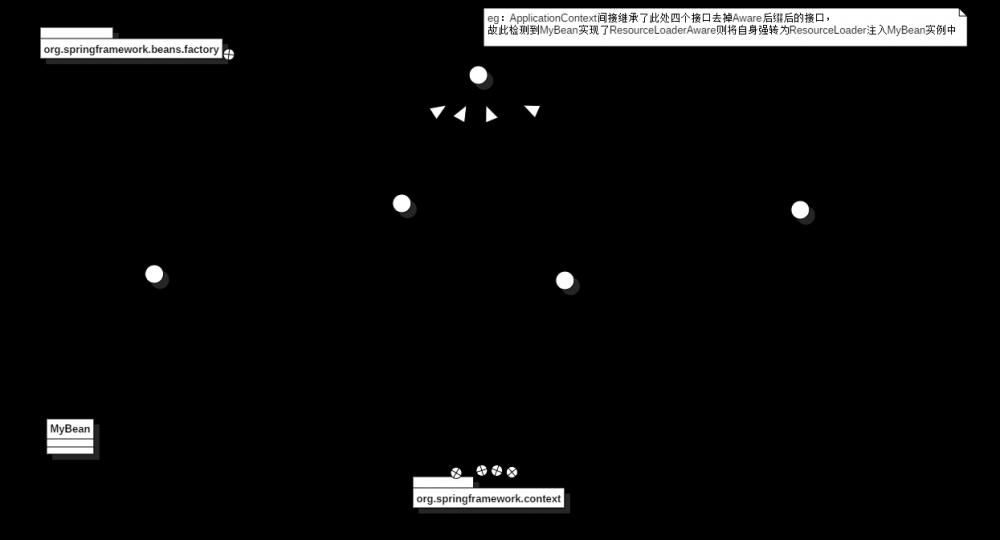
各色的 Aware 接口
当对象实例化完成并且相关属性以及依赖设置完成之后,Spring容器会检查当前对象实例是否实现了一系列的以 Aware 命名结尾的接口定义。如果是,则将这些 Aware 接口定义中规定的依赖注入给当前对象实例。
BeanFactory 对应的 Aware :
ApplicationContext 对应的
Aware
:
BeanPostProcessor
BeanPostProcessor存在于对象实例化阶段。
接口定义如下:
package org.springframework.beans.factory.config;
public interface BeanPostProcessor {

    //实例化前执行
	@Nullable
	default Object postProcessBeforeInitialization(Object bean, String beanName) throws BeansException {
		return bean;
	}
	//实例化后执行
	@Nullable
	default Object postProcessAfterInitialization(Object bean, String beanName) throws BeansException {
		return bean;
	}
}
复制代码
例如ApplicationContextAwareProcessor,则是对 ApplicationContext 对应的 Aware 进行检测执行对应操作的 BeanPostProcessor 实现类,其 postProcessBeforeInitialization 方法如下:
public Object postProcessBeforeInitialization(final Object bean, String beanName) throws BeansException {
		AccessControlContext acc = null;

        //检测此bean是否实现以下Aware中的一个或多个
		if (System.getSecurityManager() != null &&
				(bean instanceof EnvironmentAware || bean instanceof EmbeddedValueResolverAware ||
						bean instanceof ResourceLoaderAware || bean instanceof ApplicationEventPublisherAware ||
						bean instanceof MessageSourceAware || bean instanceof ApplicationContextAware)) {
			//获取当前applicationContext的AccessControlContext
			acc = this.applicationContext.getBeanFactory().getAccessControlContext();
		}

		if (acc != null) {
			AccessController.doPrivileged((PrivilegedAction<Object>) () -> {
				invokeAwareInterfaces(bean);
				return null;
			}, acc);
		}
		else {
			invokeAwareInterfaces(bean);
		}

		return bean;
	}
复制代码
自定义 BeanPostProcessor
BeanPostProcessor
BeanPostProcessor
- 对于 BeanFactory 类型的容器,采用硬编码
ConfigurableBeanFactory beanFactory = new XmlBeanFactory(new ClassPathResource(...));
beanFactory.addBeanPostProcessor(new CustomPostProcessor());
复制代码
- 对于 ApplicationContext 容器,直接XML注册
<beans>
    <bean id="customPostProcessor" class="package.name.CustomPostProcessor">
    <!--如果需要,注入必要的依赖-->
    </bean>
    ...
</beans>
复制代码
InitializingBean 和 init-method
org.springframework.beans.factory.InitializingBean 是容器内部广泛使用的一个对象生命周期标识接口,用于在 BeanPostProcessor 的前置处理执行后进一步编辑实现该接口的bean,如下:
public interface InitializingBean {

	/**
	 * Invoked by the containing {@code BeanFactory} after it has set all bean properties
	 * and satisfied {@link BeanFactoryAware}, {@code ApplicationContextAware} etc.
	 * <p>This method allows the bean instance to perform validation of its overall
	 * configuration and final initialization when all bean properties have been set.
	 * @throws Exception in the event of misconfiguration (such as failure to set an
	 * essential property) or if initialization fails for any other reason
	 */
	void afterPropertiesSet() throws Exception;

}
复制代码
实际开发中使用 <bean> 的 init-method 属性来代替上述方式。一般用于集成第三方库。
DisposableBean 与 destroy-method
与 InitializingBean 和 init-method 对应,用于执行 singleton 类型的对象销毁操作。
为该实例注册一个用于对象销毁的回调(Callback),以便在这些singleton类型的对象实例销毁之前,执行销毁逻辑。
例如Spring注册的数据库连接池:
<!--销毁方法为BasicDataSource自定义的close方法-->
    <bean id="dataSource" class="org.apache.commons.dbcp.BasicDataSource"
          destroy-method="close">
        <property name="url">
            <value>${jdbc.url}</value>
        </property>
        <property name="driverClassName">
            <value>${jdbc.driver}</value>
        </property>
        <property name="username">
            <value>${jdbc.username}</value>
        </property>
        <property name="password">
            <value>${jdbc.password}</value>
        </property>
        ...
    </bean>
复制代码
对 BeanFactory :
应在程序退出或者其他业务场景调用 ConfigurableBeanFactory 的 destroySingletons() 方法(处理所有实现 DisposableBean 接口和注册了 destroy-method 方法的类)销毁容器管理的所有singleton类型的对象实例。
/**
 * BeanFactory销毁单例实例方法调用。
 */
public class ApplicationLauncher {
    public static void main(String[] args) {
        BasicConfigurator.configure();
        BeanFactory container = new XmlBeanFactory(new ClassPathResource("..."));
        BusinessObject bean = (BusinessObject) container.getBean("...");
        bean.doSth();
        ((ConfigurableListableBeanFactory) container).destroySingletons();
        // 应用程序退出,容器关闭
    }
}
复制代码
对 ApplicationContext :
AbstractApplicationContext 为我们提供了 registerShutdownHook() 方法,该方法底层使用标准的 Runtime 类的 addShutdownHook() 方式来调用相应bean对象的销毁逻辑。
/**
 * 使用 registerShutdownHook() 方法注册并触发对象销毁逻辑回调行为
 */
public class ApplicationLauncher {
    public static void main(String[] args) {
        BasicConfigurator.configure();
        BeanFactory container = new ClassPathXmlApplicationContext("...");
        ((AbstractApplicationContext) container).registerShutdownHook();
        BusinessObject bean = (BusinessObject) container.getBean("...");
        bean.doSth();
        // 应用程序退出,容器关闭
    }
}
复制代码
正文到此结束
- 本文标签: dataSource 定制 BeanDefinition cat HashMap CEO 参数 生命 db ioc UI 实例 cglib DBCP apache Security 数据库 bus 代码 list http tab bean 配置 parse JDBC spring ioc java message https id 管理 value src 源码 Action map 连接池 App final spring ACE IO IDE key lib classpath Property sql 字节码 CTO 开发 mysql Word mail ORM 数据 XML 类图
- 版权声明: 本文为互联网转载文章,出处已在文章中说明(部分除外)。如果侵权,请联系本站长删除,谢谢。
- 本文海报: 生成海报一 生成海报二
热门推荐


相关文章

近期评论
-
出现OpenClaw "device signature expired"。the Gateway rejects if Math.abs(Date.now() - signedAt) > 10 * 60 * 1000 (10 minutes)
-
-
想购买您这个站,我的联系方式QQ741756694微信同步 能卖联系
-
-
-
博主的博客用的什么技术栈,内容都是干货,赞
-
-
https://www.liuhaihua.cn/archives/40657.html 这篇博客中的图片打不开了
-
不会英语啊。
-
Loading...
![[HBLOG]公众号](https://www.liuhaihua.cn/img/qrcode_gzh.jpg)

