190323-Spring MVC之Filter基本使用姿势
Java Web三大基本组件,我们知道SpringMVC主要就是构建在Servlet的基础上的,接下来我们看一下Filter的使用姿势
I. Filter说明
在介绍filter的使用之前,有必要知道下什么是fitler。
Filter称为过滤器,主要用来拦截http请求,做一些其他的事情
1. 流程说明
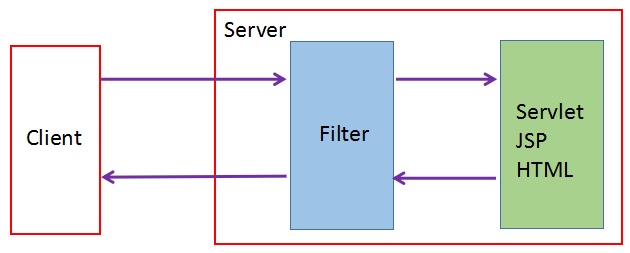
一个http请求过来之后
- 首先进入filter,执行相关业务逻辑
- 若判定通行,则进入Servlet逻辑,Servlet执行完毕之后,又返回Filter,最后在返回给请求方
- 判定失败,直接返回,不需要将请求发给Servlet
2. 场景
通过上面的流程,可以推算使用场景:
- 在filter层,来获取用户的身份
- 可以考虑在filter层做一些常规的校验(如参数校验,referer校验等)
- 可以在filter层做稳定性相关的工作(如全链路打点,可以在filter层分配一个traceId;也可以在这一层做限流等)
II. 使用姿势
1. 基本配置
在前面Java Config搭建了一个简单的web应用,我们的filter测试也放在这个demo工程上继续
pom配置如下
<properties>
    <spring.version>5.1.5.RELEASE</spring.version>
</properties>

<dependencies>
    <dependency>
        <groupId>javax.servlet</groupId>
        <artifactId>javax.servlet-api</artifactId>
        <version>3.1.0</version>
    </dependency>

    <dependency>
        <groupId>org.springframework</groupId>
        <artifactId>spring-core</artifactId>
        <version>${spring.version}</version>
    </dependency>
    <dependency>
        <groupId>org.aspectj</groupId>
        <artifactId>aspectjweaver</artifactId>
    </dependency>
    <dependency>
        <groupId>org.springframework</groupId>
        <artifactId>spring-aop</artifactId>
        <version>${spring.version}</version>
    </dependency>
    <dependency>
        <groupId>org.springframework</groupId>
        <artifactId>spring-web</artifactId>
        <version>${spring.version}</version>
    </dependency>
    <dependency>
        <groupId>org.springframework</groupId>
        <artifactId>spring-webmvc</artifactId>
        <version>${spring.version}</version>
    </dependency>

    <dependency>
        <groupId>org.eclipse.jetty.aggregate</groupId>
        <artifactId>jetty-all</artifactId>
        <version>9.2.19.v20160908</version>
    </dependency>
</dependencies>

<build>
    <finalName>web-mvc</finalName>
    <plugins>
        <plugin>
            <groupId>org.eclipse.jetty</groupId>
            <artifactId>jetty-maven-plugin</artifactId>
            <version>9.4.12.RC2</version>
            <configuration>
                <httpConnector>
                    <port>8080</port>
                </httpConnector>
            </configuration>
        </plugin>
    </plugins>
</build>
2. filter声明
创建一个filter,得首先告诉spring说,我这有个filter,你得把它用起来;使用java config的方式创建应用,干掉xml文件,我们知道Servlet容器会扫描 AbstractDispatcherServletInitializer
的实现类
所以我们的filter声明也放在这里
public class MyWebApplicationInitializer extends AbstractDispatcherServletInitializer {
    @Override
    protected WebApplicationContext createRootApplicationContext() {
        return null;
    }

    @Override
    protected WebApplicationContext createServletApplicationContext() {
        AnnotationConfigWebApplicationContext applicationContext = new AnnotationConfigWebApplicationContext();
        //        applicationContext.setConfigLocation("com.git.hui.spring");
        applicationContext.register(RootConfig.class);
        applicationContext.register(WebConfig.class);

        System.out.println("-------------------");

        return applicationContext;
    }

    @Override
    protected String[] getServletMappings() {
        return new String[]{"/*"};
    }


    @Override
    protected Filter[] getServletFilters() {
        return new Filter[]{new CharacterEncodingFilter("UTF-8", true), new MyCorsFilter()};
    }
}
看上面最后一个方法,返回当前支持的fitler数组,其中 MyCorsFilter
就是我们自定义的fitler
3. Filter实现
自定义一个filter,需要实现Filter接口,其中有三个方法,主要的是第二个
/**
* Created by @author yihui in 16:13 19/3/18.
*
* 测试:
*
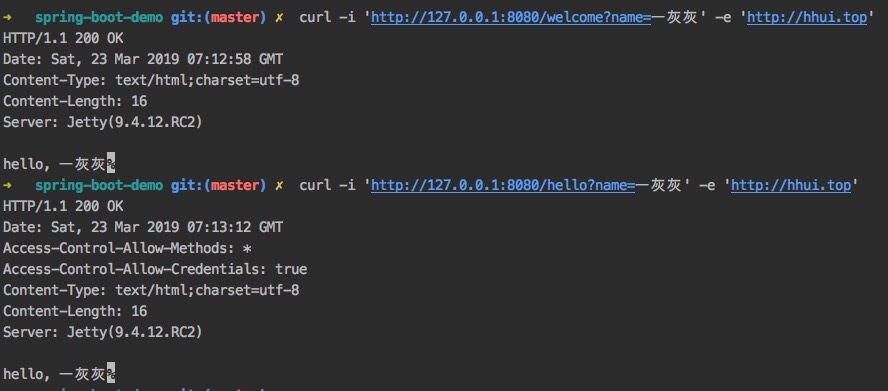
* - 返回头不会包含CORS相关: curl -i 'http://127.0.0.1:8080/welcome?name=一灰灰' -e 'http://hhui.top'
* - 返回头支持CORS: curl -i 'http://127.0.0.1:8080/hello?name=一灰灰' -e 'http://hhui.top'
*/
@Slf4j
public class MyCorsFilter implements Filter {
@Override
public void init(FilterConfig filterConfig) throws ServletException {
}
@Override
public void doFilter(ServletRequest servletRequest, ServletResponse servletResponse, FilterChain filterChain)
throws IOException, ServletException {
try {
HttpServletRequest request = (HttpServletRequest) servletRequest;
HttpServletResponse response = (HttpServletResponse) servletResponse;
if ("/hello".equals(request.getRequestURI())) {
response.setHeader("Access-Control-Allow-Origin", request.getHeader("origin"));
response.setHeader("Access-Control-Allow-Methods", "*");
response.setHeader("Access-Control-Allow-Credentials", "true");
}
} finally {
filterChain.doFilter(servletRequest, servletResponse);
}
}
@Override
public void destroy() {
}
}
上面的 doFilter
方法就是我们重点观察目标,三个参数,注意第三个
-
执行
filterChain.doFilter(servletRequest, servletResponse)表示会继续将请求执行下去;若不执行这一句,表示这一次的http请求到此为止了,后面的走不下去了
4. 测试
创建一个rest接口,用来测试下我们的filter是否生效
@RestController
public class HelloRest {
    @Autowired
    private PrintServer printServer;

    @GetMapping(path = {"hello", "welcome"}, produces = "text/html;charset=UTF-8")
    public String sayHello(HttpServletRequest request) {
        printServer.print();
        return "hello, " + request.getParameter("name");
    }


    @GetMapping({"/", ""})
    public String index() {
        return UUID.randomUUID().toString();
    }
}
启动web之后,观察下访问 hello
与 welcome
的返回头
5. 其他
相关博文
- JavaWeb三大组件之Filter学习详解
- 190316-Spring MVC之基于xml配置的web应用构建
- 190317-Spring MVC之基于java config无xml配置的web应用构建
II. 其他
- 系列博文
web系列:
- Spring Web系列博文汇总
mvc应用搭建篇:
- 190316-Spring MVC之基于xml配置的web应用构建
- 190317-Spring MVC之基于java config无xml配置的web应用构建
- 190319-SpringBoot高级篇WEB之demo应用构建
0. 项目
- 工程: spring-boot-demo
- 项目: https://github.com/liuyueyi/spring-boot-demo/blob/master/spring/200-mvc-annotation
1. 一灰灰Blog
- 一灰灰Blog个人博客 https://blog.hhui.top
- 一灰灰Blog-Spring专题博客 http://spring.hhui.top
一灰灰的个人博客,记录所有学习和工作中的博文,欢迎大家前去逛逛
2. 声明
尽信书则不如,以上内容,纯属一家之言,因个人能力有限,难免有疏漏和错误之处,如发现bug或者有更好的建议,欢迎批评指正,不吝感激
- 微博地址:小灰灰Blog
- QQ: 一灰灰/3302797840
3. 扫描关注
一灰灰blog

知识星球
打赏 如果觉得我的文章对您有帮助,请随意打赏。
正文到此结束
- 本文标签: git id GitHub dependencies eclipse 文章 配置 equals DOM web src ip Master FIT 参数 pom ACE map bus HTML java build servlet AOP API 2019 REST maven 博客 cat bug App spring 微博 IO IDE rand SpringMVC 测试 http https springboot CTO final jetty plugin UI 限流 XML root core
- 版权声明: 本文为互联网转载文章,出处已在文章中说明(部分除外)。如果侵权,请联系本站长删除,谢谢。
- 本文海报: 生成海报一 生成海报二
热门推荐


相关文章

近期评论
-
出现OpenClaw "device signature expired"。the Gateway rejects if Math.abs(Date.now() - signedAt) > 10 * 60 * 1000 (10 minutes)
-
-
想购买您这个站,我的联系方式QQ741756694微信同步 能卖联系
-
-
-
博主的博客用的什么技术栈,内容都是干货,赞
-
-
https://www.liuhaihua.cn/archives/40657.html 这篇博客中的图片打不开了
-
不会英语啊。
-
Loading...
![[HBLOG]公众号](https://www.liuhaihua.cn/img/qrcode_gzh.jpg)

