Spring boot学习(九)Spring boot配置邮件发送
邮件发送这一功能在实际的项目中使用的是非常普遍的,用户忘记账户忘记密码等很多操作都是通过邮件的方式来交互,因此邮件发送在 web 开发中是必不可少一个功能模块,本文就主要介绍如何在 spring boot 中发送不同类型的邮件。
Spring boot中配置步骤
Spring 本身提供了很好用的 org.springframework.mail.javamail.JavaMailSender 接口来实现邮件发送功能, Spring boot 中也为此提供了自动化配置,所以我们使用起来非常方便。
添加依赖
首先在 pom.xml 文件中添加如下依赖:
<dependency>
    <groupId>org.springframework.boot</groupId>
    <artifactId>spring-boot-starter-mail</artifactId>
</dependency>
修改配置文件
添加依赖之后就需要在项目配置文件 application.properties 中配置发送邮件相关的参数,具体如下:
spring.mail.host=smtp.163.com
spring.mail.username=xxx
spring.mail.password=xxx
spring.mail.default-encoding=UTF-8
重要的参数就这些,其它的使用默认的即可,以下为解释:
-
spring.mail.host:邮箱服务器地址,这个根据自己使用什么邮箱有区别,比如:smtp.163.com smtp.126.com smtp.qq.com
-
spring.mail.username:邮箱登陆用户名。 -
spring.mail.password:第三方登陆授权码(下面会具体介绍该授权码的获取方式)。 -
spring.mail.default-encoding:编码方式
POP3/SMTP 服务
上面提到了授权码的概念,首先要明确一个概念就是授权码跟我们直接登陆邮箱的密码不是一样的,授权码可以理解为第三方客户端登陆邮箱的密码,要想获取授权码需要我们去自己所用邮箱的官网设置开启 POP3/SMTP 以及 IMAP/SMTP 服务,我这里就以自己使用的 163 账号为例介绍打开该服务以及获取授权码的步骤,如图:
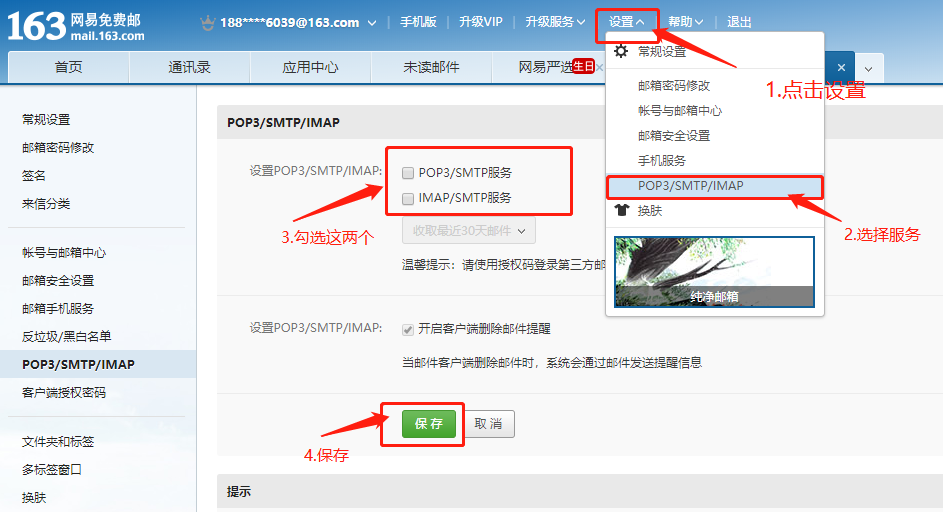
登陆 163 邮箱官网,按照图示步骤进行操作,在选择了服务之后会给你发送验证码,输入验证码之后就会让你自己设置授权码,这里的授权码就是上边配置文件中 spring.mail.password 需要填写的值。
封装邮件工具类
对邮件的操作最好是封装一个类以便代码重用以及维护,我这里封装成一个 service 层。
定义接口 IMailService.interface :
package com.web.springbootmail.service;
/**
* @author Promise
* @createTime 2019年3月30日 下午3:14:14
* @description
*/
public interface IMailService {

	/**
	 * 简单文本邮件
	 * @param toUser 邮件接收者
	 */
	void simpleMil(String toUser)throws Exception;

	/**
	 * html邮件
	 * @param toUser 邮件接收者
	 */
	void htmlMail(String toUser) throws Exception;

	/**
	 * 带附件邮件
	 * @param toUser 邮件接收者
	 */
	void attachmentMail(String toUser)throws Exception;

	/**
	 * 带图片邮件
	 * @param toUser 邮件接收者
	 */
	void imgMail(String toUser)throws Exception;

	/**
	 * 模板邮件
	 * @param toUser 邮件接收者
	 */
	void TemplateMail(String toUser)throws Exception;

}
实现类 MailServiceimpl.java :
package com.web.springbootmail.service.impl;

import java.io.File;

import javax.mail.MessagingException;
import javax.mail.internet.MimeMessage;

import org.springframework.beans.factory.annotation.Autowired;
import org.springframework.beans.factory.annotation.Value;
import org.springframework.core.io.FileSystemResource;
import org.springframework.mail.SimpleMailMessage;
import org.springframework.mail.javamail.JavaMailSender;
import org.springframework.mail.javamail.MimeMessageHelper;
import org.springframework.stereotype.Service;
import org.thymeleaf.TemplateEngine;
import org.thymeleaf.context.Context;

import com.web.springbootmail.service.IMailService;

/**
* @author Promise
* @createTime 2019年3月30日 下午3:14:37
* @description  邮件发送服务类
*/
@Service("mailService")
public class MailServiceImpl implements IMailService{

	@Autowired
	private JavaMailSender jms;

	@Autowired
	private TemplateEngine templateEngine;

	@Value("${spring.mail.username}")
	private String from;

	@Override
	public void simpleMil(String toUser) {

	}

	@Override
	public void htmlMail(String toUser) {
		// TODO Auto-generated method stub

	}

	@Override
	public void attachmentMail(String toUser) {
		// TODO Auto-generated method stub

	}

	@Override
	public void imgMail(String toUser) {
		// TODO Auto-generated method stub

	}

	@Override
	public void TemplateMail(String toUser) {
		// TODO Auto-generated method stub

	}

}
这里只给出了框架,具体实现下面依次介绍,上面还注入了三个变量:
jms
templateEngine
from
下面介绍每一种邮件的具体实现
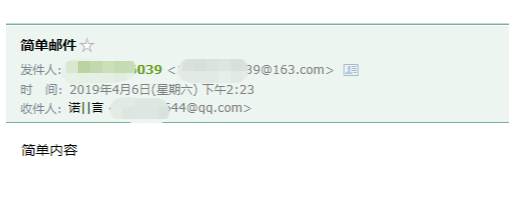
简单文本邮件
这一类邮件最简单,使用 SimpleMailMessage 对象,代码如下:
@Override
public void simpleMil(String toUser) {
	// TODO Auto-generated method stub
	//初始化简单邮件对象
	SimpleMailMessage message = new SimpleMailMessage();
	//邮件发送者
	message.setFrom(from);
	//邮件接收者
	message.setTo(toUser);
	//邮件标题
	message.setSubject("简单邮件");
	//邮件内容
	message.setText("简单内容");
	//发送邮件
	jms.send(message);
}
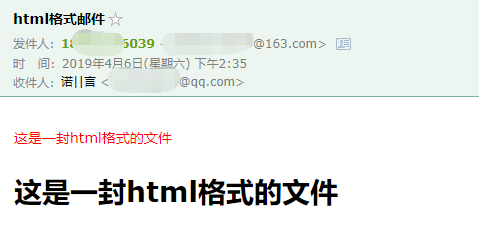
html邮件
这一类邮件使用的是 MimeMessage 对象,可丰富页面样式,代码如下:
@Override
public void htmlMail(String toUser) throws MessagingException {
	// TODO Auto-generated method stub
	MimeMessage message = jms.createMimeMessage();
	MimeMessageHelper helper = new MimeMessageHelper(message, true);
	helper.setFrom(from);
	helper.setTo(toUser);
	helper.setSubject("html格式邮件");
    //内容为html格式
	String content = "<p style='color:yellow;'>这是一封html格式的文件</p><h1>这是一封html格式的文件</h1>";
	//true表示以html格式发送邮件
	helper.setText(content, true);
	jms.send(message);
}
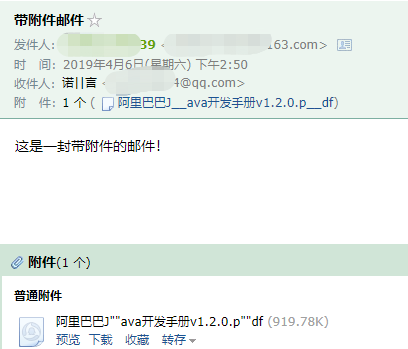
带附件的邮件
这一类邮件多了添加附件的过程,也使用 MimeMessage ,代码如下:
@Override
public void attachmentMail(String toUser) throws MessagingException {
	// TODO Auto-generated method stub
	MimeMessage message = jms.createMimeMessage();
	MimeMessageHelper helper = new MimeMessageHelper(message, true);
	helper.setFrom(from);
	helper.setTo(toUser);
	helper.setSubject("带附件邮件");
	//加载绝对路径资源
	FileSystemResource fs = new FileSystemResource(new File("D://DownLoad//file//阿里巴巴Java开发手册v1.2.0.pdf"));
	helper.setText("这是一封带附件的邮件!");
	//添加附件资源
	helper.addAttachment("阿里巴巴Java开发手册v1.2.0.pdf", fs);
	jms.send(message);
}
这里的文件路径本地文件的绝对路劲。
带图片的邮件
代码如下:
@Override
public void imgMail(String toUser) throws MessagingException {
	// TODO Auto-generated method stub
	MimeMessage message = jms.createMimeMessage();
	MimeMessageHelper helper = new MimeMessageHelper(message, true);
	helper.setFrom(from);
	helper.setTo(toUser);
	helper.setSubject("带图片邮件");
	//设置资源的cid
	String content = "<html><body>博客头像<img src='cid:img'/></body></html>";
	helper.setText(content, true);
	FileSystemResource fs = new FileSystemResource(new File("D://DownLoad//img//20171123181522_c48800.jpg"));
	//和上边的cid要对应
	helper.addInline("img", fs);
	jms.send(message);
}
其实这种方式也是html邮件,只是多了静态资源,比如我们这里就在页面上添加了一张图片,步骤跟添加附件有点类似,但是需要注意的是静态资源需要给静态资源设置cid,以便存在多个静态资源区分。
模板邮件
模板邮件指的是邮件的主体内容都是一样的,只是有一部分不一样,这样我们就可以定义一个邮件的模板,发送邮件的时候我们直接传入参数就可以了,是一种很好的封装。
这里我使用的模板解析框架为 thymeleaf ,所以需要先在项目 pom.xml 文件中添加依赖:
<dependency>
    <groupId>org.springframework.boot</groupId>
    <artifactId>spring-boot-starter-thymeleaf</artifactId>
</dependency>
接下来在 src/main/resources/templates 目录下新建 MailTemplate.html 文件,内容如下:
<!DOCTYPE html>
<html lang="zh" xmlns:th="http://www.thymeleaf.org">
<head>
<meta charset="UTF-8">
<title>Insert title here</title>
</head>
<body>
	<h2>您好,<span th:text="${username}"></span>:这是来自测试的邮件模板!</h2>
</body>
</html>
使用具体代码如下:
@Override
public void TemplateMail(String toUser) throws MessagingException {
	// TODO Auto-generated method stub
	MimeMessage message = jms.createMimeMessage();
	MimeMessageHelper helper = new MimeMessageHelper(message, true);
	helper.setFrom(from);
	helper.setTo(toUser);
	helper.setSubject("模板邮件");
	Context context = new Context();
	//给模板传入参数,username要与模板中变量名一致,promise为测试数据
	context.setVariable("username", "promise");
	//thymeleaf模板默认会从src/main/resources/tempaltes目录下寻找文件,填入我们定义的模板名,不需要写后缀。
	String template = templateEngine.process("MailTemplate", context);
	helper.setText(template, true);
	jms.send(message);
}
controller调用
封装好了发送邮件的工具类之后,我们直接在 controller 调用即可,代码如下:
package com.web.springbootmail.controller;

import java.util.HashMap;
import java.util.Map;
import org.springframework.beans.factory.annotation.Autowired;
import org.springframework.web.bind.annotation.GetMapping;
import org.springframework.web.bind.annotation.RequestMapping;
import org.springframework.web.bind.annotation.RestController;
import com.web.springbootmail.service.IMailService;

/**
* @author Promise
* @createTime 2019年4月1日 下午9:30:38
* @description  邮件发送
*/
@RequestMapping("/mail")
@RestController
public class EmailController {

	@Autowired
	private IMailService mailService;

	@GetMapping("/simple")
	public Map<String, Object> sendSimpleMail() {
		Map<String, Object> map =new HashMap<>();
		try {
		    //参数就是接收邮件的邮箱,根据自己实际填写
			mailService.simpleMil("*****@qq.com");
			map.put("res", "success");
		} catch (Exception e) {
			// TODO Auto-generated catch block
			e.printStackTrace();
			map.put("res", "error");
		}
		return map;
	}

	@GetMapping("/htmlMail")
	public Map<String, Object> htmlMail(){
		Map<String, Object> map =new HashMap<>();
		try {
			mailService.htmlMail("*****@qq.com");
			map.put("res", "success");
		} catch (Exception e) {
			// TODO Auto-generated catch block
			e.printStackTrace();
			map.put("res", "error");
		}
		return map;
	}

	@GetMapping("/attachmentsMail")
	public Map<String, Object> attachmentsMail(){
		Map<String, Object> map =new HashMap<>();
		try {
			mailService.attachmentMail("*****@qq.com");
			map.put("res", "success");
		} catch (Exception e) {
			// TODO Auto-generated catch block
			e.printStackTrace();
			map.put("res", "error");
		}
		return map;
	}

	@GetMapping("/imgMail")
	public Map<String, Object> imgMail(){
		Map<String, Object> map =new HashMap<>();
		try {
			mailService.imgMail("*****@qq.com");
			map.put("res", "success");
		} catch (Exception e) {
			// TODO Auto-generated catch block
			e.printStackTrace();
			map.put("res", "error");
		}
		return map;
	}

	@GetMapping("/templateMail")
	public Map<String, Object> templateMail(){
		Map<String, Object> map =new HashMap<>();
		try {
			mailService.TemplateMail("*****@qq.com");
			map.put("res", "success");
		} catch (Exception e) {
			// TODO Auto-generated catch block
			e.printStackTrace();
			map.put("res", "error");
		}
		return map;
	}
}
效果测试
简单邮件效果
启动项目,访问 localhost:8080/mail/simple ,此时我的收件箱收到如下邮件:
html邮件
访问 localhost:8080/mail/htmlMail ,效果如下:
带附件邮件
访问 localhost:8080/mail/attachmentsMail ,效果如下:
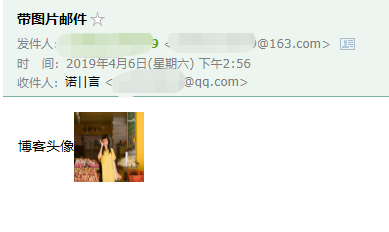
带图片邮件
访问 localhost:8080/mail/imgMail ,效果如下:
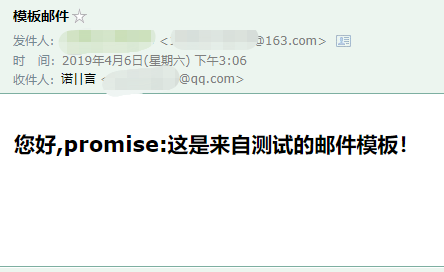
模板邮件
访问 localhost:8080/mail/templateMail ,效果如下:
正文到此结束
- 本文标签: 图片 数据 REST JMS 自动化 springboot 标题 App core spring bean https UI value ACE 测试 Spring Boot cat CTO src 目录 Service ip 配置 XML Word 服务器 id description 代码 开发 邮件模板 mail 2019 map 解析 博客 web IO tar IDE 参数 message pom HashMap 阿里巴巴 HTML http java
- 版权声明: 本文为互联网转载文章,出处已在文章中说明(部分除外)。如果侵权,请联系本站长删除,谢谢。
- 本文海报: 生成海报一 生成海报二
热门推荐


相关文章

近期评论
-
出现OpenClaw "device signature expired"。the Gateway rejects if Math.abs(Date.now() - signedAt) > 10 * 60 * 1000 (10 minutes)
-
-
想购买您这个站,我的联系方式QQ741756694微信同步 能卖联系
-
-
-
博主的博客用的什么技术栈,内容都是干货,赞
-
-
https://www.liuhaihua.cn/archives/40657.html 这篇博客中的图片打不开了
-
不会英语啊。
-
Loading...
![[HBLOG]公众号](https://www.liuhaihua.cn/img/qrcode_gzh.jpg)

