微服务中集成分布式配置中心 Apollo
随着业务的发展、微服务架构的升级,服务的数量、程序的配置日益增多(各种微服务、各种服务器地址、各种参数),传统的配置文件方式和数据库的方式已无法满足开发人员对配置管理的要求:配置修改后实时生效,灰度发布,分环境、分集群管理配置,完善的权限、审核机制。分布式环境下,这些配置更加复杂。
因此,我们需要配置中心来统一管理配置!把业务开发者从复杂以及繁琐的配置中解脱出来,只需专注于业务代码本身,从而能够显著提升开发以及运维效率。同时将配置和发布包解藕也进一步提升发布的成功率,并为运维的细力度管控、应急处理等提供强有力的支持。
在之前的文章中,我们介绍过 Spring Cloud 中的分布式配置中心组件:Spring Cloud Config。本文将会介绍功能更为强大的 Apollo。
分布式配置中心
在一个分布式环境中,同类型的服务往往会部署很多实例。这些实例使用了一些配置,为了更好地维护这些配置就产生了配置管理服务。通过这个服务可以轻松地管理成千上百个服务实例的配置问题。配置中心的特点:
- 配置的增删改查;
- 不同环境配置隔离(开发、测试、预发布、灰度/线上);
- 高性能、高可用性;
- 请求量多、高并发;
- 读多写少;
现有的配置中心组件有:Spring Cloud Config、Apollo、Disconf、Diamond 等等,这些组件在功能上有或多或少的差异,但是都具有基本的配置中心的功能。
Apollo 简介
Apollo(阿波罗)是携程框架部门研发的开源配置管理中心,能够集中化管理应用不同环境、不同集群的配置,配置修改后能够实时推送到应用端,并且具备规范的权限、流程治理等特性。目前的有超过 14k 的 star,使用广泛。Apollo基于开源模式开发,开源地址: https://github.com/ctripcorp/apollo。
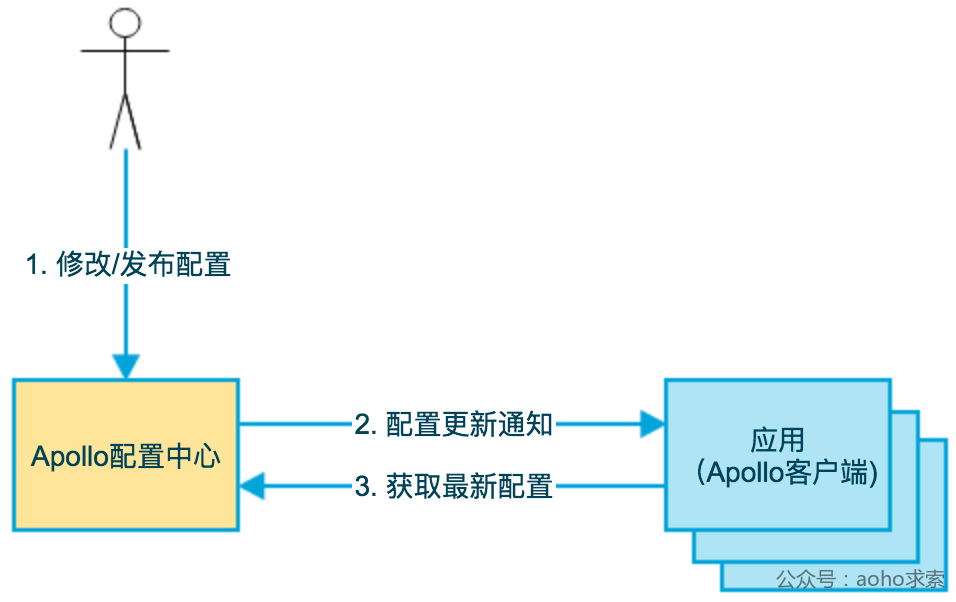
首先用户在配置中心对配置进行修改并发布;配置中心通知Apollo客户端有配置更新;Apollo客户端从配置中心拉取最新的配置、更新本地配置并通知到应用。
Apollo 支持4个维度管理 Key-Value 格式的配置:
- application (应用):实际使用配置的应用,Apollo客户端在运行时需要知道当前应用是谁,从而可以去获取对应的配置;每个应用都需要有唯一的身份标识 – appId,应用身份是跟着代码走的,所以需要在代码中配置。
- environment (环境):配置对应的环境,Apollo客户端在运行时需要知道当前应用处于哪个环境,从而可以去获取应用的配置。
- cluster (集群):一个应用下不同实例的分组,比如典型的可以按照数据中心分,把上海机房的应用实例分为一个集群,把北京机房的应用实例分为另一个集群。对不同的cluster,同一个配置可以有不一样的值,如zookeeper地址。
- namespace (命名空间):一个应用下不同配置的分组,可以简单地把namespace类比为文件,不同类型的配置存放在不同的文件中,如数据库配置文件,RPC配置文件,应用自身的配置文件等;应用可以直接读取到公共组件的配置namespace,如DAL,RPC等;应用也可以通过继承公共组件的配置namespace来对公共组件的配置做调整,如DAL的初始数据库连接数。
我们在集成 Apollo 时,可以根据需要创建相应的维度。
快速入门
下面我们搭建一个基于 Spring Boot 的微服务,集成 Apollo。
启动服务端
Apollo配置中心包括:Config Service、Admin Service 和 Portal。
- Config Service:提供配置获取接口、配置推送接口,服务于Apollo客户端;
- Admin Service:提供配置管理接口、配置修改发布接口,服务于管理界面Portal;
- Portal:配置管理界面,通过MetaServer获取AdminService的服务列表,并使用客户端软负载SLB方式调用AdminService。
官网准备好了一个Quick Start安装包,大家只需要下载到本地,就可以直接使用,免去了编译、打包过程。也可以自行编译,较为繁琐。
Apollo服务端共需要两个数据库:ApolloPortalDB和ApolloConfigDB。创建的语句见安装包,创建好之后需要配置启动的脚本,即 demo.sh 脚本:
#apollo config db info
apollo_config_db_url=jdbc:mysql://localhost:3306/ApolloConfigDB?characterEncoding=utf8
apollo_config_db_username=用户名
apollo_config_db_password=密码(如果没有密码,留空即可)

# apollo portal db info
apollo_portal_db_url=jdbc:mysql://localhost:3306/ApolloPortalDB?characterEncoding=utf8
apollo_portal_db_username=用户名
apollo_portal_db_password=密码(如果没有密码,留空即可)
脚本会在本地启动3个服务,分别使用8070, 8080, 8090端口,请确保这3个端口当前没有被使用。执行
./demo.sh start
看到输出如下的日志信息:
==== starting service ====
Service logging file is ./service/apollo-service.log
Started [10768]
Waiting for config service startup.......
Config service started. You may visit http://localhost:8080 for service status now!
Waiting for admin service startup....
Admin service started
==== starting portal ====
Portal logging file is ./portal/apollo-portal.log
Started [10846]
Waiting for portal startup......
Portal started. You can visit http://localhost:8070 now!
Apollo 服务端启动成功。
客户端应用
引入依赖
<dependency>
    <groupId>com.ctrip.framework.apollo</groupId>
    <artifactId>apollo-client</artifactId>
    <version>1.1.0</version>
</dependency>
入口程序
@SpringBootApplication
@EnableApolloConfig("TEST1.product")
public class ApolloApplication {

    public static void main(String[] args) {
        SpringApplication.run(ApolloApplication.class, args);
    }
}
我们通过 @EnableApolloConfig("TEST1.product") 注解开启注册到 Apollo 服务端,并指定了 namespace 为 TEST1.product 。
配置文件
app.id: spring-boot-logger
  # set apollo meta server address, adjust to actual address if necessary
apollo.meta: http://localhost:8080
server:
  port: 0
配置文件中指定了appid 和 Apollo 服务器的地址。
测试应用
我们通过动态设置输出的日志等级来测试接入的配置中心。
@Service
public class LoggerConfiguration {
    private static final Logger logger = LoggerFactory.getLogger(LoggerConfiguration.class);
    private static final String LOGGER_TAG = "logging.level.";

    @Autowired
    private LoggingSystem loggingSystem;

    @ApolloConfig
    private Config config;

    @ApolloConfigChangeListener
    private void onChange(ConfigChangeEvent changeEvent) {
        refreshLoggingLevels();
    }

    @PostConstruct
    private void refreshLoggingLevels() {
        Set<String> keyNames = config.getPropertyNames();
        for (String key : keyNames) {
            if (containsIgnoreCase(key, LOGGER_TAG)) {
                String strLevel = config.getProperty(key, "info");
                LogLevel level = LogLevel.valueOf(strLevel.toUpperCase());
                loggingSystem.setLogLevel(key.replace(LOGGER_TAG, ""), level);
                logger.info("{}:{}", key, strLevel);
            }
        }
    }

    private static boolean containsIgnoreCase(String str, String searchStr) {
        if (str == null || searchStr == null) {
            return false;
        }
        int len = searchStr.length();
        int max = str.length() - len;
        for (int i = 0; i <= max; i++) {
            if (str.regionMatches(true, i, searchStr, 0, len)) {
                return true;
            }
        }
        return false;
    }
}
@Service
public class PrintLogger {
    private static Logger logger = LoggerFactory.getLogger(PrintLogger.class);

    @ApolloJsonValue("${kk.v}")
    private String v;

    @PostConstruct
    public void printLogger() throws Exception {
        Executors.newSingleThreadExecutor().submit(() -> {
            while (true) {
                logger.error("=========" + v);
                logger.info("我是info级别日志");
                logger.error("我是error级别日志");
                logger.warn("我是warn级别日志");
                logger.debug("我是debug级别日志");
                TimeUnit.SECONDS.sleep(1);
            }
        });
    }
}
原理细究
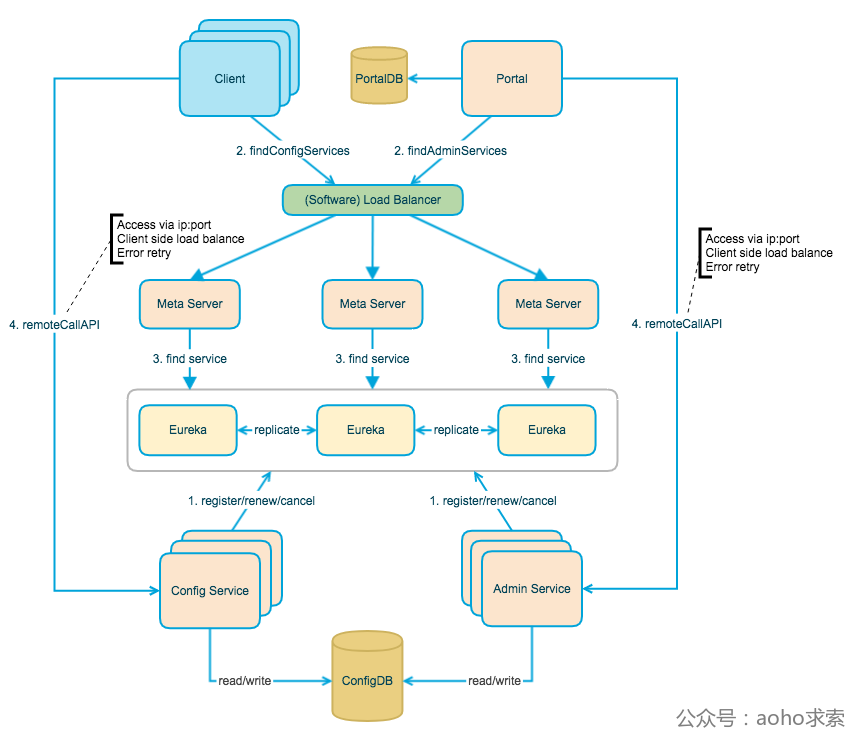 上图简要描述了Apollo的总体设计,我们可以从下往上看:
- Config Service提供配置的读取、推送等功能,服务对象是Apollo客户端
- Admin Service提供配置的修改、发布等功能,服务对象是Apollo Portal(管理界面)
- Config Service和Admin Service都是多实例、无状态部署,所以需要将自己注册到Eureka中并保持心跳
- 在Eureka之上我们架了一层Meta Server用于封装Eureka的服务发现接口
- Client通过域名访问Meta Server获取Config Service服务列表(IP+Port),而后直接通过IP+Port访问服务,同时在Client侧会做load balance、错误重试
- Portal通过域名访问Meta Server获取Admin Service服务列表(IP+Port),而后直接通过IP+Port访问服务,同时在Portal侧会做load balance、错误重试
- 为了简化部署,我们实际上会把Config Service、Eureka和Meta Server三个逻辑角色部署在同一个JVM进程中
正文到此结束
- 本文标签: MQ 管理 key bug 编译 tag Logging 配置 分布式 域名 Eureka 配置中心 ip Word cat IO 数据 json 专注 服务器 开源 并发 js kk 安装 Spring Boot 空间 onchange Spring Cloud Config db http 进程 executor 开发者 springboot spring 实例 final 微服务 https 下载 sql id 代码 list Spring cloud 端口 src 2019 数据库 Service UI 高可用 mysql App 开发 JDBC git 文章 zookeeper 服务端 GitHub value 灰度发布 测试 client 部署 tar Property Region 高并发 CTO 参数 JVM struct ACE 集群
- 版权声明: 本文为互联网转载文章,出处已在文章中说明(部分除外)。如果侵权,请联系本站长删除,谢谢。
- 本文海报: 生成海报一 生成海报二
热门推荐


相关文章

近期评论
-
谢谢
-
https://www.newcmy.com/register?aff=HBVX建议您试试草莓云机场,可以流畅观看youtube和tiktok,上reddit/x也没有问题,还有各种ai优化节点。
-
-
-
想购买您这个站,我的联系方式QQ741756694微信同步 能卖联系
-
-
-
-
-
https://www.liuhaihua.cn/archives/40657.html 这篇博客中的图片打不开了
Loading...
![[HBLOG]公众号](https://www.liuhaihua.cn/img/qrcode_gzh.jpg)

