给Java开发者的RocketMQ详解(发送与高可用设计)

前言
本文的目的:
1.同步发送和异步发送原理解析
2.浅谈RocketMQ的架构设计
目录
- RocketMQ是什么?
- RocketMQ好在哪?
- 原理简析和API介绍(发送篇)
- producer.start启动都做了哪些重要的事情
- 流程图
- 启动机制
- 小结
- 同步发送
- 流程图
- tryToFindTopicPublishInfo 查找消息路由
- selectOneMessageQueue选择消息队列发送消息
- updateFaultItem 更新故障延迟机制
- 用法
- 小结
- 异步发送
- 流程图
- 实现机制
- 用法
- 小结
- 作为消息的发送方,如何做到消息不丢失
- producer.start启动都做了哪些重要的事情
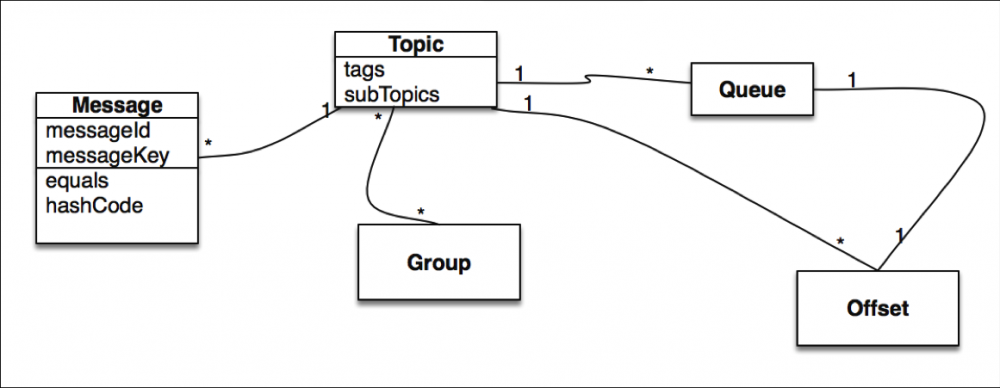
- 浅谈RocketMQ系统架构
RocketMQ是什么?
Apache RocketMQ is a distributed messaging and streaming platform with low latency, high performance and reliability, trillion-level capacity and flexible scalability.
Apache RocketMQ 是一个分布式消息传递和流媒体平台,具有低延迟,高性能和可靠性,万亿级容量和灵活的可扩展性。
- 是一个队列模型的消息中间件,具有高性能、高可靠、高实时、分布式特点。
- Producer、Consumer队列都可以分布式。
- Producer向一些队列轮流发送消息,队列集合称为Topic,Consumer如果做广播消费,则一个consumer实例消费这个Topic对应的所有队列,如果做集群消费,则多个Consumer实例平均消费这个topic对应的队列集合。
- 能够保证严格的消息顺序
- 提供丰富的消息拉取模式
- 高效的订阅者水平扩展能力
- 实时的消息订阅机制
- 亿级消息堆积能力
- 较少的依赖
RocketMQ好在哪
高可用、高性能
原理简析和API介绍(发送篇)
DefaultMQProducer producer = new DefaultMQProducer("SYNC_PRODUCER_GROUP");
// 设置NameServer地址
producer.setNamesrvAddr("localhost:9876");
// 只需要在发送前初始化一次
producer.start();
// 构建消息实体
Message msg = new Message("SYNC_MSG_TOPIC", "TagA", ("Hello RocketMQ ").getBytes(RemotingHelper.DEFAULT_CHARSET));
// 发送同步消息
SendResult sendResult = producer.send(msg);
复制代码
producer.start启动都做了哪些重要的事情
流程图
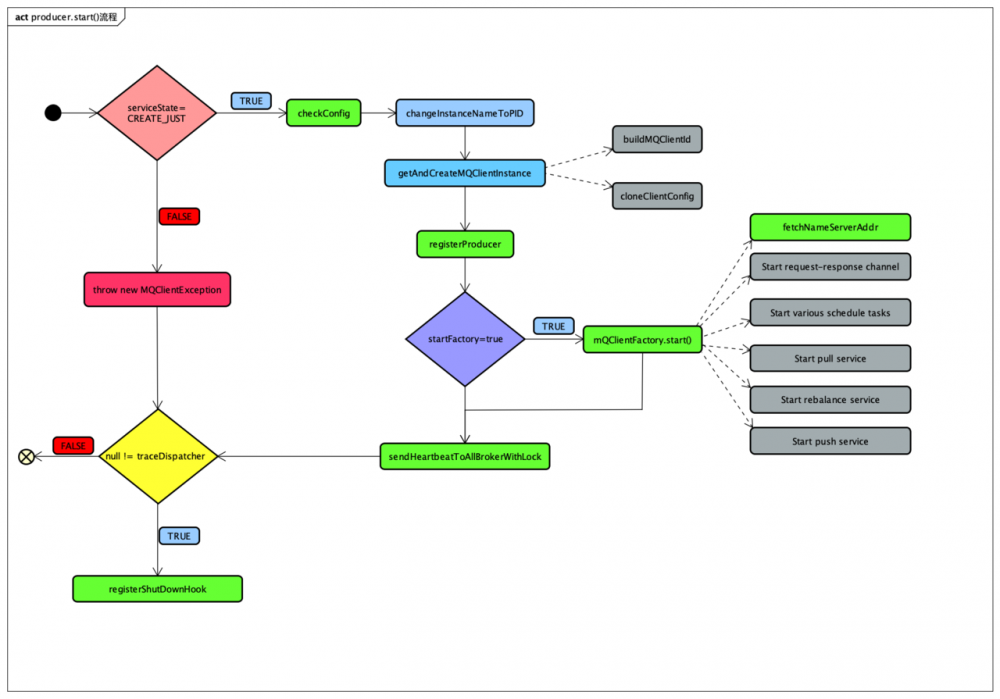
启动机制
checkConfig 配置检查主要校验producerGroup属性是否满足 复制代码
- changeInstanceNameToPID 生成pid
- getAndCreateMQClientInstance
创建MQClientlnstance实例

MQClientlnstance封装了RocketMQ网络处理API,是消息生产者( Producer)、消息消费者(Consumer)与NameServer、Broker打交道的网络通道
复制代码
- registerProducer注册producer
将当前生产者加入到MQClientlnstance管理中,方便后续调用网络请求、进行心跳检测等
复制代码
- mQClientFactory.start() 通过mQClient工厂去启动各项服务
public void start() throws MQClientException {
    synchronized (this) {
        switch (this.serviceState) {
            case CREATE_JUST:
                this.serviceState = ServiceState.START_FAILED;
                // If not specified,looking address from name server
                if (null == this.clientConfig.getNamesrvAddr()) {
                    this.mQClientAPIImpl.fetchNameServerAddr();
                }
                // Start request-response channel
                this.mQClientAPIImpl.start();
                // Start various schedule tasks
                this.startScheduledTask();
                // Start pull service
                this.pullMessageService.start();
                // Start rebalance service
                this.rebalanceService.start();
                // Start push service
                this.defaultMQProducer.getDefaultMQProducerImpl().start(false);
                log.info("the client factory [{}] start OK", this.clientId);
                this.serviceState = ServiceState.RUNNING;
                break;
            case RUNNING:
                break;
            case SHUTDOWN_ALREADY:
                break;
            case START_FAILED:
                throw new MQClientException("The Factory object[" + this.getClientId() + "] has been created before, and failed.", null);
            default:
                break;
        }
    }
}
复制代码
这块做的事情有点多 首先 this.mQClientAPIImpl.start()
org.apache.rocketmq.remoting.netty.NettyRemotingClient#start

 通过romoting (netty客户端的实现)去建立连接 (反正这块可以理解为通过这个操作,可以服务通信了)
复制代码
再者我们了解下startScheduledTask大心脏
private void startScheduledTask() {
    // 定时校验nameSrv 保证地址不为空来维持后续服务的可用性
    if (null == this.clientConfig.getNamesrvAddr()) {
        this.scheduledExecutorService.scheduleAtFixedRate(new Runnable() {

            @Override
            public void run() {
                try {
                    MQClientInstance.this.mQClientAPIImpl.fetchNameServerAddr();
                } catch (Exception e) {
                    log.error("ScheduledTask fetchNameServerAddr exception", e);
                }
            }
        }, 1000 * 10, 1000 * 60 * 2, TimeUnit.MILLISECONDS);
    }
    // 定时刷新topic路由信息到客户端实例上
    this.scheduledExecutorService.scheduleAtFixedRate(new Runnable() {

        @Override
        public void run() {
            try {
                MQClientInstance.this.updateTopicRouteInfoFromNameServer();
            } catch (Exception e) {
                log.error("ScheduledTask updateTopicRouteInfoFromNameServer exception", e);
            }
        }
    }, 10, this.clientConfig.getPollNameServerInterval(), TimeUnit.MILLISECONDS);
    // 定时清理离线的broker 并发送心跳保活
    this.scheduledExecutorService.scheduleAtFixedRate(new Runnable() {

        @Override
        public void run() {
            try {
                MQClientInstance.this.cleanOfflineBroker();
                MQClientInstance.this.sendHeartbeatToAllBrokerWithLock();
            } catch (Exception e) {
                log.error("ScheduledTask sendHeartbeatToAllBroker exception", e);
            }
        }
    }, 1000, this.clientConfig.getHeartbeatBrokerInterval(), TimeUnit.MILLISECONDS);
    // 定时获取所有消费进度
    this.scheduledExecutorService.scheduleAtFixedRate(new Runnable() {

        @Override
        public void run() {
            try {
                MQClientInstance.this.persistAllConsumerOffset();
            } catch (Exception e) {
                log.error("ScheduledTask persistAllConsumerOffset exception", e);
            }
        }
    }, 1000 * 10, this.clientConfig.getPersistConsumerOffsetInterval(), TimeUnit.MILLISECONDS);
    // 定时调整线程池
    this.scheduledExecutorService.scheduleAtFixedRate(new Runnable() {

        @Override
        public void run() {
            try {
                MQClientInstance.this.adjustThreadPool();
            } catch (Exception e) {
                log.error("ScheduledTask adjustThreadPool exception", e);
            }
        }
    }, 1, 1, TimeUnit.MINUTES);
}
复制代码
接着启动了拉取消息服务
通过pullRequestQueue队列来维护拉取的消息
复制代码
this.rebalanceService.start
内部定时轮询做负载均衡
复制代码
- sendHeartbeatToAllBrokerWithLock
给所有broker发送心跳并且加锁
复制代码
- registerShutDownHook
注册相关的shutDown钩子
复制代码
小结
start()的流程主要步骤
- nameSrv寻址
- 定时任务:更新路由信息,清理broker,发送心跳保活
- 负载均衡:通过Round-Robin负载均衡算法,轮询topic下的所有队列来实现发送方的负载均衡
同步发送
同步发送流程图
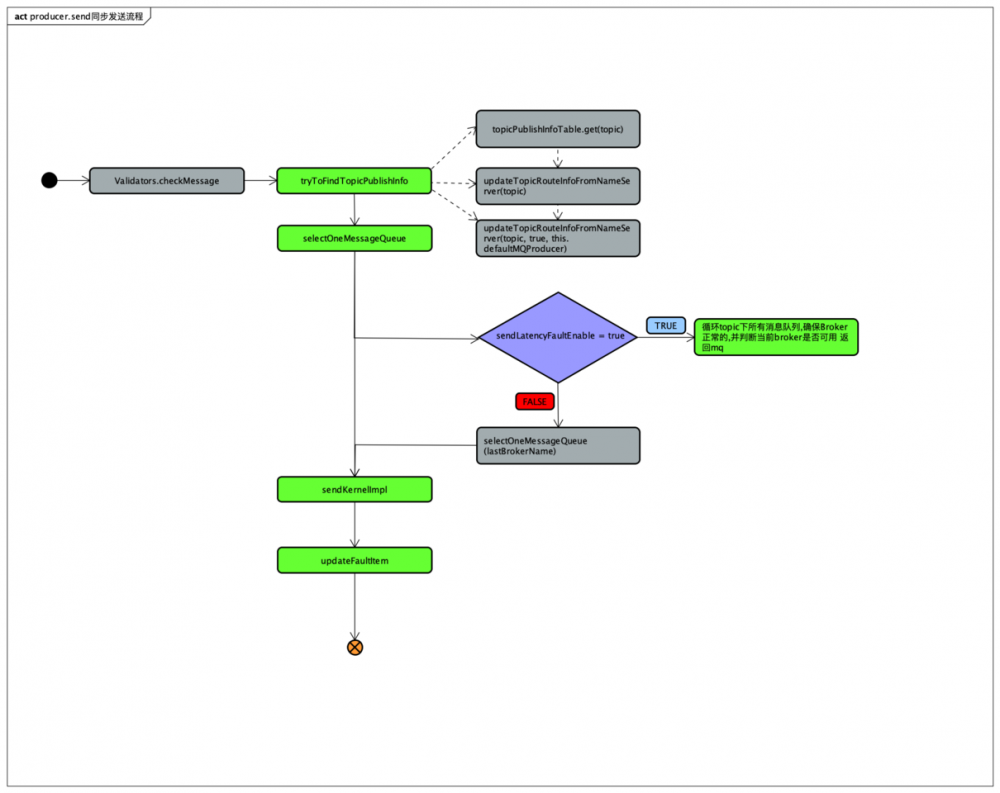
绿色块的是核心步骤,主要围绕这几块核心阐述一下 这边就不贴具体的代码了 避免篇幅过长
tryToFindTopicPublishInfo查找消息路由
消息发送之前,首先需要获取主题的路由信息,只有获取了这些信息我们才知道消息 要发送到具体的 Broker节点
private TopicPublishInfo tryToFindTopicPublishInfo(final String topic) {
    // 从本地缓存读取尝试获取
    TopicPublishInfo topicPublishInfo = this.topicPublishInfoTable.get(topic);
    if (null == topicPublishInfo || !topicPublishInfo.ok()) {
        this.topicPublishInfoTable.putIfAbsent(topic, new TopicPublishInfo());
        // 通过topic获取配置
        this.mQClientFactory.updateTopicRouteInfoFromNameServer(topic);
        topicPublishInfo = this.topicPublishInfoTable.get(topic);
    }

    if (topicPublishInfo.isHaveTopicRouterInfo() || topicPublishInfo.ok()) {
        return topicPublishInfo;
    } else {
        // 如果没有获取到配置,通过默认的topic去找路由配置信息
        this.mQClientFactory.updateTopicRouteInfoFromNameServer(topic, true, this.defaultMQProducer);
        topicPublishInfo = this.topicPublishInfoTable.get(topic);
        return topicPublishInfo;
    }
}
复制代码
步骤如下
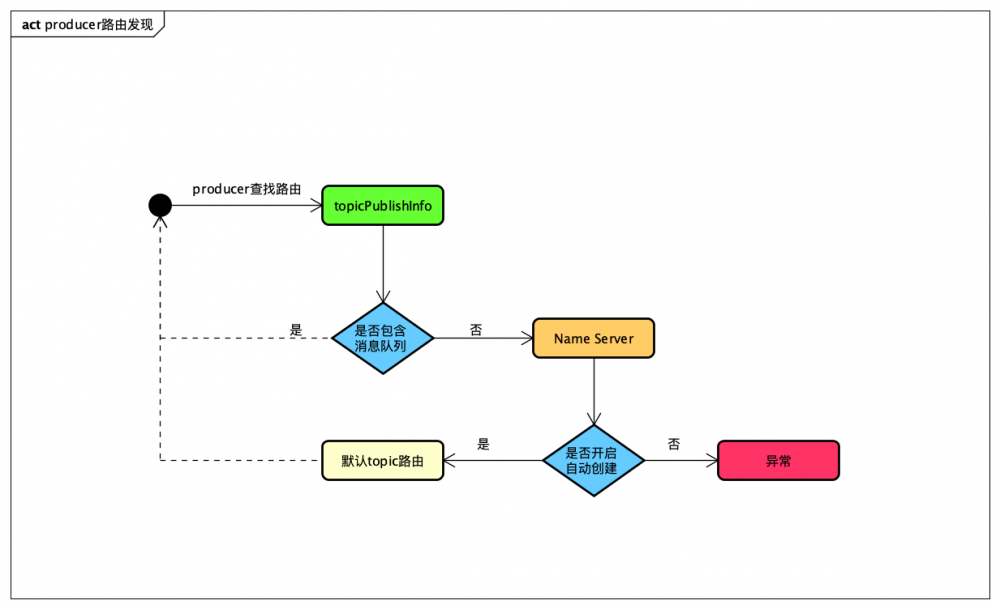 udateTopicRoutelnfoFromNameServer这个方法的功能是消息生产者更新和维护路由缓存,其内部会对比路由信息和本地的缓存路由信息,以此判断是否需要更新路由信息
selectOneMessageQueue 选择消息队列来发消息
其实在这之前有行代码也值得关注一下 这块同步发送,mq本身是有个重试的次数可配置 默认x+1 然后根据发送的次数进行按需重试,如果失败就continue进入for循环
int timesTotal = communicationMode == CommunicationMode.SYNC ? 1 + this.defaultMQProducer.getRetryTimesWhenSendFailed() : 1;
复制代码
然后我们具体看一下是这么去选择消息队列的
public MessageQueue selectOneMessageQueue(final TopicPublishInfo tpInfo, final String lastBrokerName) {
    //是否开启故障延时机制
    if (this.sendLatencyFaultEnable) {
        try {
            // 通过ThreadLocal保存上一次发送的消息队列下标
            int index = tpInfo.getSendWhichQueue().getAndIncrement();
            // 循环topic下所有的消息队列 确保所在Broker是正常的
            for (int i = 0; i < tpInfo.getMessageQueueList().size(); i++) {
                int pos = Math.abs(index++) % tpInfo.getMessageQueueList().size();
                if (pos < 0)
                    pos = 0;
                MessageQueue mq = tpInfo.getMessageQueueList().get(pos);
                // 判断当前消息队列是否可用
                if (latencyFaultTolerance.isAvailable(mq.getBrokerName())) {
                    if (null == lastBrokerName || mq.getBrokerName().equals(lastBrokerName))
                        return mq;
                }
            }

            final String notBestBroker = latencyFaultTolerance.pickOneAtLeast();
            int writeQueueNums = tpInfo.getQueueIdByBroker(notBestBroker);
            if (writeQueueNums > 0) {
                final MessageQueue mq = tpInfo.selectOneMessageQueue();
                if (notBestBroker != null) {
                    mq.setBrokerName(notBestBroker);
                    mq.setQueueId(tpInfo.getSendWhichQueue().getAndIncrement() % writeQueueNums);
                }
                return mq;
            } else {
                latencyFaultTolerance.remove(notBestBroker);
            }
        } catch (Exception e) {
            log.error("Error occurred when selecting message queue", e);
        }

        return tpInfo.selectOneMessageQueue();
    }

    return tpInfo.selectOneMessageQueue(lastBrokerName);
}
复制代码
首先在一次消息发送过程中,可能会多次执行选择消息队列这个方法,lastBrokerName 就是上一次选择的执行发送消息失败的Broker.
第一次执行消息队列选择时,lastBrokerName为null,此时直接用sendWhichQueue自增再获取值,与当前路由表中消息队列个数取模,返回该位置的MessageQueue(selectOneMessageQueue()方法),如果消息发送再失败的话, 下次进行消息队列选择时规避上次 MesageQueue 所在的Broker,否则还是很有可能再次失败.
该算法在一次消息发送过程中能成功规避故障的Broker,但如果Broker若机,由于路由算法中的消息队列是按Broker排序的,如果上一次根据路由算法选择的是宕机的 Broker的第一个队列,那么随后的下次选择的是宕机Broker的第二个队列,消息发送很有可能会失败,再次引发重试,带来不必要的性能损耗,那么有什么方法在一次消息发送失败后,暂时将该Broker排除在消息队列选择范围外呢?或许有朋友会问,Broker不可用后路由信息中为什么还会包含该Broker的路由信息呢?其实这不难解释:首先, NameServer检测Broker是否可用是有延迟的,最短为一次心跳检测间隔(1Os);
其次,NameServer不会检测到Broker宕机后马上推送消息给消息生产者,而是消息生产者每隔30s更新一次路由信息,所以消息生产者最快感知Broker最新的路由信息也需要30s。 如果能引人一种机制,在Broker宕机期间,如果一次消息发送失败后,可以将该 Broker暂时排除在消息队列的选择范围中.
updateFaultItem 更新故障延迟机制
/**
 * 更新故障延迟
 *
 * @param brokerName
 * @param currentLatency
 * @param isolation
 */
public void updateFaultItem(final String brokerName, final long currentLatency, boolean isolation) {
    if (this.sendLatencyFaultEnable) {
        long duration = computeNotAvailableDuration(isolation ? 30000 : currentLatency);
        this.latencyFaultTolerance.updateFaultItem(brokerName, currentLatency, duration);
    }
}

/**
 * 计算不可用间隔时间
 *
 * @param currentLatency
 * @return
 */
private long computeNotAvailableDuration(final long currentLatency) {
    for (int i = latencyMax.length - 1; i >= 0; i--) {
        if (currentLatency >= latencyMax[i])
            return this.notAvailableDuration[i];
    }

    return 0;
}
复制代码
如果isolation为true,则使用30s作为computeNotAvailableDuration方法的参数;
如果isolation为false,则使用本次消息发送时延作为 computeNotAvailableDuration方法的参数,那computeNotAvailableDuration的作用是计算因本次消息发送故障需要将Broker规避的时长,也就是接下来多久的时间内该 Broker将不参与消息发送队列负载.
具体算法:从latencyMax数组尾部开始寻找,找到第一个比currentLatency小的下标,然后从notAvailableDuration数组中获取需要规避的时长,该方法最终调用 LatencyFaultTolerance的updateFaultltem。
用法以及其注意事项
DefaultMQProducer producer = new DefaultMQProducer("SYNC_PRODUCER_GROUP");
    // 设置NameServer地址
    producer.setNamesrvAddr("localhost:9876");
    // 只需要在发送前初始化一次
    producer.start();
    for (int i = 0; i < 1; i++) {
        try {
            // 构建消息实体
            Message msg = new Message("SYNC_MSG_TOPIC", "TagA", ("Hello RocketMQ " + i).getBytes(RemotingHelper.DEFAULT_CHARSET));
            // 发送同步消息
            SendResult sendResult = producer.send(msg);
            System.out.printf("%s%n", sendResult);
        } catch (Exception e) {
            e.printStackTrace();
            Thread.sleep(1000);
        }
    }
producer.shutdown();
复制代码
- 首先很多时候我们的系统连sendResult的结果都不关心[也难怪,毕竟框架都是void方法],别跟我说正常情况不会失败,如果失败怎么办,会不会本地做的一些操作会造成脏数据。
- send前业务方系统都应该做持久化操作,因为本身MQ故障的时候,损失是难以衡量的,为什么要持久化,持久化就是为了故障修复。
小结
-
- 消息队列负载机制
producer发送消息前,优先从本地路由表中读取,没有就从Name Server获取路由信息,更新本地信息表,并且producer每隔30s从Name Server同步路由信息
-
- 消息发送异常机制
发送高可用的两个方式: 重试机制 、 故障规避机制
重试机制 就是在发送失败时,x+1的重试次数,尽可能的保障能把消息成功发出去。
故障规避 就是在消息发送过程中发现错误,那么就把这个broker加上规避时间,这段时间内都不会去选择这个broker发消息,提高发送消息的成功率。
异步发送
流程图
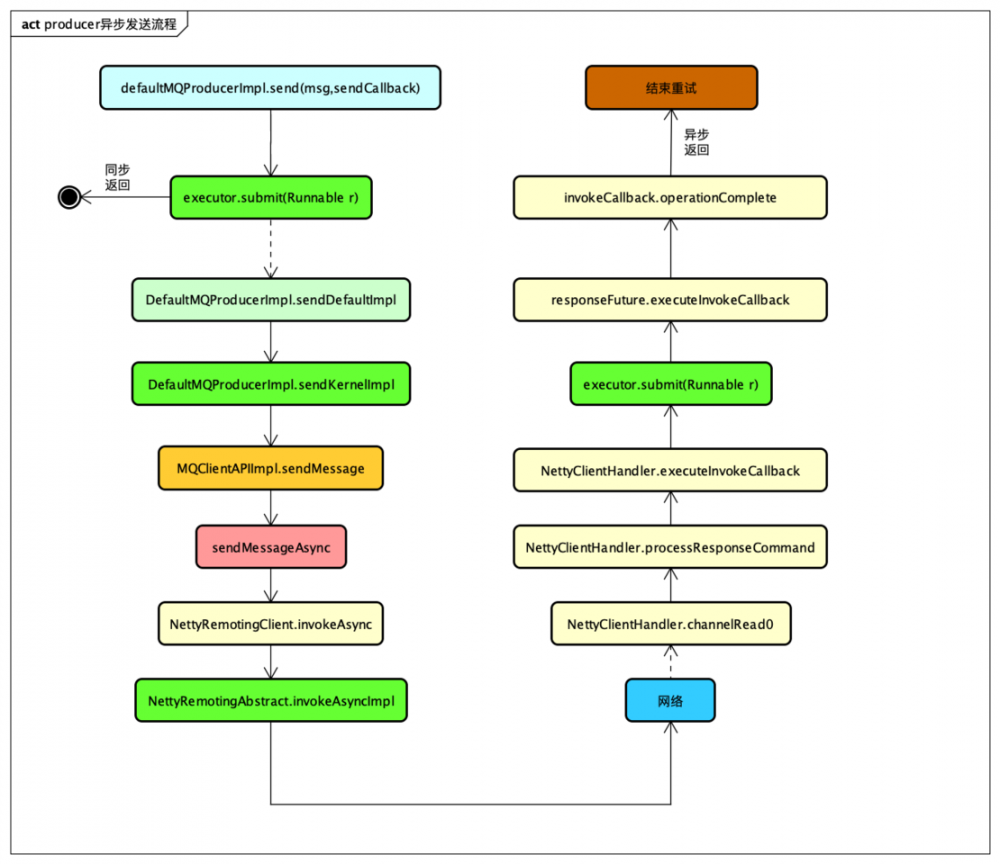
实现机制
- 用于注册回调方法SendCallBack OnSuccess、OnException
- MQClientAPIImpl.sendMessageAsync触发回调
- 可配置一个特殊的线程池处理response或使用publicExecutor,当线程池拒绝任务,会在当前线程(defaultEventExecutorGroup)中执行回调
private void executeInvokeCallback(final ResponseFuture responseFuture) {
    boolean runInThisThread = false;
    // 这块执行的时候,优先去获取可配置的公用线程池,如果有可用的就使用,没有就跑在当前线程中
    ExecutorService executor = this.getCallbackExecutor();
    if (executor != null) {
        try {
            executor.submit(new Runnable() {
                @Override
                public void run() {
                    try {
                        responseFuture.executeInvokeCallback();
                    } catch (Throwable e) {
                        log.warn("execute callback in executor exception, and callback throw", e);
                    } finally {
                        responseFuture.release();
                    }
                }
            });
        } catch (Exception e) {
            runInThisThread = true;
            log.warn("execute callback in executor exception, maybe executor busy", e);
        }
    } else {
        runInThisThread = true;
    }

    if (runInThisThread) {
        try {
            responseFuture.executeInvokeCallback();
        } catch (Throwable e) {
            log.warn("executeInvokeCallback Exception", e);
        } finally {
            responseFuture.release();
        }
    }
}
复制代码
- 递归的调用sendMessageAsync重发消息
int tmp = curTimes.incrementAndGet();
        if (needRetry && tmp <= timesTotal) {
            String retryBrokerName = brokerName;//by default, it will send to the same broker
            if (topicPublishInfo != null) { //select one message queue accordingly, in order to determine which broker to send
                MessageQueue mqChosen = producer.selectOneMessageQueue(topicPublishInfo, brokerName);
                retryBrokerName = mqChosen.getBrokerName();
            }
            String addr = instance.findBrokerAddressInPublish(retryBrokerName);
            log.info("async send msg by retry {} times. topic={}, brokerAddr={}, brokerName={}", tmp, msg.getTopic(), addr,
                    retryBrokerName);
            try {
                request.setOpaque(RemotingCommand.createNewRequestId());
                sendMessageAsync(addr, retryBrokerName, msg, timeoutMillis, request, sendCallback, topicPublishInfo, instance,
                        timesTotal, curTimes, context, producer);
            } catch (InterruptedException e1) {
                onExceptionImpl(retryBrokerName, msg, timeoutMillis, request, sendCallback, topicPublishInfo, instance, timesTotal, curTimes, e1,
                        context, false, producer);
            } catch (RemotingConnectException e1) {
                producer.updateFaultItem(brokerName, 3000, true);
                onExceptionImpl(retryBrokerName, msg, timeoutMillis, request, sendCallback, topicPublishInfo, instance, timesTotal, curTimes, e1,
                        context, true, producer);
            } catch (RemotingTooMuchRequestException e1) {
                onExceptionImpl(retryBrokerName, msg, timeoutMillis, request, sendCallback, topicPublishInfo, instance, timesTotal, curTimes, e1,
                        context, false, producer);
            } catch (RemotingException e1) {
                producer.updateFaultItem(brokerName, 3000, true);
                onExceptionImpl(retryBrokerName, msg, timeoutMillis, request, sendCallback, topicPublishInfo, instance, timesTotal, curTimes, e1,
                        context, true, producer);
            }
        } else {

            if (context != null) {
                context.setException(e);
                context.getProducer().executeSendMessageHookAfter(context);
            }

            try {
                sendCallback.onException(e);
            } catch (Exception ignored) {
            }
        }
复制代码
这里很好理解:在remotingClient.invokeAsync这块有异常的话递归重试,并且规避不可用的broker
-
异步发送的超时语义跟同步发送略有不同
-
同步在哪里返回?
当前设计线程池提交任务的时候就返回了,是毕竟符合逻辑的; 但是对比4.2的老版本 是在NettyRemotingClient.invokeAsync返回的,严格意义来说 老版本这样设计就已经不能称为严格意义上的异步了;
- 异步在哪里返回?
- 请求返回 NettyClientHandler
- 请求发送失败 ChannelFutureListener NettyRemotingAbstract#requestFail
- 连接中断 NettyConnectManageHandler.close() NettyRemotingClient.NettyConnectManageHandler
- 请求超时 NettyRemotingAbstract#scanResponseTable
用法
producer.send(msg, new SendCallback() {
    @Override
    public void onSuccess(SendResult sendResult) {
        countDownLatch.countDown();
        System.out.printf("%-10d OK %s %n", index, sendResult.getMsgId());
    }

    @Override
    public void onException(Throwable e) {
        countDownLatch.countDown();
        System.out.printf("%-10d Exception %s %n", index, e);
        e.printStackTrace();
    }
});
复制代码
小结
- 异步的出现就是为了系统的服务能快速响应,比如外卖:下单->结算-> 配送,我们只需要分别同步调用发送,关心对应的回调即可;
作为消息的发送方,如何做到消息不丢失
最多发送一次 最少发送一次 精确发送一次
-
- 首先发送方做持久化操作,防止MQ故障,导致消息都没走到MQ服务器;有了持久化,就方便应对故障修复;
-
- 调用发送api,同步返回的结果我们是需要关心的;
-
- 建议采用RocketMQ的事务消息,保障消息精确发送和正确消费
消息重试延伸
-
- 流控SYSTEM_BUSY不会重试,消息重试并不总会重试
-
- 是否重试次数越多越好?总超时时间=超时时间*(x+1)
-
- 超时可能发生在网络之前,尤其是用户自定义逻辑
-
- 故障延迟机制还可以用于分段流量控制和其他场景
消息存本地
- 提高发消息的可靠性
- 使用BerkeleyDB嵌入式KV数据库,消息存储在本地文件
- 尽量减少对客户端的影响:严格控制存本地的条数和大小,提供异步写库
- 用户交互:提供规则接口,用户可以自定义存本地规则和重新投递规则
- 不保证消息一定不丢,但会在丢消息时通知用户并告知丢失的原因
高可用设计思考与拓展
RocketMQ系统架构图
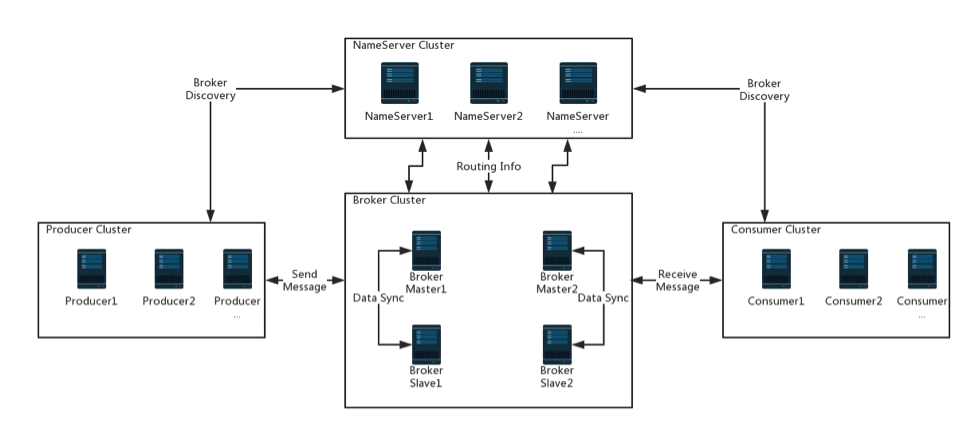
- producer去nameServer找broker 发消息到broker
- consumer去nameServer找broker 从broker拉或接收消息
- broker启动的时候注册读写队列相关基本信息,同时定时同步路由信息
多master部署,防止单点故障
namesrv怎么管理broker
- broker启动往nameServer注册信息 org.apache.rocketmq.broker.BrokerController#doRegisterBrokerAll
private void doRegisterBrokerAll(boolean checkOrderConfig, boolean oneway,
    TopicConfigSerializeWrapper topicConfigWrapper) {
    List<RegisterBrokerResult> registerBrokerResultList = this.brokerOuterAPI.registerBrokerAll(
        this.brokerConfig.getBrokerClusterName(),
        this.getBrokerAddr(),
        this.brokerConfig.getBrokerName(),
        this.brokerConfig.getBrokerId(),
        this.getHAServerAddr(),
        topicConfigWrapper,
        this.filterServerManager.buildNewFilterServerList(),
        oneway,
        this.brokerConfig.getRegisterBrokerTimeoutMills(),
        this.brokerConfig.isCompressedRegister());
}
复制代码
nameServer将broker丢过来的数据搞成自己维护的一套
- 每个cluster有哪些broker set
- 每个broker set包括哪些broker,brokerId和broker的ip:port
- 每个broker的存活情况,根据每次broker上报来的信息,清除可能下线的broker
- 每个topic的消息队列信息,几个读队列,几个写队列
producer发送消息的时候知道发送到哪一个broker(为什么是master)
消息冗余(主从结构),防止消息丢失
RocketMQ通过主从结构来实现消息冗余,master接收来自producer发送来的消息,然后同步消息到slave,根据master的role不同,同步的时机可分为两种不同的情况:
- SYNC_MASTER:如果master是这种角色,每次master在将producer发送来的消息写入内存(磁盘)的时候会同步等待master将消息传输到slave
- ASYNC_MASTER:这种角色下消息会异步复制到slave
ASYNC_MASTER同步数据到slave
- salve连接到master,向master上报slave当前的offset
- master收到后确认给slave发送数据的开始位置
- master查询开始位置对应的MappedFIle
- master将查找到的数据发送给slave
- slave收到数据后保存到自己的CommitLog
SYNC_MASTER同步数据到slave
SYNC_MASTER和ASYNC_MASTER传输数据到salve的过程是一致的,只是时机上不一样。SYNC_MASTER接收到producer发送来的消息时候,会同步等待消息也传输到salve。
- master将需要传输到slave的数据构造为GroupCommitRequest交给GroupTransferService
- 唤醒传输数据的线程(如果没有更多数据需要传输的的时候HAClient.run会等待新的消息)
- 等待当前的传输请求完成
可靠性
- 所有发往broker的消息,有同步刷盘和异步刷盘机制,总的来说,可靠性非常高
- 同步刷盘时,消息写入物理文件才会返回成功,因此非常可靠
- 异步刷盘时,只有机器宕机,才会产生消息丢失,broker挂掉可能会发生,但是机器宕机崩溃是很少发生的,除非突然断电
拓展【RocketMQ是如何做到支撑每秒几十万高并发】
页缓存技术+磁盘顺序写
开始的mq架构直接写入磁盘
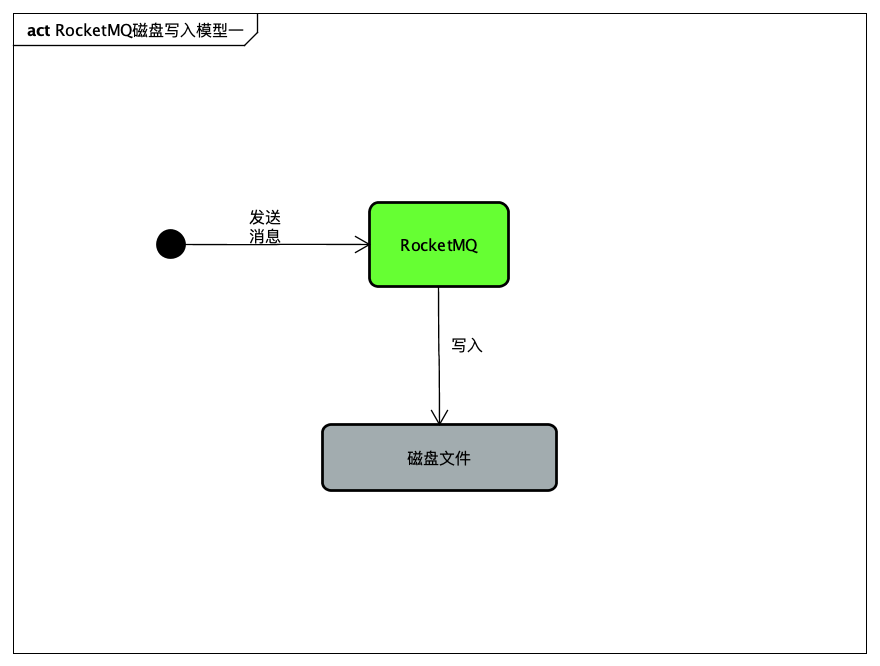 直观感受,IO操作性能是比较低的
发现操作系统级别有个Page Cache[或 称OS Cache]的东西,
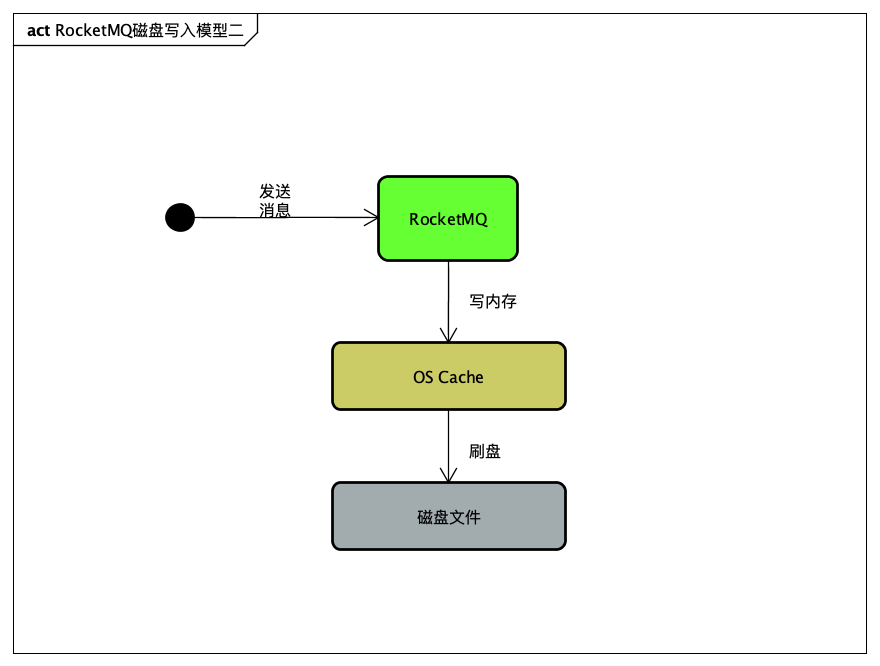 基于ECS乞丐版linux环境测试 无cache写入和有cache
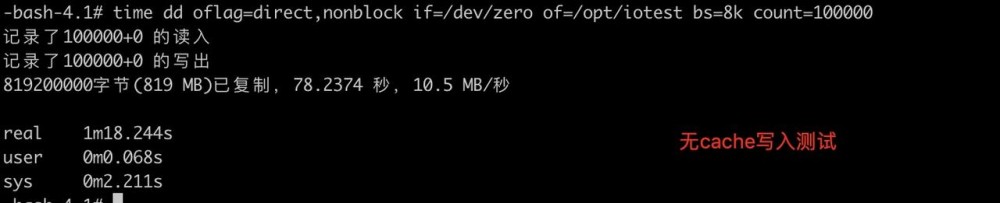
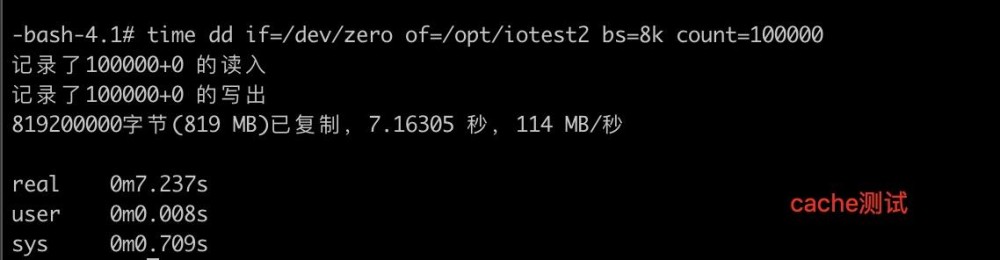
写入819M的操作,cache操作只需要7s 无cache操作就需要80s左右;更何况这是台烂机器的配置,好点的机器应该能相差个百倍;
所以如果按照第一个写入模型 如果写入1条耗时1ms => 1000/s 利用OS Cache的话 假设写入1条耗时0.01ms => 10w/s 这样一来每秒支持几十万已经初步实现
page cache了解链接
零拷贝技术
首先写的问题解决了,那么消费者怎么读,按照我们的经验肯定是缓存啊,那么来吧
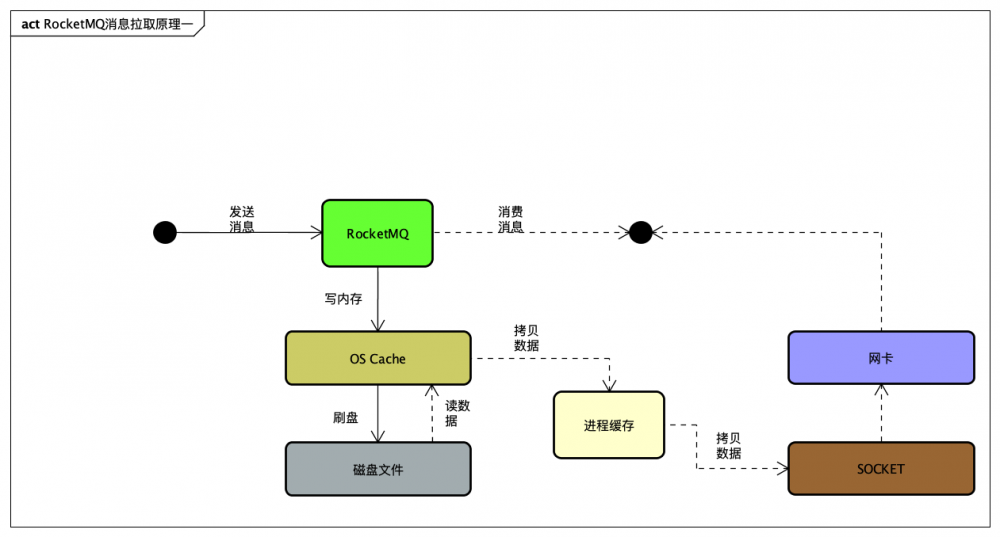
数据源:磁盘读到缓存(OS cache) cache copy -> 进程缓存 -> cache copy -> SOCKET
其实性能已经可以了 但是多了两步不必要的拷贝 那么如果没有这两步拷贝是不是就无敌了呢 答案:是
于是引入了零拷贝技术
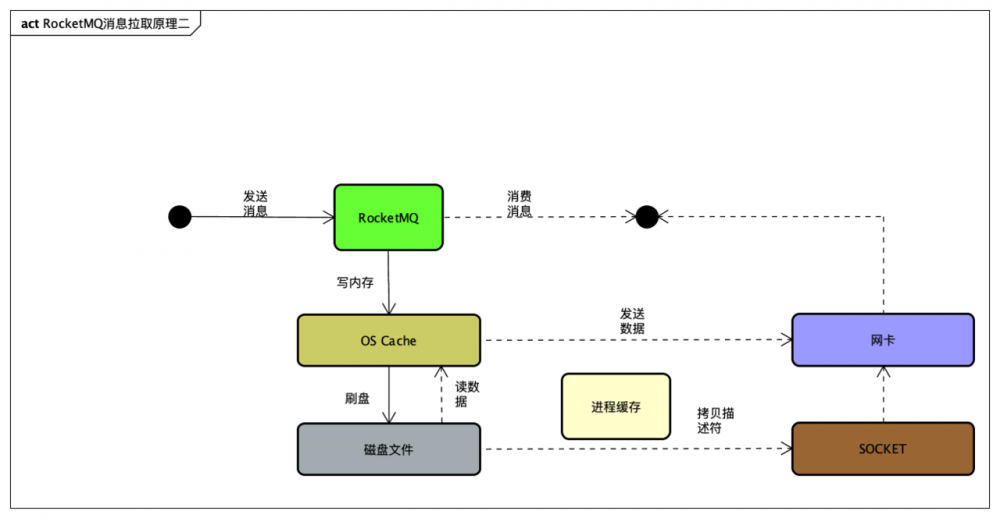 不难理解对Socket缓存仅仅就是拷贝数据的描述符过去,然后数据就直接从os cache中发送到网卡上去了,这个过程大大的提升了数据消费时读取文件数据的性能
结语
若有缘下期见
正文到此结束
- 本文标签: setInterval bus tag 配置 http 代码 ORM 目录 参数 RocketMQ heartbeat 线程 client 缓存 数据 producer 解析 MQ apache final 架构设计 负载均衡 并发 map ECS Netty Service linux list 分布式 db 数据库 build CountDownLatch 开发者 message App IO update 锁 模型 https stream 集群 ask API scala 消息队列 id tab 同步 synchronized find 部署 UI 线程池 CTO executor java 开发 高可用 网卡 cat src 重试机制 管理 brokerName 实例 Master 测试 consumer equals tar 递归 系统架构 ACE 时间 cache rmi 操作系统 高并发 ip 进程 dist retry IDE queue Select 页缓存 服务器
- 版权声明: 本文为互联网转载文章,出处已在文章中说明(部分除外)。如果侵权,请联系本站长删除,谢谢。
- 本文海报: 生成海报一 生成海报二
热门推荐


相关文章


Loading...
![[HBLOG]公众号](https://www.liuhaihua.cn/img/qrcode_gzh.jpg)

