OkHttp源码分析(一) 请求和响应过程简单分析
这篇文章简要介绍OkHttp的请求和响应过程。
文章基于 OkHttp3.14.3 版本
0 前言
OkHttp 作为当下Java系编程的网络请求库,其热门程度自不必说了。网上有关OkHttp的使用、封装和源码分析的文章和代码也早已是百家齐放、甚至可以说是烂大街了。然而尽管如此,笔者还是希望能够将对OkHttp的学习和研究记录下来形成自己的内容,方便以后查看,于是开始写吧,好记性不如烂笔头。
那就从最简单的开始。这篇文章打算简要描述一下OkHttp中大致的请求响应过程。
1 开始
首先看看简单的同步GET请求和异步GET请求:
- 同步GET请求 :
public static void getSync() {
    // Step 1. 创建一个HttpClient实例用于创建请求任务
    OkHttpClient httpClient = new OkHttpClient();
    // Step 2. 构建一个Request用于封装请求地址、请求类型、参数等信息
    Request request = new Request.Builder().get()
                                           .url("https://www.baidu.com")
                                           .build();
    // Step 3. 创建一个新的请求任务Call
    Call call = httpClient.newCall(request);
    try {
        // Step 4. 发起请求
        Response response = call.execute();
        // Step 5. 读取、处理请求结果
        ResponseBody responseBody = response.body();
        if (responseBody != null) {
            System.out.println(responseBody.string());
        }
    } catch (IOException e) {
        e.printStackTrace();
    }
}
- 异步GET请求:
public void getAsync() {
    // Step 1. 创建一个HttpClient实例用于创建请求任务
    OkHttpClient httpClient = new OkHttpClient();
    // Step 2. 构建一个Request用于封装请求地址、请求类型、参数等信息
    Request request = new Request.Builder().get()
                                           .url("https://www.baidu.com")
                                           .build();
    // Step 3. 创建一个新的请求任务Call
    Call call = httpClient.newCall(request);
    // Step 4. 发起请求
    call.enqueue(new Callback() {
        @Override
        public void onFailure(final Call call, final IOException e) {
            e.printStackTrace();
        }

        @Override
        public void onResponse(final Call call, final Response response) throws IOException {
            // Step 5. 读取、处理请求结果
            ResponseBody responseBody = response.body();
            if (responseBody != null) {
                System.out.println(responseBody.string());
            }
        }
    });

}
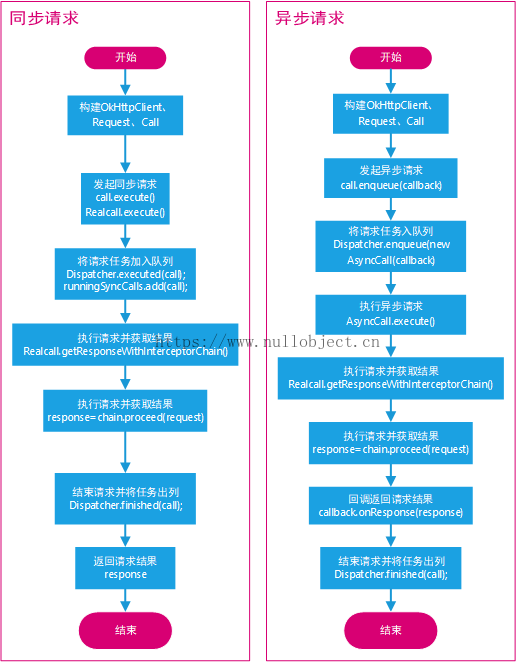
可以看到,不管是同步还是异步请求,都需要经过Step1~Step3三个步骤构建一个请求任务,并通过调用call.execute()/call.enqueue(callback)来执行同步/异步请求。那接下来就看看这两个方法的执行过程吧。
首先看看call.execute():
点击查看Call类,发现Call是一个接口,尝试跳转到call.execute()方法的具体实现( ps: AS快捷键Ctrl+Alt+B实现快速跳转到方法的具体实现 ),来到Call接口的唯一实现类 RealCall 类,RealCall.execute()具体实现如下:
@Override public Response execute() throws IOException {
  // Step 1.
  synchronized (this) {
    if (executed) throw new IllegalStateException("Already Executed");
    executed = true;
  }
  // Step 2.
  transmitter.timeoutEnter();
  transmitter.callStart();
  try {
    // Step 3.
    client.dispatcher().executed(this);
    // Step 4.
    return getResponseWithInterceptorChain();
  } finally {
    // Step 5.
    client.dispatcher().finished(this);
  }
}
- Step 1.执行请求之前,确保该call请求任务尚未被执行过。由此可以看到OkHttp要求每个请求任务只能被执行一次。
- Step 2.开始计算超时时间,并记录 请求开始callStart 这个流程。
- Step 3.通过 Dispatcher 将本次请求任务记录到同步请求队列 runningSyncCalls 。runningSyncCalls是一个实现为ArrayDeque的双向队列:
/** 正在运行的同步请求任务,包括尚未结束就已经取消同步请求. */
private final Deque<RealCall> runningSyncCalls = new ArrayDeque<>();
synchronized void executed(RealCall call) {
  runningSyncCalls.add(call);
}
- Step 4. 接着调用RealCall.getResponseWithInterceptorChain()发起请求并获取请求结果;
- Step 5.在返回结果给上层调用之前,通过Dispatcher将本次任务从runningSyncCalls队列中移除以表示本次请求任务结束:
- Step 6.返回请求结果给上层,请求结束。
经过以上这几个步骤,一次同步GET请求就算是结束了。可以发现,RealCall.getResponseWithInterceptorChain()方法负责进行具体的HTTP请求,这里暂时不跟进去,先来 看看异步的GET请求 :
Ctrl+Alt+B 快速跳转到 call.enqueue(callback) 的具体实现RealCall.enqueue(callback):
@Override public void enqueue(Callback responseCallback) {
  // Step 1.
  synchronized (this) {
    if (executed) throw new IllegalStateException("Already Executed");
    executed = true;
  }
  // Step 2.
  transmitter.callStart();
  // Step 3.
  client.dispatcher().enqueue(new AsyncCall(responseCallback));
}
- Step 1.与同步GET请求的Step 1相同。
- Step 2.记录该请求过程。
- Step 3.构造一个 AsyncCall 对象并加入请求队列。AsyncCall是RealCall的内部类,用于表示异步的请求任务。AsyncCall的父类 NamedRunnable 是一个实现了Runnable接口的抽象类并重写了Runnable.run方法,同时对外提供了 execute() 抽象方法,并在run方法实现中调用。因此,接下来关注AsyncCall类实现的execute()方法,既然AsyncCall是一个Runnable,而run中又调用了execute(), 可以判定,异步请求任务最终会执行到这里并进行实际的HTTP请求 :
@Override protected void execute() {
  boolean signalledCallback = false;
  // Step 3.1 开始计算请求超时时间
  transmitter.timeoutEnter();
  try {
    // Step 3.2 发起请求并获取请求结果
    Response response = getResponseWithInterceptorChain();
    signalledCallback = true;
    // Step 3.3 请求成功,将结果通过回调接口返回给上层
    responseCallback.onResponse(RealCall.this, response);
  } catch (IOException e) {
    if (signalledCallback) {
      // Do not signal the callback twice!
      Platform.get().log(INFO, "Callback failure for " + toLoggableString(), e);
    } else {
      // 请求失败
      responseCallback.onFailure(RealCall.this, e);
    }
  } finally {
    // Step 4.结束本次请求任务,并从队列中移除
    client.dispatcher().finished(this);
  }
}
}
而查阅execute的实现也验证了这个判定是正确的,至于何时,从哪儿,会执行到这个execute方法,先留个小坑吧后续再填~。同时,对比RealCall.execute()方法(同步请求)和AsyncCall.execute()方法(异步请求)发现,不管是同步还是异步请求,最后都会通过调用getResponseWithInterceptorChain()方法来实现网络请求求并获取返回结果,看看这个方法的实现:
Response getResponseWithInterceptorChain() throws IOException {
  // 构建一个完整的拦截器列表
  List<Interceptor> interceptors = new ArrayList<>();
  // 添加用户自定义的拦截器
  interceptors.addAll(client.interceptors());
  // 添加用于失败重试和重定向的拦截器
  interceptors.add(new RetryAndFollowUpInterceptor(client));
  // 添加用于连接应用层和网络层的拦截器,该拦截器会将一个用户请求转换为网络请求,并将网络请求结果以用户友好的方式返回
  interceptors.add(new BridgeInterceptor(client.cookieJar()));
  // 添加用于缓存的拦截器
  interceptors.add(new CacheInterceptor(client.internalCache()));
  // 添加用于打开与服务器间网络连接的拦截器
  interceptors.add(new ConnectInterceptor(client));
  if (!forWebSocket) {
    // 如果本次请求任务是websocket请求,则添加用于处理websocket请求的拦截器,该拦截器也需要用户自定义
    interceptors.addAll(client.networkInterceptors());
  }
  // 添加最后一个拦截器,该拦截器负责执行最终的网络请求并返回结果
  interceptors.add(new CallServerInterceptor(forWebSocket));
    // 构建一个拦截器链chain对象
  Interceptor.Chain chain = new RealInterceptorChain(interceptors, transmitter, null, 0,
                                                     originalRequest, this, client.connectTimeoutMillis(),
                                                     client.readTimeoutMillis(), client.writeTimeoutMillis());

  boolean calledNoMoreExchanges = false;
  try {
    // 执行请求并获取返回结果
    Response response = chain.proceed(originalRequest);
    if (transmitter.isCanceled()) {
      closeQuietly(response);
      throw new IOException("Canceled");
    }
    return response;
  } catch (IOException e) {
    calledNoMoreExchanges = true;
    throw transmitter.noMoreExchanges(e);
  } finally {
    if (!calledNoMoreExchanges) {
      transmitter.noMoreExchanges(null);
    }
  }
}
可以看到,这个方法最终是通过chain.proceed(originalRequest);实现请求和返回结果,到这里,OkHttp的请求过程就结束了。因此,一个OkHttp的请求过程大致如下:
先到这里吧。本来想着一篇写完的但太长了似乎自己都不想看,还是一步步来吧。下一篇开始着重分析以上OkHttp请求过程中接触到的各个关键的类。
2 The End :)
欢迎关注公众号:

文章首发在个人博客 https://www.nullobject.cn ,公众号 NullObject 同步更新。
正文到此结束
热门推荐


相关文章

近期评论
-
出现OpenClaw "device signature expired"。the Gateway rejects if Math.abs(Date.now() - signedAt) > 10 * 60 * 1000 (10 minutes)
-
-
想购买您这个站,我的联系方式QQ741756694微信同步 能卖联系
-
-
-
博主的博客用的什么技术栈,内容都是干货,赞
-
-
https://www.liuhaihua.cn/archives/40657.html 这篇博客中的图片打不开了
-
不会英语啊。
-
Loading...
![[HBLOG]公众号](https://www.liuhaihua.cn/img/qrcode_gzh.jpg)

