Android自动化脚本多渠道加固、打包
爱回收拍机堂APP因为要上应用市场,渠道运营找了我希望我能给出加固的多渠道包,现在目前国内市场的android应用市场大部分都是需要加固的,所以我们需要进行加固和多渠道打包构建自动化。
前期技术调研
调研了Android原生方案,美团walle方案,360加固保三个主流的打包方案,各有优缺点:
| 技术方案 | 优点 | 缺点 |
|---|---|---|
| Android原生方案 | 通过PrpductFlovers进行变体打包,变体与变体之间构建灵活 | 每个变体都是assebleXXXRelease重新打包,打包速度慢 |
| 美团walle | 每个渠道是通过解apk之后,插入渠道信息,再重新签名 打包速度快 | 加固需要自己实现或者其他第三方方案 |
| 360加固保 | 同walle方案类似,打包速度快;可以加固多渠道打包一体化 | 渠道之间的差异需要获取meta-data硬编码 |
我们实际需求
-
目前每个渠道只是一个纯粹的apk进行上架,暂时没有针对某个渠道进行特殊化需求。
-
我们需要将渠道的来源传递给BI进行渠道分析
-
很多渠道上架需要加固apk,所以必须需要apk加固
结合上面的调研和我们实际的需求,我们决定选择360加固包进行加固。
那就开始整。。。
加固打包流程图
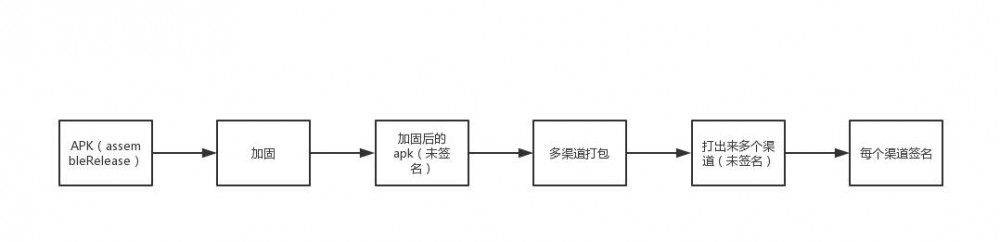
需求梳理
-
在assembleRelease后面新建一个任务来处理apk包
-
找到assembleRelease生成的app-release.apk
-
对这个apk进行加固
-
对这个apk进行多渠道打包
-
对多渠道的apk重新签名
-
把apk包持续交付给测试和渠道运营
代码实现
找到360加固宝的zip以及文档:
360加固保下载地址: jiagu.360.cn/index.html
因为我们需要把自动加固和多渠道打包做到自动化CI(jenkins)上,所以我们需要使用360加固宝的命令行工具
命令行工具文档: jiagu.360.cn/qcms/help.h…
通过文档,找到几个关键的命令行
# 登录
java -jar jiagu.jar –login <username> <password>

#导入签名
java -jar jiagu.jar  -importsign <keystore_path> <keystore_password> <alias><alias_password>

#导入渠道列表文件
java -jar jiagu.jar -importmulpkg <mulpkg_path>

#加固 多渠道打包
java -jar jiagu.jar -jiagu <inputAPKpath> <outputpath> -autosign  -automulpkg

复制代码
代码实现
- 找到assembleRelease生成的app-release.apk
/**
     * 找出release文件app build 文件夹中
     * 只能匹配出 以apk结尾 并且包含release字符串的apk文件
     */
    findReleaseApkPath = { ->
        def appBuildOutPut = new File("${rootProject.rootDir}/app/build/outputs/apk/release")
        def apkFile = null
        appBuildOutPut.eachFile {
            if (it.name.endsWith(".apk") && it.name.contains("release")) {
                println(it)
                apkFile = it
            }
        }
        return apkFile
    }
复制代码
- 调用360加固.jar 进行加固打包
/**
     * 通过调用360的命令行加固并且多渠道打包
     * apk ->  原有release包的文件
     * outputPath -> 多渠道打包后文件输出路径
     */
    reinForceApk = { File apk, File outPutPath ->
        println(outPutPath)
        if (apk == null || !apk.exists()) {
            println("没有找到apk文件")
            throw new FileNotFoundException("没有找到APK文件")
        }
        if (!outPutPath.exists()) {
            outPutPath.mkdirs()
        }

        "java -jar ${rein360ForceJarPath} -login ${account360} ${psw360}".execute().waitForProcessOutput(System.out, System.err)

        "java -jar ${rein360ForceJarPath} -importmulpkg ${mulpkgPath}".execute().waitForProcessOutput(System.out, System.err)

        "java -jar ${rein360ForceJarPath} –importsign ${keyStorePath} ${KEYSTORE_PASSWORD} ${KEY_ALIAS} ${KEY_PASSWORD}".execute().waitForProcessOutput(System.out, System.err)

        "java -jar ${rein360ForceJarPath} -config  -analyse".execute().waitForProcessOutput(System.out, System.err)

        "java -jar ${rein360ForceJarPath} -jiagu ${apk.path} ${outPutPath.path} -autosign -automulpkg".execute().waitForProcessOutput(System.out, System.err)

    }
复制代码
- 把这个加固的任务写在task上,并且建立在assembleRelease后面
task assembleReinForceRelease() {
    group 'multipleChannels'
    dependsOn('assembleRelease')

    doLast {
        def apk = findReleaseApkPath()
        def outputFile = new File(reinForcedOutPutPath)
        reinForceApk(apk, outputFile)
    }
}

复制代码
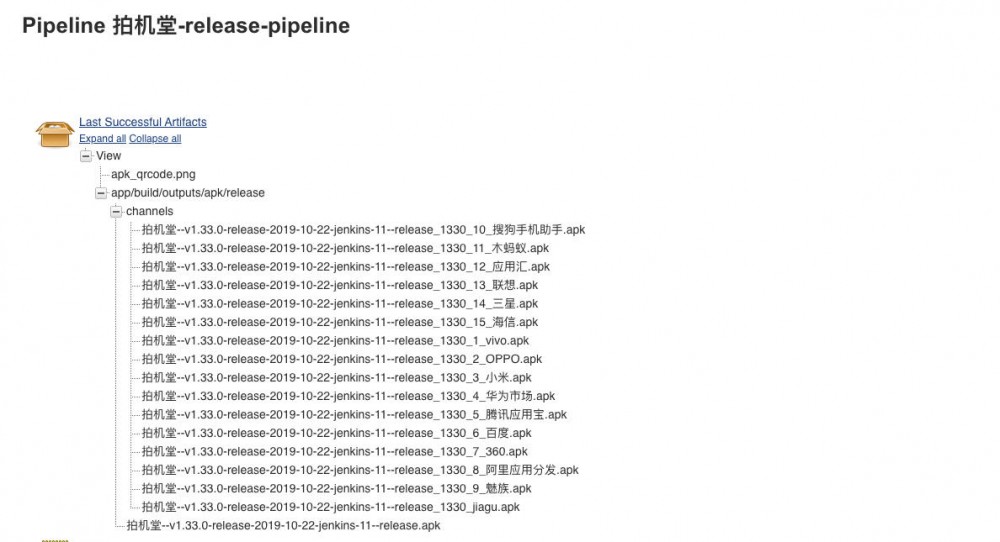
- 通过Jenkins归档所有的apk文件(具体在Jenkins ci的操作)
完整的代码实现
在官网下载360加固zip包解压到工程的子目录下,目录结构如下:
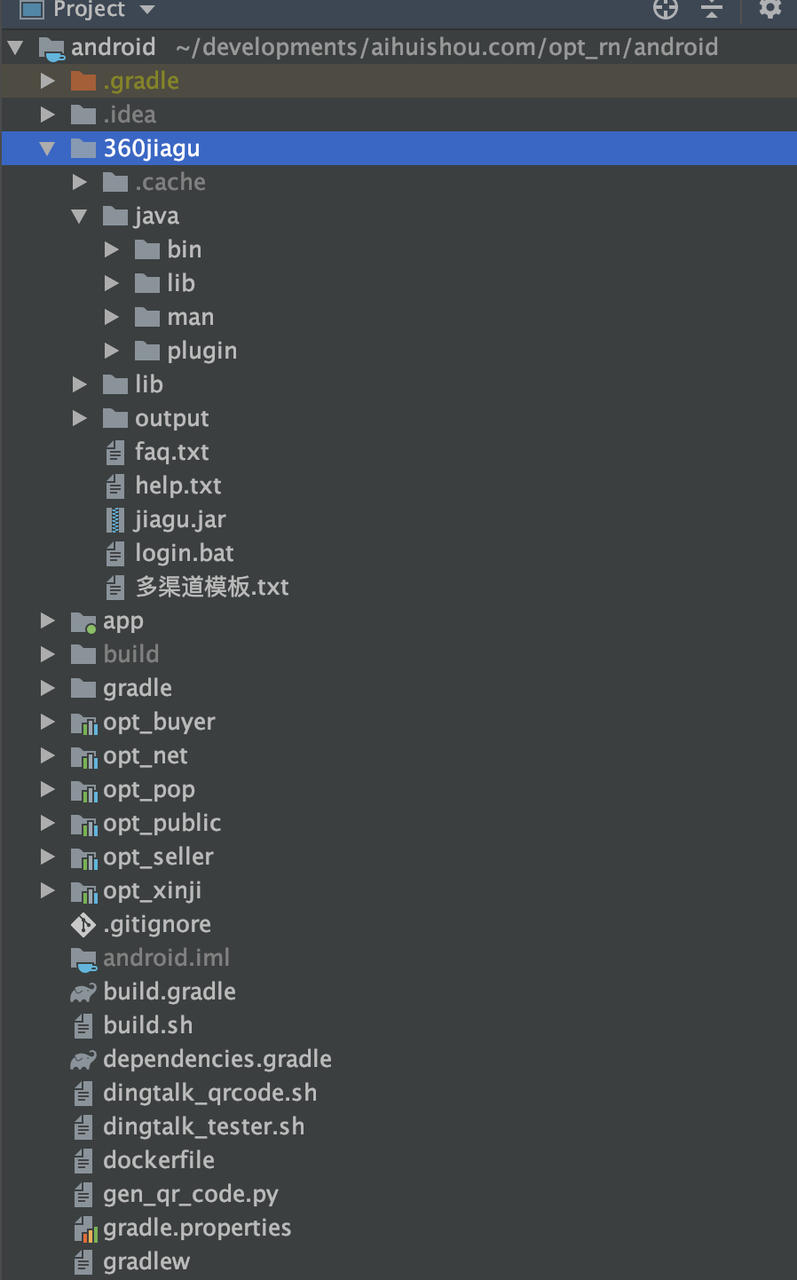
rootProject下面新建一个multiple-channels.gradle文件
ext {
    reinForceJarPath = "${project.rootDir}/360jiagu/jiagu.jar"

    keyStorePath = "${rootProject.rootDir}/app/keystore/observer_app.keystore"

    rein360ForceDirPath = "${rootProject.rootDir}/360jiagu"

    reinForcedOutPutPath = "${rootProject.rootDir}/app/build/outputs/apk/release/channels"

    rein360ForceJarPath = "${rein360ForceDirPath}/jiagu.jar"

    account360 = "360U3104721855"

    psw360 = "aihuishou_apm"

    mulpkgPath = "${rein360ForceDirPath}/多渠道模板.txt"


    /**
     * 找出release文件app build 文件夹中
     * 只能匹配出 以apk结尾 并且包含release字符串的apk文件
     */
    findReleaseApkPath = { ->
        def appBuildOutPut = new File("${rootProject.rootDir}/app/build/outputs/apk/release")
        def apkFile = null
        appBuildOutPut.eachFile {
            if (it.name.endsWith(".apk") && it.name.contains("release")) {
                println(it)
                apkFile = it
            }
        }
        return apkFile
    }


    /**
     * 通过调用360的命令行加固并且多渠道打包
     * apk ->  原有release包的文件
     * outputPath -> 多渠道打包后文件输出路径
     */
    reinForceApk = { File apk, File outPutPath ->
        println(outPutPath)
        if (apk == null || !apk.exists()) {
            println("没有找到apk文件")
            throw new FileNotFoundException("没有找到APK文件")
        }
        if (!outPutPath.exists()) {
            outPutPath.mkdirs()
        }

        "java -jar ${rein360ForceJarPath} -login ${account360} ${psw360}".execute().waitForProcessOutput(System.out, System.err)

        "java -jar ${rein360ForceJarPath} -importmulpkg ${mulpkgPath}".execute().waitForProcessOutput(System.out, System.err)

        "java -jar ${rein360ForceJarPath} –importsign ${keyStorePath} ${KEYSTORE_PASSWORD} ${KEY_ALIAS} ${KEY_PASSWORD}".execute().waitForProcessOutput(System.out, System.err)

        "java -jar ${rein360ForceJarPath} -config  -analyse".execute().waitForProcessOutput(System.out, System.err)

        "java -jar ${rein360ForceJarPath} -jiagu ${apk.path} ${outPutPath.path} -autosign -automulpkg".execute().waitForProcessOutput(System.out, System.err)

    }
}

复制代码
在app module下build.gradle添加
apply from: "../multiple-channels.gradle"

task assembleReinForceRelease() {
    group 'multipleChannels'
    dependsOn('assembleRelease')

    doLast {
        def apk = findReleaseApkPath()
        def outputFile = new File(reinForcedOutPutPath)
        reinForceApk(apk, outputFile)
    }
}

复制代码
最后
调用./gradlew assembleReinForceRelease 就可以加固并且打完所有的渠道包了
一些坑
- 第一个
个人开发电脑是mac Jenkins CI是linux,下载的zip是mac的版本,在Jenkins会报aapt check failed. null的错。
- 第二个
360加固宝的命令是需要网络请求,是需要等待login的异步返回登录结果的
原本的
exec {
            commandLine("sh", "-c", "java -jar ${rein360ForceJarPath} -login ${jia_gu_user_name} ${jia_gu_psw}")
            commandLine("sh", "-c", "java -jar ${rein360ForceJarPath} -importmulpkg ${mulpkgPath}")
            commandLine("sh", "-c", "java -jar ${rein360ForceJarPath} -importsign ${keyStorePath} ${KEYSTORE_PASSWORD} ${KEY_ALIAS} ${KEY_PASSWORD}")
            commandLine("sh", "-c", "java -jar ${rein360ForceJarPath} -showmulpkg")
            commandLine("sh", "-c", "java -jar ${rein360ForceJarPath}  -showconfig")
            commandLine("sh", "-c", "java -jar ${rein360ForceJarPath}  -jiagu ${apk.path} ${outPutPath.path} -autosign -automulpkg")
        }
复制代码
改为等待结果的shell
"java -jar ${rein360ForceJarPath} -login ${account360} ${psw360}".execute().waitForProcessOutput(System.out, System.err)

        "java -jar ${rein360ForceJarPath} -importmulpkg ${mulpkgPath}".execute().waitForProcessOutput(System.out, System.err)

        "java -jar ${rein360ForceJarPath} –importsign ${keyStorePath} ${KEYSTORE_PASSWORD} ${KEY_ALIAS} ${KEY_PASSWORD}".execute().waitForProcessOutput(System.out, System.err)

        "java -jar ${rein360ForceJarPath} -config  -analyse".execute().waitForProcessOutput(System.out, System.err)

        "java -jar ${rein360ForceJarPath} -jiagu ${apk.path} ${outPutPath.path} -autosign -automulpkg".execute().waitForProcessOutput(System.out, System.err)

复制代码
通过反编译发现360会在代码里面注入很多360的服务,广播,activity和application加载器

发现360会在清单文件里面修改application的指向文件。
除此之外如果你选择了更新服务和其他的服务的话他还可能会在文件里面增加更新服务更新广播,总之四大组件都增加了个遍。
这样我们可能会被360增加广告之类的服务,丧失了app的部分控制权。
再结合360市场必须360加固,应用宝必须legu加固,所以360加固的不能再应用宝上线。
综合以上的几个点,我们更改技术方案是:
-
使用VasDolly多渠道打包(walle plugin总是加载失败就放弃了)
-
其他市场直接上架,需要加固的市场让运营的同事手动加固一下。
集成VasDolly
github地址 github.com/Tencent/Vas…
首选命令行工具 因为我们之前都写了那么多,不能荒废啊
命令行说明地址 : github.com/Tencent/Vas…
新建一个vasdolly文件夹 下载jar包放进去
java -jar VasDolly.jar put -c channel.txt /home/user/base.apk /home/user/
VasDolly 的原理介绍:
github.com/Tencent/Vas…
他是基于v1和v2签名方式,在签名中写入渠道参数。:+1::+1::+1::+1::+1:,速度快还对于apk本身没有任何侵入,只是在签名上增加了渠道信息。
最后vasdolly完整代码
新增目录结构 删除所有360加固的文件夹 新增一个vasdolly文件夹

multiple-channeles.gradle
ext {
    jarPath = "${project.rootDir}/vasdolly/VasDolly.jar"
    channelsPath = "${project.rootDir}/vasdolly/channels.txt"
    outputChannelsFilePath = "${project.rootDir}/app/build/outputs/apk/release/channels/"


    /**
     * 找出release文件app build 文件夹中
     * 只能匹配出 以apk结尾 并且包含release字符串的apk文件
     */
    findReleaseApkPath = { ->
        def appBuildOutPut = new File("${rootProject.rootDir}/app/build/outputs/apk/release")
        def apkFile = null
        appBuildOutPut.eachFile {
            if (it.name.endsWith(".apk") && it.name.contains("release")) {
                apkFile = it
            }
        }
        return apkFile
    }


    /**
     * 通过调用360的命令行加固并且多渠道打包
     * apk ->  原有release包的文件
     * outputPath -> 多渠道打包后文件输出路径
     */
    buildMultipleChannels = { File apk, File outPutPath ->
        println(outPutPath)
        if (apk == null || !apk.exists()) {
            throw new FileNotFoundException("没有找到APK文件")
        }
        if (!outPutPath.exists()) {
            outPutPath.mkdirs()
        }

        def cmd = "java -jar ${jarPath} put -c ${channelsPath} ${apk} ${outPutPath}"
        println cmd
        cmd.execute().waitForProcessOutput(System.out, System.err)
    }
}
复制代码
app build.gradle
apply from: "../vasdolly/multiple-channels.gradle"


/**
 * 开启多渠道打包的任务
 * 这个任务会依赖assembleRelease 打出来的apk包
 */
task assembleMultipleChannelsRelease() {
    group 'multipleChannels'
    dependsOn('assembleRelease')

    doLast {
        buildMultipleChannels(findReleaseApkPath(), new File(outputChannelsFilePath))
    }
}

复制代码
代码中获取渠道名称
fun getChannelName(ctx: Activity): String {
    return try {
        ChannelReaderUtil.getChannel(ctx.application)
    } catch (e: Exception) {
        e.printStackTrace()
        "official"
    }
}
复制代码
代码更加简洁了。:+1::+1::+1::+1::+1::+1:
最终我们执行 ./gradlew assembleMultipleChannelsRelease
查看结果:
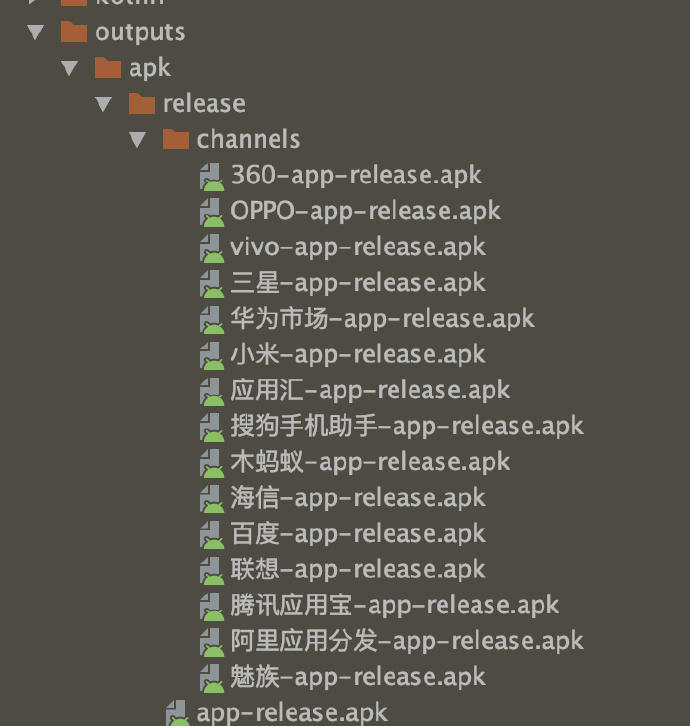
finished
正文到此结束
热门推荐


相关文章

近期评论
-
出现OpenClaw "device signature expired"。the Gateway rejects if Math.abs(Date.now() - signedAt) > 10 * 60 * 1000 (10 minutes)
-
-
想购买您这个站,我的联系方式QQ741756694微信同步 能卖联系
-
-
-
博主的博客用的什么技术栈,内容都是干货,赞
-
-
https://www.liuhaihua.cn/archives/40657.html 这篇博客中的图片打不开了
-
不会英语啊。
-
Loading...
![[HBLOG]公众号](https://www.liuhaihua.cn/img/qrcode_gzh.jpg)

