Spring Boot从零入门3_创建Hello World及项目剖析
本文属于原创,转载注明出处,欢迎关注微信小程序 小白AI博客 微信公众号 小白AI 或者网站 https://xiaobaiai.net

[TOC]
1 前言
上一篇我们讲述了 Spring boot 的几个核心模块,知道了 Spring boot 是如何减少组件依赖和简化繁杂的配置的,以及讲述了 Spring boot 减少组件依赖和简化繁杂配置的内部原理,最后完成了 Spring boot 的开发环境搭建。这一篇我们将讲述如何创建 Spring boot Hello World 级别的项目,创建一个简单的WEB应用,然后我们对这个项目层层剖析,让我们更深的了解 Spring boot 是如何工作的。
2 名词术语
| 名词术语 | 释义 |
|---|---|
| CLI | 命令行界面,command-line interface |
| Marven | Apache Maven是一个软件项目管理和综合工具,构建自动化系统(如Make,CMake)。基于项目对象模型(POM)的概念,Maven可以从一个中心资料片管理项目构建,报告和文件。Maven简化和标准化项目建设过程,处理编译,分配,文档,团队协作和其他任务的无缝连接。 Maven增加可重用性并负责建立相关的任务;Marven拥有依赖管理功能,它通过简单的配置就可以自动从网络上下载项目所需的依赖 |
| POM | 项目对象模型(Project Object Model),它是Maven项目中的文件,使用XML表示,名称叫做pom.xml;该文件用于管理:源代码、配置文件、开发者的信息和角色、问题追踪系统、组织信息、项目授权、项目的url、项目的依赖关系等;Maven世界中,project可以什么都没有,甚至没有代码,但是必须包含pom.xml文件 |
| Gradle | Gradle是一个完全开源的构建自动化系统,使用特定编程语言Groovy来书写配置文件,不同于Marven使用XML。如Android开发IDE Android Studio默认就是使用Gradle来构建项目;Gradle与Maven相比更为灵活,简单。 |
| JDK8 | JDK8或者JDK1.8是由于自从JDK1.5/JDK5命名方式改变后遗留的新旧命令方式问题。所以JDK8或者JDK1.8也是同一个东西。 |
| STS | Spring Tool Suite,Spring Tools 4是适用于你喜欢的编码环境的下一代Spring工具。无论是你喜欢Eclipse,Visual Studio Code还是Theia IDE,STS是从头开始大量重构的,为开发基于Spring的企业应用程序提供了世界一流的支持。 |
| Thymeleaf | Thymeleaf是现代化服务器端的Java模板引擎,不同与JSP和FreeMarker,Thymeleaf的语法更加接近HTML,并且也有不错的扩展性。 |
| 注解 | 注解只有成员变量,没有方法。注解的成员变量在注解的定义中以“无形参的函数”形式来声明,如int id();引用时如@TestAnnotation(id=3) 。注解中属性可以有默认值,默认值需要用 default 关键值指定,如public int id() default -1;注解的提取需要借助于 Java 的反射技术,反射比较慢,所以注解使用时也需要谨慎计较时间成本。注解主要给编译器及工具类型的软件用的。 |
| 元注解 | 元注解是可以注解到注解上的注解,或者说元注解是一种基本注解,但是它能够应用到其它的注解上面。如果把注解理解为标签,元注解也是一张标签,但是它是一张特殊的标签,它的作用和目的就是给其他普通的标签进行解释说明的。元标签有 @Retention、@Documented、@Target、@Inherited、@Repeatable 5 种 |
3 创建Hello World项目
创建一个 Spring boot 应用,有下面几种方式可以选择:
Spring boot CLI
Spring Initializr
下面对这三种方式一一讲述如何创建一个 Spring boot WEB项目。
:bulb: STS(Spring Tool Suite)可以开发其他很多类型的项目,这里仅以Spring boot项目作为创建示例。
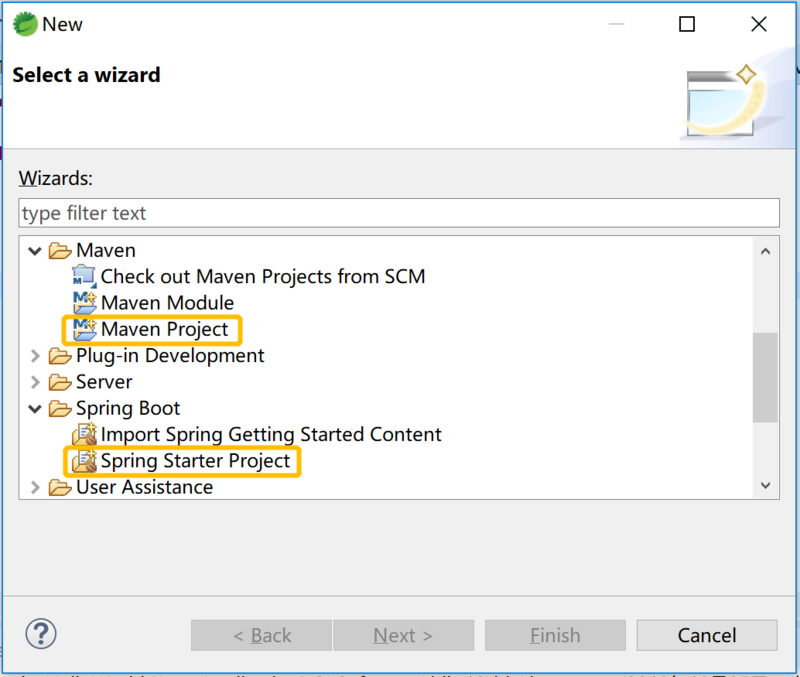
3.1 基于STS4创建项目
3.1.1 项目创建
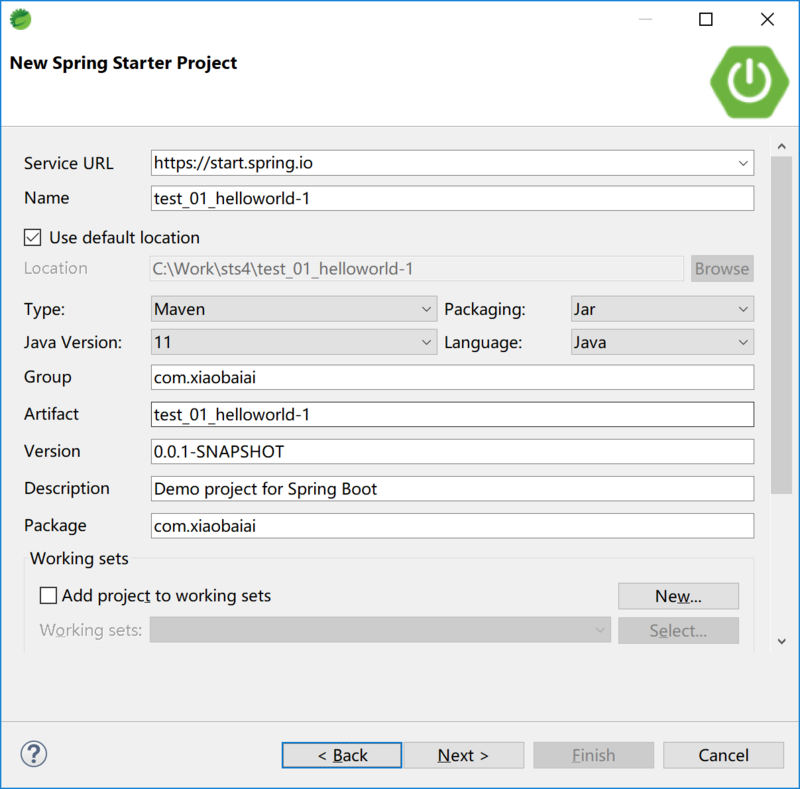
基于STS4创建 Spring Web 项目,这里选择 Marven Project 项目类型或者是 Spring Starter Project 项目类型。 Spring Stater Project 跟下一小节所讲的 Spring Initializr Website 创建项目基本一致,只不过一个是集成在STS中,一个是独立的Web网站,下一小节细讲,这里就不展开了。这里选择 Marven Project 类型,开始创建。
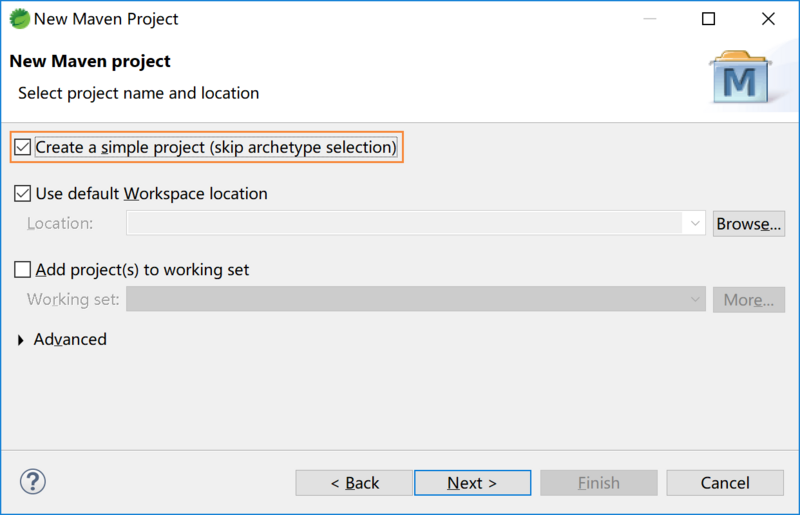
创建 Marven 项目中,我们选择 Create a Simple Project ,可以选择默认工作目录或者其他存放项目的目录,Next后需要我们填写一些项目信息,包括:
-
groupId:在所有项目中唯一标识你的项目。组ID应该遵循Java的程序包名称规则。这意味以反向域名开头(当然这不是强迫的,只是历史遗留下来的),如:
- org.apache.maven
- org.apache.commons
- org.apache.maven.plugins
- org.apache.maven.reporting
- artifactId:是没有版本的jar的名称。如果创建了它,那么可以选择任何名称,包括小写字母和不是很奇怪的符号。如果是第三方jar,则必须使用该jar的名称。
- version:如果发布了版本,则可以选择带有数字和点(1.0、1.1、1.0.1,...)的任何典型版本。不要使用日期,因为它们通常与
SNAPSHOT(快照)构建相关联。
如果它是第三方artifact,则无论使用什么版本,都必须使用其版本号。
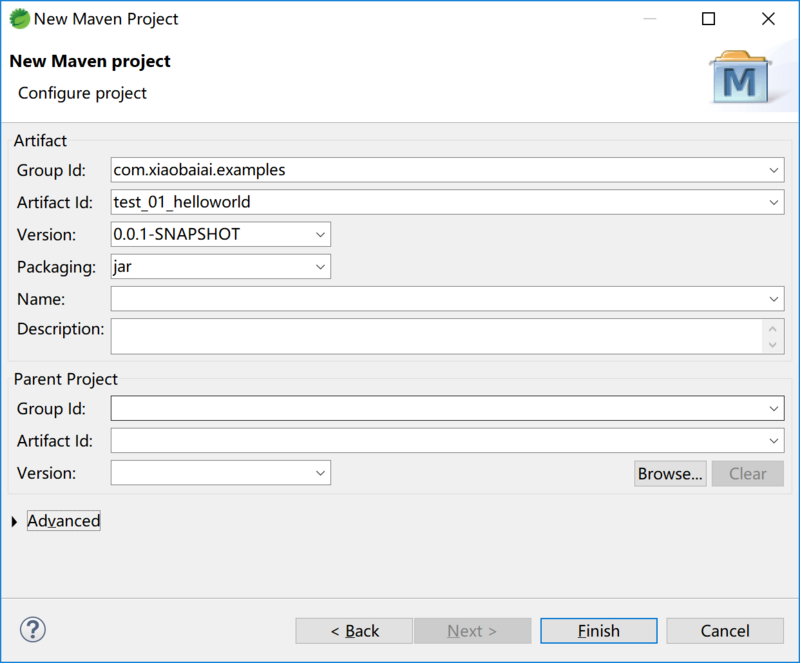
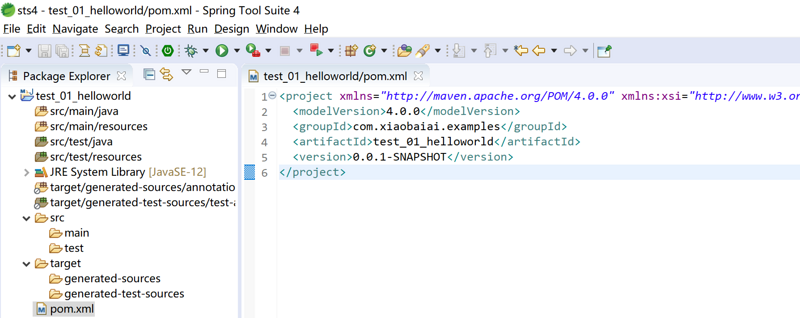
点击完成后,就创建了一个最简单的 Marven 项目,仅仅只有一个 pom.xml 文件,里面也只有我们创建的项目信息,接下来我们需要实现WEB服务器,访问一个简单的页面,页面显示出 Hello World! 。
3.1.2 添加工程代码
添加 Spring WEB 依赖项到 pom.xml 中:
<project xmlns="http://maven.apache.org/POM/4.0.0"
    xmlns:xsi="http://www.w3.org/2001/XMLSchema-instance"
    xsi:schemaLocation="http://maven.apache.org/POM/4.0.0 http://maven.apache.org/xsd/maven-4.0.0.xsd">
    <modelVersion>4.0.0</modelVersion>
    <groupId>com.xiaobaiai.examples</groupId>
    <artifactId>test_01_helloworld</artifactId>
    <version>0.0.1-SNAPSHOT</version>

    <!-- 下面为添加的依赖内容,spring-boot-starter-web -->
    <parent>
        <groupId>org.springframework.boot</groupId>
        <artifactId>spring-boot-starter-parent</artifactId>
        <version>2.2.0.RELEASE</version>
        <relativePath /> <!-- lookup parent from repository -->
    </parent>
    <properties>
        <java.version>11</java.version>
    </properties>

    <dependencies>
        <dependency>
            <groupId>org.springframework.boot</groupId>
            <artifactId>spring-boot-starter-web</artifactId>
        </dependency>
    </dependencies>
</project>
第二步,在 src/main/java 目录下新建一个Java文件:

填写 Package 和 Name ,点击 Finish ,创建完成,然后编写该Java文件:
package com.xiaobaiai;

import org.springframework.boot.SpringApplication;
import org.springframework.boot.autoconfigure.SpringBootApplication;
import org.springframework.stereotype.Controller;
import org.springframework.web.bind.annotation.RequestMapping;
import org.springframework.web.bind.annotation.ResponseBody;

@SpringBootApplication
@Controller
public class Test01HelloworldApplication {
    @RequestMapping("/")
    @ResponseBody
    public String index() {
        return "Hello World!";
    }

    public static void main(String[] args) {
        SpringApplication.run(Test01HelloworldApplication.class, args);
    }
}
:bulb: 在STS中,包一键导入快捷键 Ctrl + Shift + o
3.1.3 运行Hell World Web应用
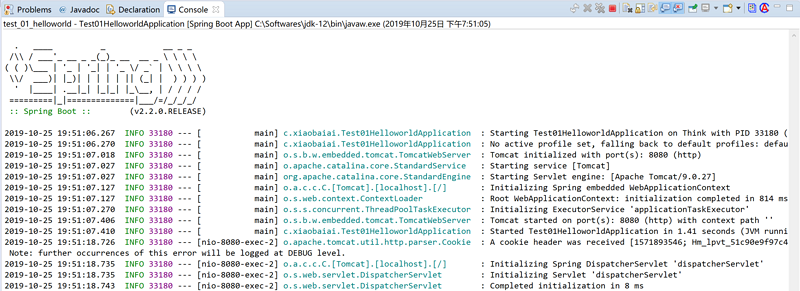
上述修改两个文件就完成一个基本的 Hello World! 级别应用,然后就可以运行了: 选中项目 --> 菜单栏Run --> Run ( Spring boot App )或者直接到工具栏找到快捷按钮(绿色右箭头),点击。接下来就可以看到在STS中的 console (控制台)中看到 Web 服务启动的过程了,没有出现错误, Tomcat initialized with port(s): 8080 (http) ,打开浏览器,输入 http://localhost:8080 回车可看到输出 Hello World! ,Demo成功:
3.2 使用Spring Initializr Website创建项目并导入
3.2.1 STS中的Spring Initializr
通过 Spring Initializr 我们可以通过点击页面,选择我们所需要的依赖项,最终生成项目配置文件和应用文件。一般IDE中也集成了 Spring Initializr ,如STS中新建一个 Spring Starter Project 就可以操作 Spring Initializr ,在下一小节中我们将通过网站中的 Spring Initializr 来实现创建一个Web项目:
3.2.2 网站的中Spring Initializr
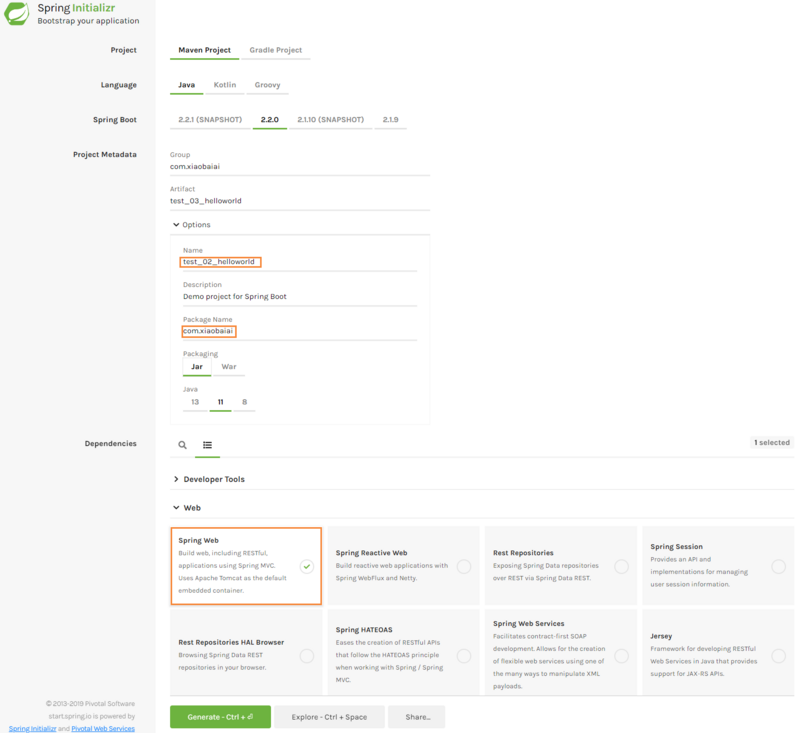
在浏览器中打开 https://start.spring.io ,输入项目相关信息,并选择 Spring Boot 及构建工具等,在 Dependencies 的 Web 栏中选中 Spring Web ,最后点击绿色按钮 Generate - Ctrl 按钮生成工程文件压缩包,放于你的工作目录中并解压,然后用STS导入该项目:
导入成功后,可以看到自动生成了上一小节中我们创建的 pom.xml 和 XXApplication.java 文件以及测试文件 XXApplicationTests.java ,其中 pom.xml 具体内容如下:
<?xml version="1.0" encoding="UTF-8"?>
<project xmlns="http://maven.apache.org/POM/4.0.0"
    xmlns:xsi="http://www.w3.org/2001/XMLSchema-instance"
    xsi:schemaLocation="http://maven.apache.org/POM/4.0.0 https://maven.apache.org/xsd/maven-4.0.0.xsd">
    <modelVersion>4.0.0</modelVersion>
    <parent>
        <groupId>org.springframework.boot</groupId>
        <artifactId>spring-boot-starter-parent</artifactId>
        <version>2.2.0.RELEASE</version>
        <relativePath /> <!-- lookup parent from repository -->
    </parent>
    <groupId>com.xiaobaiai</groupId>
    <artifactId>test_02_helloworld</artifactId>
    <version>0.0.1-SNAPSHOT</version>
    <name>test_02_helloworld</name>
    <description>Demo project for Spring Boot</description>

    <properties>
        <java.version>11</java.version>
    </properties>

    <dependencies>
        <dependency>
            <groupId>org.springframework.boot</groupId>
            <artifactId>spring-boot-starter-web</artifactId>
        </dependency>

        <dependency>
            <groupId>org.springframework.boot</groupId>
            <artifactId>spring-boot-starter-test</artifactId>
            <scope>test</scope>
            <exclusions>
                <exclusion>
                    <groupId>org.junit.vintage</groupId>
                    <artifactId>junit-vintage-engine</artifactId>
                </exclusion>
            </exclusions>
        </dependency>
    </dependencies>

    <build>
        <plugins>
            <plugin>
                <groupId>org.springframework.boot</groupId>
                <artifactId>spring-boot-maven-plugin</artifactId>
            </plugin>
        </plugins>
    </build>
</project>
同样地我们把下面代码复制到 Test02HelloworldApplication.java 中(注意我们的类名改了,不是Test01了):
package com.xiaobaiai;

import org.springframework.boot.SpringApplication;
import org.springframework.boot.autoconfigure.SpringBootApplication;
import org.springframework.stereotype.Controller;
import org.springframework.web.bind.annotation.RequestMapping;
import org.springframework.web.bind.annotation.ResponseBody;

@SpringBootApplication
@Controller
public class Test02HelloworldApplication {
    @RequestMapping("/")
    @ResponseBody
    public String index() {
        return "Hello World!";
    }
    public static void main(String[] args) {
        SpringApplication.run(Test02HelloworldApplication.class, args);
    }
}
最后点击 Run ,到浏览器中输入 http://localhost:8080 回车可看到输出 Hello World! 。
3.3 基于Spring Boot CLI创建项目
上一篇中我们已经介绍过 Sping Boot CLI (命令行界面)这个工具了,它可用于快速使用Spring进行原型设计。使我们可以运行Groovy脚本,接下来我们实际操作一下。
3.3.1 安装Spring Boot CLI工具
从Spring软件存储库下载 Spring CLI 发行版,选择你工作的平台版本,这里选择了 spring-boot-cli-2.2.0.RELEASE-bin.zip Windows版本:
- https://repo.spring.io/release/org/springframework/boot/spring-boot-cli/
下载好后,解压,然后配置好环境变量,则就安装成功,验证是否安装并配置好:
# 查看spring cli版本
$ spring --version
Spring CLI v2.2.0.RELEASE
# 查看spring所有帮助
$ spring --help
# 查看spring run命令帮助
$ spring help run
# 查看spring init命令帮助
$ spring help init
# 查看所有支持的dependencies,支持的工程类型(Project types,默认工程类型为marven-project)
$ spring init --list

$ spring init --list
  .   ____          _            __ _ _
 /// / ___'_ __ _ _(_)_ __  __ _ / / / /
( ( )/___ | '_ | '_| | '_ // _` | / / / /
 ///  ___)| |_)| | | | | || (_| |  ) ) ) )
  '  |____| .__|_| |_|_| |_/__, | / / / /
 =========|_|==============|___/=/_/_/_/
:: Service capabilities ::  https://start.spring.io

Supported dependencies
+--------------------------------------+--------------------------------------------------------------+-------------------------------+
| Id                                   | Description                                                  | Required version              |
+--------------------------------------+--------------------------------------------------------------+-------------------------------+
......
| activemq                             | Spring JMS support with Apache ActiveMQ 'Classic'.           |                               |
| web                                  | Build web, including RESTful, applications using Spring MVC. |                               |
|                                      | Uses Apache Tomcat as the default embedded container.        |                               |
......
+--------------------------------------+--------------------------------------------------------------+-------------------------------+

Project types (* denotes the default)
+-----------------+------------------------------------------+-----------------------------+
| Id              | Description                              | Tags                        |
+-----------------+------------------------------------------+-----------------------------+
| gradle-build    | Generate a Gradle build file.            | build:gradle,format:build   |
| gradle-project  | Generate a Gradle based project archive. | build:gradle,format:project |
| maven-build     | Generate a Maven pom.xml.                | build:maven,format:build    |
| maven-project * | Generate a Maven based project archive.  | build:maven,format:project  |
+-----------------+------------------------------------------+-----------------------------+

Parameters
+-------------+------------------------------------------+------------------------------+
| Id          | Description                              | Default value                |
+-------------+------------------------------------------+------------------------------+
| artifactId  | project coordinates (infer archive name) | demo                         |
| bootVersion | spring boot version                      | 2.2.0.RELEASE                |
| description | project description                      | Demo project for Spring Boot |
| groupId     | project coordinates                      | com.example                  |
| javaVersion | language level                           | 1.8                          |
| language    | programming language                     | java                         |
| name        | project name (infer application name)    | demo                         |
| packageName | root package                             | com.example.demo             |
| packaging   | project packaging                        | jar                          |
| type        | project type                             | maven-project                |
| version     | project version                          | 0.0.1-SNAPSHOT               |
+-------------+------------------------------------------+------------------------------+
3.3.2 使用Spring Boot CLI工具创建Hell World应用
接下来,我们直接使用 Spring Boot CLI 工具创建上述我们的 Hello World WEB应用。
# 创建项目name: test_03_helloworld
# groupId: com.xiaobaiai
# artifactId: test_03_helloworld
# language: java/groovy/kotlin
# boot-version: 2.2.0
# 构建工具类型: marven-project/marven-build/gradle-project/gradle-build
# 依赖项(dependencies):web
# java-version: java(jdk)版本
# --package-name: 包名
# --packaging:打包方式jar/war
# --extract: 不加这个参数则创建出来的项目就是已经压缩过的,跟用Spring Initializr Website创建出来的一样
# 最后一个test_03_helloworld即指定目标生成目录
$ mkdir test_03_helloworld
$ cd test_03_helloworld
$ spring init -n test_03_helloworld -g com.xiaobaiai -a test_03_helloworld -l java -b 2.2.0.RELEASE -t maven-project -d web --extract -j 11 --package-name com.xiaobaiai --extract test_03_helloworld
:bulb: spring run命令只是针对Groovy语言的。
创建完成后,其实跟上述两种方式创建出来的工程是一样的,然后同样地,我们去修改 src/main/java/com/xiaobaiai/Test03HelloworldApplication.java 这个文件,添加一样的内容,这里就不贴代码了(可以使用文本编辑器如Vim/VS Code/Notepad++/Atom/Subline2等等)。
.
├── HELP.md
├── list
│   ├── HELP.md
│   ├── mvnw
│   ├── mvnw.cmd
│   ├── pom.xml
│   └── src
│       ├── main
│       └── test
├── mvnw
├── mvnw.cmd
├── pom.xml
└── src
    ├── main
    │   ├── java
    │   └── resources
    └── test
        └── java
:bulb: 用Spring Boot CLI工具创建出来生成的工程文件默认是在当前文件夹中,如果加了--extract参数,则所有文件都解压出来,因此需要预先建立一个工程目录再执行创建命令。当然也可以指定生成文件夹,则会创建项目的时候创建该文件夹并将项目文件都生成到该文件夹中。
:bulb: 另外还可以使用SDKMAN管理各种二进制SDK的多个版本,包括Groovy和Spring Boot CLI,具体的可以去 官方文档 了解。
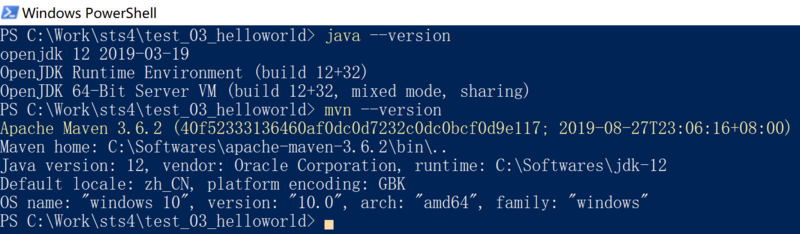
接下来就是如何编译了。 spring cli针对不同类型语言的WEB应用编译方式是不一样的,如果我们创建了 Groovy 语言类型的项目,那么只需要用到 spring run 组合命令就可以了,但是这里选择了 java 语言类型,则需要结合 mvn (marven的命令行工具)和 java (jdk的命令行工具)了。首先确保这两个命令已经配置好了环境变量。
然后到项目 根目录 执行:
# spring-boot:run为Spring Boot Maven Plugin插件所支持,还有如spring-boot:repackage/spring-boot:start/spring-boot:stop/spring-boot:build-info。
$ mvn spring-boot:run
最后到浏览器中输入 http://localhost:8080 回车可看到输出 Hello World! 。
3.4 各创建项目方式比较
SPring Initializr
4 Spring Boot应用是如何工作的?
上面是一个简单的WEB应用,一一讲述了几种创建方式,并在浏览器中输出了 Hello World! ,那么整个应用是怎么运作的呢?这一节我们详细地来剖析下。
4.1 pom.xml
4.1.1 spring-boot-starter-parent
pom.xml 是整个项目的核心配置文件,Marven的POM文件之间具有集成性,下面这段代码就表示POM文件继承自 groupId 为 org.springframework.boot , artifactId 为 spring-boot-starter-parent , version 为 2.2.0.RELEASE 的POM文件。
<parent>
    <groupId>org.springframework.boot</groupId>
    <artifactId>spring-boot-starter-parent</artifactId>
    <version>2.2.0.RELEASE</version>
    <relativePath /> <!-- lookup parent from repository -->
</parent>
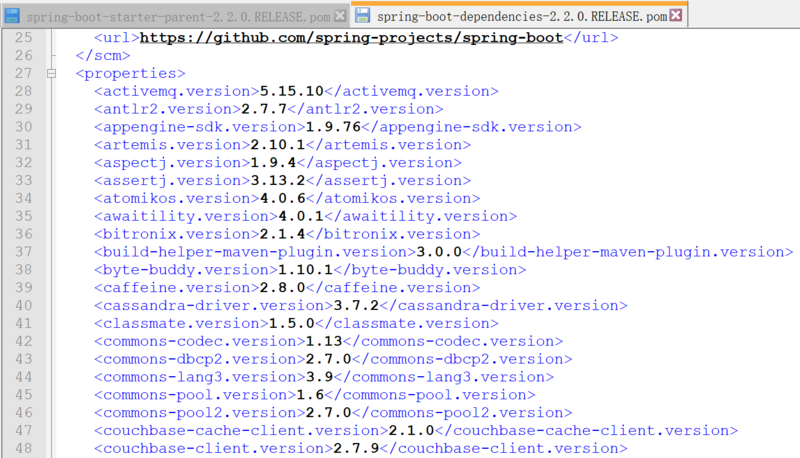
spring-boot-starter-parent 项目是一个特殊的启动程序项目,为我们的应用程序提供默认配置,并提供完整的依赖关系树以快速构建我们的 Spring Boot 项目。它还为Maven插件提供了默认配置,例如 maven-failsafe-plugin , maven-jar-plugin , maven-surefire-plugin , maven-war-plugin 。我们可以找到 spring-boot-starter-parent-2.2.0.RELEASE.pom 具体查看,如Windows系统中,该文件在 C:/Users/{your username}/.m2/repository/org/springframework/boot/spring-boot-starter-parent/2.2.0.RELEASE/ 路径下。 Linux平台在用户目录 ~/.m2/repository/org/springframework/boot/spring-boot-starter-parent/2.2.0.RELEASE/ 路径下。打开该文件后,我们可以看到 spring-boot-starter-parent-2.2.0.RELEASE.pom 又依赖了 spring-boot-dependencies 项目,这个文件里面定义了大部分底层依赖软件的版本号以及我们上一节介绍的 Spring boot 核心模块,如 spring-boot-actuator 等。我们可以从这个链接获取 spring-boot-starter-parent 的最新版本 https://search.maven.org/classic/#search%7Cga%7C1%7Ca%3A%22spring-boot-starter-parent%22 。
4.1.2 spring-boot-starter-web
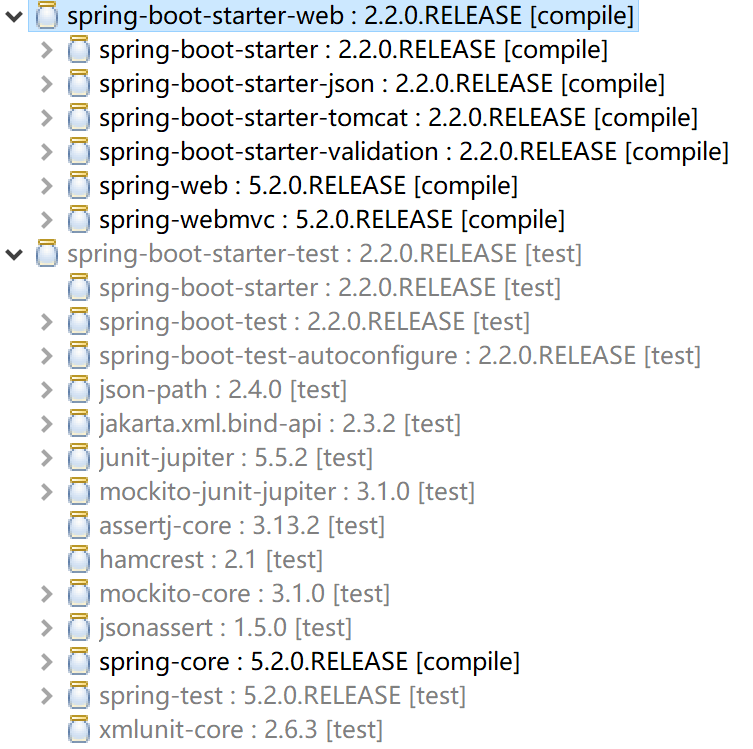
再到我们的应用这一层,我们依赖了 spring-boot-starter-web 和 spring-boot-starter-test (可以做单元测试)两个依赖。我们可以通过 STS 可以看到两个依赖里又包含了哪些依赖,如 spring-boot-starter-web 里面依赖了 tomcat (实际用的是spring boot内嵌的tomcat)、 spring-web 和 spring-webmvc 等。有了这些依赖其实就构成了我们实现一个 Web Server 的基础。
另外,添加了父级依赖模块( spring-boot-starter-parent )后,在应用中添加其他依赖,我们是不需要指定版本了,所以的依赖版本已经在父级依赖中得到了管理(当然,我们也可以独立指定版本)。如:
<dependencies>
    <dependency>
        <groupId>org.springframework.boot</groupId>
        <artifactId>spring-boot-starter-web</artifactId>
    </dependency>
</dependencies>
4.1.3 dependencyManagement标签自定义父级依赖以及其他属性自定义
我们可以定义自己的一套父级版本依赖吗?当然是可以的,我们只需要定义 <dependencyManagement> 标记里内容就可以了,类似 spring-boot-dependencies 的POM文件里所示一样:
<dependencyManagement>
    <dependencies>
      <dependency>
        <groupId>org.springframework.boot</groupId>
        <artifactId>spring-boot</artifactId>
        <version>2.2.0.RELEASE</version>
      </dependency>
      <dependency>
        <groupId>org.springframework.boot</groupId>
        <artifactId>spring-boot-test</artifactId>
        <version>2.2.0.RELEASE</version>
      </dependency>
      <dependency>
        <groupId>org.springframework.boot</groupId>
        <artifactId>spring-boot-test-autoconfigure</artifactId>
        <version>2.2.0.RELEASE</version>
      </dependency>
      <dependency>
        <groupId>org.springframework.boot</groupId>
        <artifactId>spring-boot-actuator</artifactId>
        <version>2.2.0.RELEASE</version>
      </dependency>
      <dependency>
        <groupId>org.springframework.boot</groupId>
        <artifactId>spring-boot-actuator-autoconfigure</artifactId>
        <version>2.2.0.RELEASE</version>

        ......

    </dependencies>
</dependencyManagement>
为了自定义父级依赖中其他属性(配置),我们可以在相应位置重新去声明配置相关值, spring-boot-starter-parent 通过其父级 spring-boot-dependencies 依赖使用属性来配置所有依赖项版本,Java版本和Maven插件版本等。因此,我们只需更改相应的属性即可自定义控制这些配置。比如我们想更改tomcat的版本,只需要在 spring-boot-dependencies 的POM文件中对应位置修改如下代码:
<properties>
    ......
    <tomcat.version>9.0.27</tomcat.version>
    ......
</properties>
4.1.4 自定义父级依赖
对于添加指定的父级依赖,而不是 spring-boot-starter-parent ,我们可以完全自定义配置我们所有的依赖,那么我们就需要配置类似 spring-boot-starter-parent 所有相关的内容,包括版本以及相关属性配置等。
4.1.5 Spring Boot Marven插件
pom.xml 中还有这么一段代码:
<build>
    <plugins>
        <plugin>
            <groupId>org.springframework.boot</groupId>
            <artifactId>spring-boot-maven-plugin</artifactId>
        </plugin>
    </plugins>
</build>
上面的配置就是 Spring Boot Maven 插件, Spring Boot Maven 插件提供了许多方便的功能:
- 把项目打包成一个可执行的超级
JAR(uber-JAR),包括把应用程序的所有依赖打入JAR文件内,并为JAR添加一个描述文件,其中的内容能让你用java -jar来运行应用程序。 - 搜索
public static void main()方法来标记为可运行类。
4.2 Spring Boot 注解(annotations)与应用入口
4.2.1 注解(annotations)
在我们实现的简单 Hello World Web项目中,我们使用了几个注解,如代码中所示的 SpringBootApplication 和 Controller :
@SpringBootApplication
@Controller
public class Test02HelloworldApplication {
    @RequestMapping("/")
    @ResponseBody
    public String index() {
        return "Hello World!";
    }
    public static void main(String[] args) {
        SpringApplication.run(Test02HelloworldApplication.class, args);
    }

}
我们可以直接看到 SpringBootApplication 类中是什么内容,具体做了啥?它的定义如下:
@Target(ElementType.TYPE) // 元注解,指定了注解运用的地方,注解就被限定了运用的场景,此处限定为可以给一个类型进行注解,比如类、接口、枚举
@Retention(RetentionPolicy.RUNTIME)  // 元注解, 注解可以保留到程序运行的时候,它会被加载进入到 JVM 中,所以在程序运行时可以获取到它们
@Documented // 元注解,将注解中的元素包含到 Javadoc 中去
@Inherited // 元注解,超类被 @Inherited 注解过的注解进行注解的话,那么如果它的子类没有被任何注解应用的话,那么这个子类就继承了超类的注解。
@SpringBootConfiguration
@EnableAutoConfiguration
@ComponentScan(excludeFilters = { @Filter(type = FilterType.CUSTOM, classes = TypeExcludeFilter.class),
        @Filter(type = FilterType.CUSTOM, classes = AutoConfigurationExcludeFilter.class) })
@ConfigurationPropertiesScan
public @interface SpringBootApplication {
    ......
}
里面又有三个重要的注解:
1) @SpringBootConfiguration
该注解向类添加 @Configuration 注解,该注解将类标记为应用程序上下文的Bean定义的源。
2) @EnableAutoConfiguration
这告诉 Spring Boot 通过基于类路径设置,其他bean和各种属性设置添加 bean ,从而基于 pom.xml 中添加的依赖关系自动配置重要的bean定义。
3) @ComponentScan
该注解告诉 Spring boot 扫描基础包,查找其他的bean/组件,并对其进行配置。
4) @Controller: 该注解指定了当前类 Test02HelloworldApplication 充当 MVC 中控制器作用,调度程序扫描带此类注解的类以查找映射的方法,并检测 @RequestMapping 注解。
5)@RequestMapping: 你可以使用 @RequestMapping 注解将URL(例如 /appointments )映射到整个类或特定的处理方法上。通常,类级别的注解将特定的请求路径(或路径模式)映射到表单控制器上,其他方法级别的注解使特定的HTTP请求方法(GET、POST等)的主映射范围变窄,或一个HTTP请求参数条件。下面是一个 Controller + RequestMapping 的示例:
@Controller
@RequestMapping("/appointments")
public class AppointmentsController {

    private final AppointmentBook appointmentBook;

    @Autowired
    public AppointmentsController(AppointmentBook appointmentBook) {
        this.appointmentBook = appointmentBook;
    }

    @RequestMapping(method = RequestMethod.GET)
    public Map<String, Appointment> get() {
        return appointmentBook.getAppointmentsForToday();
    }

    @RequestMapping(value="/{day}", method = RequestMethod.GET)
    public Map<String, Appointment> getForDay(@PathVariable @DateTimeFormat(iso=ISO.DATE) Date day, Model model) {
        return appointmentBook.getAppointmentsForDay(day);
    }

    @RequestMapping(value="/new", method = RequestMethod.GET)
    public AppointmentForm getNewForm() {
        return new AppointmentForm();
    }

    @RequestMapping(method = RequestMethod.POST)
    public String add(@Valid AppointmentForm appointment, BindingResult result) {
        if (result.hasErrors()) {
            return "appointments/new";
        }
        appointmentBook.addAppointment(appointment);
        return "redirect:/appointments";
    }
}
在类级别上,如果没有 @RequestMapping ,想URL路径都是绝对的,而不是相对的,如我们 Hello World WEB项目里代码所示。而上面的示例都是相对 appointments 路径。
4.2.2 应用入口及应用配置
在上一节中我们也提到了 SpringApplication 类的作用,只是没有实际项目来体会,这一节有了 Hello World 程序作为示例,我们再次来总结它的作用,进一步加深理解:
@SpringBootApplication
run(Class, String [])
SpringApplication
SpringApplication springApplication = new SpringApplication(SpringbootActionApplication.class);
// 关闭应用启动时的Banner,如下:
//  .   ____          _            __ _ _
// /// / ___'_ __ _ _(_)_ __  __ _ / / / /
//( ( )/___ | '_ | '_| | '_ // _` | / / / /
// ///  ___)| |_)| | | | | || (_| |  ) ) ) )
//  '  |____| .__|_| |_|_| |_/__, | / / / /
// =========|_|==============|___/=/_/_/_/
// :: Spring Boot ::        (v2.2.0.RELEASE)
springApplication.setBannerMode(Banner.Mode.OFF);
springApplication.run(args);
在修改应用程序默认配置上,我们还可以通过 src/main/resources/application.properties 这个文件来配置。里面内容默认为空。常见配置有:
# 指定应用名(该名字在Spring Cloud应用中会被注册为服务名)
spring.application.name=hello
# 关闭Banner
spring.main.banner-mode=off
# 修改WEB端口8080为8081
server.port = 8081
# 修改日志级别和中控台日志保存文件路径
# 所有文件日志打印级别为WARN
logging.level.root=WARN
# 指定包或具体类打印日志级别, 如logging.level.com.xiaobaiai=DEBUG
logging.level.{some.package.path}=DEBUG
# 默认日志都会打印到控制台,你可以设定打印到文件,即直接指定路径和文件名
logging.file=/path_to/logfile.log
# 也可以只指定路径,默认为spring.log
logging.file.path=C://Work//sts4//test_02_helloworld//logs
# 自定义属性值,然后在应用程序中通过@Value注解来赋值,
# @Value(value=”${com.xiaobaiai.name}”)
# private String name;
com.xiaobaiai.name="小白AI"
当然我们还可以在配置参数与配置参数之间进行引用,还可以使用指定配置参数文件,或者通过定义专用类来导入配置,这里就不展开了。
5 总结
这一节内容有点长,但是总的来说就是讲述了三种方式去创建一个 Hello World WEB 项目,然后对这个WEB项目从pom.xml文件开始进行了分析,讲述了父级依赖,以及应用依赖和具体的版本依赖是如何实现的,最后对 Spring Boot 的应用入口和重要的几个注解也进行了讲解。完成这些,我们现在基本上对 Spring Boot 应用有了基本的了解了,接下来我们继续。
6 参考资料
- https://www.thymeleaf.org/
- https://howtodoinjava.com/spr...
- https://www.journaldev.com/81...
- https://www.dev2qa.com/spring...
- https://start.spring.io/
- https://spring.io/tools
- https://maven.apache.org/guid...
- https://docs.spring.io/spring...
- https://docs.spring.io/spring...
- https://repo.spring.io/releas...
- https://www.cnblogs.com/acm-b...
- https://stackoverflow.com/que...
- https://www.tianmaying.com/tu... spring-boot初探
- https://tengj.github.io/2017/... 解析pom.xml 父级依赖
- https://dzone.com/articles/he... RequestMapping Controller 作用
- https://howtodoinjava.com/spr... 各种Spring boot示例
- https://juejin.im/post/5db24e... 关闭banner
- https://www.cnblogs.com/zwwhn... spring mvc常用注解
- https://www.journaldev.com/81...
- https://spring.io/guides/gs/s... 单元测试
- https://www.baeldung.com/spri...
- https://search.maven.org/clas...
- https://blog.csdn.net/shengzh...
- https://docs.spring.io/spring...
- http://tengj.top/2017/02/28/s...
本文属于原创,转载注明出处,欢迎关注CSDN freeape 或微信小程序 小白AI博客 微信公众号 小白AI 或者网站 https://xiaobaiai.net
正文到此结束
- 本文标签: IDE http apache Atom windows HTML IO ip 软件 JVM map 企业 linux ldap GitHub 下载 Service 自动化 XML springboot 开发 开发者 src zip ActiveMQ cmd App 自动生成 tomcat 插件 EnableAutoConfiguration 网站 Uber SDN 项目管理 服务器 Action db Document Spring Boot js dependencies tag UI build java tab 域名 JMS plugin eclipse 组织 Spring cloud cat 开源 RESTful ACE root Freemarker db2 解析 id https 参数 junit 配置 example spring 测试 时间 微信公众号 ORM pom list bug description 总结 管理 博客 web NotePad 端口 Android MQ git REST 单元测试 安装 schema 目录 编译 代码 Logging bean maven value 模型 tar final
- 版权声明: 本文为互联网转载文章,出处已在文章中说明(部分除外)。如果侵权,请联系本站长删除,谢谢。
- 本文海报: 生成海报一 生成海报二
热门推荐


相关文章


Loading...
![[HBLOG]公众号](https://www.liuhaihua.cn/img/qrcode_gzh.jpg)

