OkHttp源码分析
OkHttp使用Call抽象出一个满足请求的模型,尽管中间可能会有多个请求或响应。执行Call有两种方式,同步或异步
一、创建OKHTTPClient对象,进行源码分析:
OkHttpClient client = new OkHttpClient();复制代码
通过okhttp源码分析,直接创建的 OkHttpClient 对象并且默认构造 builder 对象进行初始化
public class OkHttpClient implements Cloneable, Call.Factory, WebSocket.Factory {
  public OkHttpClient() {
       this(new Builder());
  }
  OkHttpClient(Builder builder) {
    this.dispatcher = builder.dispatcher;
    this.proxy = builder.proxy;
    this.protocols = builder.protocols;
    this.connectionSpecs = builder.connectionSpecs;
    this.interceptors = Util.immutableList(builder.interceptors);
    this.networkInterceptors = Util.immutableList(builder.networkInterceptors);
    this.eventListenerFactory = builder.eventListenerFactory;
    this.proxySelector = builder.proxySelector;
    this.cookieJar = builder.cookieJar;
    this.cache = builder.cache;
    this.internalCache = builder.internalCache;
    this.socketFactory = builder.socketFactory;

    boolean isTLS = false;
    ......

    this.hostnameVerifier = builder.hostnameVerifier;
    this.certificatePinner = builder.certificatePinner.withCertificateChainCleaner(
        certificateChainCleaner);
    this.proxyAuthenticator = builder.proxyAuthenticator;
    this.authenticator = builder.authenticator;
    this.connectionPool = builder.connectionPool;
    this.dns = builder.dns;
    this.followSslRedirects = builder.followSslRedirects;
    this.followRedirects = builder.followRedirects;
    this.retryOnConnectionFailure = builder.retryOnConnectionFailure;
    this.connectTimeout = builder.connectTimeout;
    this.readTimeout = builder.readTimeout;
    this.writeTimeout = builder.writeTimeout;
    this.pingInterval = builder.pingInterval;
  }
}复制代码
二、发起Http请求
Request request = new Request.Builder().url("url").build();
okHttpClient.newCall(request).enqueue(new Callback() {
  @Override
  public void onFailure(Call call, IOException e) {

  }

  @Override
  public void onResponse(Call call, Response response) throws IOException {

  }
});复制代码
三、代码流程分析
Request request = new Request.Builder().url("url").build();复制代码
初始化构造者模式和请求对象 ,并且用URL替换Web嵌套字URL。
public final class Request {
    public Builder() {
      this.method = "GET";
      this.headers = new Headers.Builder();
    }
    public Builder url(String url) {
      ......

      // Silently replace web socket URLs with HTTP URLs.
      if (url.regionMatches(true, 0, "ws:", 0, 3)) {
        url = "http:" + url.substring(3);
      } else if (url.regionMatches(true, 0, "wss:", 0, 4)) {
        url = "https:" + url.substring(4);
      }

      HttpUrl parsed = HttpUrl.parse(url);
      ......
      return url(parsed);
    }
    public Request build() {
      ......
      return new Request(this);
    }
}复制代码
四、方法解析
okHttpClient.newCall(request).enqueue(new Callback() {
@Override
public void onFailure(Call call, IOException e) {

}

@Override
public void onResponse(Call call, Response response) throws IOException {

}
});复制代码
源码分析:
public class OkHttpClient implements Cloneable, Call.Factory, WebSocket.Factory {
   @Override
   public Call newCall(Request request) {
    return new RealCall(this, request, false /* for web socket */);
   }
}复制代码
RealCall 实现了 Call.Factory 接口创建了一个 RealCall 的实例,而 RealCall 是 Call 接口的 实现 。
1、异步请求的执行流程
final class RealCall implements Call {
   @Override
   public void enqueue(Callback responseCallback) {
     synchronized (this) {
       if (executed) throw new IllegalStateException("Already Executed");
       executed = true;
     }
     captureCallStackTrace();
     client.dispatcher().enqueue(new AsyncCall(responseCallback));
  }
}复制代码
由上述源码得知:
- 检查 这个Call是否已经被执行 了, 每个
Call只能被执行一次 ,如果想要一个完全一样的call,可以利用call#clone方法进行克隆。 - 利用
client.dispatcher().enqueue(this)来进行实际执行,dispatcher是刚才看到的OkHttpClient.Builder的成员之一。 -
AsyncCall类是RealCall类的一个 内部类 并且继承NamedRunnable,那么首先看NamedRunnable类是什么样的,如下:
public abstract class NamedRunnable implements Runnable {
  ......

  @Override
  public final void run() {
   ......
    try {
      execute();
    }
    ......
  }

  protected abstract void execute();
}复制代码
可以看到 NamedRunnable 实现了 Runnable 接口 并且是个 抽象类 ,其 抽象方法 时 execute() ,该方法是在 run() 方法中 被调用 的,这也就 意味着NamedRunnable是一个任务 ,并且其子类 应该实现execute()方法 。下面再看AsyncCall的实现:
final class AsyncCall extends NamedRunnable {
    private final Callback responseCallback;

    AsyncCall(Callback responseCallback) {
      super("OkHttp %s", redactedUrl());
      this.responseCallback = responseCallback;
    }

    ......复制代码
final class RealCall implements Call {
  @Override
  protected void execute() {
    boolean signalledCallback = false;
    try {
       Response response = getResponseWithInterceptorChain();
       if (retryAndFollowUpInterceptor.isCanceled()) {
        signalledCallback = true;
        responseCallback.onFailure(RealCall.this, new IOException("Canceled"));
       } else {
         signalledCallback = true;
         responseCallback.onResponse(RealCall.this, response);
       }
    } catch (IOException e) {
      ......
      responseCallback.onFailure(RealCall.this, e);

    } finally {
      client.dispatcher().finished(this);
    }
  }
}复制代码
AsyncCall类 实现了 execute() 方法,首先是调用 getResponseWithInterceptorChain() 方法 获取响应 ,然后 获取成功 后,就调用回调的 onResponse() 方法,若 失败 ,就回调 onFailure() 方法。最后,调用 Dispatcher 的 finished() 方法。
关键代码:
responseCallback.onFailure(RealCall.this, new IOException("Canceled"));
复制代码
和
responseCallback.onResponse(RealCall.this, response);
复制代码
走完这两句代码会进行回调到刚刚我们初始化OkHttp的地方,如下:
okHttpClient.newCall(request).enqueue(new Callback() {
   @Override
   public void onFailure(Call call, IOException e) {

   }

   @Override
   public void onResponse(Call call, Response response) throws IOException {

   }
});复制代码
通过传入的 callback 封装了 AsyncCall 对象,在AsyncCall之后直接调用了 dispatcher().enqueue() 方法,并将前面创建好的AsyncCall传到这个方法当中。
client.dispatcher() 返回的就是 一个 dispatcher 对象 ,同时他的 初始化操作 也是在前面构建okhttpClient对象时它的内部的构造方法已经初始化好了,dispatcher默认值。
enqueue() 方法 如下:
synchronized void enqueue(AsyncCall call){
  if(runningAsyncCalls.size() > maxRequests && runningCallsForHost(call)){
    runningAsyncCalls.add(call);
    executorService().execute(call);
  } else {
    readyAsyncCalls.add(call);
  }
}复制代码
enqueue() 方法本身加了一个 同步锁 ,并且这个方法传入了刚才的 Runnable 实例 ,也就是 AsyncCall 对象 。
首先是一个判断,就是正在运行的这个异步任务( maxRequests = 64 )和正在调度请求每一个主机的最大数( maxRequestsPerHost = 5 )进行这两个值的判断你,如果这两个值都在最大数里面,那么就可以把刚才传入的AsyncCall对象添加到正在执行的异步请求队列( runningAsyncCalls )当中,如果不满足就会加到准备就绪的异步请求队列当中( readyAsyncCalls )。
五、核心重点类Disposepatcher线程池介绍
public final class Dispatcher {
  /** 最大并发请求数为64 */
  private int maxRequests = 64;
  /** 每个主机最大请求数为5 */
  private int maxRequestsPerHost = 5;

  /** 线程池 */
  private ExecutorService executorService;

  /** 准备执行的请求 */
  private final Deque<AsyncCall> readyAsyncCalls = new ArrayDeque<>();

  /** 正在执行的异步请求,包含已经取消但未执行完的请求 */
  private final Deque<AsyncCall> runningAsyncCalls = new ArrayDeque<>();

  /** 正在执行的同步请求,包含已经取消单未执行完的请求 */
  private final Deque<RealCall> runningSyncCalls = new ArrayDeque<>();复制代码
在OkHttp,使用如下构造了 单例线程池
public synchronized ExecutorService executorService() {
    if (executorService == null) {
      executorService = new ThreadPoolExecutor(0, Integer.MAX_VALUE, 60, TimeUnit.SECONDS,
          new SynchronousQueue<Runnable>(), Util.threadFactory("OkHttp Dispatcher", false));
    }
    return executorService;
  }复制代码
构造一个线程池ExecutorService:
executorService = new ThreadPoolExecutor(
//corePoolSize 最小并发线程数,如果是0的话,空闲一段时间后所有线程将全部被销毁
    0,
//maximumPoolSize: 最大线程数,当任务进来时可以扩充的线程最大值,当大于了这个值就会根据丢弃处理机制来处理
    Integer.MAX_VALUE,
//keepAliveTime: 当线程数大于corePoolSize时,多余的空闲线程的最大存活时间
    60,
//单位秒
    TimeUnit.SECONDS,
//工作队列,先进先出
    new SynchronousQueue<Runnable>(),
//单个线程的工厂
   Util.threadFactory("OkHttp Dispatcher", false));复制代码
可以看出,在 OkHttp 中,构建了一个线程范围在 [0, Integer.MAX_VALUE] 的 线程池 ,它 不保留任何最小线程数 , 随时创建更多的线程数 ,当线程 空闲时只能存活 60s ,它使用了一个 不存储元素的阻塞工作队列 ,一个叫做“ OkHttp Dispatcher ”的 线程工厂 。
也就是说,在实际运行中,当收到10个并发请求时,线程池创建10个线程,当工作完成后,线程池会在60s后相继关闭所有线程。
synchronized void enqueue(AsyncCall call) {
    if (runningAsyncCalls.size() < maxRequests && runningCallsForHost(call) < maxRequestsPerHost) {
      runningAsyncCalls.add(call);
      executorService().execute(call);
    } else {
      readyAsyncCalls.add(call);
    }
  }复制代码
从上述源码分析,如果当前还能执行一个并发请求,则加入runningAsyncCalls,立即执行,否则加入readyAsyncCall队列。
六、Dispatcher线程池总结
- 调度线程池Dispatcher实现了高并发,低阻塞的功能
- 采用Deque作为缓存,先进先出的顺序执行
- 任务在try/finally中调用了finished()方法,控制任务队列的执行顺序,而不是采用锁,减少了编码复杂性,提高性能。
try {
        Response response = getResponseWithInterceptorChain();
        if (retryAndFollowUpInterceptor.isCanceled()) {
          signalledCallback = true;
          responseCallback.onFailure(RealCall.this, new IOException("Canceled"));
        } else {
          signalledCallback = true;
          responseCallback.onResponse(RealCall.this, response);
        }
      } finally {
        client.dispatcher().finished(this);
      }复制代码
在任务执行完成后, 无论是否有异常 ,finally代码段总会被执行,也就是会调用 DIspatcher 的 finished() 方法。
void finished(AsyncCall call) {
    finished(runningAsyncCalls, call, true);
  }复制代码
从上面的代码可以看出,第一个参数传入的是正在运行的异步队列,第三个参数为true,下面再看有 三个参数 的 finished() 方法:
private <T> void finished(Deque<T> calls, T call, boolean promoteCalls) {
    int runningCallsCount;
    Runnable idleCallback;
    synchronized (this) {
      if (!calls.remove(call)) throw new AssertionError("Call wasn't in-flight!");
      if (promoteCalls) promoteCalls();
      runningCallsCount = runningCallsCount();
      idleCallback = this.idleCallback;
    }

    if (runningCallsCount == 0 && idleCallback != null) {
      idleCallback.run();
    }
  }复制代码
打开源码,发现它将 正在运行的任务Call 从队列 runningAsyncCalls 中移除后,获取 运行数量 判断是否进入 Idle 状态 ,接着执行 promoteCalls() 方法,
下面是 promoteCalls() 方法:
private void promoteCalls() {
    if (runningAsyncCalls.size() >= maxRequests) return; // Already running max capacity.
    if (readyAsyncCalls.isEmpty()) return; // No ready calls to promote.

    for (Iterator<AsyncCall> i = readyAsyncCalls.iterator(); i.hasNext(); ) {
      AsyncCall call = i.next();

      if (runningCallsForHost(call) < maxRequestsPerHost) {
        i.remove();
        runningAsyncCalls.add(call);
        executorService().execute(call);
      }

      if (runningAsyncCalls.size() >= maxRequests) return; // Reached max capacity.
    }
  }复制代码
该方法主要是 遍历等待队列 ( readyAsynsCalls ),并且 需要满足同一主机的请求( runningCallsForHost(Call) )小于 maxRequestsPerHost 时,就移到运行队列中并交给线程池运行。就主动的把缓存队列向前走了一步,而没有使用互斥锁等复杂编码。
七、核心重点getResponseWithInterceptorChain()方法
Response getResponseWithInterceptorChain() throws IOException {
    // Build a full stack of interceptors.
    List<Interceptor> interceptors = new ArrayList<>();
    interceptors.addAll(client.interceptors());
    interceptors.add(retryAndFollowUpInterceptor);
    interceptors.add(new BridgeInterceptor(client.cookieJar()));
    interceptors.add(new CacheInterceptor(client.internalCache()));
    interceptors.add(new ConnectInterceptor(client));
    if (!forWebSocket) {
      interceptors.addAll(client.networkInterceptors());
    }
    interceptors.add(new CallServerInterceptor(forWebSocket));

    Interceptor.Chain chain = new RealInterceptorChain(
        interceptors, null, null, null, 0, originalRequest);
    return chain.proceed(originalRequest);
  }复制代码
流程图:
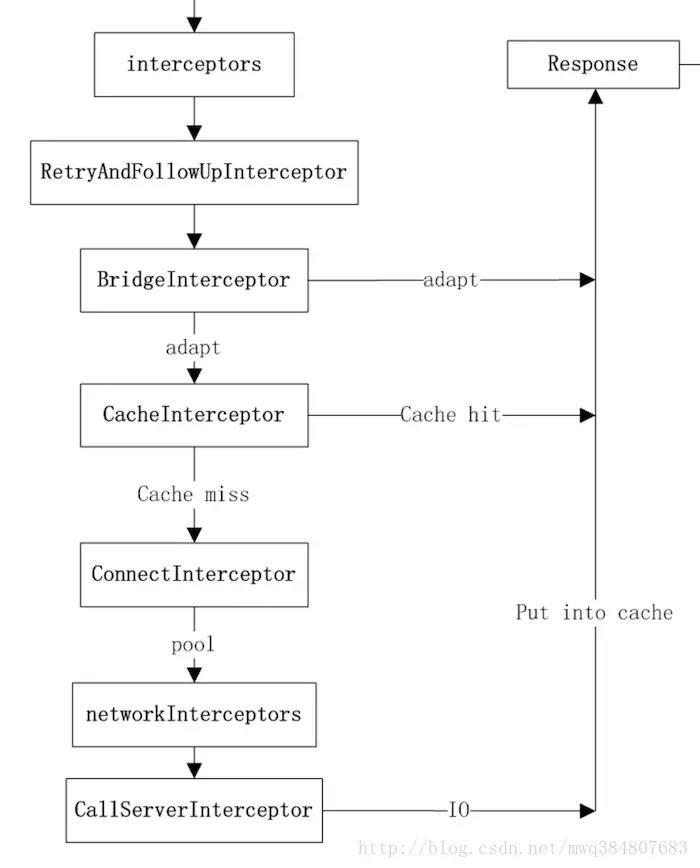
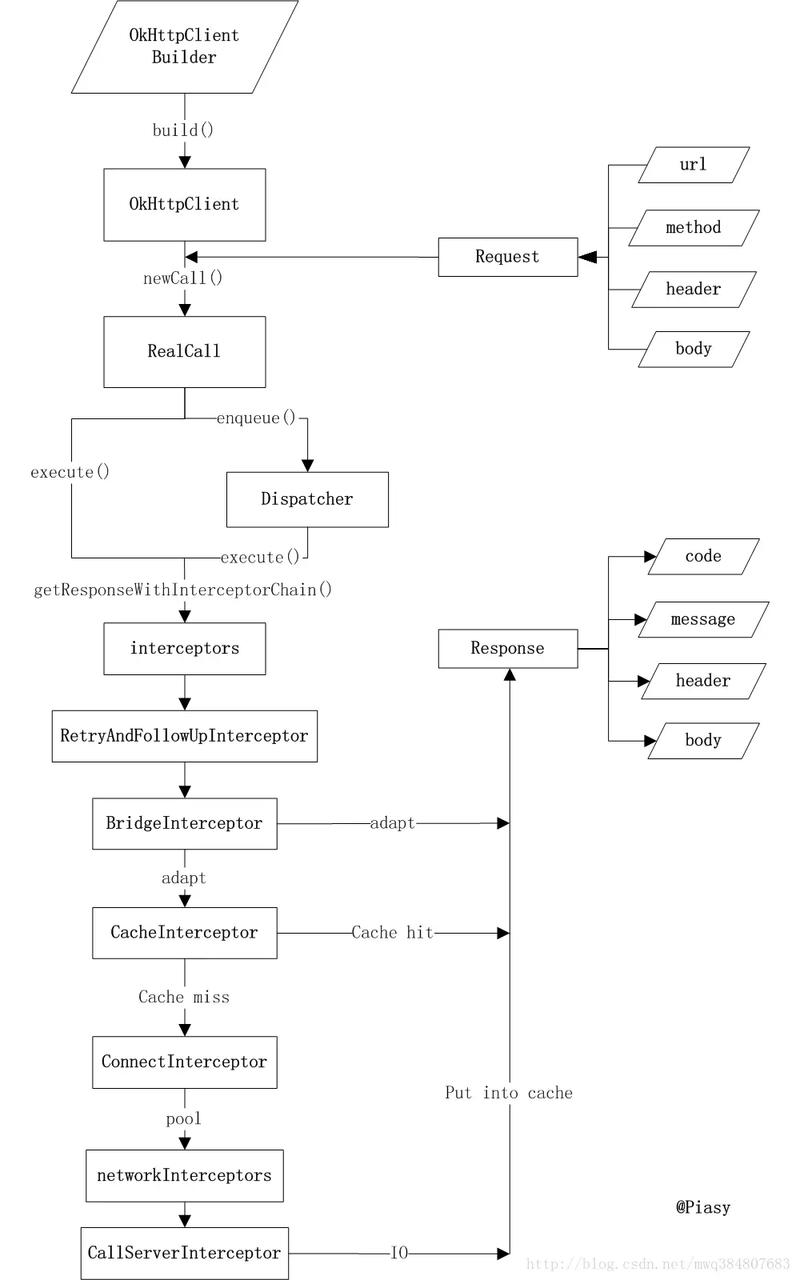
OkHttpClient 时设置的
interceptors
(2)负责 失败重试以及重定向 的 RetryAndFollowUpInterceptor
(3)负责把 用户 构造的 请求 转换为 发送到服务器 的 请求 、 把服务器返回的响应 转换为 用户友好的响应 的 BridgeInterceptor
(4)负责 读取缓存 直接返回、 更新缓存 的 CacheInterceptor
(5) 负责和服务器建立连接 的 ConnectInterceptor
(6)配置 OkHttpClient 时设置的 networkInterceptors
(7)负责向 服务器发送请求数据 、从 服务器读取响应数据 的 CallServerInterceptor
OkHttp 的这种 拦截器链 采用的是 责任链模式 ,这样的 好处 是将 请求的发送和处理分开 ,并且可以 动态添加 中间的 处理方 实现对 请求的处理、短路等操作 。
从上述源码得知,不管 OkHttp 有多少拦截器最后都会走,如下方法:
Interceptor.Chain chain = new RealInterceptorChain(
        interceptors, null, null, null, 0, originalRequest);
return chain.proceed(originalRequest);复制代码
从方法名字基本可以猜到是干嘛的,调用 chain.proceed(originalRequest); 将 request 传递进去,从拦截器链里拿到返回结果。
那么拦截器Interceptor是干嘛的,Chain是干嘛的呢?
继续往下看 RealInterceptorChain类
下面是 RealInterceptorChain类 的定义,该类 实现了 Chain接口 ,在 getResponseWithInterceptor() 调用时有好几个参数都传入的null。
public final class RealInterceptorChain implements Interceptor.Chain {

   public RealInterceptorChain(List<Interceptor> interceptors, StreamAllocation streamAllocation,
        HttpCodec httpCodec, RealConnection connection, int index, Request request) {
        this.interceptors = interceptors;
        this.connection = connection;
        this.streamAllocation = streamAllocation;
        this.httpCodec = httpCodec;
        this.index = index;
        this.request = request;
  }
  ......

 @Override
 public Response proceed(Request request) throws IOException {
    return proceed(request, streamAllocation, httpCodec, connection);
  }

  public Response proceed(Request request, StreamAllocation streamAllocation,
      HttpCodec httpCodec, RealConnection connection) throws IOException {
    if (index >= interceptors.size()) throw new AssertionError();

    calls++;

    ......

    // Call the next interceptor in the chain.
    RealInterceptorChain next = new RealInterceptorChain(
        interceptors, streamAllocation, httpCodec, connection, index + 1, request);
    Interceptor interceptor = interceptors.get(index);
    Response response = interceptor.intercept(next);

   ......

    return response;
  }

  protected abstract void execute();
}复制代码
主要看 processd() 方法,proceed()方法中判断 index (此时为0)是否大于或者等于 client.interceptors(list) 的大小。由于 HTTPStream 为 null ,所以首先 创建 next 拦截器链 ,需要把索引设置为 index+1 即可;然后获取 第一个拦截器 ,调用其 intercept() 方法。
1、Interceptor接口
public interface Interceptor {
  Response intercept(Chain chain) throws IOException;

  interface Chain {
    Request request();

    Response proceed(Request request) throws IOException;

    Connection connection();
  }
}复制代码
2、BridgeInterceptor类
BridgeInterceptor 类从用户的请求的构建网络请求,然后提交给网络,最后从网络响应中提取出用户响应。
从最上面的图可以看出,BridgeInterceptor实现了 适配的功能 。下面是其 intercept() 方法
public final class BridgeInterceptor implements Interceptor {
  ......

@Override
public Response intercept(Chain chain) throws IOException {
    Request userRequest = chain.request();
    Request.Builder requestBuilder = userRequest.newBuilder();

    RequestBody body = userRequest.body();
    //如果存在请求主体部分,那么需要添加Content-Type、Content-Length首部
    if (body != null) {
      MediaType contentType = body.contentType();
      if (contentType != null) {
        requestBuilder.header("Content-Type", contentType.toString());
      }

      long contentLength = body.contentLength();
      if (contentLength != -1) {
        requestBuilder.header("Content-Length", Long.toString(contentLength));
        requestBuilder.removeHeader("Transfer-Encoding");
      } else {
        requestBuilder.header("Transfer-Encoding", "chunked");
        requestBuilder.removeHeader("Content-Length");
      }
    }

    //请求头部为null,则添加请求头内容
    if (userRequest.header("Host") == null) {
      requestBuilder.header("Host", hostHeader(userRequest.url(), false));
    }

    //连接断开,则请求保持连接状态
    if (userRequest.header("Connection") == null) {
      requestBuilder.header("Connection", "Keep-Alive");
    }

    // If we add an "Accept-Encoding: gzip" header field we're responsible for also decompressing
    // the transfer stream.
    boolean transparentGzip = false;
    if (userRequest.header("Accept-Encoding") == null && userRequest.header("Range") == null) {
      transparentGzip = true;
      requestBuilder.header("Accept-Encoding", "gzip");
    }

    //若cookies为空,则添加对应的内容
    List<Cookie> cookies = cookieJar.loadForRequest(userRequest.url());
    if (!cookies.isEmpty()) {
      requestBuilder.header("Cookie", cookieHeader(cookies));
    }

    //添加用户代理
    if (userRequest.header("User-Agent") == null) {
      requestBuilder.header("User-Agent", Version.userAgent());
    }

    //此处执行chain类的proceed()方法,获得对应的网络请求数据
    Response networkResponse = chain.proceed(requestBuilder.build());

    HttpHeaders.receiveHeaders(cookieJar, userRequest.url(), networkResponse.headers());

    Response.Builder responseBuilder = networkResponse.newBuilder()
        .request(userRequest);

    //得到的请求数据,并对这些数据进行判断,以便添加一些数据,如请求数据内容,头信息等
    if (transparentGzip
        && "gzip".equalsIgnoreCase(networkResponse.header("Content-Encoding"))
        && HttpHeaders.hasBody(networkResponse)) {
      GzipSource responseBody = new GzipSource(networkResponse.body().source());
      Headers strippedHeaders = networkResponse.headers().newBuilder()
          .removeAll("Content-Encoding")
          .removeAll("Content-Length")
          .build();
      responseBuilder.headers(strippedHeaders);
      responseBuilder.body(new RealResponseBody(strippedHeaders, Okio.buffer(responseBody)));
    }

    return responseBuilder.build();
  }

  /** Returns a 'Cookie' HTTP request header with all cookies, like {@code a=b; c=d}. */
  private String cookieHeader(List<Cookie> cookies) {
    StringBuilder cookieHeader = new StringBuilder();
    for (int i = 0, size = cookies.size(); i < size; i++) {
      if (i > 0) {
        cookieHeader.append("; ");
      }
      Cookie cookie = cookies.get(i);
      cookieHeader.append(cookie.name()).append('=').append(cookie.value());
    }
    return cookieHeader.toString();
  }
}复制代码
从上面的代码可以看出,首先 获取原请求 ,然后在请求中 添加头信息 ,如 Host 、 Connection 、 Accept-Encoding 参数等,然后根据看是否需要 填充 Cookie ,在对原始请求做出处理后,使用 chain 的 proceed() 方法得到响应,接下来对 响应做处理得到用户响应,最后返回响应 。
接下来再看下一个拦截器ConnectionInterceptor类的处理:
3、ConnectionInterceptor类
public final class ConnectInterceptor implements Interceptor {
  ......

 @Override
 public Response intercept(Chain chain) throws IOException {
   RealInterceptorChain realChain = (RealInterceptorChain) chain;
   Request request = realChain.request();
   StreamAllocation streamAllocation = realChain.streamAllocation();

   // We need the network to satisfy this request. Possibly for validating a conditional GET.
   boolean doExtensiveHealthChecks = !request.method().equals("GET");
   HttpCodec httpCodec = streamAllocation.newStream(client, doExtensiveHealthChecks);
   RealConnection connection = streamAllocation.connection();

   return realChain.proceed(request, streamAllocation, httpCodec, connection);
 }
}复制代码
实际上建立连接就是创建一个 HttpCodec 对象,它利用 Okio 对 Socket 的 读写操作 进行封装,Okio以后有机会再进行分析,现在让我们对它们保持一个简单地认识:它对 java.io 和 java.nio 进行了 封装 ,让我们 更便捷高效的进行 io 操作 。
4、CallServerInterceptor类
CallServerInterceptor 是拦截器链中 最后一个拦截器 ,负责将 网络请求提交给服务器 。它的 intercep() 方法实现如下:
@Override
public Response intercept(Chain chain) throws IOException {
    RealInterceptorChain realChain = (RealInterceptorChain) chain;
    HttpCodec httpCodec = realChain.httpStream();
    StreamAllocation streamAllocation = realChain.streamAllocation();
    RealConnection connection = (RealConnection) realChain.connection();
    Request request = realChain.request();

    long sentRequestMillis = System.currentTimeMillis();
    httpCodec.writeRequestHeaders(request);

    Response.Builder responseBuilder = null;
    if (HttpMethod.permitsRequestBody(request.method()) && request.body() != null) {
      // If there's a "Expect: 100-continue" header on the request, wait for a "HTTP/1.1 100
      // Continue" response before transmitting the request body. If we don't get that, return what
      // we did get (such as a 4xx response) without ever transmitting the request body.
      if ("100-continue".equalsIgnoreCase(request.header("Expect"))) {
        httpCodec.flushRequest();
        responseBuilder = httpCodec.readResponseHeaders(true);
      }

      if (responseBuilder == null) {
        // Write the request body if the "Expect: 100-continue" expectation was met.
        Sink requestBodyOut = httpCodec.createRequestBody(request, request.body().contentLength());
        BufferedSink bufferedRequestBody = Okio.buffer(requestBodyOut);
        request.body().writeTo(bufferedRequestBody);
        bufferedRequestBody.close();
      } else if (!connection.isMultiplexed()) {
        // If the "Expect: 100-continue" expectation wasn't met, prevent the HTTP/1 connection from
        // being reused. Otherwise we're still obligated to transmit the request body to leave the
        // connection in a consistent state.
        streamAllocation.noNewStreams();
      }
    }

    httpCodec.finishRequest();

    if (responseBuilder == null) {
      responseBuilder = httpCodec.readResponseHeaders(false);
    }

    Response response = responseBuilder
        .request(request)
        .handshake(streamAllocation.connection().handshake())
        .sentRequestAtMillis(sentRequestMillis)
        .receivedResponseAtMillis(System.currentTimeMillis())
        .build();

    int code = response.code();
    if (forWebSocket && code == 101) {
      // Connection is upgrading, but we need to ensure interceptors see a non-null response body.
      response = response.newBuilder()
          .body(Util.EMPTY_RESPONSE)
          .build();
    } else {
      response = response.newBuilder()
          .body(httpCodec.openResponseBody(response))
          .build();
    }

    if ("close".equalsIgnoreCase(response.request().header("Connection"))
        || "close".equalsIgnoreCase(response.header("Connection"))) {
      streamAllocation.noNewStreams();
    }

    if ((code == 204 || code == 205) && response.body().contentLength() > 0) {
      throw new ProtocolException(
          "HTTP " + code + " had non-zero Content-Length: " + response.body().contentLength());
    }

    return response;
  }@Override public Response intercept(Chain chain) throws IOException {
    RealInterceptorChain realChain = (RealInterceptorChain) chain;
    HttpCodec httpCodec = realChain.httpStream();
    StreamAllocation streamAllocation = realChain.streamAllocation();
    RealConnection connection = (RealConnection) realChain.connection();
    Request request = realChain.request();

    long sentRequestMillis = System.currentTimeMillis();
    httpCodec.writeRequestHeaders(request);

    Response.Builder responseBuilder = null;
    if (HttpMethod.permitsRequestBody(request.method()) && request.body() != null) {
      // If there's a "Expect: 100-continue" header on the request, wait for a "HTTP/1.1 100
      // Continue" response before transmitting the request body. If we don't get that, return what
      // we did get (such as a 4xx response) without ever transmitting the request body.
      if ("100-continue".equalsIgnoreCase(request.header("Expect"))) {
        httpCodec.flushRequest();
        responseBuilder = httpCodec.readResponseHeaders(true);
      }

      if (responseBuilder == null) {
        // Write the request body if the "Expect: 100-continue" expectation was met.
        Sink requestBodyOut = httpCodec.createRequestBody(request, request.body().contentLength());
        BufferedSink bufferedRequestBody = Okio.buffer(requestBodyOut);
        request.body().writeTo(bufferedRequestBody);
        bufferedRequestBody.close();
      } else if (!connection.isMultiplexed()) {
        // If the "Expect: 100-continue" expectation wasn't met, prevent the HTTP/1 connection from
        // being reused. Otherwise we're still obligated to transmit the request body to leave the
        // connection in a consistent state.
        streamAllocation.noNewStreams();
      }
    }

    httpCodec.finishRequest();

    if (responseBuilder == null) {
      responseBuilder = httpCodec.readResponseHeaders(false);
    }

    Response response = responseBuilder
        .request(request)
        .handshake(streamAllocation.connection().handshake())
        .sentRequestAtMillis(sentRequestMillis)
        .receivedResponseAtMillis(System.currentTimeMillis())
        .build();

    int code = response.code();
    if (forWebSocket && code == 101) {
      // Connection is upgrading, but we need to ensure interceptors see a non-null response body.
      response = response.newBuilder()
          .body(Util.EMPTY_RESPONSE)
          .build();
    } else {
      response = response.newBuilder()
          .body(httpCodec.openResponseBody(response))
          .build();
    }

    if ("close".equalsIgnoreCase(response.request().header("Connection"))
        || "close".equalsIgnoreCase(response.header("Connection"))) {
      streamAllocation.noNewStreams();
    }

    if ((code == 204 || code == 205) && response.body().contentLength() > 0) {
      throw new ProtocolException(
          "HTTP " + code + " had non-zero Content-Length: " + response.body().contentLength());
    }

    return response;
  }复制代码
从上面的代码中可以看出,首先获取 HttpStream 对象,然后调用 writeRequestHeaders() 方法 写入请求的头部 ,然后判断是否需要 写入请求的body部分 ,最后调用 finishRequest() 方法将所有数据刷新给 底层的 Socket ,接下里尝试调用 readResponseHeaders() 方法获取 响应的头部 ,然后再调用 openResponseBody() 方法得到响应的 body部分 ,最后返回响应。
八、总结
OkHttp的底层是通过Java的Socket发送Http请求与接受响应的。但是OkHttp实现了连接池的概念,即对于同一主机的多个请求,其实可以公用一个Socket连接,而不是没发送完Http请求就关闭底层的Socket,这样就实现了连接池的概念。而OkHttp对Socket的读写操作使用的Okio库进行了一层封装。
本文所有内容来源于: android面试题-okhttp内核剖析
部分来源于: okhttp异步请求:AsyncCall、线程池、双向队列
正文到此结束
- 本文标签: synchronized java 参数 DNS client Service 代码 cookies Select Agent ssl 开源 配置 ECS IO App 构造方法 rmi list https build IDE queue Keep-Alive parse 缓存 服务器 总结 cat 主机 NIO CTO equals value 并发 ip Connection 数据 线程池 模型 遍历 Proxy web final 线程 core executor Full Stack ArrayList 实例 stream tab ThreadPoolExecutor UI ACE 高并发 解析 连接池 zip 锁 src cache 时间 索引 URLs retry 源码 同步 Region http id Android
- 版权声明: 本文为互联网转载文章,出处已在文章中说明(部分除外)。如果侵权,请联系本站长删除,谢谢。
- 本文海报: 生成海报一 生成海报二
热门推荐


相关文章

近期评论
-
ws0132613@gmail.comhttps://getmacos.com/gopanel/william smith
-
谢谢
-
https://www.newcmy.com/register?aff=HBVX建议您试试草莓云机场,可以流畅观看youtube和tiktok,上reddit/x也没有问题,还有各种ai优化节点。
-
-
-
想购买您这个站,我的联系方式QQ741756694微信同步 能卖联系
-
-
-
-
Loading...
![[HBLOG]公众号](https://www.liuhaihua.cn/img/qrcode_gzh.jpg)

