Spring IoC 注解的使用
xml VS 注解
spring2.5后支持使用 注解 来管理javaBean
xml方式

注解方式
常用注解标签
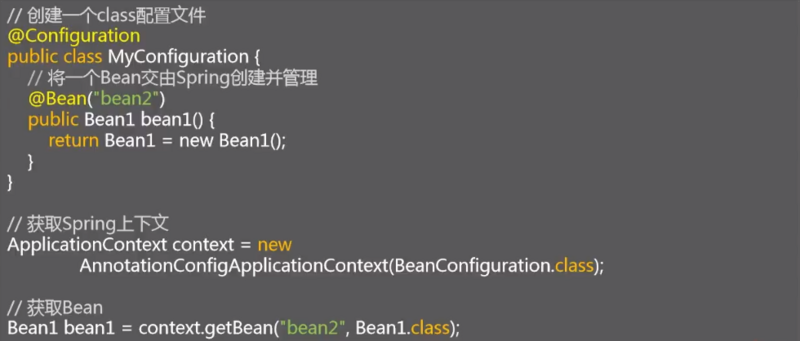
@Configuration
该注解标识在类上,然后就可以通过 AnnotationConfigApplicationContext (***.class)来获取spring上下文环境(相当于xml的功能)。
@Bean
与xml配置文件 <bean> 标签一个用处,<bean>标签的id相当于 @Bean(name="Id名") ,如果不使用name,id值为方法名称。
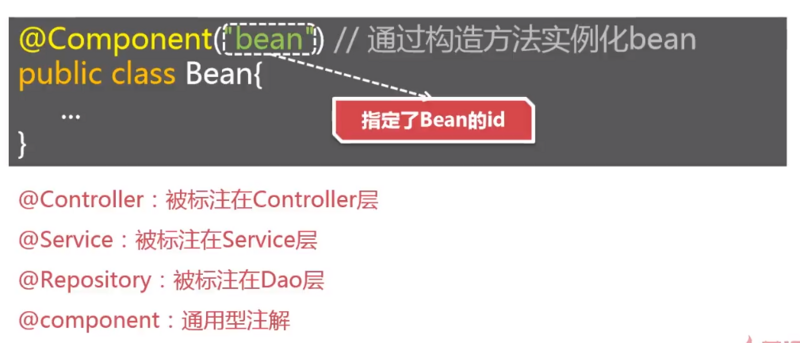
@Component
告知spring管理这个类,还可以通过该注解的 value 属性指定Bean的Id。
@Controller
被标注在 Controller 层。
@Service
被标注在 Service 层。
@Repository
被标注在 Dao 层
如何进行简化:当要获取多个Bean时,则要编写多个@Bean注解和获取Bean方法?
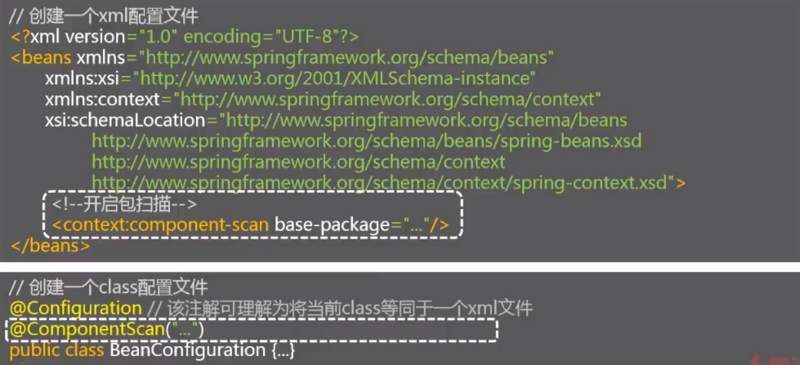
@ComponentScan
1.开启包扫描
方法1:在配置类中添加 @ComponentScan(value="扫描的路径") 注解。
扫描带有 @Component 注解的Class,Spring将管理这些Class。
方法2:spring.xml中
<context:component-scan base-package="扫描的包路径"/>
2.加注解 @Component
Bean的类上加注解 @Component ,默认的Bean的id是类名的首字母小写的全称,或者写为 @Component(value="id值") 。
给Bean取别名
注解方式
可以使一个Bean对应多个Id名.
因为 Bean(name="bean2,bean3") 注解里的name属性是String类型的数组,所以可以通过它来指定Bean的多个Id。
注意: @Component 里的value是字符串类型,只能有一个BeanId。
xml方式
<bean id="bean1" name="bean2,bean3" class="*.class"/>
<!-- 或者 -->
<alias name="bean1"  alias="bean4"/>
通过注解注入Bean
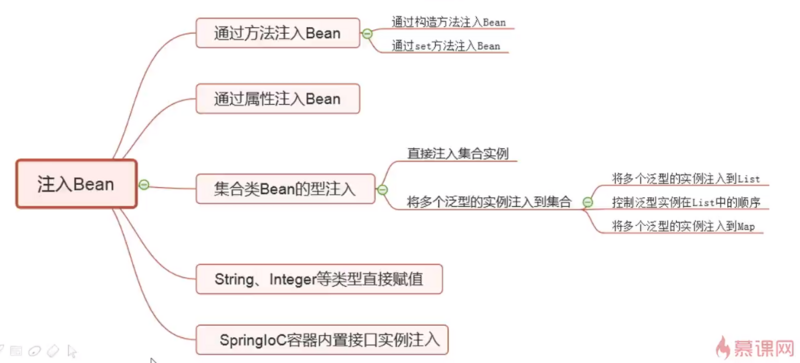
@Autowired
通过该注解实现构造方法注入和set方法注入,可以标识在 有参构造方法 上、 set()方法 上、 属性 上。
一、通过方法注入Bean
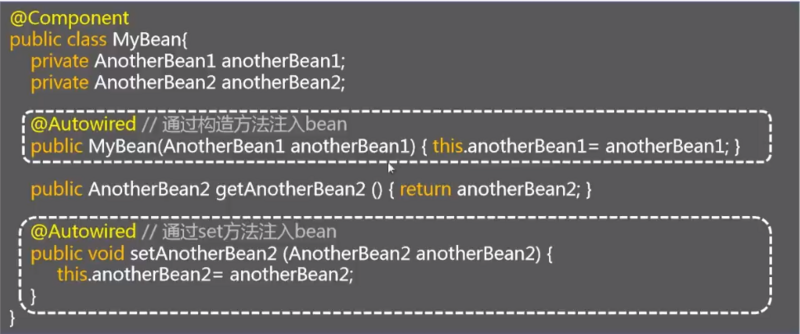
1:通过 有参构造方法 注入
- 步骤1
创建扫描配置类,并添加注解 @Configuration、@ComponentScan(value="路径")
@Configuration
@ComponentScan(value="com.xx.compo")
public class MyConfiguration {
}
- 步骤2
创建要实例化的Bean,并提供有参的构造方法,并在构造方法上添加注解 @Autowired 在类上添加 @Component 。
@Component
public class MyBean {
    private AnotherBean anotherBean;
    @Autowired
    public MyBean(AnotherBean anotherBean) {
        super();
        this.anotherBean = anotherBean;
    }
测试代码:
@Test
public void test(){
    ApplicationContext ac=new AnnotationConfigApplicationContext(MyConfiguration.class);
    MyBean bean1=ac.getBean("myBean",MyBean.class);
    System.out.println(bean1);
}
结果:
MyBean[anotherBean=com.xx.compo.AnotherBean@27b47740]
2:通过 set() 方法注入
- 步骤1
创建扫描配置类,并添加注解 @Configuration 、 @ComponentScan(value="路径")
@Configuration
@ComponentScan(value="com.xx.compo")
public class MyConfiguration {
}
- 步骤2
创建要实例化的Bean,并提供set方法,并在set方法上添加注解 @Autowired ,在类上添加 @Component 。
@Component(value="myBean")
public class MyBean {
    private AnotherBean anotherBean;
    private AnotherBean anotherBean1;

    @Autowired
    public MyBean(AnotherBean anotherBean) {
        super();
        System.out.println("MyBean被创建了");
        this.anotherBean = anotherBean;
    }

    @Autowired
    public void setAnotherBean1(AnotherBean anotherBean1) {
        this.anotherBean1 = anotherBean1;
    }

    @Override
    public String toString() {
        return "MyBean [anotherBean=" + anotherBean + ", anotherBean1=" + anotherBean1 + "]";
    }
}
测试:
@Test
public void test(){
    ApplicationContext ac=new AnnotationConfigApplicationContext(MyConfiguration.class);

    MyBean bean1=ac.getBean("myBean",MyBean.class);
    System.out.println(bean1);
}
结果:anotherBean和anotherBean1相同,因为 @Component 默认是单例模式,同一spring上下文中只会创建一个AnotherBean的对象。
MyBean[anotherBean=com.xx.compo.AnotherBean@3c8587f,anotherBean1=com.xx.compo.AnotherBean@3c8587f]
二、通过属性直接注入Bean
属性不需要 get() , set() 方法
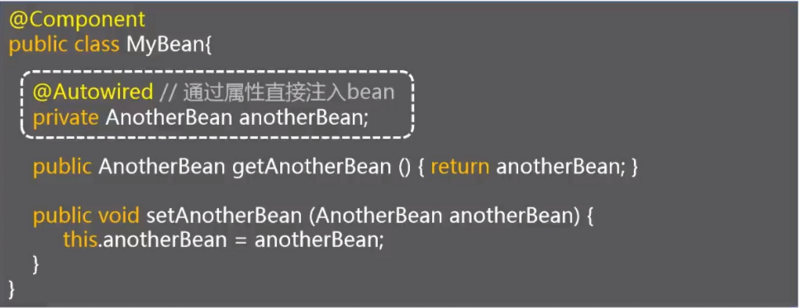
实例化和注入时指定Bean的id
三、集合类型Bean的注入
1、List(Set)集合类型Bean的注入
直接注入List实例:
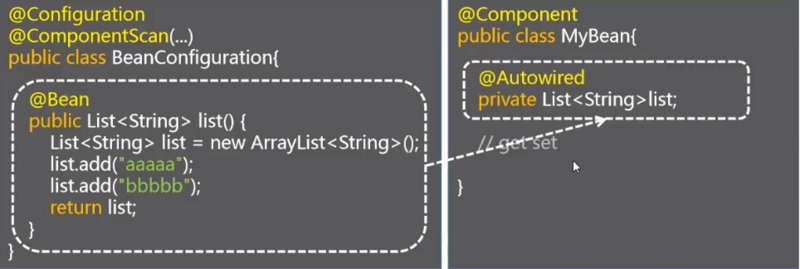
将多个集合元素注入到List:
- 步骤1
创建注入Bean的类(包括创建集合类型的属性,基本类型的作为Bean的属性),并提供 set() 方法,添加 @Resource 注解。
public class MyBean {
    private List<String> stringList;
    public List<String> getStringList() {
        return stringList;
}

    @Resource   //@Resource注解首先会根据属性名称注入,其次会根据类型进行注入。
    public void setStringList(List<String> stringList) {
        this.stringList = stringList;
    }
}
- 步骤2
扫描配置类,提供List<String>类型的实例的方法,并添加 @Bean 注解,告知spring由spring管理的方法。
@Bean
public List<String> stringList(){
        List<String> list=new ArrayList<String>();
        list.add("哈哈");
        list.add("嘿嘿");
        list.add("呵呵");
        return list;
}
测试:
@Test
public void test(){
    ApplicationContext ac=new AnnotationConfigApplicationContext(MyConfiguration.class);
    MyBean myBean=ac.getBean("myBean",MyBean.class);
    System.out.println(myBean);
    for (String s:myBean.getStringList()) {
        System.out.println(s);
    }
}
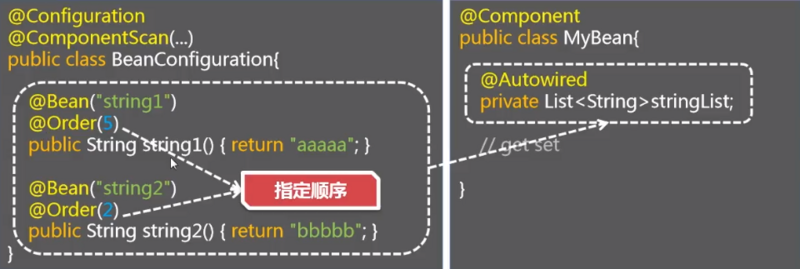
通过注解注入List的第二种方式:在扫描配置类中添加几个返回类型为字符串类型的方法,返回的字符串都会被注入到Bean的集合属性中。
@Configuration
@ComponentScan(value="springzhuru")
public class MyConfiguration {
    @Bean
    public String string1(){
        return "111";
    }
    @Bean
    public String string2(){
        return "222";
    }
}
测试:
MyBean [anotherBean=springzhuru.AnotherBean@7ea7476f, anotherBean1=springzhuru.AnotherBean@7ea7476f, anotherBean2=springzhuru.AnotherBean@7ea7476f, stringList=[222, 111]]
222
111
List注入方式:如果一个Bean有一个List类型的属性需要注入,spring会到上下文中(扫描注解类)查找所有该List中定义泛型的所有实例(带有@Bean),然后将所有实例注入到List里面。
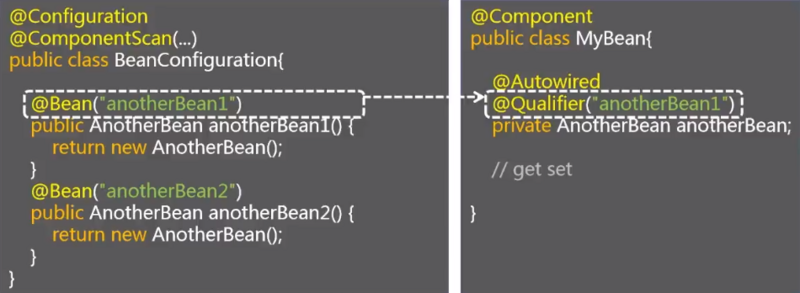
@Qualifier("stringList")指定Id,而且在集合属性的set方法上的@Qualifier(“stringList”)指定Id。
拓展:@Order(数值),来控制实例化Bean的顺序,小的先注入。前提:Spring4.2版本以后该注解才起作用,可以通过它实现注入集合中数据的顺序。
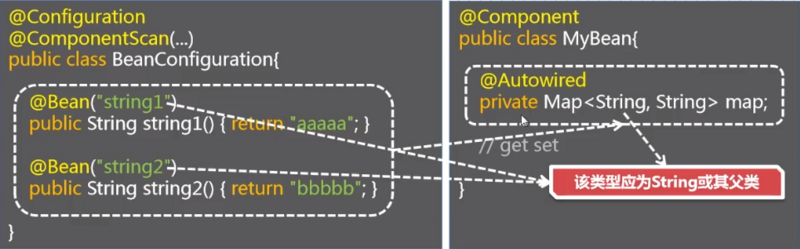
2.Map的注入
直接注入Map实例:

将多个泛型实例注入到Map:
- 步骤1
创建Map类型的集合,并提供set方法
public class MyBean {
 private Map<String,Integer> getIntegerMap;
    @Resource("map")
    public void setGetIntegerMap(Map<String, Integer> getIntegerMap) {
            this.getIntegerMap = getIntegerMap;
        }
        public Map<String, Integer> getGetIntegerMap() {
        return getIntegerMap;
    }
}
- 步骤2
扫描配置文件中提供返回map集合的方法。
@Bean("map")
    public Map<String,Integer> integerMap(){
        Map<String,Integer> map=new HashMap<String,Integer>();
        map.put("aaa", 111);
        map.put("bbb", 222);
        map.put("ccc", 333);
        return map;
    }
测试:
@Test
public void test(){
    ApplicationContext ac=new AnnotationConfigApplicationContext(MyConfiguration.class);
    MyBean myBean=ac.getBean("myBean",MyBean.class);
    System.out.println(myBean);
    for(Entry<String,Integer> entry:myBean.getGetIntegerMap().entrySet()){
        System.out.println(entry);
    }
}
Map注入的第二种方式:同List相同,创建多个方法返回Integer类型参数。
扫描配置类代码:
@Bean  //该情况下key的值为Bean的名
    public Integer integerMap1(){
        return 444;
    }
    @Bean
    public Integer integerMap2(){
        return 555;
    }
还可以通过 @Bean(name="名称") 来给实例取名。
结果:
springzhuru.MyBean@11de0733
integerMap1=444
integerMap2=555
四、String、Integer等简单类型的注入
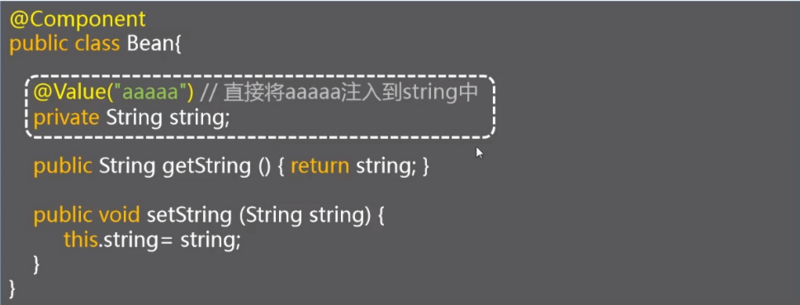
创建简单数据类型的变量,并提供set方法,并在set方法上添加
@value("值")注解。
public class MyBean {
    private String string;
    public String getString() {
        return string;
    }
    @Value("2222")
    public void setString(String string) {
        this.string = string;
    }
}
测试:
@Test
public void test(){
    ApplicationContext ac=new AnnotationConfigApplicationContext(MyConfiguration.class);
    MyBean myBean=ac.getBean("myBean",MyBean.class);
    System.out.println(myBean);
}
结果:
MyBean [string=2222]
五、SpringIoC容器内置接口实例注入
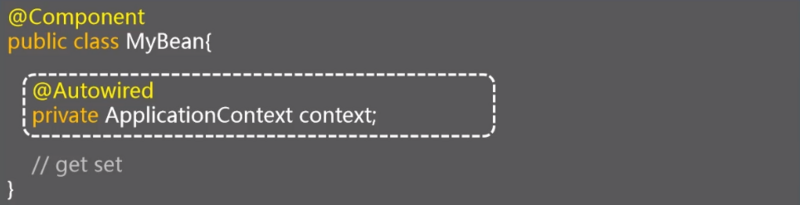
private ApplicationContext context;
    //这种情况下,可以直接使用ApplicationContext方法
    public ApplicationContext getContext() {
        return context;
    }
    @Autowired
    public void setContext(ApplicationContext context) {
        this.context = context;
    }
拓展:除了可以将ApplicationContext注入进来,还可以注入
- BeanFactory
- Environment
- ResourceLoader
- ApplicationEventPublisher
- MessageResource
及其实现类。
使用注解设置Bean的作用域(Scope)
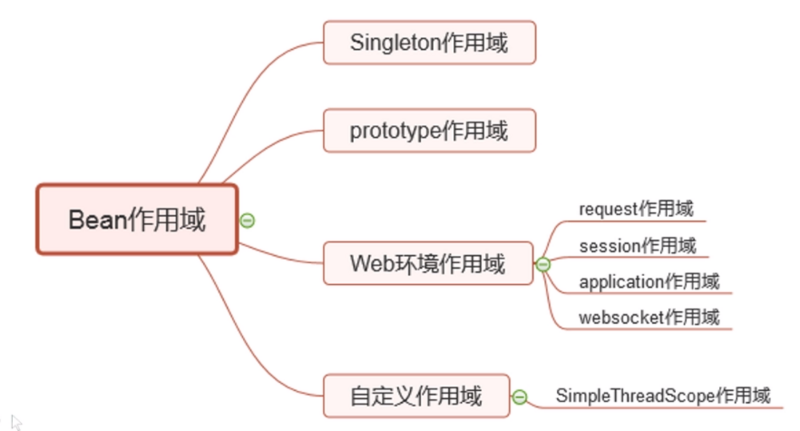
通过注解设定Bean的作用域Scope
一、 Singleton 作用域、 prototype 作用域、 Web环境 作用域( request 作用域、 session 作用域、 application 作用域、 websocket 作用域)
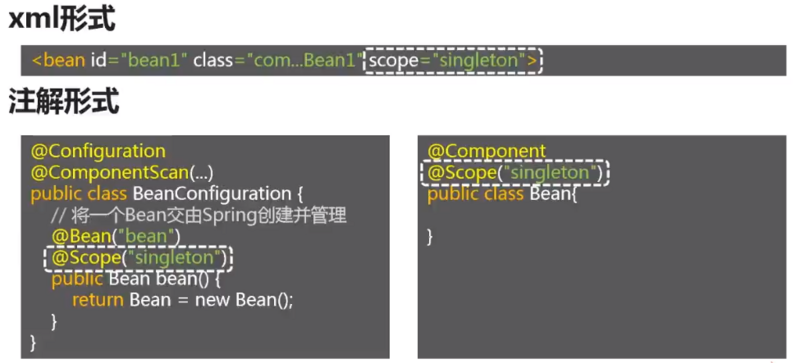
@Scope(value="") :实现实例化Bean的作用域功能。
实现Bean的多例模式:
Bean代码:
@Component(value="bean1")
@Scope(value="prototype")
public class Bean11 {
}
Configuration代码:
@Configuration
@ComponentScan("springscope")
public class Configuration11 {
@Bean(name="bean2")
@Scope(value="prototype")
public Bean11 getBean(){
    return new Bean11();
}
}
测试代码:
@Test
public void test(){
    ApplicationContext ac=new AnnotationConfigApplicationContext(Configuration11.class);
    for(int i=0;i<10;i++){
        Bean11 bean=ac.getBean("bean1", Bean11.class);
        System.out.println(bean);
    }
System.out.println("=================================");
    for(int i=0;i<10;i++){
        Bean11 bean1=ac.getBean("bean2",Bean11.class);
        System.out.println(bean1);
    }
}
结果:
springscope.Bean11@7cd3258f
springscope.Bean11@a470f4f
springscope.Bean11@3f3e10ce
springscope.Bean11@3c164d2
springscope.Bean11@dc218eb
springscope.Bean11@41f1f35b
springscope.Bean11@739ffd2f
springscope.Bean11@ca753f7
springscope.Bean11@3d79839e
springscope.Bean11@74b01999
=================================
springscope.Bean11@672add5f
springscope.Bean11@2f2bbce3
springscope.Bean11@607df346
springscope.Bean11@6ceeaa27
springscope.Bean11@28e51e50
springscope.Bean11@5a292b29
springscope.Bean11@44d0befd
springscope.Bean11@64aaf756
springscope.Bean11@145462bc
springscope.Bean11@301e2f11
二、自定义作用域
xml形式:
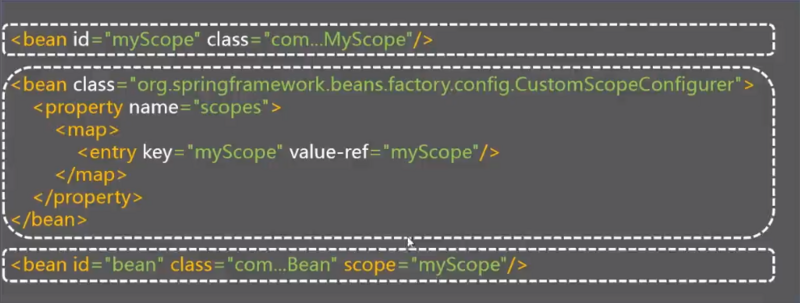
注解形式:

- 步骤1
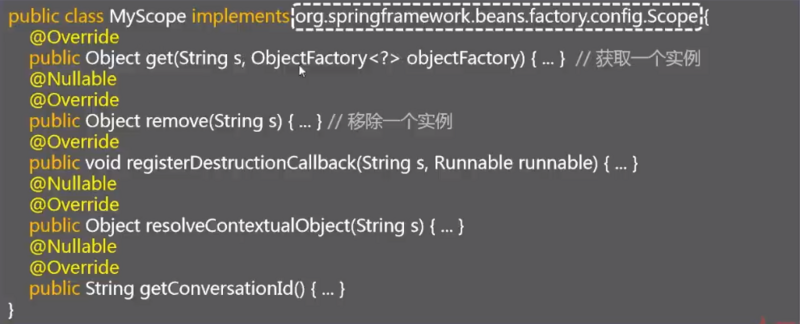
根据spring.xml中自定义作用域配置,应该先实例化MyScope,所以先通过注解方式来实例化MyScope。
@Bean
public MyScope myScope(){
    return new MyScope();
}
- 步骤2
根据spring.xml中自定义作用域配置,通过注解再实例化一个 CustomScopeConfigurer ,再通过该对象的 addScope(String scopeName,Scope scope) 方法来实现xml中的<map>标签的功能。
@Bean
public CustomScopeConfigurer customScopeConfigurer(){
    CustomScopeConfigurer csc=new CustomScopeConfigurer();
    csc.addScope("myScope",myScope());
    return csc;
}
问题:CustomScopeConfigurer该对象没有addScope方法。
三、方法注入
xml方式:
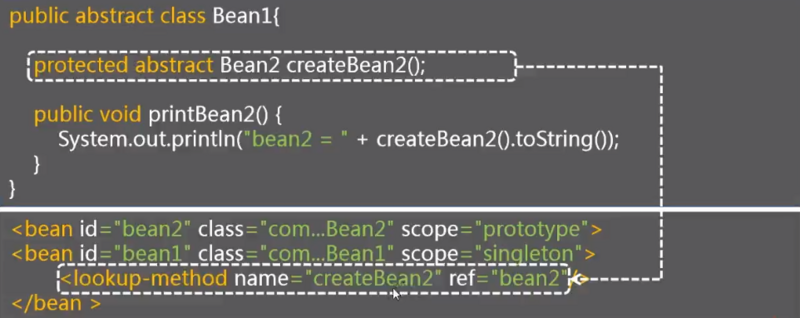
注解方式:

Bean 依赖 AnotherBean ,当Bean的作用域为 singleton ,AnotherBean的作用域为 prototype 时,通过注解实现方法注入.实现单个Bean,多个AnotherBean.
通过注解开启Bean的懒加载
懒加载:创建spring上下文时,并不会实例化Bean,而是在获取Bean时,才去实例化Bean。(单例的懒汉模式)
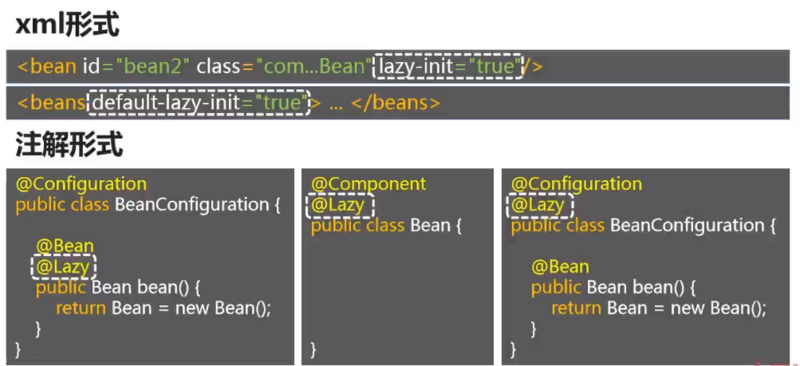
- 步骤1 创建配置扫描文件,并添加注解
@Configuration,@ComponentScan("路径"),
方法一,在 Configuration 中提供一个返回Bean实例的方法,在 @Bean 下添加注解 @Lazy 。
@Configuration
@ComponentScan("springlazy")
public class Configuration1 {
    @Bean(name="bean2")
    @Lazy
    public Bean1 bean(){
        return new Bean1();
    }
}
- 步骤2:Bean类代码。
方法二,在 @Component 下添加注解 @Lazy ,
@Component(value="bean1")
@Lazy
public class Bean1 {
    public Bean1(){
        System.out.println("Bean1被创建了");
    }
}
将所有Spring管理的Bean单例都声明为懒加载:
方法一:
xml在 <beans> 标签里添加 default-lazy-init
方法二:
@Configuration 注解下添加 @Lazy 注解:该IoC容器中所有作用域为singleton的Bean对象都会被懒加载。
@Configuration
@ComponentScan("springlazy")
@Lazy
public class Configuration1 {
    @Bean(name="bean2")
    public Bean1 bean(){
        return new Bean1();
    }
}
Bean的初始化和销毁逻辑
回顾xml方式:
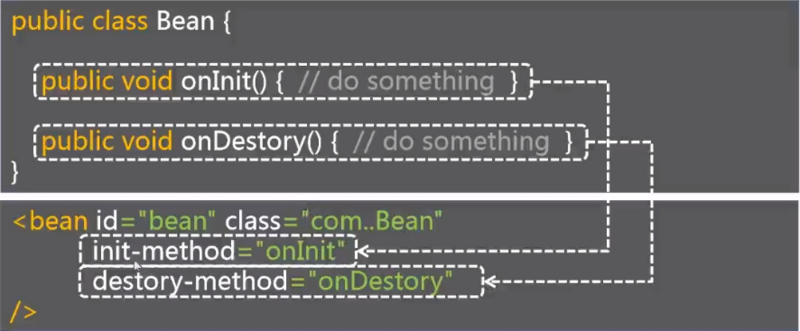
通过注解实现Bean的初始化和销毁的逻辑处理.
方式一
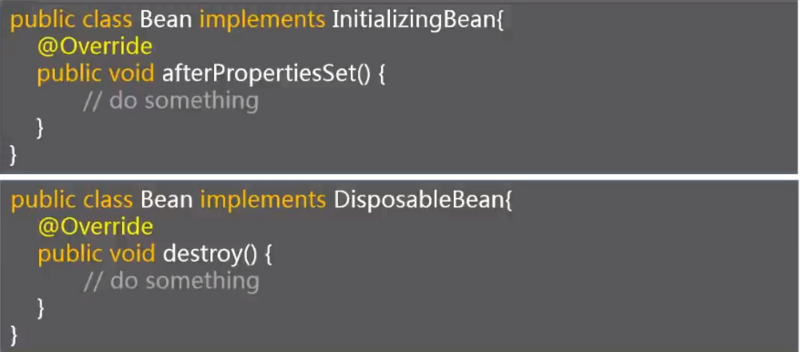
Bean类实现 InitializingBean 、 DisposableBean 接口,并实现 afterPropertiesSet() 和 destroy() 方法。
@Component(value="bean2")
public class Bean2 implements InitializingBean,DisposableBean {
    @Override
    public void destroy() throws Exception {
        System.out.println("Bean的销毁逻辑方法执行了");
    }
    @Override
    public void afterPropertiesSet() throws Exception {
        System.out.println("Bean的初始化逻辑方法执行了");
    }
}
测试:
AbstractApplicationContext 才有 close() 方法.
@Test
public void test(){
    AbstractApplicationContext ac=new AnnotationConfigApplicationContext(Configuration2.class);
    Bean2 bean=ac.getBean("bean2",Bean2.class);
    System.out.println(bean);
    ac.close();
}
结果:
Bean的初始化逻辑方法执行了
springinit_destory.Bean2@46a7cbfd
Bean的销毁逻辑方法执行了
方式二
不用实现接口,自定义方法,
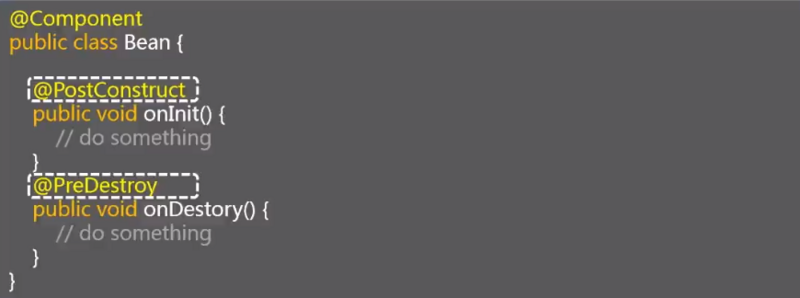
@PostConstruct
@PreDestroy
@Component(value="bean2")
public class Bean2 {
    @PostConstruct
    public void onInit(){
        System.out.println("Bean的初始化逻辑方法执行了");
    }
    @PreDestroy
    public void onDestory(){
        System.out.println("Bean的销毁逻辑方法执行了");
    }
}
方式三
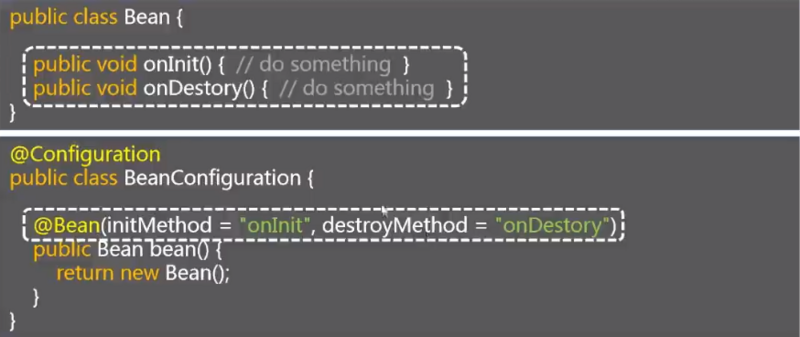
Bean的管理不通过 @Component ,而是通过 @Bean 提供方法管理,Bean里提供的初始化和销毁方法不用添加注解,而是通过
@Bean(initMethod="初始化方法名"destroyMethod="销毁方法名") 。
@Configuration
public class Configuration2 {
@Bean(initMethod="onInit",destroyMethod="onDestory",name="bean2")
    public Bean2 bean(){
        return new Bean2();
    }
}
正文到此结束
热门推荐


相关文章

近期评论
-
出现OpenClaw "device signature expired"。the Gateway rejects if Math.abs(Date.now() - signedAt) > 10 * 60 * 1000 (10 minutes)
-
-
想购买您这个站,我的联系方式QQ741756694微信同步 能卖联系
-
-
-
博主的博客用的什么技术栈,内容都是干货,赞
-
-
https://www.liuhaihua.cn/archives/40657.html 这篇博客中的图片打不开了
-
不会英语啊。
-
Loading...
![[HBLOG]公众号](https://www.liuhaihua.cn/img/qrcode_gzh.jpg)

