spring boot 自动装配
Spring Boot的很多特性都是基于spring framework来实现的,例如我们熟知的特性,也是它的核心特性: 组件自动装配 。它能够根据依赖的jar包自动配置Spring Boot的应用,例如: 如果类路径中存在DispatcherServlet类,就会自动配置springMvc相关的Bean。
而你需要的仅仅是编写一个启动类,加上 @SpringBootApplication 注解,执行它的main方法,接下来的就交给Sping Boot:
@SpringBootApplication
public class SpringbootApplication {
    public static void main(String[] args) {
        SpringApplication.run(SpringbootApplication.class, args);
    }
}
复制代码
为什么说Spring Boot很多特性是基于Spring framework实现的呢,在进入主题之前,需要先了解一下模式注解
模式注解
spring的模式注解:
一种用于声明在应用中扮演"组件"角色的注解,即标注了这个注解,表明一个类等在应用中扮演组件。比如 @Repository 标注在一个类上,说明这个类是扮演的仓储角色。
而 @Component 是作为通用模式组件,任何被 @Component 标注的组件均为组件扫描的候选对象。类似地,凡是被 @Component 标注的注解,如 @Service ,当任何组件标注它时,也被视作组件扫描的候选对象。
| Spring Framework注解 | 场景说明 | 起始版本 |
|---|---|---|
| @Repository | 数据仓储 | 2.0 |
| @Component | 通用组件 | 2.5 |
| @Service | 服务 | 2.5 |
| @Controller | 控制器 | 2.5 |
| @Configuration | 配置类 | 3.0 |
装配方式
spring2.5之前,使用的是xml配置的方式实现:
<context:component-scan base-package="com.wxpay.*"/>
复制代码
spring3.1之后,可以使用注解实现:
@ComponentScan("com.wxpay.*")
复制代码
自定义模式注解
模式注解的两种属性:
- 派生性:
@component,@Repository注解,都有value签名,保留了签名的一致性,这就是注解的派生性,换句话说,就是被@component标注的注解就具备了@component的功能 - 层次性: 声明二级注解
SecondLevelRepository,我们的SecondLevelRepository派生于FirstLevelRepository,这就是层次性
严格上讲 注解是没有派生性和层次性的,之所以这样讲,是为了方便理解,因为在spring中的很多注解都是有着派生性和层次性的结构
可能前面的说法有些不够明确,大家可能听的云里雾里的,接下来我们用一个例子来说明一下模式注解的特性。
首先我们先定义一个注解,使用 @Repository 标注:
@Target({ElementType.TYPE})
@Retention(RetentionPolicy.RUNTIME)
@Documented
@Repository
public @interface FirstLevelRepository {
    String value() default "";
}
复制代码
然后定义一个类,使用上面的注解标注:
@FirstLevelRepository(value = "myFirstLevelRepository")
public class MyFirstLevelRepository {

}
复制代码
最后再定义一个引导类,这儿使用了 @ComponentScan 扫描上面的类:
@ComponentScan("com.lingxiao.springboot.Repository")
public class RepositoryBootstrap {
    public static void main(String[] args) {
        ConfigurableApplicationContext applicationContext =
                new SpringApplicationBuilder(RepositoryBootstrap.class).web(WebApplicationType.NONE).run(args);
        MyFirstLevelRepository firstLevelRepository = applicationContext
                .getBean("myFirstLevelRepository", MyFirstLevelRepository.class);
        System.out.println("获取到的bean" + firstLevelRepository);
        applicationContext.close();
    }
}
复制代码
最终也是成功获取到了 MyFirstLevelRepository ,这里可以看出,被 @Repository 标注的注解 @FirstLevelRepository ,就像是继承关系,是具备 @Repository 的功能的。
然后我们再定义一个注解,使用 @FirstLevelRepository 来标注它:
@Target({ElementType.TYPE})
@Retention(RetentionPolicy.RUNTIME)
@Documented
@FirstLevelRepository
public @interface SeondLevelRepository {
    String value() default "";
}
复制代码
同样的方法,使用这个注解标注上面的类 MyFirstLevelRepository ,运行引导类 RepositoryBootstrap ,也是可以成功获取到bean的。这也印证了模式注解的 派生性 和 层次性 。
@SpringBootApplication也是模式注解
好了,上面的例子已经说明模式注解的特性了,我们接下来可以看 @SpringBootApplication 这个注解了·,进去看看源码:
@Target(ElementType.TYPE)
@Retention(RetentionPolicy.RUNTIME)
@Documented
@Inherited
@ComponentScan(excludeFilters = { @Filter(type = FilterType.CUSTOM, classes = TypeExcludeFilter.class),
		@Filter(type = FilterType.CUSTOM, classes = AutoConfigurationExcludeFilter.class) })
@SpringBootConfiguration
@EnableAutoConfiguration
public @interface SpringBootApplication {
}
复制代码
可以看到 @SpringBootApplication 是一个组合注解
@ComponentScan ,配置自动扫包,没什么好说的
再点开 @SpringBootConfiguration ,我们可以看见:
@Configuration
public @interface SpringBootConfiguration {

}
复制代码
@SpringBootConfiguration 被 @Configuration ,说明 @SpringBootConfiguration 以及被它标注的 @SpringBootApplication 是模式注解
然后是 @EnableAutoConfiguration ,这是接下来要讲的 @Enable模块装配 ,也是实现自动装配的核心
@Enable模块装配
使用@Enable模块装配,可以配置激活哪些模块
| 框架实现 | 注解模块 | |
|---|---|---|
| Spring Framework | @EnableWebMvc | |
| @EnableTransationManagement | ||
| @EnableCaching | Caching模块 | |
| @EnableMBeanExport | JMX模块 | |
| @EnableAsync | 异步处理模块 | |
| @EnableWebFlux | Web Flux模块 | |
| Spring Boot | @EnableAutoConfiguration | 自动装配模块 |
| @EnableOAuth2Sao | OAuth2单点登录模块 |
有两种方式实现@Enable
基于注解驱动实现
先定义一个Bean:
@Configuration
public class HelloWorldConfiguration {

    @Bean
    public String helloWorld() { // 方法名即 Bean 名称
        return "Hello,World";
    }
}
复制代码
然后再定义一个注解,使用 @Import 导入刚刚定义的bean:
@Retention(RetentionPolicy.RUNTIME)
@Target(ElementType.TYPE)
@Documented
@Import(HelloWorldConfiguration.class)
public @interface EnableHelloWorld {
}
复制代码
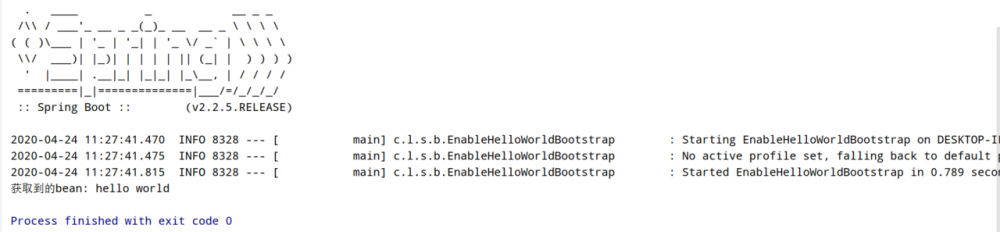
完成上面两步之后,我们只要用 @EnableHelloWorld 标注在某个类上时,这个Bean就会加载到Spring容器中。
@EnableHelloWorld
public class EnableHelloWorldBootstrap {
    public static void main(String[] args) {
        ConfigurableApplicationContext context = new SpringApplicationBuilder(EnableHelloWorldBootstrap.class)
                .web(WebApplicationType.NONE)
                .run(args);
        // helloWorld Bean 是否存在
        String helloWorld =
                context.getBean("helloWorld", String.class);
        System.out.println("获取到的bean: " + hello);
        // 关闭上下文
        context.close();
    }
}
复制代码
运行查看效果:

可以看到这个bean确实已经加载到Spring容器中了。
基于接口驱动实现
实现 ImportSelector 接口,实现它的 selectImports 方法,返回的是一个string类型的数组,数组里面存放的类名:
public class HelloWorldImportSelector implements ImportSelector {
    @Override
    public String[] selectImports(AnnotationMetadata importingClassMetadata) {
        return new String[]{HelloWorldConfiguration.class.getName()};
    }
}
复制代码
然后将上面定义的注解改一下:
@Target({ElementType.TYPE})
@Retention(RetentionPolicy.RUNTIME)
@Documented
//@Import({HelloWorldConfiguration.class})  enable注解驱动的方式
@Import({HelloWorldImportSelector.class})  //接口编程的方式
public @interface EnableHelloWorld {

}
复制代码
可以看到,基于接口的方式实现更加灵活,我们可以在 selectImports 中做一些判断,根据需要返回不同的类名数组,然后再根据类名进行装配。
Spring Boot自动装配核心
我们再回头看一下 @EnableAutoConfiguration 这个注解:
@Target(ElementType.TYPE)
@Retention(RetentionPolicy.RUNTIME)
@Documented
@Inherited
@AutoConfigurationPackage
@Import(AutoConfigurationImportSelector.class)
public @interface EnableAutoConfiguration {
	String ENABLED_OVERRIDE_PROPERTY = "spring.boot.enableautoconfiguration";
}
复制代码
再点进 @AutoConfigurationPackage 看一下
@Target(ElementType.TYPE)
@Retention(RetentionPolicy.RUNTIME)
@Documented
@Inherited
@Import(AutoConfigurationPackages.Registrar.class)
public @interface AutoConfigurationPackage {

}
复制代码
使用 @Import 来给Spring容器中导入一个组件 ,这里导入的是Registrar.class
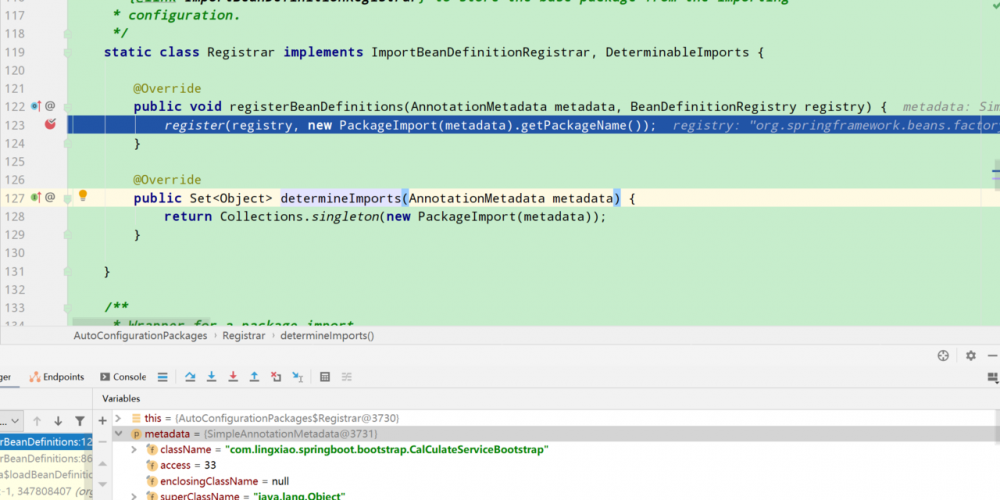
运行springboot项目,debug看一下,可以发现metadata是被 @SpringBootApplication 标注的类,再看看 new PackageImport(metadata).getPackageName() 的值:
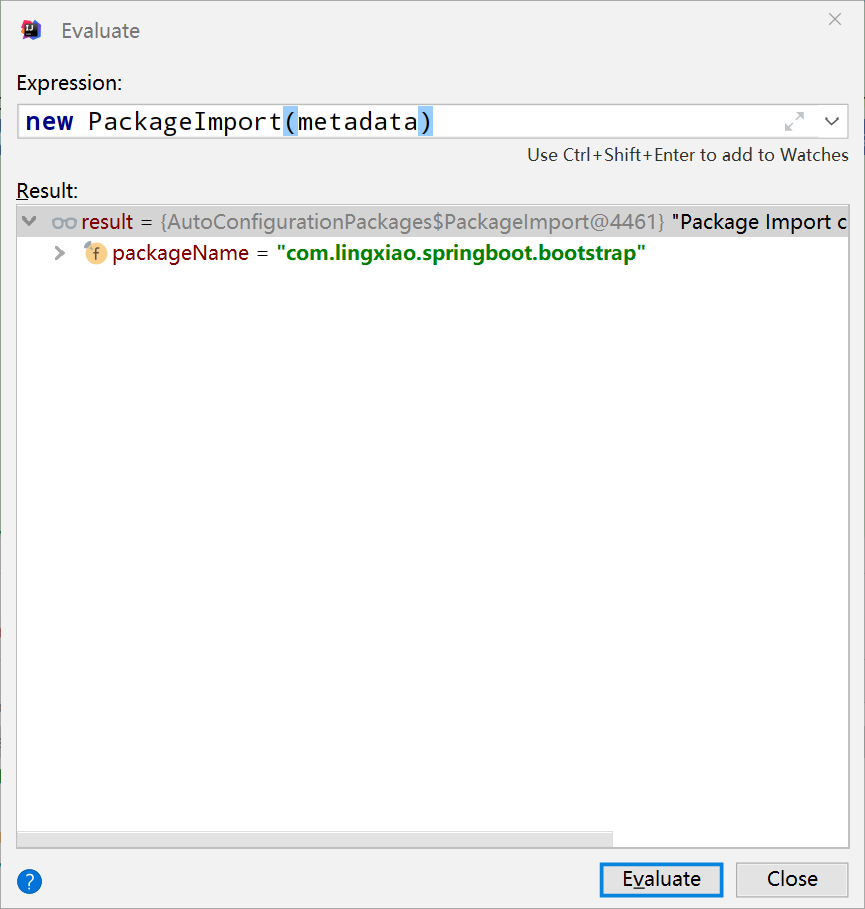
这个值就是扫描的包路径,也就是说,默认扫描的包路径是引导类所在的包以及子包。
接着我们再看 EnableAutoConfiguration 也使用了 @import ,导入了 AutoConfigurationImportSelector.class,从这个类的名字我们就可以知道,它指定是实现了 ImportSelector 接口,重写了selectImports方法,所以我们直接看selectImports:
@Override
public String[] selectImports(AnnotationMetadata annotationMetadata) {
	if (!isEnabled(annotationMetadata)) {
		return NO_IMPORTS;
	}
	AutoConfigurationMetadata autoConfigurationMetadata = AutoConfigurationMetadataLoader.loadMetadata(this.beanClassLoader);
	AutoConfigurationEntry autoConfigurationEntry = getAutoConfigurationEntry(autoConfigurationMetadata,annotationMetadata);
		return tringUtils.toStringArray(autoConfigurationEntry.getConfigurations());
	}
复制代码
可以看到返回结果是通过 autoConfigurationEntry 的 getConfigurations() 获取的,所以我们直接看 getAutoConfigurationEntry 方法:
protected AutoConfigurationEntry getAutoConfigurationEntry(AutoConfigurationMetadata autoConfigurationMetadata,
			AnnotationMetadata annotationMetadata) {
		if (!isEnabled(annotationMetadata)) {
			return EMPTY_ENTRY;
		}
		AnnotationAttributes attributes = getAttributes(annotationMetadata);
		List<String> configurations = getCandidateConfigurations(annotationMetadata, attributes);
		configurations = removeDuplicates(configurations);
		Set<String> exclusions = getExclusions(annotationMetadata, attributes);
		checkExcludedClasses(configurations, exclusions);
		configurations.removeAll(exclusions);
		configurations = filter(configurations, autoConfigurationMetadata);
		fireAutoConfigurationImportEvents(configurations, exclusions);
		return new AutoConfigurationEntry(configurations, exclusions);
	}
复制代码
同理,这里我们进入 getCandidateConfigurations 方法看一下:
protected List<String> getCandidateConfigurations(AnnotationMetadata metadata, AnnotationAttributes attributes) {
		List<String> configurations = SpringFactoriesLoader.loadFactoryNames(getSpringFactoriesLoaderFactoryClass(),
				getBeanClassLoader());
		Assert.notEmpty(configurations, "No auto configuration classes found in META-INF/spring.factories. If you "
				+ "are using a custom packaging, make sure that file is correct.");
		return configurations;
}
复制代码
想必英文不太好的童鞋从这里面也能看出一些端倪,没错,最终加载的配置类会从 META-INF/spring.factories 中获取,也就是说,Spring Boot在启动的时候会从类路径下的 META-INF/spring.factories 文件中将指定的值作为配置类导入到容器中,也就实现了自动配置。
条件装配
条件装配注解有两种:
| Spring注解 | 场景说明 | 起始版本 |
|---|---|---|
| @Profile | 配置化条件装配 | 3.1 |
| @Conditional | 编程条件装配 | 4.0 |
在4.0之后@profile也变成了@Conditional来实现
应用场景:一般用于生产环境和开发环境之间的切换,就是在类或者方法上添加注解并设置环境标识比如 java7 、 java8 ,我们以一个简单的多整数求和来演示如何使用
@Profile实现条件装配
首先定义一个接口:
public interface CalCulateService {
    /**
     * 整数求和
     * @param args
     * @return
     */
    Integer sum(Integer... args);
}
复制代码
然后分别实现一个JDK7和JDK8的求和方法。
首先是JDK7的实现:
/**
 * java7的方式实现求和
 */
@Profile("Java7")
@Service
public class Java7CalCulateServiceImpl implements CalCulateService {
    @Override
    public Integer sum(Integer... args) {
        System.out.println("java7的方式求和");
        int sum = 0;
        for (int i = 0; i < args.length; i++) {
            sum+=args[i];
        }
        return sum;
    }
}
复制代码
然后是JDK8的实现:
@Profile("Java8")
@Service
public class Java8CalCulateServiceImpl implements CalCulateService {
    @Override
    public Integer sum(Integer... args) {
        System.out.println("java8的方式求和");
        int sum = Stream.of(args).reduce(0,Integer::sum);
        return sum;
    }
}
复制代码
然后创建一个启动类,在启动容器的时候,使用 .profiles("Java8") 来指定使用哪个版本来计算:
@SpringBootApplication(scanBasePackages = "com.lingxiao.springboot.service")
public class CalCulateServiceBootstrap {

    public static void main(String[] args) {
        ConfigurableApplicationContext applicationContext =
                new SpringApplicationBuilder(CalCulateServiceBootstrap.class)
                        .web(WebApplicationType.NONE)
                        .profiles("Java8")
                        .run(args);
        CalCulateService calCulateService = applicationContext
                .getBean(CalCulateService.class);
        System.out.println("求和: " + calCulateService.sum(1,2,3,4,5));
        applicationContext.close();
    }
}
复制代码
运行结果:
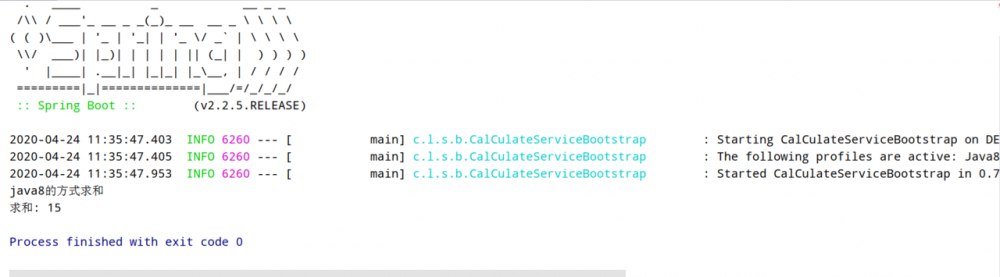
可以看到确实是java8的方式实现的求和
@Conditional实现条件装配
在创建bean时,增加一系列条件限制,只有当所有指定的条件都满足是,组件才可以注册。在使用 @Conditional 时,进行条件判断的类必须实现 Condition 接口
现在我们自定义一个条件装配,创建一个注解:
/**
 * 编程方式实现条件装配
 */
@Retention(RetentionPolicy.RUNTIME)
@Target({ElementType.TYPE,ElementType.METHOD})
@Documented
@Conditional(OnSystemPropertyCondition.class)
public @interface ConditionalOnSystemProperty {
    /**
     * java系统属性名称
     * @return
     */
    String name();

    /**
     * java系统属性值
     */
    String value();
}
复制代码
在这个注解中定义了两个属性 name 和 value ,这两个属性在实现条件判断的 OnSystemPropertyCondition 中会用到。
创建条件判断类:
/**
 * 编程方式实现条件装配
 */
public class OnSystemPropertyCondition implements Condition {

    /**
     *
     * @param context
     * @param metadata 源信息
     * @return
     */
    @Override
    public boolean matches(ConditionContext context, AnnotatedTypeMetadata metadata) {
        MultiValueMap<String, Object> attributes = metadata.getAllAnnotationAttributes(ConditionalOnSystemProperty.class.getName());
        List<Object> nameObj = attributes.get("name");
        String name = "";
        if (!CollectionUtils.isEmpty(nameObj)) {
            name = String.valueOf(attributes.get("name").get(0));
        }
        String value = "";
        if (!CollectionUtils.isEmpty(nameObj)) {
            value = String.valueOf(attributes.get("value").get(0));
        }
        String property = System.getProperty(name);
        return value.equals(property);  //条件满足才会返回装配
    }
}
复制代码
使用 metadata.getAllAnnotationAttributes 获取注解中的属性值,然后判断是否满足条件,满足条件之后才会装配。
创建引导类:
public class ConditionalOnSystemPropertyBootstrap {

    @Bean
    @ConditionalOnSystemProperty(name = "java.vm.specification.version",value = "1.8")
    public String helloWorld(){
        return "hello world";
    }

    public static void main(String[] args) {
        ConfigurableApplicationContext context = new SpringApplicationBuilder(ConditionalOnSystemPropertyBootstrap.class)
                .web(WebApplicationType.NONE)
                .run(args);
        String helloWorld = context.getBean("helloWorld", String.class);
        System.out.println("bean name:  "+helloWorld);
        context.close();
    }
}
复制代码
在这个引导类中我们申明了一个helloWorld的bean,在这个方法上添加了条件装配注释,其中 java.vm.specification.version 是获取的java虚拟机版本,如果满足虚拟机为1.8的条件,这个bean就会被加载到spring容器中
当前版本为1.8时,运行代码:
正常加载没有问题,当我们切换版本之后,再次运行:

发现报错了,spring找不到这个bean,也就是说bean没有满足被加载的条件
实现自动装配
罗里吧嗦了这么多,我们看看如何实现Spring Boot的自动装配
而Spring Boot的自动装配是结合了上面所说的技术,所以我们可以基于Spring Framework的知识点实现自动装配,步骤如下:
- 实现需要装配的类
- Spring工厂加载,配置需要装配的类
- 实现类 :SpringFactoriesLoader
- 配置资源:META-INF/spring.factories
- 激活自动装配-@EnableAutoConfiguration
首先创建一个类:
/**
 * 自动装配
 */
@Configuration   //模式注解
@EnableHelloWorld  //Enable模块装配
@ConditionalOnSystemProperty(name = "java.vm.specification.version",value = "1.8") //条件装配
public class HelloWorldAutoConfiguration {

}
复制代码
可以看到,修饰的三个注解都是基于Spring Framework的,现在只需要配置spring.factories文件即可,我们在resouries目录下新建文件:
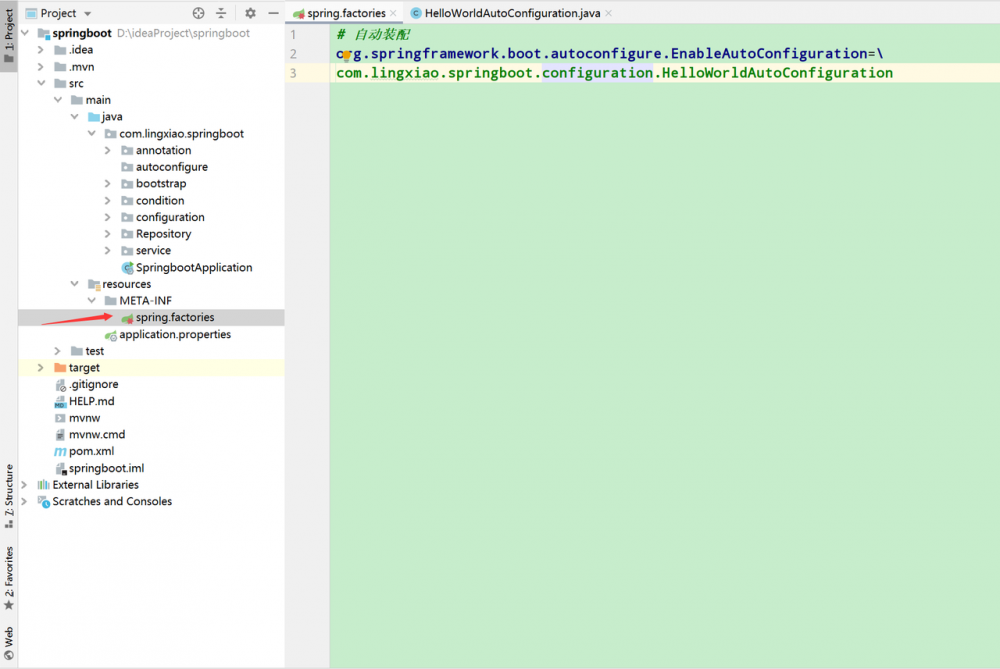
内容为key-value的格式,key为 @EnableAutoConfiguration ,value为自动装配类的包路径:
# 自动装配
org.springframework.boot.autoconfigure.EnableAutoConfiguration=/
com.lingxiao.springboot.configuration.HelloWorldAutoConfiguration
复制代码
然后再创建一个启动类:
@EnableAutoConfiguration
public class EnableAutoConfigurationBootstrap {
    public static void main(String[] args) {
        ConfigurableApplicationContext context = new SpringApplicationBuilder(EnableAutoConfigurationBootstrap.class)
                .web(WebApplicationType.NONE)
                .run(args);
        String hello = context
                .getBean("helloWorld", String.class);
        System.out.println("获取到的bean: " + hello);
        context.close();
    }
}
复制代码
运行结果也是能正确获取到bean。这里梳理一下整个流程:
- 使用
@EnableAutoConfiguration激活自动装配,Spring Boot会去spring.factories文件中解析需要自动装配的类HelloWorldAutoConfiguration - 装配
HelloWorldAutoConfiguration的时候会去判断是否满足装配要求,这里是jdk1.8的环境,所以是满足要求的 -
HelloWorldAutoConfiguration是被@EnableHelloWorld标注了,@EnableHelloWorld通过@Import({HelloWorldImportSelector.class})的方式引入了HelloWorldImportSelector - 在
HelloWorldImportSelector的selectImports方法中返回了HelloWorldConfiguration的类名 - 在
HelloWorldConfiguration中加载helloWorld
源码已上传至gitee: 点击访问
参考:
SpringBoot自动装配原理分析
慕课网:Spring Boot2.0深度实践之核心技术篇
正文到此结束
- 本文标签: cat springboot 注释 云 list bean 数据 EnableAutoConfiguration Document web src tar Spring Boot 代码 value db Service UI 原理分析 解析 java build https id NSA key tab Property 配置 bug App spring 开发 git Collection Bootstrap stream XML 源码 ACE map 一致性 CTO 目录 SpringMVC servlet IO IDE equals Select ssl http
- 版权声明: 本文为互联网转载文章,出处已在文章中说明(部分除外)。如果侵权,请联系本站长删除,谢谢。
- 本文海报: 生成海报一 生成海报二
热门推荐


相关文章

近期评论
-
出现OpenClaw "device signature expired"。the Gateway rejects if Math.abs(Date.now() - signedAt) > 10 * 60 * 1000 (10 minutes)
-
-
想购买您这个站,我的联系方式QQ741756694微信同步 能卖联系
-
-
-
博主的博客用的什么技术栈,内容都是干货,赞
-
-
https://www.liuhaihua.cn/archives/40657.html 这篇博客中的图片打不开了
-
不会英语啊。
-
Loading...
![[HBLOG]公众号](https://www.liuhaihua.cn/img/qrcode_gzh.jpg)

