Okhttp源码解析(流程和各种过滤器)
本文分为六个部分:
-
异步请求
-
同步请求
-
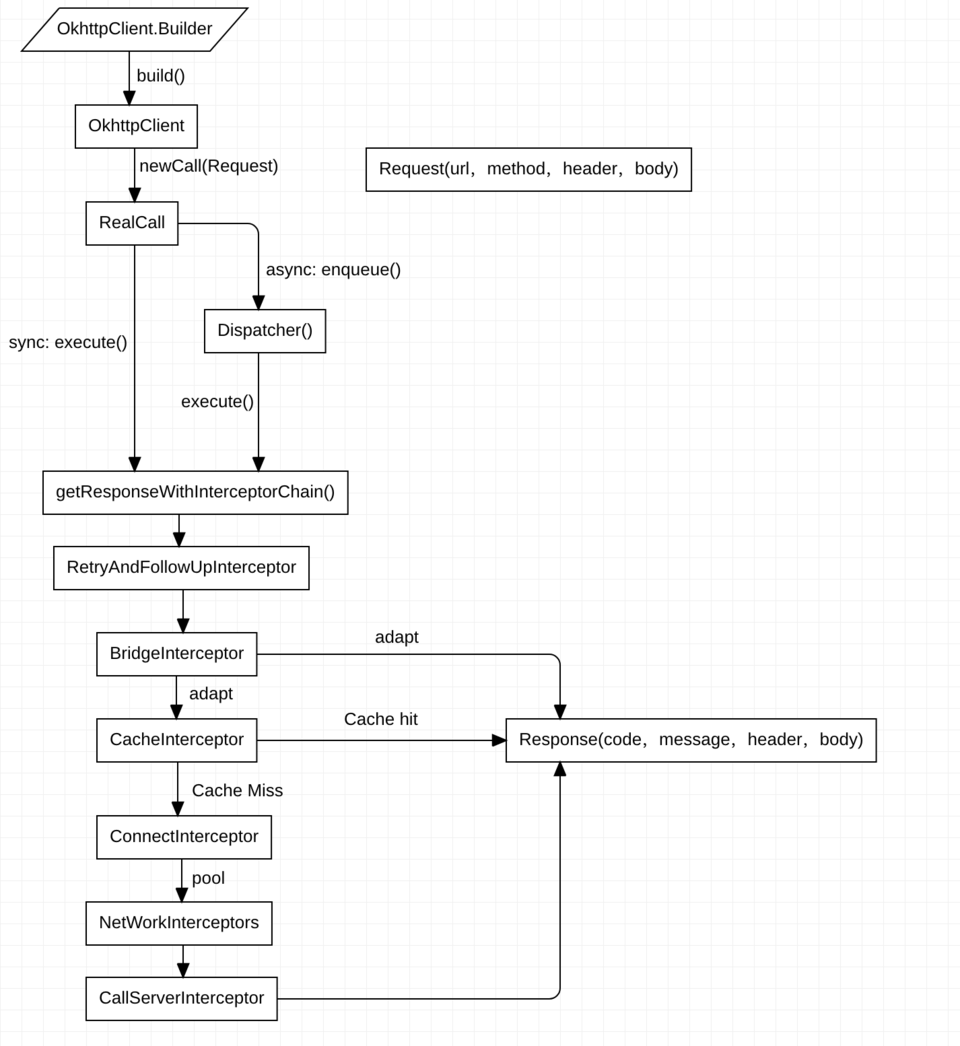
Okhttp请求流程图
-
ArrayQueue
-
各种过滤器
-
自定义过滤器
异步请求
OkHttpClient okHttpClient = new OkHttpClient();
Request request = new Request.Builder().url("www.google.com").build();
okHttpClient.newCall(request).enqueue(new Callback() { //异步
  @Override
  public void onFailure(Call call, IOException e) {

  }

  @Override
  public void onResponse(Call call, Response response) throws IOException {

  }
});
复制代码
我们构建为Request之后,就需要构建一个Call,一般都是
Call call = okHttpClient.newCall(request)
复制代码
返回OkhttpClient可以看到
@Override public Call newCall(Request request) {
  return RealCall.newRealCall(this, request, false /* for web socket */);
}

//Okhttp实现Call.Factory接口
public class OkHttpClient implements Cloneable, Call.Factory, WebSocket.Factory {

//Call接口之中
interface Factory {
  Call newCall(Request request);
}
复制代码
从接口的源码我们可以看到,只是定义一个newCall用于创建Call的方法,这里其实用到了 工厂模式 的思想, 将构建的细节交给具体实现,顶层只需要拿到Call对象即可 。
下面是RealCall的实现细节:
RealCall:

  static RealCall newRealCall(OkHttpClient client, Request originalRequest, boolean forWebSocket) {
    // Safely publish the Call instance to the EventListener.
    RealCall call = new RealCall(client, originalRequest, forWebSocket);
    call.eventListener = client.eventListenerFactory().create(call);
    return call;
  }

RealCall构造方法:

  private RealCall(OkHttpClient client, Request originalRequest, boolean forWebSocket) {
    this.client = client;
    this.originalRequest = originalRequest;
    this.forWebSocket = forWebSocket;
    this.retryAndFollowUpInterceptor = new RetryAndFollowUpInterceptor(client, forWebSocket);
    this.timeout = new AsyncTimeout() {
      @Override protected void timedOut() {
        cancel();
      }
    };
    this.timeout.timeout(client.callTimeoutMillis(), MILLISECONDS);
  }
复制代码
Call创建完之后,一般就到最后一个步骤了,将请求加入调度。
call.enqueue(new Callback() { //异步
  @Override
  public void onFailure(Call call, IOException e) {

  }

  @Override
  public void onResponse(Call call, Response response) throws IOException {

  }
});
复制代码
这里的call的真正实现是RealCall方法,我们来看下RealCall里面的enqueue方法。
@Override public void enqueue(Callback responseCallback) {
  synchronized (this) {
    if (executed) throw new IllegalStateException("Already Executed");
    executed = true;
  }
  captureCallStackTrace();
  eventListener.callStart(this);
  client.dispatcher().enqueue(new AsyncCall(responseCallback));
}
复制代码
- 首先利用synchroized加入的对象锁,同一对象下,保证在同一时间只有一个线程可以访问,使用代码块可以保证锁的粒度更细一些。
- captureCallStackTrace(),为retryAndFollowUpInterceptor加入一个用于追踪堆栈信息的callStackTrace
private void captureCallStackTrace() {
  Object callStackTrace = Platform.get().getStackTraceForCloseable("response.body().close()");
  retryAndFollowUpInterceptor.setCallStackTrace(callStackTrace);
}
复制代码
- eventListener.callStart(this) 可以看到前面构建的eventListener起作用了,这里先回callStart方法,通过这些回调方法我们可以添加一个监听器(实现EventListener),监听整个网络流程各个阶段的时间调用,流量等等。
- client.dispatcher().enqueue(new AsyncCall(responseCallback)) 我们需要回归OkhttpClient源码中
//OkhttpClient
public Dispatcher dispatcher() {
  return dispatcher;
}

//Dispatcher
void enqueue(AsyncCall call) {
	synchronized (this) {
		readyAsyncCalls.add(call);
	}
	promoteAndExecute();
}
复制代码
这里先对Dispatcher的成员变量做个初步的认识
private int maxRequests = 64;
  private int maxRequestsPerHost = 5;
  private @Nullable Runnable idleCallback;

  /** Executes calls. Created lazily. */
  private @Nullable ExecutorService executorService;

  /** Ready async calls in the order they'll be run. */
  private final Deque<AsyncCall> readyAsyncCalls = new ArrayDeque<>();

  /** Running asynchronous calls. Includes canceled calls that haven't finished yet. */
  private final Deque<AsyncCall> runningAsyncCalls = new ArrayDeque<>();

  /** Running synchronous calls. Includes canceled calls that haven't finished yet. */
  private final Deque<RealCall> runningSyncCalls = new ArrayDeque<>();
复制代码
可以看到这里用了三个队列ArrayDeque用于保存Call对象,分为三种状态:
- 异步等待
- 同步running
- 异步running
关于ArrayDeque的介绍见文章末尾。
下面来看Dispather的enqueue()方法,先是加入到异步等待队列,然后执行promoteAndExecute()方法
private boolean promoteAndExecute() {
    assert (!Thread.holdsLock(this));

    List<AsyncCall> executableCalls = new ArrayList<>();
    boolean isRunning;
    synchronized (this) {
      for (Iterator<AsyncCall> i = readyAsyncCalls.iterator(); i.hasNext(); ) {
        AsyncCall asyncCall = i.next();

        if (runningAsyncCalls.size() >= maxRequests) break; // Max capacity.
        if (runningCallsForHost(asyncCall) >= maxRequestsPerHost) continue; // Host max capacity.

        i.remove();
        executableCalls.add(asyncCall);
        runningAsyncCalls.add(asyncCall);
      }
      isRunning = runningCallsCount() > 0;
    }

    for (int i = 0, size = executableCalls.size(); i < size; i++) {
      AsyncCall asyncCall = executableCalls.get(i);
      asyncCall.executeOn(executorService());
    }

    return isRunning;
  }
复制代码
该方法中遍历异步等待队列readyAsyncCalls, 如果当前正在执行的同步running队列个数大于maxRequest(64),跳出该循环,如果取出某一个的请求(AsyncCall)请求同一个主机的个数大于maxRequestsPerHost(5)时,跳过本地循环,继续下一次循环 。最后再加入线程池执行。
public synchronized ExecutorService executorService() {
  if (executorService == null) {
    executorService = new ThreadPoolExecutor(0, Integer.MAX_VALUE, 60, TimeUnit.SECONDS,
        new SynchronousQueue<Runnable>(), Util.threadFactory("OkHttp Dispatcher", false));
  }
  return executorService;
}
复制代码
该线程池没有核心线程,线程个数最大为Integer.MAX_VALUE,空闲时线程存活时间为60s。
下面来分析一下AsyncCall的源码:
final class AsyncCall extends NamedRunnable {
···
}

public abstract class NamedRunnable implements Runnable {
  protected final String name;

  public NamedRunnable(String format, Object... args) {
    this.name = Util.format(format, args);
  }

  @Override public final void run() {
    String oldName = Thread.currentThread().getName();
    Thread.currentThread().setName(name);
    try {
      execute();
    } finally {
      Thread.currentThread().setName(oldName);
    }
  }

  protected abstract void execute();
}
复制代码
实现了一个Runnable接口,线程名字为我们在构造器中传入的名字,最后执行execute()方法,具体实现在AsyncCall中
//异步最终走的方法,RealCall类中的内部类AsyncCall
@Override protected void execute() {
  boolean signalledCallback = false;
  timeout.enter();
  try {
    Response response = getResponseWithInterceptorChain();
    if (retryAndFollowUpInterceptor.isCanceled()) {
      signalledCallback = true;
      responseCallback.onFailure(RealCall.this, new IOException("Canceled"));
    } else {
      signalledCallback = true;
      responseCallback.onResponse(RealCall.this, response);
    }
  } catch (IOException e) {
    e = timeoutExit(e);
    if (signalledCallback) {
      // Do not signal the callback twice!
      Platform.get().log(INFO, "Callback failure for " + toLoggableString(), e);
    } else {
      eventListener.callFailed(RealCall.this, e);
      responseCallback.onFailure(RealCall.this, e);
    }
  } finally {
    client.dispatcher().finished(this);
  }
}

//同步走的方法,在RealCall中
@Override public Response execute() throws IOException {
    synchronized (this) {
      if (executed) throw new IllegalStateException("Already Executed");
      executed = true;
    }
    captureCallStackTrace();
    timeout.enter();
    eventListener.callStart(this);
    try {
      client.dispatcher().executed(this);
      Response result = getResponseWithInterceptorChain();
      if (result == null) throw new IOException("Canceled");
      return result;
    } catch (IOException e) {
      e = timeoutExit(e);
      eventListener.callFailed(this, e);
      throw e;
    } finally {
      client.dispatcher().finished(this);
    }
  }
复制代码
上面为异步和同步最终走的方法,可以看到同样的代码,终于看到了我们关注的Response了
Response result = getResponseWithInterceptorChain();
复制代码
方法具体实现为:
Response getResponseWithInterceptorChain() throws IOException {
  // Build a full stack of interceptors.
  List<Interceptor> interceptors = new ArrayList<>();
  interceptors.addAll(client.interceptors());
  //失败和重定向过滤器
  interceptors.add(retryAndFollowUpInterceptor);
  //封装request和response过滤器
  interceptors.add(new BridgeInterceptor(client.cookieJar()));
  //缓存相关的过滤器,负责读取缓存直接返回,更新缓存
  interceptors.add(new CacheInterceptor(client.internalCache()));
  //负责和服务器建立连接
  interceptors.add(new ConnectInterceptor(client));
  if (!forWebSocket) {
    //配置 OkHttpClient 时设置的 networkInterceptors
    interceptors.addAll(client.networkInterceptors());
  }
  //负责向服务器发送网络请求数据,从服务器读取响应数据(实际网络请求)
  interceptors.add(new CallServerInterceptor(forWebSocket));

  Interceptor.Chain chain = new RealInterceptorChain(interceptors, null, null, null, 0,
      originalRequest, this, eventListener, client.connectTimeoutMillis(),
      client.readTimeoutMillis(), client.writeTimeoutMillis());

  return chain.proceed(originalRequest);
}
复制代码
Okhttp默认会给我们实现这些过滤器,也可以添加自己想要实现的过滤器。
这里可以对比一下Volley源码中的思想,Volley的处理是将缓存,网络请求等一系列操作揉在一起写,导致用户对于Volley的修改只能通过修改源码方式,而修改就必须要充分阅读理解volley整个的流程,可能一部分的修改会影响全局的流程,而这里,将不同的职责的过滤器分别单独出来,用户只需要对关注的某一个功能项进行理解,并可以进行扩充修改,一对比,okHttp在这方面的优势立马体现出来了。这里大概先描述一下几个过滤器的功能:
retryAndFollowUpInterceptor——失败和重定向过滤器
BridgeInterceptor——封装request和response过滤器
CacheInterceptor——缓存相关的过滤器,负责读取缓存直接返回、更新缓存
ConnectInterceptor——负责和服务器建立连接,连接池等
networkInterceptors——配置 OkHttpClient 时设置的 networkInterceptors
CallServerInterceptor——负责向服务器发送请求数据、从服务器读取响应数据(实际网络请求)
复制代码
添加完过滤器,就是执行过滤器了
Interceptor.Chain chain = new RealInterceptorChain(interceptors, null, null, null, 0,
        originalRequest, this, eventListener, client.connectTimeoutMillis(),
        client.readTimeoutMillis(), client.writeTimeoutMillis());

    return chain.proceed(originalRequest);
复制代码
进入proceed方法
public Response proceed(Request request, StreamAllocation streamAllocation, HttpCodec httpCodec,
      RealConnection connection) throws IOException {
    if (index >= interceptors.size()) throw new AssertionError();

    calls++;
		···
		···

    // Call the next interceptor in the chain.
    RealInterceptorChain next = new RealInterceptorChain(interceptors, streamAllocation, httpCodec,
        connection, index + 1, request, call, eventListener, connectTimeout, readTimeout,
        writeTimeout);
    Interceptor interceptor = interceptors.get(index);
    Response response = interceptor.intercept(next);
		···
		···
    return response;
  }
复制代码
index传入的时候为0,后面new一个RealInterceptorChain并且将参数传递,index+1,接着获取index的interceptor,并调用intercept方法,传入新new的next对象,这里采用递归的思想来完成遍历,完成一个个interceptor的变量,随便找个interceptor来看看:
/** Opens a connection to the target server and proceeds to the next interceptor. */
public final class ConnectInterceptor implements Interceptor {
  public final OkHttpClient client;

  public ConnectInterceptor(OkHttpClient client) {
    this.client = client;
  }

  @Override public Response intercept(Chain chain) throws IOException {
    RealInterceptorChain realChain = (RealInterceptorChain) chain;
    Request request = realChain.request();
    StreamAllocation streamAllocation = realChain.streamAllocation();

    // We need the network to satisfy this request. Possibly for validating a conditional GET.
    boolean doExtensiveHealthChecks = !request.method().equals("GET");
    HttpCodec httpCodec = streamAllocation.newStream(client, chain, doExtensiveHealthChecks);
    RealConnection connection = streamAllocation.connection();

    return realChain.proceed(request, streamAllocation, httpCodec, connection);
  }
}
复制代码
在ConnectInterceptor中可以看到,得到chain后,进行相应的处理后,继续调用proceed方法,接着刚才的逻辑,index+1,获取下一个interceptor,重复操作,利用递归循环,也就是Okhttp最经典的 责任链模式 。
同步请求
//同步走的方法,在RealCall中
@Override public Response execute() throws IOException {
    synchronized (this) { //检查是否运行过
      if (executed) throw new IllegalStateException("Already Executed");
      executed = true;
    }
    captureCallStackTrace();
    timeout.enter();
    eventListener.callStart(this);
    try {
      //加入到同步队列中
      client.dispatcher().executed(this);
      //创建过滤责任链,得到response
      Response result = getResponseWithInterceptorChain();
      if (result == null) throw new IOException("Canceled");
      return result;
    } catch (IOException e) {
      e = timeoutExit(e);
      eventListener.callFailed(this, e);
      throw e;
    } finally {
      client.dispatcher().finished(this);
    }
  }
复制代码
Okttp请求流程图
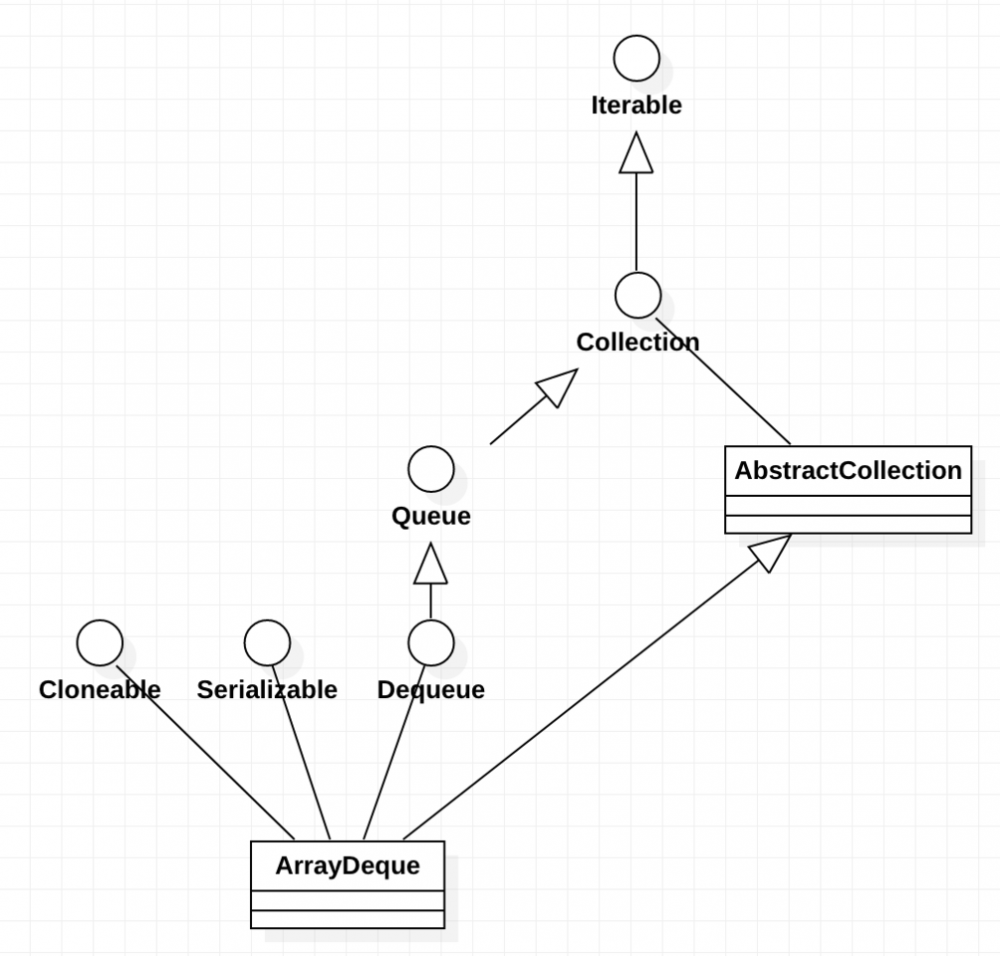
ArrayDeque
Deque 接口继承自 Queue接口,但 Deque 支持同时从两端添加或移除元素,因此又被成为双端队列。鉴于此,Deque 接口的实现可以被当作 FIFO队列使用,也可以当作LIFO队列(栈)来使用。官方也是推荐使用 Deque 的实现来替代 Stack。
ArrayDeque 可以作为栈来使用,效率要高于 Stack;ArrayDeque 也可以作为队列来使用,效率相较于基于双向链表的 LinkedList 也要更好一些。
ArrayDeque 是 Deque 接口的一种具体实现,是依赖于可变数组来实现的。ArrayDeque 没有容量限制,可根据需求自动进行扩容。ArrayDeque不支持值为 null 的元素。
各种过滤器
-
RetryAndFollowUpInterceptor 重试和重定向
看看该过滤器中的intercept方法,简单处理一下:
@Override public Response intercept(Chain chain) throws IOException {
	···
  while (true) {
		···
    Response response;
    boolean releaseConnection = true;
    try {
      response = realChain.proceed(request, streamAllocation, null, null);
      releaseConnection = false;
    }
    ···
    ···

    if (followUp == null) {  //满足条件,返回response
      streamAllocation.release();
      return response;
    }
    ···
		//不满足条件,重来
    request = followUp;
    priorResponse = response;
  }
}
复制代码
先梳理一下大致流程,在while(true)中执行的是proceed(),执行这个方法后,就会交给下一个过滤器执行,所以可以简单的理解为这个过滤器其实没做什么。
但是当出现一些异常导致条件不满足的时候,就要重新进行一系列操作,重新复制request,重新请求,也就是while的功能,对应也就是这个过滤器的主要功能:重试和重定向。
@Override public Response intercept(Chain chain) throws IOException {
    Request request = chain.request();
    RealInterceptorChain realChain = (RealInterceptorChain) chain;
    Call call = realChain.call();
    EventListener eventListener = realChain.eventListener();
    //streamAllocation的创建位置
    streamAllocation = new StreamAllocation(client.connectionPool(), createAddress(request.url()),
        call, eventListener, callStackTrace);

    int followUpCount = 0;
    Response priorResponse = null;
    while (true) {
      //取消
      if (canceled) {
        streamAllocation.release();
        throw new IOException("Canceled");
      }

      Response response;
      boolean releaseConnection = true;
      try {
        response = realChain.proceed(request, streamAllocation, null, null);
        releaseConnection = false;
      } catch (RouteException e) {
        // The attempt to connect via a route failed. The request will not have been sent.
        //尝试连接一个路由失败,这个请求还没有发出
        if (!recover(e.getLastConnectException(), false, request)) {
          throw e.getLastConnectException();
        }
        releaseConnection = false;
        //重试。。。
        continue;
      } catch (IOException e) {
        // An attempt to communicate with a server failed. The request may have been sent.
        //先判断当前请求是否已经发送了
        boolean requestSendStarted = !(e instanceof ConnectionShutdownException);
        //同样的重试判断
        if (!recover(e, requestSendStarted, request)) throw e;
        releaseConnection = false;
        //重试。。。
        continue;
      } finally {
        // We're throwing an unchecked exception. Release any resources.
        //没有捕获到的异常,最终要释放
        if (releaseConnection) {
          streamAllocation.streamFailed(null);
          streamAllocation.release();
        }
      }

      // Attach the prior response if it exists. Such responses never have a body.
      //这里基本上都没有讲,priorResponse是用来保存前一个Resposne的,这里可以看到将前一个Response和当前的Resposne
      //结合在一起了,对应的场景是,当获得Resposne后,发现需要重定向,则将当前Resposne设置给priorResponse,再执行一遍流程,
      //直到不需要重定向了,则将priorResponse和Resposne结合起来。
      if (priorResponse != null) {
        response = response.newBuilder()
            .priorResponse(priorResponse.newBuilder()
                    .body(null)
                    .build())
            .build();
      }
      //判断是否需要重定向,如果需要重定向则返回一个重定向的Request,没有则为null
      Request followUp = followUpRequest(response);

      if (followUp == null) {
        //不需要重定向
        if (!forWebSocket) {
          //是WebSocket,释放
          streamAllocation.release();
        }
        //返回response
        return response;
      }
      //需要重定向,关闭响应流
      closeQuietly(response.body());
      //重定向次数++,并且小于最大重定向次数MAX_FOLLOW_UPS(20)
      if (++followUpCount > MAX_FOLLOW_UPS) {
        streamAllocation.release();
        throw new ProtocolException("Too many follow-up requests: " + followUpCount);
      }
      //是UnrepeatableRequestBody, 刚才看过也就是是流类型,没有被缓存,不能重定向
      if (followUp.body() instanceof UnrepeatableRequestBody) {
        streamAllocation.release();
        throw new HttpRetryException("Cannot retry streamed HTTP body", response.code());
      }
      //判断是否相同,不然重新创建一个streamConnection
      if (!sameConnection(response, followUp.url())) {
        streamAllocation.release();
        streamAllocation = new StreamAllocation(client.connectionPool(),
            createAddress(followUp.url()), call, eventListener, callStackTrace);
      } else if (streamAllocation.codec() != null) {
        throw new IllegalStateException("Closing the body of " + response
            + " didn't close its backing stream. Bad interceptor?");
      }
      //赋值再来!
      request = followUp;
      priorResponse = response;
    }
  }
复制代码
默认的Okhttp是配置失败重连的 retryOnConnectionFailure = true
小结:
1.如果我们在配置OkHttpClient中配置retryOnConnectionFailure属性为false,表明拒绝失败重连,那么这 里返回false
2.如果请求已经发送,并且这个请求体是一个UnrepeatableRequestBody类型,则不能重试
3.如果是一些严重的问题(协议,安全...),拒绝重试
4.没有更多的可以使用的路由,则不要重试了
-
BridgeInterceptor:主要处理请求头,Gzip,以及cookie的处理
-
CacheInterceptor
1.通过Request尝试到Cache中拿缓存(里面非常多流程),当然前提是OkHttpClient中配置了缓存,默认是不支持的。 2.根据response,time,request创建一个缓存策略,用于判断怎样使用缓存。 3.如果缓存策略中设置禁止使用网络,并且缓存又为空,则构建一个Resposne直接返回,注意返回码=504 4.缓存策略中设置不使用网络,但是又缓存,直接返回缓存 5.接着走后续过滤器的流程,chain.proceed(networkRequest) 6.当缓存存在的时候,如果网络返回的Resposne为304,则使用缓存的Resposne。 7.构建网络请求的Resposne 8.当在OKHttpClient中配置了缓存,则将这个Resposne缓存起来。 9.缓存起来的步骤也是先缓存header,再缓存body。 10.返回Resposne。
Okhttp只能缓存Get请求,作者觉得技术上讲可以缓存head,post请求,但是这样做复杂度高而且收益低。
-
ConnectInterceptor(与服务器建立连接的过滤器)
-
CallServerInterceptor 数据交换(实际网络请求)
自定义过滤器
- 如果想统一处理服务端的某个状态码,比如401
class NetworkErrorCodeInterceptor : Interceptor {

    override fun intercept(chain: Interceptor.Chain): Response {
        val request = chain.request()
        val response = chain.proceed(request)

        if (response.code() == 401) {
            //do something
        }

        return response
    }
}
复制代码
- 如果想给请求统一添加请求头
class RequestHeaderInterceptor : Interceptor {
    override fun intercept(chain: Interceptor.Chain): Response {

        val original = chain.request()
        val hmacBefore = getHMACString(original)
//        LogUtil.e("hmac=before=$hmacBefore")
        val hmacAfter = AlgorithmUtil.hmacSHA256(hmacBefore)
//        LogUtil.e("hmac=after=$hmacAfter")

        val request = original.newBuilder()
            .header("accept", "application/json")
            .header("content-type", "application/json")
            .header("clientVersion", BuildConfig.VERSION_NAME)
            .header("x-client-id", BuildConfig.CLIENT_ID)
            .header("x-session-token", SessionManager.getSessionToken())
            .header("x-hmac", hmacAfter)
            .header("x-anonymous", false.toString())
            .header("platform", APP_PLATFORM)
            .build()

        LogUtil.d("header=${request.headers()}")
        return chain.proceed(request)
    }
复制代码
-
添加日志拦截器:HttpLoggingInterceptor
-
添加浏览器查看请求:StethoInterceptor
-
不算是拦截器OkHttpEventListener(继承于EventListener),是用于记录网络请求各个流程的时间,流量等等。
写在最后:
Okhttp在返回码 大于等于200并且小于300 的时候,才视为获取成功,否则会将返回的body放到错误的返回结果中,如下所示:
//Response
public boolean isSuccessful() {
  return code >= 200 && code < 300;
}

/** Create an error response from {@code rawResponse} with {@code body} as the error body. */
public static <T> Response<T> error(ResponseBody body, okhttp3.Response rawResponse) {
    checkNotNull(body, "body == null");
    checkNotNull(rawResponse, "rawResponse == null");
    if (rawResponse.isSuccessful()) {
      throw new IllegalArgumentException("rawResponse should not be successful response");
    }
    return new Response<>(rawResponse, null, body);
}
复制代码
正文到此结束
- 本文标签: http cache Google equals 遍历 源码 Connection 线程池 安全 id Full Stack 缓存 参数 主机 js ORM IDE ArrayList 解析 递归 协议 ThreadPoolExecutor Logging cat 服务端 时间 连接池 list https src Service 数据 LinkedList App CST 服务器 同步 文章 线程 IO 需求 synchronized value ip client queue UI session CTO stream web final ACE tar executor 代码 构造方法 json tab build 监听器 配置 token CEO retry zip 锁
- 版权声明: 本文为互联网转载文章,出处已在文章中说明(部分除外)。如果侵权,请联系本站长删除,谢谢。
- 本文海报: 生成海报一 生成海报二
热门推荐


相关文章

近期评论
-
出现OpenClaw "device signature expired"。the Gateway rejects if Math.abs(Date.now() - signedAt) > 10 * 60 * 1000 (10 minutes)
-
-
想购买您这个站,我的联系方式QQ741756694微信同步 能卖联系
-
-
-
博主的博客用的什么技术栈,内容都是干货,赞
-
-
https://www.liuhaihua.cn/archives/40657.html 这篇博客中的图片打不开了
-
不会英语啊。
-
Loading...
![[HBLOG]公众号](https://www.liuhaihua.cn/img/qrcode_gzh.jpg)

