Spring Boot 2.X(十八):集成 Spring Security-登录认证和权限控制
前言
在企业项目开发中,对系统的安全和权限控制往往是必需的,常见的安全框架有 Spring Security、Apache Shiro 等。本文主要简单介绍一下 Spring Security,再通过 Spring Boot 集成开一个简单的示例。
Spring Security
什么是 Spring Security?
Spring Security 是一种基于 Spring AOP 和 Servlet 过滤器 Filter 的安全框架,它提供了全面的安全解决方案,提供在 Web 请求和方法调用级别的用户鉴权和权限控制。
Web 应用的安全性通常包括两方面:用户认证(Authentication)和用户授权(Authorization)。
用户认证指的是验证某个用户是否为系统合法用户,也就是说用户能否访问该系统。用户认证一般要求用户提供用户名和密码,系统通过校验用户名和密码来完成认证。
用户授权指的是验证某个用户是否有权限执行某个操作。
2.原理
Spring Security 功能的实现主要是靠一系列的过滤器链相互配合来完成的。以下是项目启动时打印的默认安全过滤器链(集成5.2.0):
[
    org.springframework.security.web.context.request.async.WebAsyncManagerIntegrationFilter@5054e546,
    org.springframework.security.web.context.SecurityContextPersistenceFilter@7b0c69a6,
    org.springframework.security.web.header.HeaderWriterFilter@4fefa770,
    org.springframework.security.web.csrf.CsrfFilter@6346aba8,
    org.springframework.security.web.authentication.logout.LogoutFilter@677ac054,
    org.springframework.security.web.authentication.UsernamePasswordAuthenticationFilter@51430781,
    org.springframework.security.web.savedrequest.RequestCacheAwareFilter@4203d678,
    org.springframework.security.web.servletapi.SecurityContextHolderAwareRequestFilter@625e20e6,
    org.springframework.security.web.authentication.AnonymousAuthenticationFilter@19628fc2,
    org.springframework.security.web.session.SessionManagementFilter@471f8a70,
    org.springframework.security.web.access.ExceptionTranslationFilter@3e1eb569,
    org.springframework.security.web.access.intercept.FilterSecurityInterceptor@3089ab62
]
- WebAsyncManagerIntegrationFilter
- SecurityContextPersistenceFilter
- HeaderWriterFilter
- CsrfFilter
- LogoutFilter
- UsernamePasswordAuthenticationFilter
- RequestCacheAwareFilter
- SecurityContextHolderAwareRequestFilter
- AnonymousAuthenticationFilter
- SessionManagementFilter
- ExceptionTranslationFilter
- FilterSecurityInterceptor
详细解读可以参考:https://blog.csdn.net/dushiwodecuo/article/details/78913113
3.核心组件
SecurityContextHolder
用于存储应用程序安全上下文(Spring Context)的详细信息,如当前操作的用户对象信息、认证状态、角色权限信息等。默认情况下, SecurityContextHolder 会使用 ThreadLocal 来存储这些信息,意味着安全上下文始终可用于同一执行线程中的方法。
获取有关当前用户的信息
因为身份信息与线程是绑定的,所以可以在程序的任何地方使用静态方法获取用户信息。例如获取当前经过身份验证的用户的名称,代码如下:
Object principal = SecurityContextHolder.getContext().getAuthentication().getPrincipal();
if (principal instanceof UserDetails) {
    String username = ((UserDetails)principal).getUsername();
} else {
    String username = principal.toString();
}
其中, getAuthentication() 返回认证信息, getPrincipal() 返回身份信息, UserDetails 是对用户信息的封装类。
Authentication
认证信息接口,集成了 Principal 类。该接口中方法如下:
| 接口方法 | 功能说明 |
|---|---|
| getAuthorities() | 获取权限信息列表,默认是 GrantedAuthority 接口的一些实现类,通常是代表权限信息的一系列字符串 |
| getCredentials() | 获取用户提交的密码凭证,用户输入的密码字符窜,在认证过后通常会被移除,用于保障安全 |
| getDetails() | 获取用户详细信息,用于记录 ip、sessionid、证书序列号等值 |
| getPrincipal() | 获取用户身份信息,大部分情况下返回的是 UserDetails 接口的实现类,是框架中最常用的接口之一 |
AuthenticationManager
认证管理器,负责验证。认证成功后, AuthenticationManager 返回一个填充了用户认证信息(包括权限信息、身份信息、详细信息等,但密码通常会被移除)的 Authentication 实例。然后再将 Authentication 设置到 SecurityContextHolder 容器中。
AuthenticationManager 接口是认证相关的核心接口,也是发起认证的入口。但它一般不直接认证,其常用实现类 ProviderManager 内部会维护一个 List<AuthenticationProvider> 列表,存放里多种认证方式,默认情况下,只需要通过一个 AuthenticationProvider 的认证,就可被认为是登录成功。
UserDetailsService
负责从特定的地方加载用户信息,通常是通过 JdbcDaoImpl 从数据库加载实现,也可以通过内存映射 InMemoryDaoImpl 实现。
UserDetails
该接口代表了最详细的用户信息。该接口中方法如下:
| 接口方法 | 功能说明 |
|---|---|
| getAuthorities() | 获取授予用户的权限 |
| getPassword() | 获取用户正确的密码,这个密码在验证时会和 Authentication 中的 getCredentials() 做比对 |
| getUsername() | 获取用于验证的用户名 |
| isAccountNonExpired() | 指示用户的帐户是否已过期,无法验证过期的用户 |
| isAccountNonLocked() | 指示用户的账号是否被锁定,无法验证被锁定的用户 |
| isCredentialsNonExpired() | 指示用户的凭据(密码)是否已过期,无法验证凭证过期的用户 |
| isEnabled() | 指示用户是否被启用,无法验证被禁用的用户 |
Spring Security 实战
1.系统设计
本文主要使用 Spring Security 来实现系统页面的权限控制和安全认证,本示例不做详细的数据增删改查,sql 可以在完整代码里下载,主要是基于数据库对页面 和 ajax 请求做权限控制。
1.1 技术栈
- 编程语言:Java
- 编程框架:Spring、Spring MVC、Spring Boot
- ORM 框架:MyBatis
- 视图模板引擎:Thymeleaf
- 安全框架:Spring Security(5.2.0)
- 数据库:MySQL
- 前端:Layui、JQuery
1.2 功能设计
- 实现登录、退出
- 实现菜单 url 跳转的权限控制
- 实现按钮 ajax 请求的权限控制
- 防止跨站请求伪造(CSRF)攻击
1.3 数据库层设计
t_user 用户表
| 字段 | 类型 | 长度 | 是否为空 | 说明 |
|---|---|---|---|---|
| id | int | 8 | 否 | 主键,自增长 |
| username | varchar | 20 | 否 | 用户名 |
| password | varchar | 255 | 否 | 密码 |
t_role 角色表
| 字段 | 类型 | 长度 | 是否为空 | 说明 |
|---|---|---|---|---|
| id | int | 8 | 否 | 主键,自增长 |
| role_name | varchar | 20 | 否 | 角色名称 |
t_menu 菜单表
| 字段 | 类型 | 长度 | 是否为空 | 说明 |
|---|---|---|---|---|
| id | int | 8 | 否 | 主键,自增长 |
| menu_name | varchar | 20 | 否 | 菜单名称 |
| menu_url | varchar | 50 | 是 | 菜单url(Controller 请求路径) |
t_user_roles 用户权限表
| 字段 | 类型 | 长度 | 是否为空 | 说明 |
|---|---|---|---|---|
| id | int | 8 | 否 | 主键,自增长 |
| user_id | int | 8 | 否 | 用户表id |
| role_id | int | 8 | 否 | 角色表id |
t_role_menus 权限菜单表
| 字段 | 类型 | 长度 | 是否为空 | 说明 |
|---|---|---|---|---|
| id | int | 8 | 否 | 主键,自增长 |
| role_id | int | 8 | 否 | 角色表id |
| menu_id | int | 8 | 否 | 菜单表id |
实体类这里不详细列了。
2.代码实现
2.0 相关依赖
<dependencies>
        <dependency>
            <groupId>org.springframework.boot</groupId>
            <artifactId>spring-boot-starter-web</artifactId>
        </dependency>

        <dependency>
            <groupId>org.springframework.boot</groupId>
            <artifactId>spring-boot-starter-test</artifactId>
            <scope>test</scope>
            <exclusions>
                <exclusion>
                    <groupId>org.junit.vintage</groupId>
                    <artifactId>junit-vintage-engine</artifactId>
                </exclusion>
            </exclusions>
        </dependency>

        <dependency>
            <groupId>org.springframework.boot</groupId>
            <artifactId>spring-boot-starter-jdbc</artifactId>
        </dependency>

        <!-- 热部署模块 -->
        <dependency>
            <groupId>org.springframework.boot</groupId>
            <artifactId>spring-boot-devtools</artifactId>
            <optional>true</optional> <!-- 这个需要为 true 热部署才有效 -->
        </dependency>

            <!-- mysql 数据库驱动. -->
        <dependency>
            <groupId>mysql</groupId>
            <artifactId>mysql-connector-java</artifactId>
            <scope>runtime</scope>
        </dependency>

        <!-- mybaits -->
        <dependency>
            <groupId>org.mybatis.spring.boot</groupId>
            <artifactId>mybatis-spring-boot-starter</artifactId>
            <version>2.1.0</version>
        </dependency>

        <!-- thymeleaf -->
        <dependency>
            <groupId>org.springframework.boot</groupId>
            <artifactId>spring-boot-starter-thymeleaf</artifactId>
        </dependency>

        <!-- alibaba fastjson -->
        <dependency>
            <groupId>com.alibaba</groupId>
            <artifactId>fastjson</artifactId>
            <version>1.2.47</version>
        </dependency>
        <!-- spring security -->
        <dependency>
            <groupId>org.springframework.boot</groupId>
            <artifactId>spring-boot-starter-security</artifactId>
        </dependency>
    </dependencies>
2.1 继承 WebSecurityConfigurerAdapter 自定义 Spring Security 配置
/**
prePostEnabled :决定Spring Security的前注解是否可用 [@PreAuthorize,@PostAuthorize,..]
secureEnabled : 决定是否Spring Security的保障注解 [@Secured] 是否可用
jsr250Enabled :决定 JSR-250 annotations 注解[@RolesAllowed..] 是否可用.
 */
@Configurable
@EnableWebSecurity
//开启 Spring Security 方法级安全注解 @EnableGlobalMethodSecurity
@EnableGlobalMethodSecurity(prePostEnabled = true,securedEnabled = true,jsr250Enabled = true)
public class WebSecurityConfig extends WebSecurityConfigurerAdapter{

    @Autowired
    private CustomAccessDeniedHandler customAccessDeniedHandler;
    @Autowired
    private UserDetailsService userDetailsService;

    /**
     * 静态资源设置
     */
    @Override
    public void configure(WebSecurity webSecurity) {
        //不拦截静态资源,所有用户均可访问的资源
        webSecurity.ignoring().antMatchers(
                "/",
                "/css/**",
                "/js/**",
                "/images/**",
                "/layui/**"
                );
    }
    /**
     * http请求设置
     */
    @Override
    public void configure(HttpSecurity http) throws Exception {
        //http.csrf().disable(); //注释就是使用 csrf 功能
        http.headers().frameOptions().disable();//解决 in a frame because it set 'X-Frame-Options' to 'DENY' 问题
        //http.anonymous().disable();
        http.authorizeRequests()
            .antMatchers("/login/**","/initUserData","/main")//不拦截登录相关方法
            .permitAll()
            //.antMatchers("/user").hasRole("ADMIN")  // user接口只有ADMIN角色的可以访问
//          .anyRequest()
//          .authenticated()// 任何尚未匹配的URL只需要验证用户即可访问
            .anyRequest()
            .access("@rbacPermission.hasPermission(request, authentication)")//根据账号权限访问
            .and()
            .formLogin()
            .loginPage("/")
            .loginPage("/login")   //登录请求页
            .loginProcessingUrl("/login")  //登录POST请求路径
            .usernameParameter("username") //登录用户名参数
            .passwordParameter("password") //登录密码参数
            .defaultSuccessUrl("/main")   //默认登录成功页面
            .and()
            .exceptionHandling()
            .accessDeniedHandler(customAccessDeniedHandler) //无权限处理器
            .and()
            .logout()
            .logoutSuccessUrl("/login?logout");  //退出登录成功URL

    }
    /**
     * 自定义获取用户信息接口
     */
    @Override
    public void configure(AuthenticationManagerBuilder auth) throws Exception {
        auth.userDetailsService(userDetailsService).passwordEncoder(passwordEncoder());
    }

    /**
     * 密码加密算法
     * @return
     */
    @Bean
    public BCryptPasswordEncoder passwordEncoder() {
        return new BCryptPasswordEncoder();

    }
}
2.2 自定义实现 UserDetails 接口,扩展属性
public class UserEntity implements UserDetails {

    /**
     *
     */
    private static final long serialVersionUID = -9005214545793249372L;

    private Long id;// 用户id
    private String username;// 用户名
    private String password;// 密码
    private List<Role> userRoles;// 用户权限集合
    private List<Menu> roleMenus;// 角色菜单集合

    private Collection<? extends GrantedAuthority> authorities;
    public UserEntity() {

    }

    public UserEntity(String username, String password, Collection<? extends GrantedAuthority> authorities,
            List<Menu> roleMenus) {
        this.username = username;
        this.password = password;
        this.authorities = authorities;
        this.roleMenus = roleMenus;
    }

    public Long getId() {
        return id;
    }

    public void setId(Long id) {
        this.id = id;
    }

    public String getUsername() {
        return username;
    }

    public void setUsername(String username) {
        this.username = username;
    }

    public String getPassword() {
        return password;
    }

    public void setPassword(String password) {
        this.password = password;
    }

    public List<Role> getUserRoles() {
        return userRoles;
    }

    public void setUserRoles(List<Role> userRoles) {
        this.userRoles = userRoles;
    }

    public List<Menu> getRoleMenus() {
        return roleMenus;
    }

    public void setRoleMenus(List<Menu> roleMenus) {
        this.roleMenus = roleMenus;
    }

    @Override
    public Collection<? extends GrantedAuthority> getAuthorities() {
        return this.authorities;
    }

    @Override
    public boolean isAccountNonExpired() {
        return true;
    }

    @Override
    public boolean isAccountNonLocked() {
        return true;
    }

    @Override
    public boolean isCredentialsNonExpired() {
        return true;
    }

    @Override
    public boolean isEnabled() {
        return true;
    }

}
2.3 自定义实现 UserDetailsService 接口
/**
 * 获取用户相关信息
 * @author charlie
 *
 */
@Service
public class UserDetailServiceImpl implements UserDetailsService {
    private Logger log = LoggerFactory.getLogger(UserDetailServiceImpl.class);

    @Autowired
    private UserDao userDao;

    @Autowired
    private RoleDao roleDao;
    @Autowired
    private MenuDao menuDao;

    @Override
    public UserEntity loadUserByUsername(String username) throws UsernameNotFoundException {
        // 根据用户名查找用户
        UserEntity user = userDao.getUserByUsername(username);
        System.out.println(user);
        if (user != null) {
            System.out.println("UserDetailsService");
            //根据用户id获取用户角色
            List<Role> roles = roleDao.getUserRoleByUserId(user.getId());
            // 填充权限
            Collection<SimpleGrantedAuthority> authorities = new HashSet<SimpleGrantedAuthority>();
            for (Role role : roles) {
                authorities.add(new SimpleGrantedAuthority(role.getRoleName()));
            }
            //填充权限菜单
            List<Menu> menus=menuDao.getRoleMenuByRoles(roles);
            return new UserEntity(username,user.getPassword(),authorities,menus);
        } else {
            System.out.println(username +" not found");
            throw new UsernameNotFoundException(username +" not found");
        }
    }

}
2.4 自定义实现 URL 权限控制
/**
 * RBAC数据模型控制权限
 * @author charlie
 *
 */
@Component("rbacPermission")
public class RbacPermission{

    private AntPathMatcher antPathMatcher = new AntPathMatcher();

    public boolean hasPermission(HttpServletRequest request, Authentication authentication) {
        Object principal = authentication.getPrincipal();
        boolean hasPermission = false;
        // 读取用户所拥有的权限菜单
        List<Menu> menus = ((UserEntity) principal).getRoleMenus();
        System.out.println(menus.size());
        for (Menu menu : menus) {
            if (antPathMatcher.match(menu.getMenuUrl(), request.getRequestURI())) {
                hasPermission = true;
                break;
            }
        }
        return hasPermission;
    }
}
2.5 实现 AccessDeniedHandler
自定义处理无权请求
/**
 * 处理无权请求
 * @author charlie
 *
 */
@Component
public class CustomAccessDeniedHandler implements AccessDeniedHandler {

    private Logger log = LoggerFactory.getLogger(CustomAccessDeniedHandler.class);

    @Override
    public void handle(HttpServletRequest request, HttpServletResponse response,
            AccessDeniedException accessDeniedException) throws IOException, ServletException {
        boolean isAjax = ControllerTools.isAjaxRequest(request);
        System.out.println("CustomAccessDeniedHandler handle");
        if (!response.isCommitted()) {
            if (isAjax) {
                String msg = accessDeniedException.getMessage();
                log.info("accessDeniedException.message:" + msg);
                String accessDenyMsg = "{/"code/":/"403/",/"msg/":/"没有权限/"}";
                ControllerTools.print(response, accessDenyMsg);
            } else {
                request.setAttribute(WebAttributes.ACCESS_DENIED_403, accessDeniedException);
                response.setStatus(HttpStatus.FORBIDDEN.value());
                RequestDispatcher dispatcher = request.getRequestDispatcher("/403");
                dispatcher.forward(request, response);
            }
        }

    }

    public static class ControllerTools {
        public static boolean isAjaxRequest(HttpServletRequest request) {
            return "XMLHttpRequest".equals(request.getHeader("X-Requested-With"));
        }

        public static void print(HttpServletResponse response, String msg) throws IOException {
            response.setCharacterEncoding("UTF-8");
            response.setContentType("application/json; charset=utf-8");
            PrintWriter writer = response.getWriter();
            writer.write(msg);
            writer.flush();
            writer.close();
        }
    }

}
2.6 相关 Controller
登录/退出跳转
/**
 * 登录/退出跳转
 * @author charlie
 *
 */
@Controller
public class LoginController {
    @GetMapping("/login")
    public ModelAndView login(@RequestParam(value = "error", required = false) String error,
            @RequestParam(value = "logout", required = false) String logout) {
        ModelAndView mav = new ModelAndView();
        if (error != null) {
            mav.addObject("error", "用户名或者密码不正确");
        }
        if (logout != null) {
            mav.addObject("msg", "退出成功");
        }
        mav.setViewName("login");
        return mav;
    }
}
登录成功跳转
@Controller
public class MainController {

    @GetMapping("/main")
    public ModelAndView toMainPage() {
        //获取登录的用户名
        Object principal= SecurityContextHolder.getContext().getAuthentication().getPrincipal();
        String username=null;
        if(principal instanceof UserDetails) {
            username=((UserDetails)principal).getUsername();
        }else {
            username=principal.toString();
        }
        ModelAndView mav = new ModelAndView();
        mav.setViewName("main");
        mav.addObject("username", username);
        return mav;
    }

}
用于不同权限页面访问测试
/**
* 用于不同权限页面访问测试
* @author charlie
*
*/
@Controller
public class ResourceController {
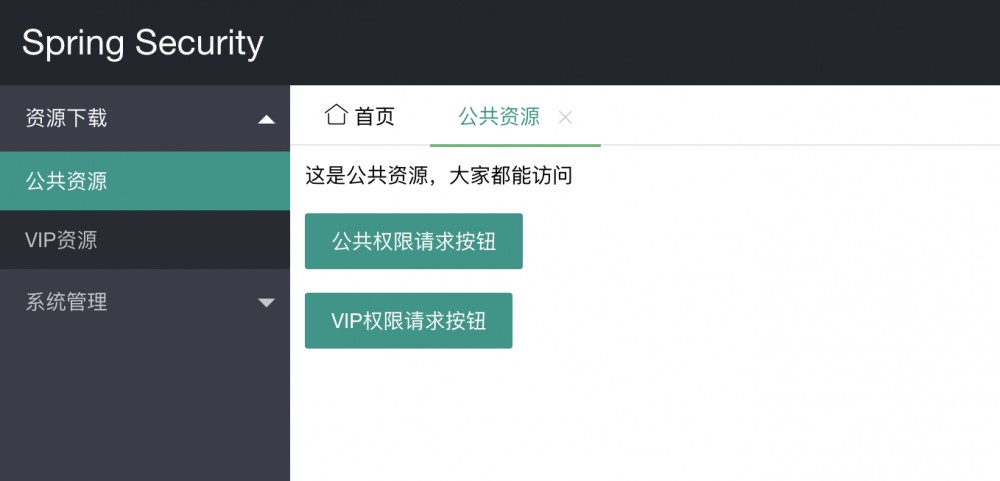
@GetMapping("/publicResource")
public String toPublicResource() {
return "resource/public";
}
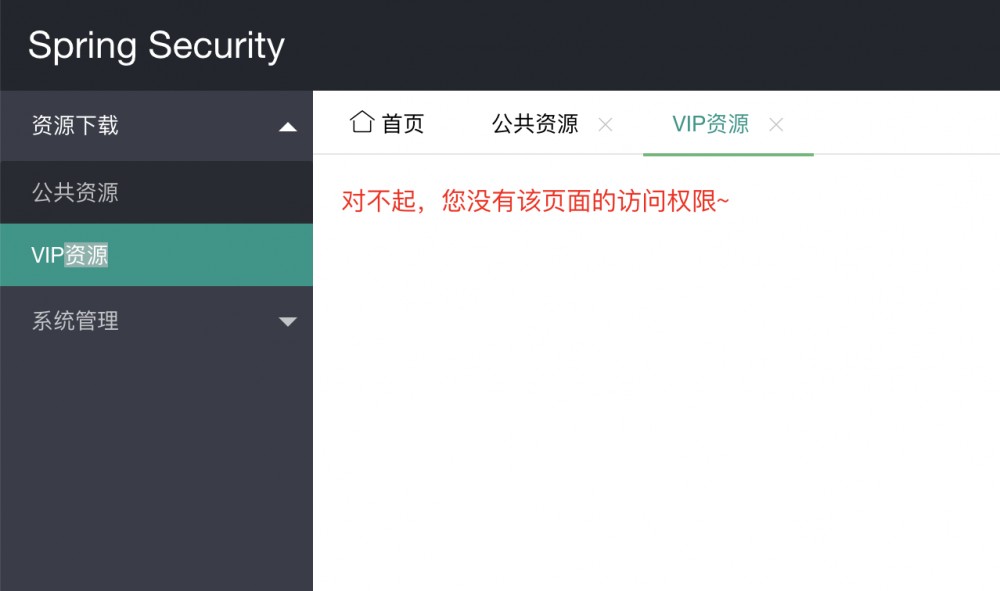
@GetMapping("/vipResource")
public String toVipResource() {
return "resource/vip";
}
}
用于不同权限ajax请求测试
/**
* 用于不同权限ajax请求测试
* @author charlie
*
*/
@RestController
@RequestMapping("/test")
public class HttptestController {
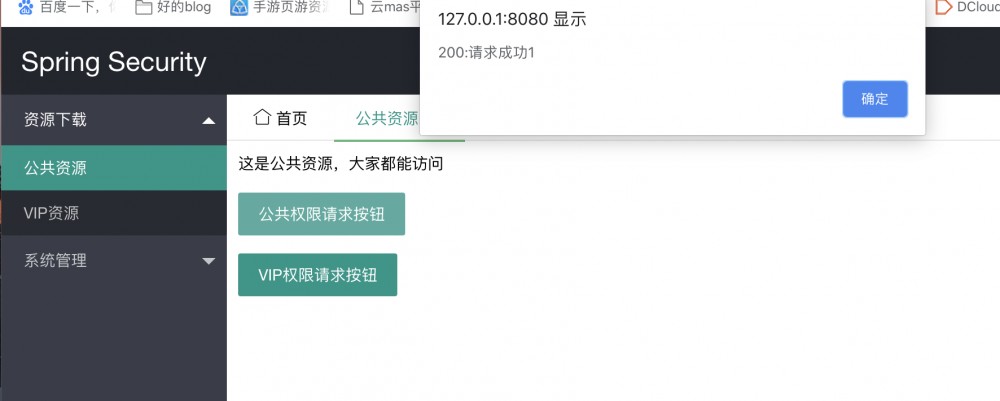
@PostMapping("/public")
public JSONObject doPublicHandler(Long id) {
JSONObject json = new JSONObject();
json.put("code", 200);
json.put("msg", "请求成功" + id);
return json;
}
@PostMapping("/vip")
public JSONObject doVipHandler(Long id) {
JSONObject json = new JSONObject();
json.put("code", 200);
json.put("msg", "请求成功" + id);
return json;
}
}
2.7 相关 html 页面
登录页面
<form class="layui-form" action="/login" method="post">
            <div class="layui-input-inline">
                <input type="hidden" th:name="${_csrf.parameterName}" th:value="${_csrf.token}"/>
                <input type="text" name="username" required
                    placeholder="用户名" autocomplete="off" class="layui-input">
            </div>
            <div class="layui-input-inline">
                <input type="password" name="password" required  placeholder="密码" autocomplete="off"
                    class="layui-input">
            </div>
            <div class="layui-input-inline login-btn">
                <button id="btnLogin" lay-submit lay-filter="*" class="layui-btn">登录</button>
            </div>
            <div class="form-message">
                <label th:text="${error}"></label>
                <label th:text="${msg}"></label>
            </div>
        </form>
防止跨站请求伪造(CSRF)攻击
退出系统
<form id="logoutForm" action="/logout" method="post"
                                style="display: none;">
                                <input type="hidden" th:name="${_csrf.parameterName}"
                                    th:value="${_csrf.token}">
                            </form>
                            <a
                                href="javascript:document.getElementById('logoutForm').submit();">退出系统</a>
ajax 请求页面
<input type="hidden" th:name="${_csrf.parameterName}" th:value="${_csrf.token}" id="hidCSRF">
<button class="layui-btn" id="btnPublic">公共权限请求按钮</button>
<br>
<br>
<button class="layui-btn" id="btnVip">VIP权限请求按钮</button>
<script type="text/javascript" th:src="@{/js/jquery-1.8.3.min.js}"></script>
<script type="text/javascript" th:src="@{/layui/layui.js}"></script>
<script type="text/javascript">
        layui.use('form', function() {
            var form = layui.form;
            $("#btnPublic").click(function(){
                $.ajax({
                    url:"/test/public",
                    type:"POST",
                    data:{id:1},
                    beforeSend:function(xhr){
                        xhr.setRequestHeader('X-CSRF-TOKEN',$("#hidCSRF").val());
                    },
                    success:function(res){
                        alert(res.code+":"+res.msg);

                    }
                });
            });
            $("#btnVip").click(function(){
                $.ajax({
                    url:"/test/vip",
                    type:"POST",
                    data:{id:2},
                    beforeSend:function(xhr){
                        xhr.setRequestHeader('X-CSRF-TOKEN',$("#hidCSRF").val());
                    },
                    success:function(res){
                        alert(res.code+":"+res.msg);

                    }
                });
            });
        });
    </script>
2.8 测试
测试提供两个账号:user 和 admin (密码与账号一样)
由于 admin 作为管理员权限,设置了全部的访问权限,这里只展示 user 的测试结果。
完整代码
github
码云
非特殊说明,本文版权归 朝雾轻寒 所有,转载请注明出处.
原文标题:Spring Boot 2.X(十八):集成 Spring Security-登录认证和权限控制
原文地址: https://www.zwqh.top/article/info/27
如果文章有不足的地方,欢迎提点,后续会完善。
如果文章对您有帮助,请给我点个赞,请扫码关注下我的公众号,文章持续更新中...

正文到此结束
- 本文标签: js REST Collection equals 配置 企业 SDN 文章 spring 实例 Service Spring Security cat 开发 加密 IDE entity CEO Authorization 测试 https list IO session map Ajax API 数据模型 rmi Document Action db Spring Boot 线程 dependencies junit 数据 src 注释 Persistence web git value cache 权限控制 sql provider 部署 管理 ACE 云 HTML 处理器 tab id 数据库 参数 JDBC UI lib 代码 message apache XML ORM ip token 安全 final tag Menu Word logo App JavaScript authenticate tar mybatis AOP 静态方法 jquery build GitHub 下载 java json bean servlet 模型 标题 锁 HashSet CSS http mysql CTO Security 认证
- 版权声明: 本文为互联网转载文章,出处已在文章中说明(部分除外)。如果侵权,请联系本站长删除,谢谢。
- 本文海报: 生成海报一 生成海报二
热门推荐


相关文章

近期评论
-
收到
-
https://www.liuhaihua.cn/archives/40657.html 这篇博客中的图片打不开了
-
不会英语啊。
-
-
-
https://pplx.ai/floraliu4199466 这个链接打不开是什么原因?
-
-
-
-
来看看,最近更新了一波,顺着友联过来的,几年过去了,网站越搞越好,厉害
Loading...
![[HBLOG]公众号](https://www.liuhaihua.cn/img/qrcode_gzh.jpg)

