springboot web项目创建及自动配置分析(thymeleaf+flyway)
@
目录
springboot 创建web项目只需要引入对应的web-starter,自己定义好moudel层,再采用相应的模版引擎技术(view层)就可以将数据渲染到模版中,从而生成一个单体的web应用!那这些视图是如何解析的呢?最常用的模版引擎语法有哪些呢?
新建一个空的项目,我们选择对应的web依赖,工具相关我三个都勾选上,数据库驱动选mysql驱动!具体见我的另一篇博客:
springboot集成mybatis和druid监控 ,此处不再赘述.
创建好项目后,我们来分析下源码
源码分析
首先我们都知道,springboot初始化的项目下面都是没有webapp这样一个模块的,那我们的web相关的一些资源,该放在哪里呢?为何对应的放置就可以生效呢?
我们尝试从源码中寻求答案
SpringMVC 整个 SSM 都是基于它的,所以我们第一步应该去研究 SpringBoot 关于Mvc的自动配置!
- 1、所有mvc相关的配置都在 WebMvcAutoConfiguration (视图解析器、静态资源过滤!)
- 2、addResourceHandlers 静态资源处理方法
@Override
public void addResourceHandlers(ResourceHandlerRegistry registry) {
//禁用默认规则的一个配置,如果你手动的添加了资源映射路径的配置,那么这些自动配置就会直接失效!
if (!this.resourceProperties.isAddMappings()) {
   logger.debug("Default resource handling disabled");
   return;
}
// 缓存控制
Duration cachePeriod = this.resourceProperties.getCache().getPeriod();
CacheControl cacheControl = this.resourceProperties.getCache().getCachecontrol().toHttpCacheControl();
// 分析源代码,需要掌握看对象的方法调用!
// localhost:8080/webjars/jquery.js
// 判断是否存在一个映射路径 /webjars/**,
// addResourceHandler 处理逻辑 /webjars/a.js
// addResourceLocations 处理资源的地址 classpath:/META-INF/resources/webjars/a.js
if (!registry.hasMappingForPattern("/webjars/**")) {
    customizeResourceHandlerRegistration(registry.addResourceHandler("/webjars/**")
    .addResourceLocations("classpath:/META-INF/resources/webjars/")
    .setCachePeriod(getSeconds(cachePeriod)).setCacheControl(cacheControl));
}
// 获取静态资源路径!
String staticPathPattern = this.mvcProperties.getStaticPathPattern(); // localhost:8080/
// 如果访问映射的路径是 staticPathPattern = "/**";
// this.resourceProperties.getStaticLocations())
if (!registry.hasMappingForPattern(staticPathPattern)) {
    customizeResourceHandlerRegistration(registry.addResourceHandler("/**")
    .addResourceLocations(getResourceLocations(this.resourceProperties.getStaticLocations()))
    .setCachePeriod(getSeconds(cachePeriod)).setCacheControl(cacheControl)); }
}
// 对应的资源加载先后顺序 优先级:META-INF > resources > static > public
// 对于怎么验证这个优先级,可以建对于的文件加,放些静态资源,页面直接访问测试
private static final String[] CLASSPATH_RESOURCE_LOCATIONS =
{
     "classpath:/META-INF/resources/",
     "classpath:/resources/",
     "classpath:/static/",
     "classpath:/public/"
};
我们一句句的解读,就可以读懂源码!可以看到这段源码中就这个webjars我们不怎么熟悉
webjars
什么是 webjars?
webjars官网
webjars是一个前端依赖管理工具,集成了前端主流的一些框架,使得我们只需引入对应的jar包就可以在项目中使用它!
接下来,我们引入jquery的依赖:
<dependency>
    <groupId>org.webjars</groupId>
    <artifactId>jquery</artifactId>
    <version>3.4.1</version>
</dependency>
看下生成的依赖:
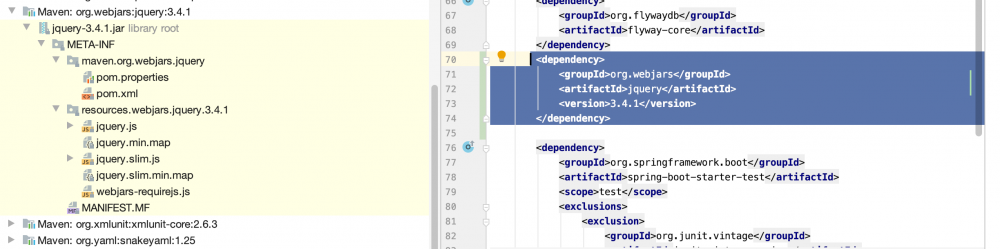 我们看下是否可以直接通过路径访问:
http://localhost:8080/webjars/jquery/3.4.1/jquery.js

很明显,这样是可以直接访问的。那这些可以常用的框架等静态资源我们可以这样引入,我们自定义的东西例如css 图片等该如何使用呢?
我常用的规则推荐如下:
private static final String[] CLASSPATH_RESOURCE_LOCATIONS =
{
"classpath:/META-INF/resources/", // 在 starter 中使用! SWAGGER-UI
"classpath:/resources/", // 文件资源
"classpath:/static/", // 静态资源
"classpath:/public/" // 公共的,图标......
};
当然我们也可以更改spring的默认资源路径配置:
# 一旦自己配置了  那么默认的就会失效
spring.resources.static-locations=xxx
thymeleaf
- 1.官网: https://www.thymeleaf.org/documentation.html
- 2.github: https://github.com/thymeleaf/thymeleaf/blob/3.0-master
引入依赖,在spring中采用jar一般都是使用对应的starter
<dependency>
    <groupId>org.springframework.boot</groupId>
    <artifactId>spring-boot-starter-thymeleaf</artifactId>
</dependency>
任何starter都有一个 xxxProperties 我们去其依赖下看看源码:
@ConfigurationProperties(prefix = "spring.thymeleaf") public class ThymeleafProperties {
private static final Charset DEFAULT_ENCODING = StandardCharsets.UTF_8;
    public static final String DEFAULT_PREFIX = "classpath:/templates/";
    public static final String DEFAULT_SUFFIX = ".html";
    ...省略
}
可以看出thymeleaf的默认配置路径是 templates 下,默认文件格式是 .html 的
我们要改只需要 spring.thymeleaf.prefix=xxx ,当然更改了默认的便不会生效了。
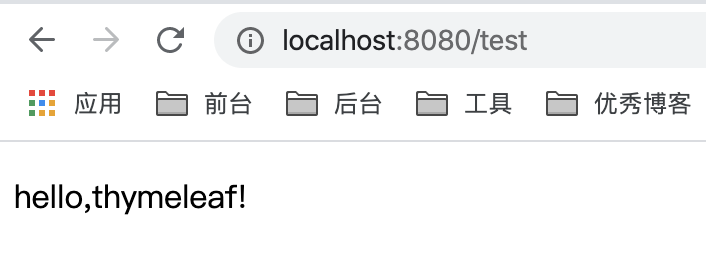
测试thymeleaf
templates新增一个页面test.html
<!DOCTYPE html>
<html lang="en">
<head>
    <meta charset="UTF-8">
    <title>Title</title>
</head>
<body>
<p>hello,thymeleaf!</p>
</body>
</html>
controller中新增一个接口:
package com.blog.controller;

import org.springframework.stereotype.Controller;
import org.springframework.web.bind.annotation.RequestMapping;
@Controller
public class IndexController {
    @GetMapping(value = "/test")
    public String test(){
        return "test";
    }
}
启动项目可见:
thymeleaf语法
了解了基本的页面渲染规则后,我们来看下thymeleaf的语法:
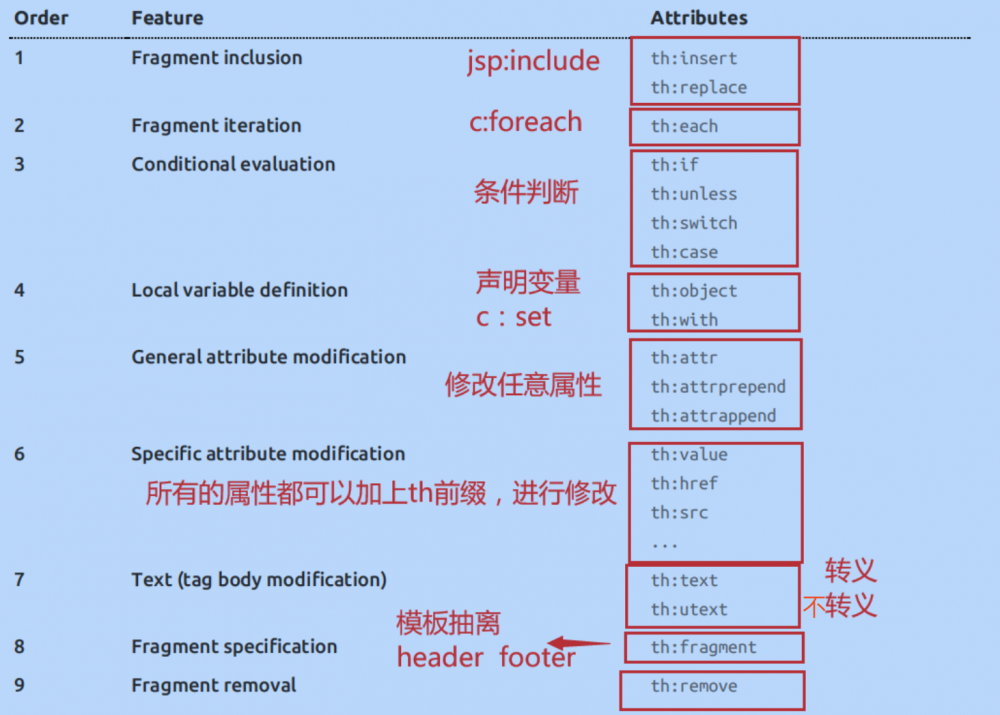
我们还可以编写哪些表达式呢?
Variable Expressions: ${...} 获取一些基本的变量值! OGNL;
- 对象的属性,调用方法
- 使用内置的基本对象
${#ctx.locale}
${param.foo}
${session.foo}
${application.foo}
${#request.getAttribute('foo')}
${#servletContext.contextPath}
- 工具对象
${#messages.msg('msgKey')}
${#uris.escapePath(uri)}
${#conversions.convert(object, 'java.util.TimeZone')}
${#dates.format(date, 'dd/MMM/yyyy HH:mm')}
${#calendars.format(cal)}
${#numbers.formatInteger(num,3)}
${#strings.toString(obj)}
${#arrays.toArray(object)}
.....
4.其他
Selection Variable Expressions: *{...} 选择表达式,和 ${} 是一样的;
 Message Expressions: #{...} 国际化内容获取!
Link URL Expressions: @{...} URL表达式;th:href=“@{/login}”
Fragment Expressions: ~{...} 组件化表达式;
Literals (字面量);
Text literals: 'one text' , 'Another one!' ,... (字符串)
Number literals: 0 , 34 , 3.0 , 12.3 ,...
Boolean literals: true , false
Null literal: null
Literal tokens: one , sometext , main ,...
Text operations: (文本操作)
String concatenation: +
Literal substitutions: |The name is ${name}| Arithmetic operations: (数学运算)
Binary operators: + , - , * , / , %
Minus sign (unary operator): -
Boolean operations: (布尔运算)
Binary operators: and , or
Boolean negation (unary operator): ! , not
Comparisons and equality: (比较运算)
Comparators: > , < , >= , <= ( gt , lt , ge , le )
Equality operators: == , != ( eq , ne )
Conditional operators: (条件运算符)
If-then: (if) ? (then)
If-then-else: (if) ? (then) : (else)
Default: (value) ?: (defaultvalue)
Special tokens:
Page 17 of 104**No-Operation:** _
springmvc 启动配置原理
我们来看官方文档,虽然都是英文但是不要怂,慢慢的翻的多了也就认识了!
地址: 官网
找到对应的Spring MVC Auto-configuration

我们来解读下:
Spring MVC Auto-configuration
// SpringBoot为SpringMVC 提供提供了自动配置,他可以很多好的工作于大多数的应用!
Spring Boot provides auto-configuration for Spring MVC that works well with most applications.
// 自动配置在Spring默认配置的基础上添加了以下功能:
The auto-configuration adds the following features on top of Spring’s defaults: // 包含视图解析器
Inclusion of ContentNegotiatingViewResolver and BeanNameViewResolver beans.
// 支持静态资源文件的路径吗,包含webjar的支持
Support for serving static resources, including support for WebJars (covered later in this document)).
// 自动注册了转换器
// 转换器 网页提交的前端对象,到后台自动封装为具体的对象;"1" 自动转换为 数字 1; // 格式化器Formatter 【2020-03-18 后台可以自动封装为Date】
Automatic registration of Converter, GenericConverter, and Formatter beans. // 支持消息转换
// request、response,对象自动转换为 json对象
Support for HttpMessageConverters (covered later in this document).
// 定错代码生成规则
Automatic registration of MessageCodesResolver (covered later in this document). // 支持首页定制
Static index.html support.
// 支持自定义图标
Custom Favicon support (covered later in this document).
//配置web数据绑定
Automatic use of a ConfigurableWebBindingInitializer bean (covered later in this document).

// 如果你希望保持 Spring Boot MVC 一些功能,并且希望添加一些其他的 MVC配置(拦截器、格式化 器、视图控制器、或其他的配置),你可以添加自己的配置类 (类型为WebMvcConfigurer) 需要添加注 解@Configuration ,一定不能拥有注解@EnableWebMvc.
If you want to keep those Spring Boot MVC customizations and make more MVC customizations (interceptors, formatters, view controllers, and other features), you can add your own @Configuration class of type WebMvcConfigurer but without @EnableWebMvc.

//如果要提供RequestMappingHandlerMapping、RequestMappingHandlerAdapter或ExceptionHandlerExceptionResolver的自定义实例,并且仍然保留Spring Boot MVC自定义,则可以声明WebMVCregistration类型的bean,并使用它来提供这些组件的自定义实例
If you want to provide custom instances of RequestMappingHandlerMapping, RequestMappingHandlerAdapter, or ExceptionHandlerExceptionResolver, and still keep the Spring Boot MVC customizations, you can declare a bean of type WebMvcRegistrations and use it to provide custom instances of those components.

// 全面接管Spring MVC,自己配置配置类的时候加上 @EnableWebMvc即可!
If you want to take complete control of Spring MVC, you can add your own @Configuration annotated with @EnableWebMvc, or alternatively add your own @Configuration-annotated DelegatingWebMvcConfiguration as described in the Javadoc of @EnableWebMvc.
我们先分析下为什么加了 @EnableWebMvc 注解,视图解析器就不生效了,也就是说 springmvc 这一套东西都不好使了!这个很神奇
源码:
// 如果这个bean不存在,这个类才生效!~
@ConditionalOnMissingBean(WebMvcConfigurationSupport.class)
// @EnableWebMvc 源码
@Import(DelegatingWebMvcConfiguration.class)
public @interface EnableWebMvc
// 点进DelegatingWebMvcConfiguration继承了WebMvcConfigurationSupport
public class DelegatingWebMvcConfiguration extends WebMvcConfigurationSupport

//其实 @EnableWebMvc 就是导入了一个类 WebMvcConfigurationSupport ,但是源码中,一旦导入了 这个类,我们自动配置类就会全部失效!
//如果我们要扩展springmvc
//扩展mvc的方法:
//1、编写一个自己的config配置类
//2、实现一个接口WebMvcConfigurer
//3、重写里面的方法即可!
//@Configuration
//public class MyMvcConfig implements WebMvcConfigurer {
//}
试图解析器
ContentNegotiatingViewResolver
@Bean
@ConditionalOnBean(ViewResolver.class) // 自动配置了 ViewResolver,就是SpringMVC中的视图解析器
@ConditionalOnMissingBean(name = "viewResolver", value = ContentNegotiatingViewResolver.class)
public ContentNegotiatingViewResolver viewResolver(BeanFactory beanFactory) {
    ContentNegotiatingViewResolver resolver = new
ContentNegotiatingViewResolver();
resolver.setContentNegotiationManager(beanFactory.getBean(ContentNegotiationMan ager.class));
    // ContentNegotiatingViewResolver uses all the other view resolvers to ocate
    // a view so it should have a high precedence
    // ContentNegotiatingViewResolver 使用其他所有的视图解析器定位视图,因此它应该具有一 个高的优先级!
    resolver.setOrder(Ordered.HIGHEST_PRECEDENCE);
    return resolver;
}
解析视图名字
resolveViewName
@Override
@Nullable // 参数可以为空
public View resolveViewName(String viewName, Locale locale) throws Exception {
    RequestAttributes attrs = RequestContextHolder.getRequestAttributes();
    Assert.state(attrs instanceof ServletRequestAttributes, "No current ServletRequestAttributes");
    List<MediaType> requestedMediaTypes = getMediaTypes(((ServletRequestAttributes) attrs).getRequest());
    if (requestedMediaTypes != null) {
        // 获取所有候选的视图!
        List<View> candidateViews = getCandidateViews(viewName, locale,
        requestedMediaTypes); // 获取最好的视图
        View bestView = getBestView(candidateViews, requestedMediaTypes, attrs); // 返回最好的视图
        if (bestView != null) {
            return bestView;
        }
    }
    String mediaTypeInfo = logger.isDebugEnabled() && requestedMediaTypes != null ? " given " + requestedMediaTypes.toString() : "";
    if (this.useNotAcceptableStatusCode) { if (logger.isDebugEnabled()) {
        logger.debug("Using 406 NOT_ACCEPTABLE" + mediaTypeInfo); }
        return NOT_ACCEPTABLE_VIEW;
    }
    else {
        logger.debug("View remains unresolved" + mediaTypeInfo); return null;
    }
}
既然他是从容器中加载所有的视图解析器,那么我们可以猜想,我们自己写一个视图解析器,也可以被 扫描并加载!
// 自己写一个 bean
@Bean
public ViewResolver myViewResolver(){
    return new MyViewResolver();
}
private static class MyViewResolver implements ViewResolver{
    @Override
    public View resolveViewName(String viewName, Locale locale) throws Exception{
        return null;
    }
}
集成flyway插件
一直知道这么个东西,很好用单独写一篇博客又显得很浪费;那就跟着这篇博客一并说了吧
概念:
Flyway是独立于数据库的应用、管理并跟踪数据库变更的数据库版本管理工具,说白了就是Flyway可以像Git管理不同人的代码那样,管理不同人的sql脚本,从而做到数据库同步
食用方法
如果新建项目可以直接勾选上flyway插件依赖,我们这里没勾选就自己手动添加:
- 添加依赖
<dependency>
    <groupId>org.flywaydb</groupId>
    <artifactId>flyway-core</artifactId>
</dependency>
- 配置
# 默认不开启flyway
spring.flyway.enabled=false
spring.flyway.baseline-on-migrate=true
# flyway字符编码
spring.flyway.encoding=UTF-8
# flyway文件位置
spring.flyway.locations=classpath:db/migration
# ִV1__xxx.sql v开头默认执行一次
# R1__xxx 开头的脚本则会在项目启动时每次都会清除表后执行
spring.flyway.clean-disabled=false
# flyway 历史记录表
spring.flyway.table=flyway_schema_history
- 新建文件夹
如下图 resource 新增脚本文件(按图所示目录新建,不然无法生成)启动项目可以看到数据库中出现对应的flyway_schema_history表还有按脚本生成的表和数据,flyway_schema_history表中记录的脚本的变更历史

小结:至此我们完成SpringBoot web 项目的搭建,以及thymeleaf 模板的集成和数据库版本管理插件的集成。
正文到此结束
- 本文标签: classpath js UI CTO key 同步 Calendars 希望 缓存 测试 https jquery CEO json final ACE IO session 定制 git 配置 代码 实例 参数 mmm 图片 token web servlet map GitHub Select mybatis 博客 cache bug java sql 管理 Document 插件 http ORM springboot spring db cat CSS 解析 SpringMVC core bean Spring Boot 目录 tab 数据库 IDE HTML list src Features id mysql 源码 tar 数据 App value schema message Master druid
- 版权声明: 本文为互联网转载文章,出处已在文章中说明(部分除外)。如果侵权,请联系本站长删除,谢谢。
- 本文海报: 生成海报一 生成海报二
热门推荐


相关文章


Loading...
![[HBLOG]公众号](http://www.liuhaihua.cn/img/qrcode_gzh.jpg)

