SpringBoot中的Schedule
1.使用Schedule功能
只需要在SpringBoot的*Application.java文件上加入 @EnableScheduling 注解即可使用Schedule功能
@EnableScheduling
@SpringBootApplication
public class ScheduleApplication {
    public static void main(String[] args) {
        SpringApplication.run(ScheduleApplication.class, args);
    }
}复制代码
2.创建Service
创建 com.example.schedule.service 包,然后创建 TaskService 接口类
package com.example.schedule.service;

public interface TaskService {

    void sayHello(String type);
}复制代码
创建service接口实现包 com.example.schedule.service.impl ,然后创建 TaskService 的实现类 TaskServiceImpl
package com.example.schedule.service.impl;

import com.example.schedule.service.TaskService;
import org.slf4j.Logger;
import org.slf4j.LoggerFactory;
import org.springframework.stereotype.Service;

@Service
public class TaskServiceImpl implements TaskService {

    private Logger logger = LoggerFactory.getLogger(this.getClass());

    @Override
  public void sayHello(String type) {
        try {
            long startTime = System.currentTimeMillis() / 1000;
            logger.info(type + " => " + startTime + " - 任务开始");

            logger.info(type + " => " + "任务执行中");

            Thread.sleep(500);

            long endTime = System.currentTimeMillis() / 1000;
            logger.info(type + " => " + endTime + " - 任务结束");
        } catch (Exception e) {
            e.printStackTrace();
        }
    }
}
复制代码
3.进入主题
创建任务包 com.example.schedule.job ,然后在包内创建主要的定时任务实现类 ScheduleJob
package com.example.schedule.job;

import com.example.schedule.service.TaskService;
import org.springframework.beans.factory.annotation.Autowired;
import org.springframework.scheduling.annotation.Scheduled;
import org.springframework.stereotype.Component;

@Component
public class ScheduleJob {

    @Autowired
  private TaskService taskService;

  ....定时任务实现
}复制代码
使用 @Scheduled 定时任务,需要遵守的规则是:
void
3.1.使用fixedDelay定时任务
@Scheduled(fixedDelay = 2000)
public void fixedRateTask() {
    taskService.sayHello("fixedDelay");
}
复制代码
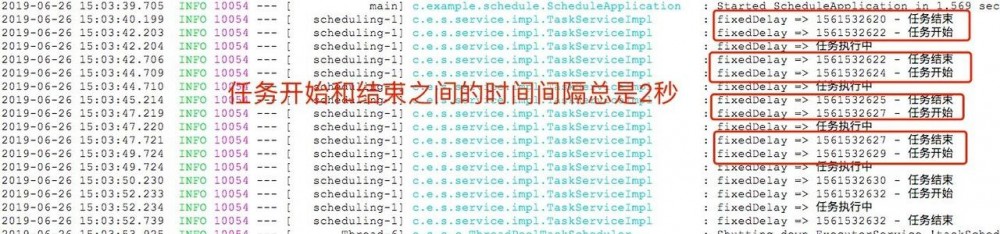
使用 fixedDelay 实现定时任务时,“上次任务的结束”和“下次任务的开始”之间会持续固定的2000毫秒即2秒。
任务总是会等到上一次任务结束后,等待两秒才开始执行。
除了使用 fixedDelay 之外还可以使用 fixedDelayString 实现上述相同功能。
@Scheduled(fixedDelayString = "2000")
public void fixedDelayStringTask() {
    taskService.sayHello("fixedDelayString");
}
复制代码
3.2.使用fixedRate定时任务
@Scheduled(fixedRate = 2000)
public void fixedRateTask() {
    taskService.sayHello("fixedRate");
}
复制代码
使用fixedRate实现定时任务时,“上次任务的开始”和“下次任务的开始”之间会持续固定的2000毫秒即2秒。
任务的开始不会等待上次任务的结束,而是在任务开始后的2秒就开始下一次任务。

同 fixedDelay 一样 fixedRate 也可以使用 fixedRateString 方式实现。
@Scheduled(fixedRateString = "2000")
public void fixedRateStringTask() {
    taskService.sayHello("fixedRateString");
}
复制代码

3.3.配合使用initialDelay
@Scheduled(initialDelay = 1000, fixedDelay = 2000)
public void fixedDelayWithInitialDelayTask() {
    taskService.sayHello("fixedDelayWithInitialDelayTask");
}复制代码
当定时任务设置了 initialDelay 时,任务在加载到时不会立即执行,会在等待 initialDelay 值之后开始第一次执行,随后它将会继续根据 fixedDelay 定时执行。
当然也可以将 fixedDelay 替换为 fixedRate ,同样会在等待 initialDelay 值之后开始第一次执行,虽有它将会继续根据 fixedRate 定时执行。但是不可同时设置 fixedDelay 和 fixedRate ,这样会报出 org.springframework.beans.factory.BeanCreationException 错误。
3.4.使用cron定时任务
相比fixedDelay和fixedRate的固定执行方式,cron表达式的方式可以更灵活控制任务的执行。
@Scheduled(cron = "*/5 * * * * *")
public void cronTask() {
    taskService.sayHello("cron");
}复制代码
该栗子等效于 @Scheduled(fixedDelay = 5000) 即上次任务执行结束后等待5秒再执行。
cron表达式,有专门的语法,这里列举通常使用的语法以供参考,复杂的语法请使用corn表达式生成器生成,或者学习corn语法。
cron一共有7位,但是最后一位是年,可以留空,所以我们可以写6位:
- 第一位,表示秒,取值0-59
- 第二位,表示分,取值0-59
- 第三位,表示小时,取值0-23
- 第四位,日期天/日,取值1-31
- 第五位,日期月份,取值1-12
- 第六位,星期,取值1-7,星期一,星期二...,注:不是第1周,第二周的意思 另外:1表示星期天,2表示星期一。
- 第七位,年份,可以留空,取值1970-2099
cron中,还有一些特殊的符号,含义如下:
● (*)星号:可以理解为每的意思,每秒,每分,每天,每月,每年...
● (?)问号:问号只能出现在日期和星期这两个位置,表示这个位置的值不确定,每天3点执行,所以第六位星期的位置,我们是不需要关注的,就是不确定的值。同时:日期和星期是两个相互排斥的元素,通过问号来表明不指定值。比如,1月10日,比如是星期1,如果在星期的位置是另指定星期二,就前后冲突矛盾了。
● (-)减号:表达一个范围,如在小时字段中使用“10-12”,则表示从10到12点,即10,11,12
● (,)逗号:表达一个列表值,如在星期字段中使用“1,2,4”,则表示星期一,星期二,星期四
● (/)斜杠:如:x/y,x是开始值,y是步长,比如在第一位(秒) 0/15就是,从0秒开始,每15秒,最后就是0,15,30,45,60 另:*/y,等同于0/y
下面列举几个例子供大家来验证:
- 0 0 3 * * ? 每天3点执行
- 0 5 3 * * ? 每天3点5分执行
- 0 5 3 ? * * 每天3点5分执行,与上面作用相同
- 0 5/10 3 * * ? 每天3点的 5分,15分,25分,35分,45分,55分这几个时间点执行
- 0 10 3 ? * 1 每周星期天,3点10分 执行,注:1表示星期天
- 0 10 3 ? * 1 #3 每个月的第三个星期,星期天 执行,#号只能出现在星期的位置
4.总结
- fixedDelay属性确保任务结束时间和下次任务开始时间之间存在固定的时间间隔。
- fixedRate属性则是每隔n毫秒运行一次任务。 > 当需要确保只有一个任务实例运行是,使用fixedDelay属性;当执行的任务都是独立的时候,使用fixedRate属性。
正文到此结束
热门推荐


相关文章

近期评论
-
https://www.newcmy.com/register?aff=HBVX建议您试试草莓云机场,可以流畅观看youtube和tiktok,上reddit/x也没有问题,还有各种ai优化节点。
-
出现OpenClaw "device signature expired"。the Gateway rejects if Math.abs(Date.now() - signedAt) > 10 * 60 * 1000 (10 minutes)
-
-
想购买您这个站,我的联系方式QQ741756694微信同步 能卖联系
-
-
-
-
-
https://www.liuhaihua.cn/archives/40657.html 这篇博客中的图片打不开了
-
不会英语啊。
Loading...
![[HBLOG]公众号](https://www.liuhaihua.cn/img/qrcode_gzh.jpg)

